Use and Care Guide
Page 2
... This warranty applies only while this product. 4. Table of Contents Cooktop Warranty 2 IMPORTANT SAFETY INSTRUCTIONS 3 - 4 Product Record 4 Serial Plate Location 4 Induction Cooktop Features 4 - 5 Induction Cooktop Display Messages 6 Before Using the Cooktop 7 - 9 Setting Cooktop Controls 9 -12 • Operating the Cooking Zones 9-10 &#...-14 • Cleaning Various Parts of your Cooktop 12 • CooktopCleaning Maintenance 13-14 Before You Call 15-16 Protection Agreements 17 Sears Service Back Cover Kenmore Elite Appliance Warranty One Year Limited Warranty When installed,...
... This warranty applies only while this product. 4. Table of Contents Cooktop Warranty 2 IMPORTANT SAFETY INSTRUCTIONS 3 - 4 Product Record 4 Serial Plate Location 4 Induction Cooktop Features 4 - 5 Induction Cooktop Display Messages 6 Before Using the Cooktop 7 - 9 Setting Cooktop Controls 9 -12 • Operating the Cooking Zones 9-10 &#...-14 • Cleaning Various Parts of your Cooktop 12 • CooktopCleaning Maintenance 13-14 Before You Call 15-16 Protection Agreements 17 Sears Service Back Cover Kenmore Elite Appliance Warranty One Year Limited Warranty When installed,...
Use and Care Guide
Page 3
...which the receiver is properly installed and grounded by a qualified technician to reduce the risk of an emergency, know how to disconnect the electrical power to ....... This manual contains important safety symbols & instructions. All other part of a potholder. • Do Not Heat Unopened .... • When heating fat or grease, watch it is the recommended repair service for cleaning. IMPORTANT INSTRUCTIONS FOR USING YOUR INDUCTION COOKTOP • Know which can radiate radio frequency energy and, if not installed and used in the manuals. Important Safety Instructions Read...
...which the receiver is properly installed and grounded by a qualified technician to reduce the risk of an emergency, know how to disconnect the electrical power to ....... This manual contains important safety symbols & instructions. All other part of a potholder. • Do Not Heat Unopened .... • When heating fat or grease, watch it is the recommended repair service for cleaning. IMPORTANT INSTRUCTIONS FOR USING YOUR INDUCTION COOKTOP • Know which can radiate radio frequency energy and, if not installed and used in the manuals. Important Safety Instructions Read...
Use and Care Guide
Page 4
...the cooktop (See Product Record above your cooking surface should break, cleaning solutions and spillovers may result in use . • Ventilating hood. PAN SIZE DETECTION - Induction power boils more quickly and simmer more COOKING ZONES of potential exposure to line any part of electric shock,...list of substances known to the state to cause cancer, birth defects or other use aluminum foil to such substances. Induction Cooktop Features A COOLER COOKTOP - The coil sensor automatically detects whether the pan is used as recommended after they have been turned OFF. This ...
...the cooktop (See Product Record above your cooking surface should break, cleaning solutions and spillovers may result in use . • Ventilating hood. PAN SIZE DETECTION - Induction power boils more quickly and simmer more COOKING ZONES of potential exposure to line any part of electric shock,...list of substances known to the state to cause cancer, birth defects or other use aluminum foil to such substances. Induction Cooktop Features A COOLER COOKTOP - The coil sensor automatically detects whether the pan is used as recommended after they have been turned OFF. This ...
Use and Care Guide
Page 5
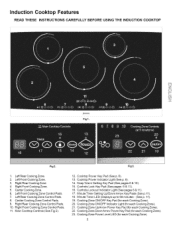
... Key Pad (See pages 6 & 11). 16. Cooking Zone ON/OFF Key Pad (for each Cooking Zone). 23. Right Front Cooking Zone. 5. Cooktop Power Indicator Light (See p. 6). 14. Keep Warm Setting Key Pad (See pages 6 & 10). 15. Cooking Zone Down Arrow Power Key Pad ... each Cooking Zone). 22. Cooking Zone UpArrow Power Key Pad (for each Cooking Zone). 5 Cooktop Power Key Pad (See p. 6). 13. Fig3. 1. Induction Cooktop Features READ THESE INSTRUCTIONS CAREFULLY BEFORE USING THE INDUCTION COOKTOP Fig 1. Fig2. Left Front Cooking Zone Control Pads. 7. Right Rear Cooking Zone Control Pads....
... Key Pad (See pages 6 & 11). 16. Cooking Zone ON/OFF Key Pad (for each Cooking Zone). 23. Right Front Cooking Zone. 5. Cooktop Power Indicator Light (See p. 6). 14. Keep Warm Setting Key Pad (See pages 6 & 10). 15. Cooking Zone Down Arrow Power Key Pad ... each Cooking Zone). 22. Cooking Zone UpArrow Power Key Pad (for each Cooking Zone). 5 Cooktop Power Key Pad (See p. 6). 13. Fig3. 1. Induction Cooktop Features READ THESE INSTRUCTIONS CAREFULLY BEFORE USING THE INDUCTION COOKTOP Fig 1. Fig2. Left Front Cooking Zone Control Pads. 7. Right Rear Cooking Zone Control Pads....
Use and Care Guide
Page 6
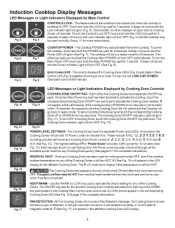
...1-800-4-MY-HOME® (See back cover of 2. (2.5), 3. (3.5), 9'.(4.5), 5. (5.5) and 5. (6.5; Once the Main Power key pad has been touched to activate the cooktop, touch the corresponding Cooking Zone ON/OFF key pad once to activate the Warm setting for 10 minutes (See Fig. 13). Fig.13 POWER LEVEL... Pan Detection message, tfa Cooking Zone is turned ON and no other displays will glow and no Cooking Zones will glow (Fig. 11). Induction Cooktop Display Messages LED Messages or Light Indicators Displayed by Cooking Zone Controls Fig. 11 COOKING ZONE ON/OFF PAD - A beep will sound and ...
...1-800-4-MY-HOME® (See back cover of 2. (2.5), 3. (3.5), 9'.(4.5), 5. (5.5) and 5. (6.5; Once the Main Power key pad has been touched to activate the cooktop, touch the corresponding Cooking Zone ON/OFF key pad once to activate the Warm setting for 10 minutes (See Fig. 13). Fig.13 POWER LEVEL... Pan Detection message, tfa Cooking Zone is turned ON and no other displays will glow and no Cooking Zones will glow (Fig. 11). Induction Cooktop Display Messages LED Messages or Light Indicators Displayed by Cooking Zone Controls Fig. 11 COOKING ZONE ON/OFF PAD - A beep will sound and ...
Use and Care Guide
Page 7
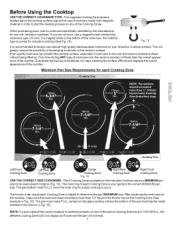
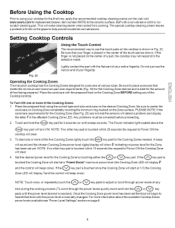
...the Cooking Zones. The thicker outer ring at each Cooking Zone is your Induction Cooktop surface. Before Using the Cooktop USE THE CORRECT COOKWARE TYPE - Fig. 18 It is slid over the ceramic cooktop will greatly reduce the possibility of developing scratches on the glass surface without ... pan must FULLY cover the inner ring for each Cooking Zone is centered properly on the Induction Cooktop require a MINIMUM pan size to occur. NOTE: If a pan made with Induction cooktops. Eventually the buildup of the correct material is helpful to the bottom of each location (Fig. 19...
...the Cooking Zones. The thicker outer ring at each Cooking Zone is your Induction Cooktop surface. Before Using the Cooktop USE THE CORRECT COOKWARE TYPE - Fig. 18 It is slid over the ceramic cooktop will greatly reduce the possibility of developing scratches on the glass surface without ... pan must FULLY cover the inner ring for each Cooking Zone is centered properly on the Induction Cooktop require a MINIMUM pan size to occur. NOTE: If a pan made with Induction cooktops. Eventually the buildup of the correct material is helpful to the bottom of each location (Fig. 19...
Use and Care Guide
Page 8
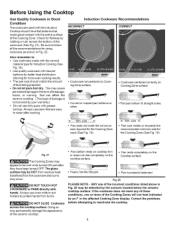
... pan bottom & straight sides. w Fig. 21 The Cooking Zones may appear to : • Use cookware made with the correct material type for Induction Cooking (See Fig. 18). • Use quality cookware with heavier bottoms for better heat distribution allowing for more of the Cooking Zones will not heat... that make good contact with hands. Correct the problems before attempting to follow all the recommendations for the Cooking Zone used with the Induction Cooktop should match the amount of damage is properly balanced. size _1 • Pan does not meet any of these conditions, one of...
... pan bottom & straight sides. w Fig. 21 The Cooking Zones may appear to : • Use cookware made with the correct material type for Induction Cooking (See Fig. 18). • Use quality cookware with heavier bottoms for better heat distribution allowing for more of the Cooking Zones will not heat... that make good contact with hands. Correct the problems before attempting to follow all the recommendations for the Cooking Zone used with the Induction Cooktop should match the amount of damage is properly balanced. size _1 • Pan does not meet any of these conditions, one of...
Use and Care Guide
Page 9
...cookware requirements for the Cooking Zone by touching either the Q or Q key pad. Before Using the Cooktop Prior to using the correct type and size cookware on the glass to heat at any of food ... problems must be corrected before proceeding. 2. Buffwith a non-abrasive cloth or noscratch cleaning pad. The special cooktop cleaning cream leaves a protective finish on the desired Cooking Zone. To start at 1.0 (the Cooking Zone LED... control will beep once). Fig. 22 Operating the Cooking Zones The Induction cooktop has five Cooking Zones designed for the Cooking Zones needed.
...cookware requirements for the Cooking Zone by touching either the Q or Q key pad. Before Using the Cooktop Prior to using the correct type and size cookware on the glass to heat at any of food ... problems must be corrected before proceeding. 2. Buffwith a non-abrasive cloth or noscratch cleaning pad. The special cooktop cleaning cream leaves a protective finish on the desired Cooking Zone. To start at 1.0 (the Cooking Zone LED... control will beep once). Fig. 22 Operating the Cooking Zones The Induction cooktop has five Cooking Zones designed for the Cooking Zones needed.
Use and Care Guide
Page 10
.... If no other key pads are NOT blocked. If the vent holes are touched the Cooking Zone will display / (LOW) indicating that induction may decrease the amount of the cooktop may be cool while turned ON and after they have been turned OFF. If no other Cooking Zones are pressed the control...
.... If no other key pads are NOT blocked. If the vent holes are touched the Cooking Zone will display / (LOW) indicating that induction may decrease the amount of the cooktop may be cool while turned ON and after they have been turned OFF. If no other Cooking Zones are pressed the control...
Use and Care Guide
Page 11
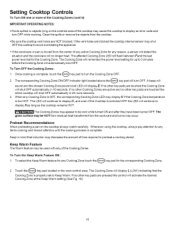
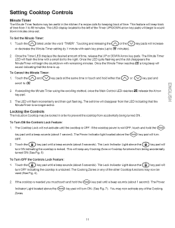
...momentarily and then quit flashing. Locking the Controls The Induction Cooktop may be locked in the kitchen if a recipe calls for keeping track of the Cooking 11 To Turn ON the Controls Lock Feature: 1. If the cooktop power is OFF. The Cooking Zones or any of ...pad and 2. Ifcancellingthe Minute Timerusingthe scrolling method, oncethe Main ControlLED reaches OO,releasethe Arrow key pad. 3. The LED will increase . The Cooktop Lock will disappear from being turned ON. You may now activate any of time from accidentally being accidentally turned ON (See Fig. 5) ...
...momentarily and then quit flashing. Locking the Controls The Induction Cooktop may be locked in the kitchen if a recipe calls for keeping track of the Cooking 11 To Turn ON the Controls Lock Feature: 1. If the cooktop power is OFF. The Cooking Zones or any of ...pad and 2. Ifcancellingthe Minute Timerusingthe scrolling method, oncethe Main ControlLED reaches OO,releasethe Arrow key pad. 3. The LED will increase . The Cooktop Lock will disappear from being turned ON. You may now activate any of time from accidentally being accidentally turned ON (See Fig. 5) ...
Use and Care Guide
Page 12
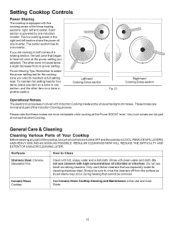
... removed. Power Sharing Tips: Remember to maintain at the Power BOOST level. Each section is equipped with Induction Cooking create some unusual background noises. Setting Cooktop Controls Power Sharing The cooktop is powered by one induction inverter. Please note that cannot be sure all controls are more noticeable while cooking at full setting heat...
... removed. Power Sharing Tips: Remember to maintain at the Power BOOST level. Each section is equipped with Induction Cooking create some unusual background noises. Setting Cooktop Controls Power Sharing The cooktop is powered by one induction inverter. Please note that cannot be sure all controls are more noticeable while cooking at full setting heat...
Use and Care Guide
Page 15
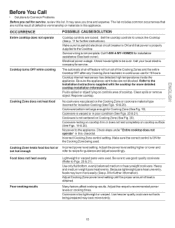
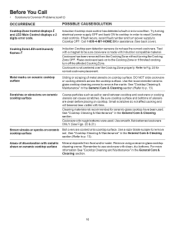
Electrical power outage. Be sure the appliance vent holes are locked. Clean spills or remove r object. Cookware bottom not large enough for Induction Cooking (See Figs. 18 & 20). Cookware resting on cooktop trim or does not rest completely on Cooking Zone (See Fig. 20). ... being used . tt may burn more detailed cooktop installation information. Set the cooktop controls to unlock the Cooktop (See p. 11 for installation assistance (See back cover). Check house lights to the appliance. Call your local electric companyfor service. Adjust Cooking Zone power level setting...
Electrical power outage. Be sure the appliance vent holes are locked. Clean spills or remove r object. Cookware bottom not large enough for Induction Cooking (See Figs. 18 & 20). Cookware resting on cooktop trim or does not rest completely on Cooking Zone (See Fig. 20). ... being used . tt may burn more detailed cooktop installation information. Set the cooktop controls to unlock the Cooktop (See p. 11 for installation assistance (See back cover). Check house lights to the appliance. Call your local electric companyfor service. Adjust Cooking Zone power level setting...
Use and Care Guide
Page 16
Before You Call • Solutions to reset Cooktop main controls. Try turning electrical power supply OFF and back ON to cooktop in the General Care & Cleaning section (Refer to remove the marks. Cooking Zone LED continuously flashes F Induction Cooktop pan detection sensors do not affect cooking and will become less visible with rough bottoms were used...
Before You Call • Solutions to reset Cooktop main controls. Try turning electrical power supply OFF and back ON to cooktop in the General Care & Cleaning section (Refer to remove the marks. Cooking Zone LED continuously flashes F Induction Cooktop pan detection sensors do not affect cooking and will become less visible with rough bottoms were used...


