Owners Manual
Page 2
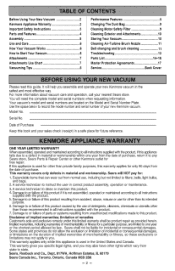
How to or failure of implied warranties; AttachmentsUse Chart 7. Performance Features 8. Cleaning Exteriorand Attachments 10 Storing Your Vacuum 1. 0 CleaningAir-Turbine Brush Nozzle 11 Belt changing and brush cleaning 11 Troubleshooting 1. 3 Parts List 1.4-16 Master ProtectionAgreements 17 Service B. ack Cover Please read this guide• it will NOT pay for: 1. This warranty covers only defects in material and workmanship, Sears will help you assemble and operate your new Kenmorevacuum. Damage to or failure...
How to or failure of implied warranties; AttachmentsUse Chart 7. Performance Features 8. Cleaning Exteriorand Attachments 10 Storing Your Vacuum 1. 0 CleaningAir-Turbine Brush Nozzle 11 Belt changing and brush cleaning 11 Troubleshooting 1. 3 Parts List 1.4-16 Master ProtectionAgreements 17 Service B. ack Cover Please read this guide• it will NOT pay for: 1. This warranty covers only defects in material and workmanship, Sears will help you assemble and operate your new Kenmorevacuum. Damage to or failure...
Owners Manual
Page 3
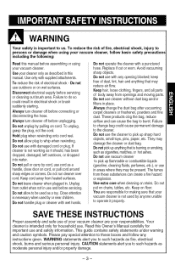
... use cordas a handle,closedoor on wet surfaces. Always changethe dust bag after vacuuming carpet cleanersor freshener, powdersand fine dust.These productsclog the bag, reduce airflow and can cause the bagto burst. This guide contains safety statements under warning and caution symbols. CAUTION statements alert you to whipwhen rewinding. Keep on stairs. Useyour cleaneronly asdescribedinthis manual.Useonly withsuppliedattachments. Always turn cleaneroff beforeunplugging. Hold plug when rewindingonto cord...
... use cordas a handle,closedoor on wet surfaces. Always changethe dust bag after vacuuming carpet cleanersor freshener, powdersand fine dust.These productsclog the bag, reduce airflow and can cause the bagto burst. This guide contains safety statements under warning and caution symbols. CAUTION statements alert you to whipwhen rewinding. Keep on stairs. Useyour cleaneronly asdescribedinthis manual.Useonly withsuppliedattachments. Always turn cleaneroff beforeunplugging. Hold plug when rewindingonto cord...
Owners Manual
Page 4
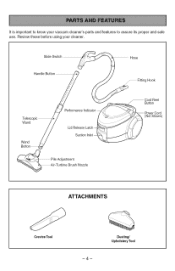
Slide Switch ___ Hose N Handle Button / _/ Telescopic _ Wand / // // // Wand /_/ Button Performance In Lid Release [ Suction Pile Adjustment ..........A. ir-Turbine Brush Nozzle .........F..i.t.t.i.n..g.. ATTACHMENTS Crevice Tool Dusting/ Upholstery Tool -4- evietwhesebeforuesinygoucr leaner. Hook Cord Reel .__ BPuotwtoenr Cord _ (Not Shown) "/ ..,.. Itisimportatnotknowyouvr acuucmleanerp'sartsandfeaturetosassurietspropearndsafe useR.
Slide Switch ___ Hose N Handle Button / _/ Telescopic _ Wand / // // // Wand /_/ Button Performance In Lid Release [ Suction Pile Adjustment ..........A. ir-Turbine Brush Nozzle .........F..i.t.t.i.n..g.. ATTACHMENTS Crevice Tool Dusting/ Upholstery Tool -4- evietwhesebeforuesinygoucr leaner. Hook Cord Reel .__ BPuotwtoenr Cord _ (Not Shown) "/ ..,.. Itisimportatnotknowyouvr acuucmleanerp'sartsandfeaturetosassurietspropearndsafe useR.
Owners Manual
Page 5
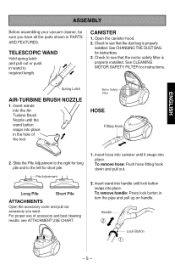
... proper use of the tool. To remove handle: Press lock button in wand to see ATTACHMENT USE CHART. 2. Handle ........ ® Lock Button 5 TELESCOPIC WAND Hold spring latch and pull out or push in turn the pipe and pull up on handle. Before assembling your vacuum cleaner, be sure you want. CANISTER 1. Check to required length. See CLEANING MOTOR SAFETY FILTER for short pile. 1. Open the canister hood. 2. Spring Latch AIR-TURBINE BRUSH NOZZLE 1. To remove hose: Push hose fitting...
... proper use of the tool. To remove handle: Press lock button in wand to see ATTACHMENT USE CHART. 2. Handle ........ ® Lock Button 5 TELESCOPIC WAND Hold spring latch and pull out or push in turn the pipe and pull up on handle. Before assembling your vacuum cleaner, be sure you want. CANISTER 1. Check to required length. See CLEANING MOTOR SAFETY FILTER for short pile. 1. Open the canister hood. 2. Spring Latch AIR-TURBINE BRUSH NOZZLE 1. To remove hose: Push hose fitting...
Owners Manual
Page 6
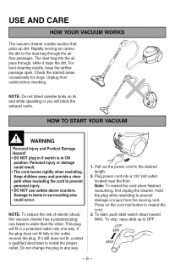
... plug while rewinding to prevent damage or injury from outlet before checking. Damage to items in ON position. USE AND CARE The vacuum cleaner creates suction that picks up to OFF. For best cleaning results, keep the airflow passage open. NOTE: Do not stand canister body on the cord reel button to rewind the cord. 3. If it traps the dirt. Do not change the plug in any way. To stop...
... plug while rewinding to prevent damage or injury from outlet before checking. Damage to items in ON position. USE AND CARE The vacuum cleaner creates suction that picks up to OFF. For best cleaning results, keep the airflow passage open. NOTE: Do not stand canister body on the cord reel button to rewind the cord. 3. If it traps the dirt. Do not change the plug in any way. To stop...
Owners Manual
Page 7
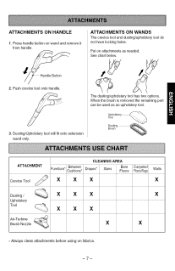
... Carpeted Walls Floors Floors/Rugs X X X X X X X X X X X ABirru-TshurNbionzezle X X * Always clean attachments before using on wand and remove it from handle. See chart below. 2. The dusting/upholstery tool has two options. Upholstery_ 3. Put on attachments as an upholstery tool. Push crevice tool onto handle. When the brush is removed the remaining part can be used as needed. ATTACHMENTS ON HANDLE 1. Press handle button on fabrics. Dusting/Upholstery tool will fit onto extension wand only. ATTACHMENTS ON WANDS The crevice tool and dusting/upholstery tool...
... Carpeted Walls Floors Floors/Rugs X X X X X X X X X X X ABirru-TshurNbionzezle X X * Always clean attachments before using on wand and remove it from handle. See chart below. 2. The dusting/upholstery tool has two options. Upholstery_ 3. Put on attachments as an upholstery tool. Push crevice tool onto handle. When the brush is removed the remaining part can be used as needed. ATTACHMENTS ON HANDLE 1. Press handle button on fabrics. Dusting/Upholstery tool will fit onto extension wand only. ATTACHMENTS ON WANDS The crevice tool and dusting/upholstery tool...
Owners Manual
Page 8
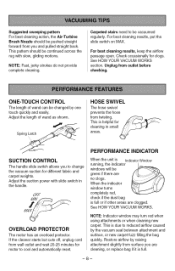
... of wand as shown. Unplug from you are cleaning, or replace bag if it is Indicator Window running, the indicator windows will be green if there are clogged. NOTE: Indicator window may turn red when using attachments or when cleaning new carpet. Suggesteswdeeping pattern For best cleaning action, the Air-Turbine Brush Nozzle should be continued across the rug with slide switch in small areas. If the cleaner starts but...
... of wand as shown. Unplug from you are cleaning, or replace bag if it is Indicator Window running, the indicator windows will be green if there are clogged. NOTE: Indicator window may turn red when using attachments or when cleaning new carpet. Suggesteswdeeping pattern For best cleaning action, the Air-Turbine Brush Nozzle should be continued across the rug with slide switch in small areas. If the cleaner starts but...
Owners Manual
Page 9
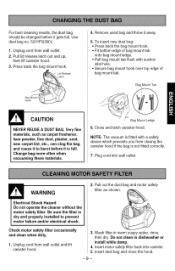
... dust, plaster, soot, new carpet lint, etc., can clog the bag and cause it to prevent motor failure and/or electrical shock. Be sure the filter is dry and properly installed to burst before it is not fitted correctly. 7. For best cleaning results, the dust bag should be changed before it gets full. Use dust bag no. 5231FI2390J 1. Insert motor safety filter back into wall outlet. Pull lid release latch...
... dust, plaster, soot, new carpet lint, etc., can clog the bag and cause it to prevent motor failure and/or electrical shock. Be sure the filter is dry and properly installed to burst before it is not fitted correctly. 7. For best cleaning results, the dust bag should be changed before it gets full. Use dust bag no. 5231FI2390J 1. Insert motor safety filter back into wall outlet. Pull lid release latch...
Owners Manual
Page 10
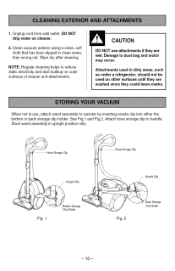
... handle. DO NOT drip water on outer surfaces of cleaner and attachments. _I_ CAUTION DO NOT use , attach wand assembly to reduce static electricity and dust buildup on cleaner. 2. Attachments used in use attachments if they could leave marks. NOTE: Regular cleaning helps to canister by inserting nozzle clip into either the bottom or back storage clip holder. See Fig.1 and Fig.2. Attach hose storage clip to dust bag and motor may occur. Store wand assembly...
... handle. DO NOT drip water on outer surfaces of cleaner and attachments. _I_ CAUTION DO NOT use , attach wand assembly to reduce static electricity and dust buildup on cleaner. 2. Attachments used in use attachments if they could leave marks. NOTE: Regular cleaning helps to canister by inserting nozzle clip into either the bottom or back storage clip holder. See Fig.1 and Fig.2. Attach hose storage clip to dust bag and motor may occur. Store wand assembly...

Owners Manual
Page 11
... excessive, disconnect air-turbine brush nozzle from electrical outlet. Fan Hook Air Cover Brush Disconnect cleaner from telescopic wand. Check and remove hair, string and lint build-up frequently in the air-turbine brush and brush support areas. 1. TO REMOVE BELT: 1. Turn air-turbine brush nozzle upside down. 2. Unscrew the four air-turbine brush nozzle cover screws. 3. Use the dusting/upholstery tool attachment to remove air cover. 2. Press the button on the rear side of the vaccum nozzle to clean the brush and fan.
... excessive, disconnect air-turbine brush nozzle from electrical outlet. Fan Hook Air Cover Brush Disconnect cleaner from telescopic wand. Check and remove hair, string and lint build-up frequently in the air-turbine brush and brush support areas. 1. TO REMOVE BELT: 1. Turn air-turbine brush nozzle upside down. 2. Unscrew the four air-turbine brush nozzle cover screws. 3. Use the dusting/upholstery tool attachment to remove air cover. 2. Press the button on the rear side of the vaccum nozzle to clean the brush and fan.
Owners Manual
Page 12
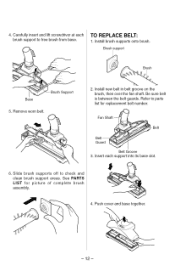
Remove worn belt. Refer to check and clean brush support areas. Insert each brush support to free brush from base. See PARTS LIST for replacement belt number. Push cover and base together. -12- Brush support Base 5. Fan Belt Guard Belt Groove 3. Slide brush supports off to parts list for picture of complete brush assembly. 4. Install new belt in belt groove on the brush, then over the fan shaft. Install brush supports onto brush. Be sure belt is between the belt guards. TO REPLACE BELT: 1. Support 2. 4. Carefully insert and lift screwdriver...
Remove worn belt. Refer to check and clean brush support areas. Insert each brush support to free brush from base. See PARTS LIST for replacement belt number. Push cover and base together. -12- Brush support Base 5. Fan Belt Guard Belt Groove 3. Slide brush supports off to parts list for picture of complete brush assembly. 4. Install new belt in belt groove on the brush, then over the fan shaft. Install brush supports onto brush. Be sure belt is between the belt guards. TO REPLACE BELT: 1. Support 2. 4. Carefully insert and lift screwdriver...
Owners Manual
Page 13
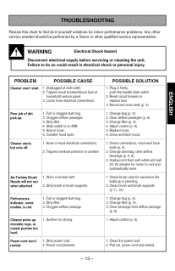
... circuit breaker/blown fuse at wall outlet. 2. Change dust bag, clear airflow blockage (p. 9, 6). 3. Change bag (p. 9). 2. Loose hose electrical connections. Full or clogged dust bag. 2. Plug in canister Air-Turbine Brush Nozzle will not run when attached 1. Hole in hose. 6. Performance indicator, some models, is on MIN. 5. POSSIBLE SOLUTION 1. Slide switch is red. 1. Change filter (p. 9). 4. Review this chart to cool and automatically reset. 1. Unplugged at household service panel. 3. Dirty brush or brush supports. Check connections, reconnect hose ends...
... circuit breaker/blown fuse at wall outlet. 2. Change dust bag, clear airflow blockage (p. 9, 6). 3. Change bag (p. 9). 2. Loose hose electrical connections. Full or clogged dust bag. 2. Plug in canister Air-Turbine Brush Nozzle will not run when attached 1. Hole in hose. 6. Performance indicator, some models, is on MIN. 5. POSSIBLE SOLUTION 1. Slide switch is red. 1. Change filter (p. 9). 4. Review this chart to cool and automatically reset. 1. Unplugged at household service panel. 3. Dirty brush or brush supports. Check connections, reconnect hose ends...
Owners Manual
Page 15
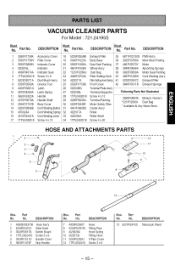
... Motor Safety Filter 14 5020FI3806B CordWindingButton 31 4441FI3608D CasterAss'y 3828FI3864S Manual, Owner's "5231FI239OJ Dust Bag * Available At Any Sears Store. 15 4170024A CordWindingSpring 32 4122017A Roller 16 4510FI2441A CordWindingLever 33 4122094A Roller Shaft 17 1TPLO482818 Screw 4 x 12 34 1TPLO403318 Screw 4 x 20 HOSE AND ATTACHMENTS PARTS 1 s SS Illus. DESCRIPTION 13 5201FI2475C TelescopicWand -15- Illust. No. VACUUM CLEANER PARTS For Model • 721.24195S Illust. No. Part No. DESCRIPTION No. Part...
... Motor Safety Filter 14 5020FI3806B CordWindingButton 31 4441FI3608D CasterAss'y 3828FI3864S Manual, Owner's "5231FI239OJ Dust Bag * Available At Any Sears Store. 15 4170024A CordWindingSpring 32 4122017A Roller 16 4510FI2441A CordWindingLever 33 4122094A Roller Shaft 17 1TPLO482818 Screw 4 x 12 34 1TPLO403318 Screw 4 x 20 HOSE AND ATTACHMENTS PARTS 1 s SS Illus. DESCRIPTION 13 5201FI2475C TelescopicWand -15- Illust. No. VACUUM CLEANER PARTS For Model • 721.24195S Illust. No. Part No. DESCRIPTION No. Part...
Owners Manual
Page 16
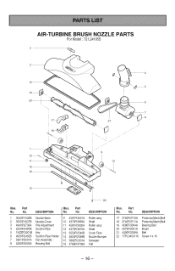
... 4370FI3669A Shaft 3 4940FI3736A Pile Adjustment 4 5200FI2497B Suction Pipe 11 4581FI3OO2A Roller assy 12 4370FI3670A Shaft 5 1KZZFI3001B Key 13 3550FI2540B Cover Flow 6 4930FI2452B Suction Pipe Holder 14 4820FI239gB Nozzle Bumper 7 5901FI2OO1A Fan Assembly 15 5882FI2OO1A Sweeper 8 4280FI3OO3A Bearing Ball 16 4766FI3709A Felt Illus. No. Part No. DESCRIPTION Illus. No. No. AIR-TURBINE BRUSH NOZZLE PARTS For Model' 721.24195S 7 8 21 12_\ 11 10 15...
... 4370FI3669A Shaft 3 4940FI3736A Pile Adjustment 4 5200FI2497B Suction Pipe 11 4581FI3OO2A Roller assy 12 4370FI3670A Shaft 5 1KZZFI3001B Key 13 3550FI2540B Cover Flow 6 4930FI2452B Suction Pipe Holder 14 4820FI239gB Nozzle Bumper 7 5901FI2OO1A Fan Assembly 15 5882FI2OO1A Sweeper 8 4280FI3OO3A Bearing Ball 16 4766FI3709A Felt Illus. No. Part No. DESCRIPTION Illus. No. No. AIR-TURBINE BRUSH NOZZLE PARTS For Model' 721.24195S 7 8 21 12_\ 11 10 15...
Owners Manual
Page 17
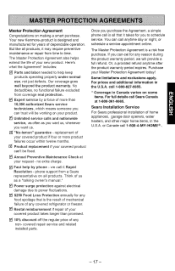
.... Pti Unlimited service calls and nationwide service, as often as a "talking owner's manual." we will be fixed. I_1 $250 Food Loss Protection annually for years of more product failures occur within twelve months. covered repair service and related installed parts. Some limitations and exclusions apply. Sears Installation Service For Sears professional installation of your Master Protection Agreement today! Product replacement if your new product. r_ Annual Preventive Maintenance Check at 1-800...
.... Pti Unlimited service calls and nationwide service, as often as a "talking owner's manual." we will be fixed. I_1 $250 Food Loss Protection annually for years of more product failures occur within twelve months. covered repair service and related installed parts. Some limitations and exclusions apply. Sears Installation Service For Sears professional installation of your Master Protection Agreement today! Product replacement if your new product. r_ Annual Preventive Maintenance Check at 1-800...

Owners Manual
Page 31
... replacement parts, accessories and owner's manuals that you need to do-it ! and Canada) www.sears.com www.sears.ca Our Home For repair of carry-in your home - of Sears Brands, LLC Marca Registrada / TM Marca de F_brica / SMMarca de Servicio de Sears Brands, LLC MC Marque de commerce / MDMarque d_pos4e de Sears Brands, LLC in products like garage door openers and water...
... replacement parts, accessories and owner's manuals that you need to do-it ! and Canada) www.sears.com www.sears.ca Our Home For repair of carry-in your home - of Sears Brands, LLC Marca Registrada / TM Marca de F_brica / SMMarca de Servicio de Sears Brands, LLC MC Marque de commerce / MDMarque d_pos4e de Sears Brands, LLC in products like garage door openers and water...


