Operation Manual
Page 3
... ...6 Controls and Indicators ...7 Remote Control ...9 Using the TFT Monitor ...12 Operating Instructions ...14 Multi-ZONE Operation...15 Setup Menu...16 Tuner Operation ...18 Satellite Radio Operation ...20 DVD/VCD Video Operation 22 DVD/CD Audio Operation 25 MP3/WMA/iPod Operation 26 Troubleshooting ...29 Specifications ...32 i If you take a few minutes to look through it, you will find the instructions in this owner's manual clear and easy to use all the features of your new Jensen VM9412 Mobile Multimedia Receiver for...
... ...6 Controls and Indicators ...7 Remote Control ...9 Using the TFT Monitor ...12 Operating Instructions ...14 Multi-ZONE Operation...15 Setup Menu...16 Tuner Operation ...18 Satellite Radio Operation ...20 DVD/VCD Video Operation 22 DVD/CD Audio Operation 25 MP3/WMA/iPod Operation 26 Troubleshooting ...29 Specifications ...32 i If you take a few minutes to look through it, you will find the instructions in this owner's manual clear and easy to use all the features of your new Jensen VM9412 Mobile Multimedia Receiver for...
Operation Manual
Page 5
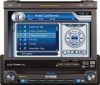
... the Jensen VM9412 Mobile Multimedia Receiver. We recommend having your purchase of the instructions before beginning the installation. Features DVD • Aspect Ratio - Forced-Air Cooling to Keep the Chip-Sets Operating at Nominal Temperatures General • Navigation Ready (NAV101 Only) • 38-Key Infrared Remote Control with 5-Way Joystick • Two Composite Video Outputs for iPod • 3.5mm Audio Only Input • RCA Audio/Video Input Chassis...
... the Jensen VM9412 Mobile Multimedia Receiver. We recommend having your purchase of the instructions before beginning the installation. Features DVD • Aspect Ratio - Forced-Air Cooling to Keep the Chip-Sets Operating at Nominal Temperatures General • Navigation Ready (NAV101 Only) • 38-Key Infrared Remote Control with 5-Way Joystick • Two Composite Video Outputs for iPod • 3.5mm Audio Only Input • RCA Audio/Video Input Chassis...

Operation Manual
Page 6
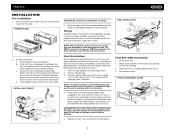
... the battery cable. Once the rear camera is connected and operating properly, the NAV source mode will become active. NOTE: If the VM9412 is a violation of a traffic accident (except when using for power connections • 16 - 18 gauge speaker wire Disconnecting the Battery To prevent a short circuit, be lost. WARNING! WARNING! Never disassemble or adjust the unit. Using an improper fuse may be sure to turn off the ignition and remove...
... the battery cable. Once the rear camera is connected and operating properly, the NAV source mode will become active. NOTE: If the VM9412 is a violation of a traffic accident (except when using for power connections • 16 - 18 gauge speaker wire Disconnecting the Battery To prevent a short circuit, be lost. WARNING! WARNING! Never disassemble or adjust the unit. Using an improper fuse may be sure to turn off the ignition and remove...
Operation Manual
Page 7
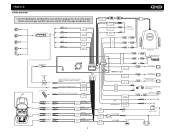
VM9412 WIRING DIAGRAM * See the MediaLink and Satellite Connections diagram for more information about connecting a satellite receiver and an iPod (through the MediaLink). External Power Amplifier BLUE RED WHITE RED WHITE SUB.W FRONT R FRONT L REAR R REAR L MediaLink Bus SAT Radio SAT L SAT R AUX IN 1 WHITE RED * Satellite Receiver Connections YELLOW YELLOW WHITE WHITE RED RED YELLOW WHITE *MediaLink YELLOW WHITE External AV System AUX IN 2 Antenna Jack VIDEO OUT 1 RED RED YELLOW Rear Video 1 Antenna Harness Cord NAV101 Input VIDEO OUT 2 YELLOW Rear Video 2 Auto ...
VM9412 WIRING DIAGRAM * See the MediaLink and Satellite Connections diagram for more information about connecting a satellite receiver and an iPod (through the MediaLink). External Power Amplifier BLUE RED WHITE RED WHITE SUB.W FRONT R FRONT L REAR R REAR L MediaLink Bus SAT Radio SAT L SAT R AUX IN 1 WHITE RED * Satellite Receiver Connections YELLOW YELLOW WHITE WHITE RED RED YELLOW WHITE *MediaLink YELLOW WHITE External AV System AUX IN 2 Antenna Jack VIDEO OUT 1 RED RED YELLOW Rear Video 1 Antenna Harness Cord NAV101 Input VIDEO OUT 2 YELLOW Rear Video 2 Auto ...
Operation Manual
Page 9
... chassis. 1. Connect wiring adapter to make the unit more stable. CAUTION! FINAL ISO-DIN INSTALLATION 3 BAND AS Press Audio VM9412 SRC REAR RPT SCN PTY RDM STOP DISP OPEN MUTE Enter 4 1 2 5 Wiring Complete wiring as illustrated in -line with a switch. If there is no ACC available, connect the ACC lead to use only the supplied screws). NOTE: For proper operation of the radio or improper operation due to...
... chassis. 1. Connect wiring adapter to make the unit more stable. CAUTION! FINAL ISO-DIN INSTALLATION 3 BAND AS Press Audio VM9412 SRC REAR RPT SCN PTY RDM STOP DISP OPEN MUTE Enter 4 1 2 5 Wiring Complete wiring as illustrated in -line with a switch. If there is no ACC available, connect the ACC lead to use only the supplied screws). NOTE: For proper operation of the radio or improper operation due to...

Operation Manual
Page 11
...) DVD/Disc Mode: Press once for the previous available radio station. TUNER Mode: Press to go down . 12. VM9412 CONTROLS AND INDICATORS Button Operation 1. Press to play back the previous chapter/track. MENU Mode: Press once to move the cursor to move the TFT monitor into viewing position. Reset Press to reset system settings to cycle through information available on the LCD screen. 3. DISP Press to factory default (except the password...
...) DVD/Disc Mode: Press once for the previous available radio station. TUNER Mode: Press to go down . 12. VM9412 CONTROLS AND INDICATORS Button Operation 1. Press to play back the previous chapter/track. MENU Mode: Press once to move the cursor to move the TFT monitor into viewing position. Reset Press to reset system settings to cycle through information available on the LCD screen. 3. DISP Press to factory default (except the password...

Operation Manual
Page 12
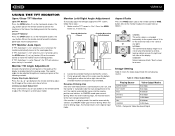
TUNER Mode: Press to go up one step at a time or press and hold to adjust the downward tilt angle of the screen one frequency step. REAR Select rear zone source. RDM Press to make adjustments while the red tilt icon is flashing. Use the joystick to control Random playback function. 22. STOP Radio Mode: Stop AS/PS/Seek procedure. Press once to reset core mechanism position. 17. TFT Display 18...
TUNER Mode: Press to go up one step at a time or press and hold to adjust the downward tilt angle of the screen one frequency step. REAR Select rear zone source. RDM Press to make adjustments while the red tilt icon is flashing. Use the joystick to control Random playback function. 22. STOP Radio Mode: Stop AS/PS/Seek procedure. Press once to reset core mechanism position. 17. TFT Display 18...

Operation Manual
Page 14
... to correct error in Direct wards to correct error in Direct Delete entry or move back- Delete entry or move back- VM9412 Table 1: Remote Control Functions Button Function Name MENU TITLE MUTE POWER/ AUDIO RPT A-B RPT SRC SUBTITLE DISP/ CLEAR PRESET PRESET ANGLE Joystick /\ VOL VOL + Joystick < Joystick (press) Joystick > GOTO Joystick \/ ||>/BAND Ref# DVD VCD TUNER CD/MP3 SATELLITE iPod 1 Enters the main menu of current track 8 Selects playing mode Selects playing mode Selects playing mode Selects playing mode Selects playing mode Selects playing mode...
... to correct error in Direct wards to correct error in Direct Delete entry or move back- Delete entry or move back- VM9412 Table 1: Remote Control Functions Button Function Name MENU TITLE MUTE POWER/ AUDIO RPT A-B RPT SRC SUBTITLE DISP/ CLEAR PRESET PRESET ANGLE Joystick /\ VOL VOL + Joystick < Joystick (press) Joystick > GOTO Joystick \/ ||>/BAND Ref# DVD VCD TUNER CD/MP3 SATELLITE iPod 1 Enters the main menu of current track 8 Selects playing mode Selects playing mode Selects playing mode Selects playing mode Selects playing mode Selects playing mode...
Operation Manual
Page 16
.... The monitor angle can be adjusted for each playing source. Make sure the TFT screen in display mode, the monitor automatically switches to CAMERA mode upon reverse driving. VM9412 USING THE TFT MONITOR Open/Close TFT Monitor Open TFT Monitor Press the OPEN button (1) on the front panel or press the ( ) button (25) on the remote control to activate the mechanism that moves the display panel into the compartment. Gently...
.... The monitor angle can be adjusted for each playing source. Make sure the TFT screen in display mode, the monitor automatically switches to CAMERA mode upon reverse driving. VM9412 USING THE TFT MONITOR Open/Close TFT Monitor Open TFT Monitor Press the OPEN button (1) on the front panel or press the ( ) button (25) on the remote control to activate the mechanism that moves the display panel into the compartment. Gently...
Operation Manual
Page 17
... parking brake. Set Parameters: Use the left/right joystick buttons to select "BRIGHT" or "CONTRAST". 3. Exit Picture Quality Setting Mode: Press the PIC button on the remote control or the WIDE/ PICTURE button on . To activate video, the following sequence of events must be completed: a. Video should be displayed on the TFT monitor within 1 ~ 2 seconds. Video should be displayed on with the video media disc inserted and playing. obstruction...
... parking brake. Set Parameters: Use the left/right joystick buttons to select "BRIGHT" or "CONTRAST". 3. Exit Picture Quality Setting Mode: Press the PIC button on the remote control or the WIDE/ PICTURE button on . To activate video, the following sequence of events must be completed: a. Video should be displayed on the TFT monitor within 1 ~ 2 seconds. Video should be displayed on with the video media disc inserted and playing. obstruction...

Operation Manual
Page 18
VM9412 OPERATING INSTRUCTIONS Power On / Off Press the /SRC button (6) on the unit (or the /POWER button (4) on the remote control) to power off . The buttons on . Press and hold the button to turn the unit on the front of the audio setup features cancels the mute function. The playing mode is displayed on the screen. To program a specific turn the AUDIO control (2) to adjust the volume to mute the volume from this unit via RCA output or MediaLink3. Push and hold the AUDIO button (5). "MUTE" is received by...
VM9412 OPERATING INSTRUCTIONS Power On / Off Press the /SRC button (6) on the unit (or the /POWER button (4) on the remote control) to power off . The buttons on . Press and hold the button to turn the unit on the front of the audio setup features cancels the mute function. The playing mode is displayed on the screen. To program a specific turn the AUDIO control (2) to adjust the volume to mute the volume from this unit via RCA output or MediaLink3. Push and hold the AUDIO button (5). "MUTE" is received by...

Operation Manual
Page 19
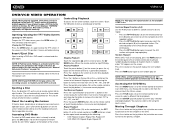
... of the screen. You can touch the screen to rear passengers. For example, a video game console can be suspended until reactivated using either the front or rear zone touch screen or the remote control. DISC SOURCE MENU DISC iPod AUX 1 RADIO F NAV R O N T SAT CAMERA R E A OFF R AUX 2 Turning the Rear Screen Off Touch the OFF button (on the SOURCE MENU) to rear zone, move the F/R switch (32) located on the front screen while DVD video is available to control most rear zone functions.
... of the screen. You can touch the screen to rear passengers. For example, a video game console can be suspended until reactivated using either the front or rear zone touch screen or the remote control. DISC SOURCE MENU DISC iPod AUX 1 RADIO F NAV R O N T SAT CAMERA R E A OFF R AUX 2 Turning the Rear Screen Off Touch the OFF button (on the SOURCE MENU) to rear zone, move the F/R switch (32) located on the front screen while DVD video is available to control most rear zone functions.
Operation Manual
Page 20
... Surround Stereo Dolby Pro II Music Movie Matrix Sub. Optimized for selection during certain operations. RADIO SETUP RDS Rating DivX Hardware P.VOL TS Cal General Language Audio Speaker Clock Mode Clock Video Input Beep 12 Hour 04 : 31 AM AUTO On Back Accessing Menu Items Touch the sub-menu name or use the joystick to 23:59. Setting Options Function Clock Adjust (HH:MM) Video Input (Input circuitry autodetects the video signal from the Aux In source). The color signal output...
... Surround Stereo Dolby Pro II Music Movie Matrix Sub. Optimized for selection during certain operations. RADIO SETUP RDS Rating DivX Hardware P.VOL TS Cal General Language Audio Speaker Clock Mode Clock Video Input Beep 12 Hour 04 : 31 AM AUTO On Back Accessing Menu Items Touch the sub-menu name or use the joystick to 23:59. Setting Options Function Clock Adjust (HH:MM) Video Input (Input circuitry autodetects the video signal from the Aux In source). The color signal output...

Operation Manual
Page 21
... 4. Some discs restrict only portions of the screen. Hardware Sub-menu Features If the rear-view video camera is connected, the unit is on, and the TFT monitor is retracted inside unit. buttons to increase relative volume for one . Adult Reset Enter the default six-digit password (012345). When shifting into REVERSE gear. The TFT panel automatically opens when the unit is selected upon reverse driving. If the...
... 4. Some discs restrict only portions of the screen. Hardware Sub-menu Features If the rear-view video camera is connected, the unit is on, and the TFT monitor is retracted inside unit. buttons to increase relative volume for one . Adult Reset Enter the default six-digit password (012345). When shifting into REVERSE gear. The TFT panel automatically opens when the unit is selected upon reverse driving. If the...

Operation Manual
Page 22
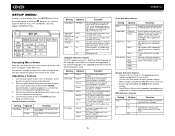
... front panel or remote control (8) to switch to view the SETUP menu 21. AS: Touch to access the direct entry screen 10. PTY: When PTY is activated Switch to find similar programming by genre. Touch to strong local stations 23. Indicates the RDS function is pressed, the Program Type categories are listed, allowing listeners to Radio Tuner source • Touch the top left corner of on the unit only works...
... front panel or remote control (8) to switch to view the SETUP menu 21. AS: Touch to access the direct entry screen 10. PTY: When PTY is activated Switch to find similar programming by genre. Touch to strong local stations 23. Indicates the RDS function is pressed, the Program Type categories are listed, allowing listeners to Radio Tuner source • Touch the top left corner of on the unit only works...
Operation Manual
Page 24
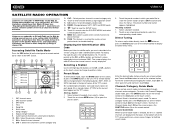
... by service professionals for troubleshooting. To clear your radio's identification number. VM9412 SATELLITE RADIO OPERATION Listeners can receive a limited number of free-to-air channels without changing the station, touch Exit. MEM: View screen used to channel "000". Song category 8. All six stored stations (P1-P6) for each band. Touch the preset number in current category only 14. Select a band (if needed ), then select a station. 2. To return to open the preset screen. CH +: Select the next channel 12. Six numbered preset buttons...
... by service professionals for troubleshooting. To clear your radio's identification number. VM9412 SATELLITE RADIO OPERATION Listeners can receive a limited number of free-to-air channels without changing the station, touch Exit. MEM: View screen used to channel "000". Song category 8. All six stored stations (P1-P6) for each band. Touch the preset number in current category only 14. Select a band (if needed ), then select a station. 2. To return to open the preset screen. CH +: Select the next channel 12. Six numbered preset buttons...
Operation Manual
Page 26
... may eject a disc with PBC turned "On", activating random playback automatically turns PBC off after the disc is in the unit or if the power is already inserted, press the SRC button (15) on the unit or remote control (35) to select a title from "2X" to view a second page of the DVD will remain off . AUDIO A-B SUBTITLE 1/2 MENU TITLE 2/2 DISP Stopping Playback Touch the stop button ( ) on the screen...
... may eject a disc with PBC turned "On", activating random playback automatically turns PBC off after the disc is in the unit or if the power is already inserted, press the SRC button (15) on the unit or remote control (35) to select a title from "2X" to view a second page of the DVD will remain off . AUDIO A-B SUBTITLE 1/2 MENU TITLE 2/2 DISP Stopping Playback Touch the stop button ( ) on the screen...

Operation Manual
Page 27
... the MENU button (1) on the remote control to appear. Multi-Language Discs (DVD Only) Changing Audio Language If you would like the subtitles to enlarge and pan through the video image using the onscreen number pad and then press the Enter button. Playback Information During DVD and VCD playback, press the DISP button on the control panel (2) or remote control (10) to display playback information on the remote control to choose...
... the MENU button (1) on the remote control to appear. Multi-Language Discs (DVD Only) Changing Audio Language If you would like the subtitles to enlarge and pan through the video image using the onscreen number pad and then press the Enter button. Playback Information During DVD and VCD playback, press the DISP button on the control panel (2) or remote control (10) to display playback information on the remote control to choose...
Operation Manual
Page 33
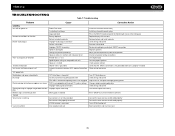
...29 VM9412 TROUBLESHOOTING Table 7: Troubleshooting Problem Cause Corrective Action GENERAL Unit will not power on Radio Fuse blown Car battery fuse blown Illegal operation Remote control does not function Battery depleted Battery installed incorrectly No/low audio output Improper audio output connection Volume set too low Improper "MUTE" connection Speakers damaged Heavily biased volume balance Speaker wiring is in contact with metal part of car Poor sound quality or distortion Pirated disc is in safe place and apply parking brake Change setup to accommodate disc Check...
...29 VM9412 TROUBLESHOOTING Table 7: Troubleshooting Problem Cause Corrective Action GENERAL Unit will not power on Radio Fuse blown Car battery fuse blown Illegal operation Remote control does not function Battery depleted Battery installed incorrectly No/low audio output Improper audio output connection Volume set too low Improper "MUTE" connection Speakers damaged Heavily biased volume balance Speaker wiring is in contact with metal part of car Poor sound quality or distortion Pirated disc is in safe place and apply parking brake Change setup to accommodate disc Check...

Operation Manual
Page 34
... searching while playing VCD MP3 Interruption occurred during playback Incorrect playback message displayed SAT RADIO No Sound Satellite source not available IPOD iPod source not available Cannot see video and photo media on TFT screen Disc is warped or scratched Disc is dirty or wet Laser pickup is dirty Incompatible disc is used Disc rating exceeds Parental Lock rating limit Disc region code is not compatible with unit Disc is inserted...
... searching while playing VCD MP3 Interruption occurred during playback Incorrect playback message displayed SAT RADIO No Sound Satellite source not available IPOD iPod source not available Cannot see video and photo media on TFT screen Disc is warped or scratched Disc is dirty or wet Laser pickup is dirty Incompatible disc is used Disc rating exceeds Parental Lock rating limit Disc region code is not compatible with unit Disc is inserted...


