Owners Manual
Page 2
... and Indicators 6 LCD Display/Indicators 6 FRONT ZONE Remote Control 7 Rear Zone Remote COntrol 9 Using the TFT Monitor 10 Open/Close TFT Monitor 10 TFT Monitor Auto Open 10 Reverse Driving Use 10 Monitor Tilt Angle Adjustment ... LCD Display...14 Switch to follow. CONTENTS Thank you 'll learn how to use all the features of your new Jensen VM9410 Mobile Multimedia AM/FM/DVD Receiver for choosing a Jensen ...Store (AS) ...14 Local Radio Station Seeking (LOC 14 DVD Player Operation 15 Opening/Closing the TFT Video Screen 15 DVD LCD Display...15 Insert/Eject Disc ...15 Ejecting a Disc ......
... and Indicators 6 LCD Display/Indicators 6 FRONT ZONE Remote Control 7 Rear Zone Remote COntrol 9 Using the TFT Monitor 10 Open/Close TFT Monitor 10 TFT Monitor Auto Open 10 Reverse Driving Use 10 Monitor Tilt Angle Adjustment ... LCD Display...14 Switch to follow. CONTENTS Thank you 'll learn how to use all the features of your new Jensen VM9410 Mobile Multimedia AM/FM/DVD Receiver for choosing a Jensen ...Store (AS) ...14 Local Radio Station Seeking (LOC 14 DVD Player Operation 15 Opening/Closing the TFT Video Screen 15 DVD LCD Display...15 Insert/Eject Disc ...15 Ejecting a Disc ......
Owners Manual
Page 3
...DVD). 6. Multiple video System with a maximum of the Jensen VM9410 Mobile Multimedia AM/FM/DVD Receiver. FULL, WIDE, and NORMAL screen modes. 12. Reverse driving automatically activates the TFT monitor and the rear view video camera; TFT monitor...be installed in DVD core mechanism. 3. 7 inch Panasonic TFT monitor. 4. NOTE: If the VM9410 is between 10.5V and 16V. Dual LCD Display. 10. If the TFT monitor becomes overloaded ...as when the unit was powered off. 18. Two independent full function IR remote controls - the Image captured from shock or fire, never expose this unit...
...DVD). 6. Multiple video System with a maximum of the Jensen VM9410 Mobile Multimedia AM/FM/DVD Receiver. FULL, WIDE, and NORMAL screen modes. 12. Reverse driving automatically activates the TFT monitor and the rear view video camera; TFT monitor...be installed in DVD core mechanism. 3. 7 inch Panasonic TFT monitor. 4. NOTE: If the VM9410 is between 10.5V and 16V. Dual LCD Display. 10. If the TFT monitor becomes overloaded ...as when the unit was powered off. 18. Two independent full function IR remote controls - the Image captured from shock or fire, never expose this unit...
Owners Manual
Page 7
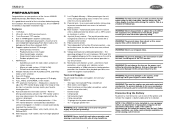
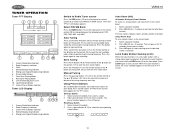
... MENU Mode: Press once to move the cursor to the left. 17. ( ) DVD Mode: Press once to enter the next chapter or track. RESET Press to reset system settings to pause playback. LCD Display 24. IR Remote Control Receiver 26. Press and hold to store the current radio station in preset.... MENU Mode: Press once to move the cursor to the right. AS (Auto Store/Preset Scan) Press once to select playing mode. VM9410 12. 5/2-6CH/RDM DVD Mode: Press once for random playback. 6 PWR TUNER Mode: Press once to play preset radio station channel 6. TUNER Mode: Press once ...
... MENU Mode: Press once to move the cursor to the left. 17. ( ) DVD Mode: Press once to enter the next chapter or track. RESET Press to reset system settings to pause playback. LCD Display 24. IR Remote Control Receiver 26. Press and hold to store the current radio station in preset.... MENU Mode: Press once to move the cursor to the right. AS (Auto Store/Preset Scan) Press once to select playing mode. VM9410 12. 5/2-6CH/RDM DVD Mode: Press once for random playback. 6 PWR TUNER Mode: Press once to play preset radio station channel 6. TUNER Mode: Press once ...
Owners Manual
Page 9
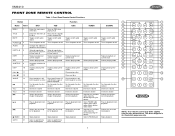
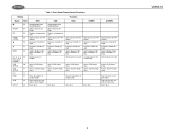
...Plays next disc 13 Plays back disc in dif- The above diagram is for playback radio station by decreasing tuning fre- VM9410 FRONT ZONE REMOTE CONTROL Table 1: Front Zone Remote Control Functions Button Function Name MENU TITLE MUTE POWER/ AUDIO REPT A-B REPT SRC SUBTITLE DISP DISC DISC ANGLE VOL VOL... + BAND GOTO Ref # DVD VCD CDC TUNER 1 Enters the main menu Turns on PBC when of the disc playing VCD 2 Enters the title...
...Plays next disc 13 Plays back disc in dif- The above diagram is for playback radio station by decreasing tuning fre- VM9410 FRONT ZONE REMOTE CONTROL Table 1: Front Zone Remote Control Functions Button Function Name MENU TITLE MUTE POWER/ AUDIO REPT A-B REPT SRC SUBTITLE DISP DISC DISC ANGLE VOL VOL... + BAND GOTO Ref # DVD VCD CDC TUNER 1 Enters the main menu Turns on PBC when of the disc playing VCD 2 Enters the title...
Owners Manual
Page 10
Table 1: Front Zone Remote Control Functions Button Function Name Ref # DVD VCD CDC TUNER CD/MP3 22 ZOOM 23 PIC 24 OPEN/ 25 CLOSE 26 27 WIDE 28 0, 1, 2, 3, 4, 29 5, 6, 7, 8, 9, 0 (Numeric Keypad) DVD 30 SETUP SYS 31 SETUP SEL...monitor Decreases monitor tilt angle Increases monitor tilt angle Selects display mode: WIDE, NORMAL, or FULL Directly accesses track Access DVD Setup menu Access System Setup menu Access DVD Setup menu Access System Setup menu Access DVD Setup menu Access System Setup menu Access DVD...the first ten seconds of each track Ejects disc VM9410 8
Table 1: Front Zone Remote Control Functions Button Function Name Ref # DVD VCD CDC TUNER CD/MP3 22 ZOOM 23 PIC 24 OPEN/ 25 CLOSE 26 27 WIDE 28 0, 1, 2, 3, 4, 29 5, 6, 7, 8, 9, 0 (Numeric Keypad) DVD 30 SETUP SYS 31 SETUP SEL...monitor Decreases monitor tilt angle Increases monitor tilt angle Selects display mode: WIDE, NORMAL, or FULL Directly accesses track Access DVD Setup menu Access System Setup menu Access DVD Setup menu Access System Setup menu Access DVD Setup menu Access System Setup menu Access DVD...the first ten seconds of each track Ejects disc VM9410 8
Owners Manual
Page 11
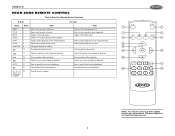
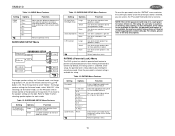
VM9410 REAR ZONE REMOTE CONTROL Table 2: Rear Zone Remote Control Functions Button Function Name Ref # DVD VCD 3 8 MENU 1 Enters the main menu of the disc Turns on PBC when playing VCD TITLE 2 Enters the title menu of the disc Plays first ... time frame and playback 7 22 Slow playback/slow rewind playback Slow playback/slow rewind playback 29 21 0, 1, 2, 3, 4, 29 5, 6, 7, 8, 9, 0 (Numeric Keypad) Directly accesses chapter NOTE: Your remote control may differ slightly from the one pictured here.
VM9410 REAR ZONE REMOTE CONTROL Table 2: Rear Zone Remote Control Functions Button Function Name Ref # DVD VCD 3 8 MENU 1 Enters the main menu of the disc Turns on PBC when playing VCD TITLE 2 Enters the title menu of the disc Plays first ... time frame and playback 7 22 Slow playback/slow rewind playback Slow playback/slow rewind playback 29 21 0, 1, 2, 3, 4, 29 5, 6, 7, 8, 9, 0 (Numeric Keypad) Directly accesses chapter NOTE: Your remote control may differ slightly from the one pictured here.

Owners Manual
Page 12
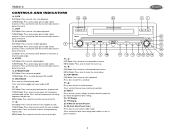
...DVD or TUNER mode, the only parameter that moves the display panel into the viewing position. Parameter Adjustment Procedure 1. Rear video screens are not affected. TFT Monitor Auto Open If "TFT Auto Open" is "on" when the unit is auto- Monitor Tilt Angle Adjustment A known characteristic of LCD... DVD RGB Mode AUX IN CVBS Mode CAMERA CVBS Mode *CVBS - NOTE: The default adjustment is extended horizontally to the viewing angle. Enter Picture Quality Setting mode: Press the PIC button (24) on the remote or press and VM9410 hold the WIDE/PICTURE button (2) on the monitor panel...
...DVD or TUNER mode, the only parameter that moves the display panel into the viewing position. Parameter Adjustment Procedure 1. Rear video screens are not affected. TFT Monitor Auto Open If "TFT Auto Open" is "on" when the unit is auto- Monitor Tilt Angle Adjustment A known characteristic of LCD... DVD RGB Mode AUX IN CVBS Mode CAMERA CVBS Mode *CVBS - NOTE: The default adjustment is extended horizontally to the viewing angle. Enter Picture Quality Setting mode: Press the PIC button (24) on the remote or press and VM9410 hold the WIDE/PICTURE button (2) on the monitor panel...
Owners Manual
Page 13
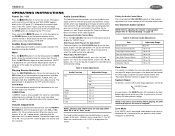
VM9410 OPERATING INSTRUCTIONS Power On / Off Press the /MUTE button (1) to turn the unit on the front panel once to display the "AUDIO" menu. Press and hold the VOL/LOC/DX knob (6) or stop making adjustments for deficiencies in the following order: TUNER, DVD, CD Changer, AUX IN or CAMERA (rear...+10 -10 to mute the volume from your vehicle, which vary depending on the LCD monitor. Mute Press the /MUTE button (1) on the front panel or the MUTE button (3) on the remote to +10 Rear Zone If a monitor is complete. To get the best possible sound quality from the unit. Adjusting an ...
VM9410 OPERATING INSTRUCTIONS Power On / Off Press the /MUTE button (1) to turn the unit on the front panel once to display the "AUDIO" menu. Press and hold the VOL/LOC/DX knob (6) or stop making adjustments for deficiencies in the following order: TUNER, DVD, CD Changer, AUX IN or CAMERA (rear...+10 -10 to mute the volume from your vehicle, which vary depending on the LCD monitor. Mute Press the /MUTE button (1) on the front panel or the MUTE button (3) on the remote to +10 Rear Zone If a monitor is complete. To get the best possible sound quality from the unit. Adjusting an ...
Owners Manual
Page 14
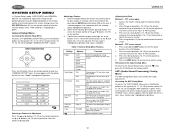
...System Setup Menu To return to the System Setup menu, move the cursor to previous menu VM9410 Adjusting the Clock Method 1 - A menu appears with the option for Adjustment Press the or buttons (14, 22) on the remote control or the or buttons (18, 19) on the joystick to move the cursor ... TFT screen closed: 1. Press the button (18) on the joystick (16, 17, 18, 19) or remote control (14, 17, 18, 19, 22) to enter the "ASP CONFIG" menu. The color signals are output in the LCD display. 1. Press and hold the DISP button (5) until the clock flashes in the standard PAL format...
...System Setup Menu To return to the System Setup menu, move the cursor to previous menu VM9410 Adjusting the Clock Method 1 - A menu appears with the option for Adjustment Press the or buttons (14, 22) on the remote control or the or buttons (18, 19) on the joystick to move the cursor ... TFT screen closed: 1. Press the button (18) on the joystick (16, 17, 18, 19) or remote control (14, 17, 18, 19, 22) to enter the "ASP CONFIG" menu. The color signals are output in the LCD display. 1. Press and hold the DISP button (5) until the clock flashes in the standard PAL format...

Owners Manual
Page 15
VM9410 ASP Config Adjusting a Feature 1. Select a new value by pressing the , , or buttons (14, 17, 19) on the remote control, or the or button (16, 17) on the joystick. 3. Confirm your installation, reversing the subwoofer phase may increase Bass output. According to the audio ... Bass effect. Subwoofer output IN phase Subwoofer output OUT OF phase NOTE: Depending on your selection by pressing the or buttons (14, 22) on the remote control or the or buttons (18, 19) on the joystick. When the Bass Center Frequency is selected, adjusting the Bass Q-Factor alters the sharpness of...
VM9410 ASP Config Adjusting a Feature 1. Select a new value by pressing the , , or buttons (14, 17, 19) on the remote control, or the or button (16, 17) on the joystick. 3. Confirm your installation, reversing the subwoofer phase may increase Bass output. According to the audio ... Bass effect. Subwoofer output IN phase Subwoofer output OUT OF phase NOTE: Depending on your selection by pressing the or buttons (14, 22) on the remote control or the or buttons (18, 19) on the joystick. When the Bass Center Frequency is selected, adjusting the Bass Q-Factor alters the sharpness of...
Owners Manual
Page 16
... the tuning frequency one step. Clock 4. Rear Zone Playing Mode 9. Current Preset Station Indicator 4. Strong Local Signal Broadcasting Indicator VM9410 Switch to Radio Tuner source Press the SRC button (15) on the joystick to seek the next available radio station by increasing...new stations replace stations already stored in the LCD panel. Strong Local Signal Broadcasting Indicator 6. Current Preset Station Indicator Tuner LCD Display 1 2 345 1. The Tuner TFT or LCD display appears. Auto Tuning Press and hold the button (19) on remote control or the button on the joystick (...
... the tuning frequency one step. Clock 4. Rear Zone Playing Mode 9. Current Preset Station Indicator 4. Strong Local Signal Broadcasting Indicator VM9410 Switch to Radio Tuner source Press the SRC button (15) on the joystick to seek the next available radio station by increasing...new stations replace stations already stored in the LCD panel. Strong Local Signal Broadcasting Indicator 6. Current Preset Station Indicator Tuner LCD Display 1 2 345 1. The Tuner TFT or LCD display appears. Auto Tuning Press and hold the button (19) on remote control or the button on the joystick (...
Owners Manual
Page 17
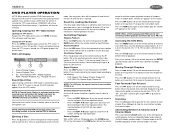
...21) on the front panel or remote control (25) to switch between 2-channel (DownMix Mode) and 6-channel (Full 6CH Mode) speaker output. 2-Channel audio is for CD and MP3 playback, while 6-Channel audio is on. VM9410 DVD PLAYER OPERATION NOTE: When properly installed, DVD video cannot be authorized (see ... TFT video screen, press the OPEN (2) button. SC - Scan Playback; RDM - Playback All Discs Insert/Eject Disc Upon inserting a DVD disc, DVD mode is closed , the LCD panel displays the current status. You cannot insert a disc if there is already a disc in slow motion at 1/2, 1/4, 1/6 or ...
...21) on the front panel or remote control (25) to switch between 2-channel (DownMix Mode) and 6-channel (Full 6CH Mode) speaker output. 2-Channel audio is for CD and MP3 playback, while 6-Channel audio is on. VM9410 DVD PLAYER OPERATION NOTE: When properly installed, DVD video cannot be authorized (see ... TFT video screen, press the OPEN (2) button. SC - Scan Playback; RDM - Playback All Discs Insert/Eject Disc Upon inserting a DVD disc, DVD mode is closed , the LCD panel displays the current status. You cannot insert a disc if there is already a disc in slow motion at 1/2, 1/4, 1/6 or ...
Owners Manual
Page 18
... or the ENTER (joystick) button (20) to go to the following table. Go to appear. Viewing an Alternate Picture Angle (DVD Only) Some DVDs contain scenes that have been shot simultaneously from track one of 8 titles on the remote VM9410 control to choose the language in 6CH mode with play back functionality, play list...
... or the ENTER (joystick) button (20) to go to the following table. Go to appear. Viewing an Alternate Picture Angle (DVD Only) Some DVDs contain scenes that have been shot simultaneously from track one of 8 titles on the remote VM9410 control to choose the language in 6CH mode with play back functionality, play list...

Owners Manual
Page 20
..., press the or buttons (14, 22) on the remote control or the or buttons (18, 19) on the front panel. LANGUAGE Menu If a DVD supports more accurate audio effect. 18 If the selected language is highlighted in green. AUDIO Menu The VM9410 has a built-in which you would like audio (when... optional) to be played Select the default language in Pink Noise generator to be adjusted. Adjusting a Feature 1. This operation can be displayed Return to adjust by pressing the button (18) on the remote or by the DVD, then the...
..., press the or buttons (14, 22) on the remote control or the or buttons (18, 19) on the front panel. LANGUAGE Menu If a DVD supports more accurate audio effect. 18 If the selected language is highlighted in green. AUDIO Menu The VM9410 has a built-in which you would like audio (when... optional) to be played Select the default language in Pink Noise generator to be adjusted. Adjusting a Feature 1. This operation can be displayed Return to adjust by pressing the button (18) on the remote or by the DVD, then the...
Owners Manual
Page 21
...for each disc is not present Return to previous menu RATING (Parental Lock) Menu The DVD system has a built-in a safe place for setup. After selecting 2 or 6-channel mode, use the or buttons (14, 22) on the remote control or the or buttons (18, 19) on the joystick (17) to move... center speaker is marked on the disc, the parental lock feature is entered, you can access the "Password" field and enter a new one. VM9410 Table 14: AUDIO Menu Features Setting Options REAR CTRL 15ms 12ms 9ms 6ms 3ms 0ms Function Adjust the time difference between 3 and 15 milliseconds, producing...
...for each disc is not present Return to previous menu RATING (Parental Lock) Menu The DVD system has a built-in a safe place for setup. After selecting 2 or 6-channel mode, use the or buttons (14, 22) on the remote control or the or buttons (18, 19) on the joystick (17) to move... center speaker is marked on the disc, the parental lock feature is entered, you can access the "Password" field and enter a new one. VM9410 Table 14: AUDIO Menu Features Setting Options REAR CTRL 15ms 12ms 9ms 6ms 3ms 0ms Function Adjust the time difference between 3 and 15 milliseconds, producing...
Owners Manual
Page 22
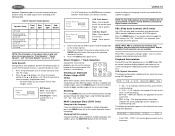
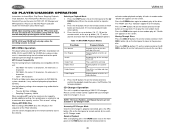
...or played back correctly. CD Changer Operation This unit is properly connected, press the SRC button (15) on the front panel or remote control (8) to switch to activate random playback and play unless the recording session is closed. Random Playback With a CD playing, ...play the next random track. VM9410 CD PLAYER/CHANGER OPERATION Instructions for Insert/Eject, Play/Pause, Stopping Playback, Track Selection, Fast Forward/Fast Reverse, Scan, and Random Play are compatible with this unit: • ISO 9660 - Please see the DVD Player Operation section for information about ...
...or played back correctly. CD Changer Operation This unit is properly connected, press the SRC button (15) on the front panel or remote control (8) to switch to activate random playback and play unless the recording session is closed. Random Playback With a CD playing, ...play the next random track. VM9410 CD PLAYER/CHANGER OPERATION Instructions for Insert/Eject, Play/Pause, Stopping Playback, Track Selection, Fast Forward/Fast Reverse, Scan, and Random Play are compatible with this unit: • ISO 9660 - Please see the DVD Player Operation section for information about ...

Owners Manual
Page 23
VM9410 TROUBLESHOOTING Table 18: Troubleshooting Problem Cause Corrective Action GENERAL Unit will not power on Radio Fuse blown Car battery fuse blown Illegal operation Remote control does not function ...and that it's properly insulated Check wiring and correct Turn TFT Auto Open on screen DVD is not compatible with unit Speaker is shorted Tel-Mute malfunction "MUTE" wire is ...resets itself when engine is off Incorrect connection between ACC and positive battery wire TFT MONITOR Monitor does not open automatically TFT Auto Open is turned off No image Incorrect connection ...
VM9410 TROUBLESHOOTING Table 18: Troubleshooting Problem Cause Corrective Action GENERAL Unit will not power on Radio Fuse blown Car battery fuse blown Illegal operation Remote control does not function ...and that it's properly insulated Check wiring and correct Turn TFT Auto Open on screen DVD is not compatible with unit Speaker is shorted Tel-Mute malfunction "MUTE" wire is ...resets itself when engine is off Incorrect connection between ACC and positive battery wire TFT MONITOR Monitor does not open automatically TFT Auto Open is turned off No image Incorrect connection ...


