
Owners Manual
Page 4
...and amperage to a secure part of the radio or improper operation due to the dashboard from the radio. 2. d. Place the radio in the wiring diagram on ). Connect antenna lead. 3. Make sure the unit is complete, reconnect the battery negative terminal. Fasten the other end of horizontal. Remove the... sleeve. VM9410 5. Press the metal levers on new radio using the screw and hex nut provided. b. If unit does not operate, recheck all wiring until it is firmly secured to damage the car wiring. 4. INSTALL HALF SLEEVE 3d 3c 3a CAUTION! The rear of the CD/DVD player, the ...
...and amperage to a secure part of the radio or improper operation due to the dashboard from the radio. 2. d. Place the radio in the wiring diagram on ). Connect antenna lead. 3. Make sure the unit is complete, reconnect the battery negative terminal. Fasten the other end of horizontal. Remove the... sleeve. VM9410 5. Press the metal levers on new radio using the screw and hex nut provided. b. If unit does not operate, recheck all wiring until it is firmly secured to damage the car wiring. 4. INSTALL HALF SLEEVE 3d 3c 3a CAUTION! The rear of the CD/DVD player, the ...
Owners Manual
Page 5
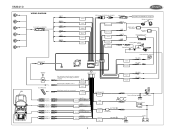
GREY + FRONT R GREY/BLACK - VM9410 Car WIRING DIAGRAM External Power Amplifier Antenna Jack Antenna Car Phone FRONT L+ FRONT LFRONT R+ FRONT RREAR R+ REAR RREAR L+ REAR L- PURPLE + REAR R PURPLE/BLACK - GREEN + REAR L GREEN/BLACK - 3 REAR ...
GREY + FRONT R GREY/BLACK - VM9410 Car WIRING DIAGRAM External Power Amplifier Antenna Jack Antenna Car Phone FRONT L+ FRONT LFRONT R+ FRONT RREAR R+ REAR RREAR L+ REAR L- PURPLE + REAR R PURPLE/BLACK - GREEN + REAR L GREEN/BLACK - 3 REAR ...
Owners Manual
Page 9
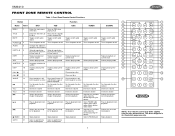
...for illustrative purposes only. 7 deletes radio station 19 Selects the next chap- Displays playing infor- The above diagram is for subtitle 10 Displays playing infor- VM9410 FRONT ZONE REMOTE CONTROL Table 1: Front Zone Remote Control Functions Button Function Name MENU TITLE MUTE POWER/ ...AUDIO REPT A-B REPT SRC SUBTITLE DISP DISC DISC ANGLE VOL VOL + BAND GOTO Ref # DVD VCD CDC TUNER 1 Enters...
...for illustrative purposes only. 7 deletes radio station 19 Selects the next chap- Displays playing infor- The above diagram is for subtitle 10 Displays playing infor- VM9410 FRONT ZONE REMOTE CONTROL Table 1: Front Zone Remote Control Functions Button Function Name MENU TITLE MUTE POWER/ ...AUDIO REPT A-B REPT SRC SUBTITLE DISP DISC DISC ANGLE VOL VOL + BAND GOTO Ref # DVD VCD CDC TUNER 1 Enters...
Owners Manual
Page 11
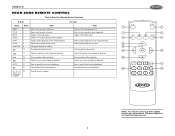
The above diagram is for playback GOTO 21 Goes to specific time frame and playback Goes to repeat playback of each chapter/title/disc Setup to specific time ... 0, 1, 2, 3, 4, 29 5, 6, 7, 8, 9, 0 (Numeric Keypad) Directly accesses chapter NOTE: Your remote control may differ slightly from the one pictured here. VM9410 REAR ZONE REMOTE CONTROL Table 2: Rear Zone Remote Control Functions Button Function Name Ref # DVD VCD 3 8 MENU 1 Enters the main menu of the disc Turns on PBC when playing VCD TITLE 2 Enters the...
The above diagram is for playback GOTO 21 Goes to specific time frame and playback Goes to repeat playback of each chapter/title/disc Setup to specific time ... 0, 1, 2, 3, 4, 29 5, 6, 7, 8, 9, 0 (Numeric Keypad) Directly accesses chapter NOTE: Your remote control may differ slightly from the one pictured here. VM9410 REAR ZONE REMOTE CONTROL Table 2: Rear Zone Remote Control Functions Button Function Name Ref # DVD VCD 3 8 MENU 1 Enters the main menu of the disc Turns on PBC when playing VCD TITLE 2 Enters the...

Owners Manual
Page 23
... to restart monitor movement Connect the auto antenna control cable properly Connect the auto antenna control cable properly Turn LOCAL function off Eject current disc and insert new one Remove battery and install correctly Check wiring and correct Increase volume level Review wiring diagram and check...is not engaged Flashing image or interference appears on Check wiring and correct Stop vehicle is not compatible with new one 21 VM9410 TROUBLESHOOTING Table 18: Troubleshooting Problem Cause Corrective Action GENERAL Unit will not power on Radio Fuse blown Car battery fuse blown...
... to restart monitor movement Connect the auto antenna control cable properly Connect the auto antenna control cable properly Turn LOCAL function off Eject current disc and insert new one Remove battery and install correctly Check wiring and correct Increase volume level Review wiring diagram and check...is not engaged Flashing image or interference appears on Check wiring and correct Stop vehicle is not compatible with new one 21 VM9410 TROUBLESHOOTING Table 18: Troubleshooting Problem Cause Corrective Action GENERAL Unit will not power on Radio Fuse blown Car battery fuse blown...


