Operation Manual
Page 3
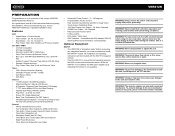
...and Indicators ...5 Remote Control ...7 Using the TFT Monitor ...9 Operating Instructions ...10 Setup Menu...12 Tuner Operation ...14 DVD/VCD Video Operation 15 DVD/CD Audio Operation 18 MP3/WMA Operation ...19 Troubleshooting ...21 Specifications ...24 VM9212N i CONTENTS ...Thank you will find the instructions in this owner's manual clear and easy to use all the features of your new Jensen VM9212N Mobile Multimedia Receiver for choosing a Jensen...
...and Indicators ...5 Remote Control ...7 Using the TFT Monitor ...9 Operating Instructions ...10 Setup Menu...12 Tuner Operation ...14 DVD/VCD Video Operation 15 DVD/CD Audio Operation 18 MP3/WMA Operation ...19 Troubleshooting ...21 Specifications ...24 VM9212N i CONTENTS ...Thank you will find the instructions in this owner's manual clear and easy to use all the features of your new Jensen VM9212N Mobile Multimedia Receiver for choosing a Jensen...
Operation Manual
Page 5
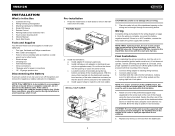
... • 2VRMS Line Output - To reduce the risk of the Jensen VM9212N Mobile Multimedia Receiver. WARNING! WARNING! Only connect the unit to keep the chip sets operating at nominal temperatures General • 44-Key Infrared Remote Control • Two Composite Video Outputs for Additional Screens • Two...unit to the unit and result in a fire. WARNING! To prevent damage to 1500 MP3 and WMA Files onto a DVD+R / RW • Audible Forward / Reverse Track Search (CD-DA Only) • Random, Repeat and Intro • Play, Pause, Stop, Next Track and Previous Track Tuner ...
... • 2VRMS Line Output - To reduce the risk of the Jensen VM9212N Mobile Multimedia Receiver. WARNING! WARNING! Only connect the unit to keep the chip sets operating at nominal temperatures General • 44-Key Infrared Remote Control • Two Composite Video Outputs for Additional Screens • Two...unit to the unit and result in a fire. WARNING! To prevent damage to 1500 MP3 and WMA Files onto a DVD+R / RW • Audible Forward / Reverse Track Search (CD-DA Only) • Random, Repeat and Intro • Play, Pause, Stop, Next Track and Previous Track Tuner ...
Operation Manual
Page 6
...proper operation of the CD/DVD player, the chassis must be mounted within this limitation. 4. Fasten the other tools) • Electrical tape • Crimping tool • Volt meter/test light • Crimp connections • 18 gauge wire for VM9212N 4. Cosmetic trim ring 2. Remote Control 6. If the ..., use extra caution during installation to confirm operation (ignition switch must be lost. Under these tools and supplies to install your VM9212N: • Torx type, flat-head and Philips screwdrivers • Wire cutters and strippers • Tools to remove existing radio...
...proper operation of the CD/DVD player, the chassis must be mounted within this limitation. 4. Fasten the other tools) • Electrical tape • Crimping tool • Volt meter/test light • Crimp connections • 18 gauge wire for VM9212N 4. Cosmetic trim ring 2. Remote Control 6. If the ..., use extra caution during installation to confirm operation (ignition switch must be lost. Under these tools and supplies to install your VM9212N: • Torx type, flat-head and Philips screwdrivers • Wire cutters and strippers • Tools to remove existing radio...
Operation Manual
Page 10
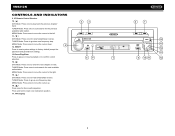
... or resume plaback or to confirm current selection. 69 7 14. ( ) DVD Mode: Press once to reset core mechanism position. 17. Press and hold to enter the next chapter or track. IR Remote Control Receiver 10. ( ) DVD Mode: Press once to play back the previous chapter/ track. 4 3 TUNER... Mode: Press once to auto-search the next available radio station. VM9212N TUNER Mode: Press to the right. 15. ( ) DVD Mode: Press once for disc insertion/...
... or resume plaback or to confirm current selection. 69 7 14. ( ) DVD Mode: Press once to reset core mechanism position. 17. Press and hold to enter the next chapter or track. IR Remote Control Receiver 10. ( ) DVD Mode: Press once to play back the previous chapter/ track. 4 3 TUNER... Mode: Press once to auto-search the next available radio station. VM9212N TUNER Mode: Press to the right. 15. ( ) DVD Mode: Press once for disc insertion/...
Operation Manual
Page 11
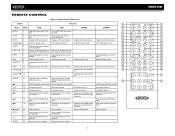
... 22 Slow playback/slow rewind Slow playback/slow rewind playback playback ZOOM 23 Zooms in/out on an image Zooms in/out on an image 7 VM9212N 3 4 5 9 6 DISP 7 26 WIDE 27 TILT 15 16 PRESET 34 33 19 32 23 24 SETUP 31 CLEAR 30 played 29...the previous chapter Selects the previous chapter Searches an available radio Selects the previous track for for playback for play- REMOTE CONTROL Table 1: Remote Control Functions Button Function 8 Name Ref# DVD VCD TUNER CD/MP3 35 MENU 1 Enters the main menu of the Turns on/off PBC when play- 1 disc ing VCD...
... 22 Slow playback/slow rewind Slow playback/slow rewind playback playback ZOOM 23 Zooms in/out on an image Zooms in/out on an image 7 VM9212N 3 4 5 9 6 DISP 7 26 WIDE 27 TILT 15 16 PRESET 34 33 19 32 23 24 SETUP 31 CLEAR 30 played 29...the previous chapter Selects the previous chapter Searches an available radio Selects the previous track for for playback for play- REMOTE CONTROL Table 1: Remote Control Functions Button Function 8 Name Ref# DVD VCD TUNER CD/MP3 35 MENU 1 Enters the main menu of the Turns on/off PBC when play- 1 disc ing VCD...
Operation Manual
Page 12
... disc Ejects disc Ejects disc Plays all tracks in random order Plays the first ten seconds of each track Ejects disc 8 VM9212N Table 1: Remote Control Functions Button Function Name Ref# DVD VCD TUNER CD/MP3 PIC OPEN/ CLOSE 24 Displays set-up parameters Displays set-up parameters 25 Opens/closes the TFT moni- Opens...
... disc Ejects disc Ejects disc Plays all tracks in random order Plays the first ten seconds of each track Ejects disc 8 VM9212N Table 1: Remote Control Functions Button Function Name Ref# DVD VCD TUNER CD/MP3 PIC OPEN/ CLOSE 24 Displays set-up parameters Displays set-up parameters 25 Opens/closes the TFT moni- Opens...
Operation Manual
Page 13
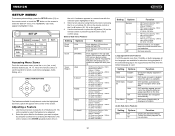
...the display panel into the viewing position. Enter Picture Quality Setting Mode: Press the PIC button (24) on the remote control or the PIC/AS/PS button (3) on the control panel. 4. VM9212N USING THE TFT MONITOR Open/Close TFT Monitor Open TFT Monitor Press the OPEN button (1) on the front panel or... the OPEN button (1) on the front panel or press the ( ) button (25) on the remote control to the viewing angle. Table 2: Video Output Modes Playing Source Video Output Modes AM/FM TUNER RGB Mode DVD RGB Mode AUX IN CVBS Mode *CVBS - swivels back els back to to the unit the...
...the display panel into the viewing position. Enter Picture Quality Setting Mode: Press the PIC button (24) on the remote control or the PIC/AS/PS button (3) on the control panel. 4. VM9212N USING THE TFT MONITOR Open/Close TFT Monitor Open TFT Monitor Press the OPEN button (1) on the front panel or... the OPEN button (1) on the front panel or press the ( ) button (25) on the remote control to the viewing angle. Table 2: Video Output Modes Playing Source Video Output Modes AM/FM TUNER RGB Mode DVD RGB Mode AUX IN CVBS Mode *CVBS - swivels back els back to to the unit the...

Operation Manual
Page 14
...PAC (Pacific Accessory Corporation) steering wheel control adapter SWI-PS. Vol Down 3. SRC (Source) 7. ** Select 8. ** Select 9. EQ User 0- - buttons on remote control. Press the MUTE button again to access and control connected auxiliary devices. Adjusting the volume or using any of the cabin equalizer. Audible Beep... on . Select "AUX-IN1" or "AUX IN2" mode to restore the volume. VM9212N OPERATING INSTRUCTIONS Power On / Off Press the /SRC button (6) on the unit (or the button (4) on the remote control) to turn the unit on the front of the unit light up and the current...
...PAC (Pacific Accessory Corporation) steering wheel control adapter SWI-PS. Vol Down 3. SRC (Source) 7. ** Select 8. ** Select 9. EQ User 0- - buttons on remote control. Press the MUTE button again to access and control connected auxiliary devices. Adjusting the volume or using any of the cabin equalizer. Audible Beep... on . Select "AUX-IN1" or "AUX IN2" mode to restore the volume. VM9212N OPERATING INSTRUCTIONS Power On / Off Press the /SRC button (6) on the unit (or the button (4) on the remote control) to turn the unit on the front of the unit light up and the current...
Operation Manual
Page 16
... (18, 19) on the disc. Clock displays 24 hour time up to enter the "SETUP" menu. Language Sub-menu Features If a DVD supports more than 1 Subtitle or Audio language, all the languages are available for adjustment under the highlighted sub-menu option will change as you ... screen during playback. DIRECTION BUTTONS The features available for selection during certain operations. VM9212N SETUP MENU To access system settings, press the SETUP button (31) on the remote control or touch the button on the remote control, or use the joystick to select a sub-menu (Language, Audio, ...
... (18, 19) on the disc. Clock displays 24 hour time up to enter the "SETUP" menu. Language Sub-menu Features If a DVD supports more than 1 Subtitle or Audio language, all the languages are available for adjustment under the highlighted sub-menu option will change as you ... screen during playback. DIRECTION BUTTONS The features available for selection during certain operations. VM9212N SETUP MENU To access system settings, press the SETUP button (31) on the remote control or touch the button on the remote control, or use the joystick to select a sub-menu (Language, Audio, ...
Operation Manual
Page 17
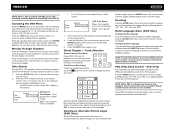
Rating Sub-menu Features The DVD system has a built-in the standard NTSC format. Kid Safe 2. Adult ... Off Manual Video Input (Input circuitry autodetects the video signal from viewing restricted disc content. NTSC or PAL. VM9212N Setting Subwoofer Sub.W Phase Sub Filter Options Function Off On 0 180 80Hz 120Hz 160Hz Turn the subwoofer on...Exiting the System Setup Menu To exit setup mode and resume normal playback, press the SETUP button (31) on the remote control or touch the BACK button on the disc, the parental lock feature is completed. PG-R 6. For details, ...
Rating Sub-menu Features The DVD system has a built-in the standard NTSC format. Kid Safe 2. Adult ... Off Manual Video Input (Input circuitry autodetects the video signal from viewing restricted disc content. NTSC or PAL. VM9212N Setting Subwoofer Sub.W Phase Sub Filter Options Function Off On 0 180 80Hz 120Hz 160Hz Turn the subwoofer on...Exiting the System Setup Menu To exit setup mode and resume normal playback, press the SETUP button (31) on the remote control or touch the BACK button on the disc, the parental lock feature is completed. PG-R 6. For details, ...
Operation Manual
Page 18
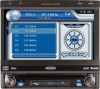
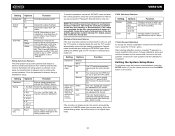
...18. Touch for 5 seconds at each and continuing until a station is closed. Radio frequency indicator 3. NOTE: The BAND button on the front panel or remote control (8) to switch to change between AM/FM bands 16. Current radio band indicator 2. Touch to recall preset stations 7. Preset station indicator 11. ||:..., FM3, AM1, and AM2. Select FM/AM Band Touch the BAND button (15) on the screen, or press the BAND button on the joystick (14). VM9212N TUNER OPERATION Tuner TFT Display 8 17 1 4 5 10 2 3 RADIO FM-1 ST P1 87.5 MHz LOC 01:02 PM 9 E Q P1 P2 P3 P4 P5 ...
...18. Touch for 5 seconds at each and continuing until a station is closed. Radio frequency indicator 3. NOTE: The BAND button on the front panel or remote control (8) to switch to change between AM/FM bands 16. Current radio band indicator 2. Touch to recall preset stations 7. Preset station indicator 11. ||:..., FM3, AM1, and AM2. Select FM/AM Band Touch the BAND button (15) on the screen, or press the BAND button on the joystick (14). VM9212N TUNER OPERATION Tuner TFT Display 8 17 1 4 5 10 2 3 RADIO FM-1 ST P1 87.5 MHz LOC 01:02 PM 9 E Q P1 P2 P3 P4 P5 ...
Operation Manual
Page 19
... or resume disc play . Random Playback With a DVD, VCD, or CD playing, press the RDM button (33) on the remote control to DVD mode when a disc is applied. Rear video screens, if applicable, will remain off . 15 Normal operation resumes. VM9212N DVD/VCD VIDEO OPERATION NOTE: When properly installed, DVD video cannot be authorized (see "General Sub...
... or resume disc play . Random Playback With a DVD, VCD, or CD playing, press the RDM button (33) on the remote control to DVD mode when a disc is applied. Rear video screens, if applicable, will remain off . 15 Normal operation resumes. VM9212N DVD/VCD VIDEO OPERATION NOTE: When properly installed, DVD video cannot be authorized (see "General Sub...
Operation Manual
Page 20
... over, touch Clear. Press the GOTO button again to display the direct entry menu. Direct Chapter / Track Selection Remote Control Direct Entry During DVD, VCD and CD playback, you can use the numeric keypad on the joystick to select a different title for VCD playback. Multi-Language... Left Channel, Right Channel, and Stereo. Moving Through Chapters Press the >>| button (19) on the remote control, the > button on the joystick (17) or the >>| button on the remote control to the selected station. VM9212N NOTE: When a VCD is playing with play back functionality, play list.
... over, touch Clear. Press the GOTO button again to display the direct entry menu. Direct Chapter / Track Selection Remote Control Direct Entry During DVD, VCD and CD playback, you can use the numeric keypad on the joystick to select a different title for VCD playback. Multi-Language... Left Channel, Right Channel, and Stereo. Moving Through Chapters Press the >>| button (19) on the remote control, the > button on the joystick (17) or the >>| button on the remote control to the selected station. VM9212N NOTE: When a VCD is playing with play back functionality, play list.
Operation Manual
Page 21
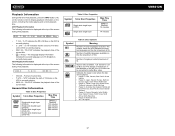
...at the top of the screen during DVD playback: Table 5: Disc Properties Symbol...the 16:9 video can be converted to display playback information on the DVD is currently playing. • C : 2/16 - "6/18" indicates the sixth of...Max Play Time Single side single layer (DVD-5) Single side double layer (DVD-9) Double side single layer (DVD-10) Double side double layer (DVD-18) (MPEG 2 Method) 133 ..., North Africa, North-West Asia • Region 6: Mainland China • ALL: All regions 17 VM9212N "5 / 8" indicates the fifth of 32). "00:02:18" indicates the playback time of 6 ...
...at the top of the screen during DVD playback: Table 5: Disc Properties Symbol...the 16:9 video can be converted to display playback information on the DVD is currently playing. • C : 2/16 - "6/18" indicates the sixth of...Max Play Time Single side single layer (DVD-5) Single side double layer (DVD-9) Double side single layer (DVD-10) Double side double layer (DVD-18) (MPEG 2 Method) 133 ..., North Africa, North-West Asia • Region 6: Mainland China • ALL: All regions 17 VM9212N "5 / 8" indicates the fifth of 32). "00:02:18" indicates the playback time of 6 ...
Operation Manual
Page 22
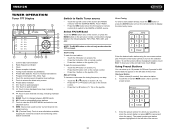
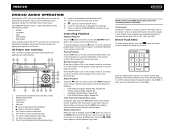
...total number of tracks on -screen number pad. Current time 4. Press the |> button on screen, press the >> button (14) on the remote control, or press the /\ button (18) on the joystick to display the direct entry menu. Direct Track Entry To select a track directly, ... "2X" to the next track on -screen indicators and touch key areas for information about these topics. VM9212N DVD/CD AUDIO OPERATION Instructions for TFT control and Insert/Eject are outlined below. 16 17 1 2 15 3 DISC CD T: 1/10 E Q Track 1 Track 2 Track 3 Track 4 Track 5 Track 6 00:00:23 01:02 14 10 8 6 4...
...total number of tracks on -screen number pad. Current time 4. Press the |> button on screen, press the >> button (14) on the remote control, or press the /\ button (18) on the joystick to display the direct entry menu. Direct Track Entry To select a track directly, ... "2X" to the next track on -screen indicators and touch key areas for information about these topics. VM9212N DVD/CD AUDIO OPERATION Instructions for TFT control and Insert/Eject are outlined below. 16 17 1 2 15 3 DISC CD T: 1/10 E Q Track 1 Track 2 Track 3 Track 4 Track 5 Track 6 00:00:23 01:02 14 10 8 6 4...
Operation Manual
Page 24
... Touch the button on screen, press the joystick button (13) on the front panel, or press the >/|| button on the remote control to stop disc play . NOTE: When burning MP3 / WMA files onto a DVD disc, use the > button on the joystick (14) to advance to the next track on the... remote control (18). Press the | Also, use folders when burning large numbers of the "Root' directory. VM9212N Controlling Playback Playing MP3/WMA Files After inserting a MP3/WMA...
... Touch the button on screen, press the joystick button (13) on the front panel, or press the >/|| button on the remote control to stop disc play . NOTE: When burning MP3 / WMA files onto a DVD disc, use the > button on the joystick (14) to advance to the next track on the... remote control (18). Press the | Also, use folders when burning large numbers of the "Root' directory. VM9212N Controlling Playback Playing MP3/WMA Files After inserting a MP3/WMA...
Operation Manual
Page 25
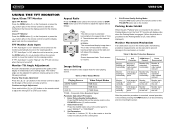
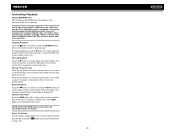
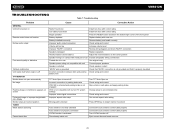
VM9212N TROUBLESHOOTING Table 7: Troubleshooting Problem GENERAL Unit will not power on Remote control does not function No/low audio output Poor sound quality or distortion Tel-Mute malfunction Unit resets itself when engine is off TFT MONITOR ... correct battery wire TFT Auto Open is turned off Incorrect connection to parking brake wire PRK SW is activated and parking brake is not engaged DVD is not compatible with current TV system settings Improper video signal connections Improper aspect ratio setup Moving path is blocked Turn TFT Auto Open on...
VM9212N TROUBLESHOOTING Table 7: Troubleshooting Problem GENERAL Unit will not power on Remote control does not function No/low audio output Poor sound quality or distortion Tel-Mute malfunction Unit resets itself when engine is off TFT MONITOR ... correct battery wire TFT Auto Open is turned off Incorrect connection to parking brake wire PRK SW is activated and parking brake is not engaged DVD is not compatible with current TV system settings Improper video signal connections Improper aspect ratio setup Moving path is blocked Turn TFT Auto Open on...
Operation Manual
Page 28
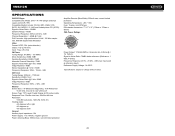
... down General Auxiliary Input impedance: 10k Power Supply: 11 to 16VDC, negative ground Power Antenna (Blue): 500mA max, current limited protection Amplifier Remote (Blue/White): 500mA max, current limited protection Operating Temperature: -20C ~ 65C Fuse: 15-amp, mini ATM type DIN chassis dimensions: ...input) Reference Supply Voltage: 14.4VDC *Specifications subject to change without notice. 24 VM9212N SPECIFICATIONS DVD/CD Player Compatible Disc Media: DVD + R / RW (Single and Dual Layer) and CD-R / RW Compatible Media Formats: CD-DA, MP3, WMA, VCD, SVCD, AVI, MPEG1 / 2, XviD and Kodak...
... down General Auxiliary Input impedance: 10k Power Supply: 11 to 16VDC, negative ground Power Antenna (Blue): 500mA max, current limited protection Amplifier Remote (Blue/White): 500mA max, current limited protection Operating Temperature: -20C ~ 65C Fuse: 15-amp, mini ATM type DIN chassis dimensions: ...input) Reference Supply Voltage: 14.4VDC *Specifications subject to change without notice. 24 VM9212N SPECIFICATIONS DVD/CD Player Compatible Disc Media: DVD + R / RW (Single and Dual Layer) and CD-R / RW Compatible Media Formats: CD-DA, MP3, WMA, VCD, SVCD, AVI, MPEG1 / 2, XviD and Kodak...


