Operation Manual
Page 3
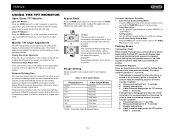
...your new Jensen VM9022 Mobile Multimedia Receiver for choosing a Jensen product. If you take a few minutes to look through it, you'll learn how to follow. Preparation...1 Installation ...5 Anti-Theft Feature ...7 Controls and Indicators ...8 Remote Control ...10 Using the TFT Monitor ...13 Operating... Instructions ...14 Multi-ZONE Operation...16 Setup Menu...17 Tuner Operation ...20 Satellite Radio Operation ...22 DVD/VCD Video Operation 24 DVD/CD Audio Operation 27 MP3/WMA Operation ...
...your new Jensen VM9022 Mobile Multimedia Receiver for choosing a Jensen product. If you take a few minutes to look through it, you'll learn how to follow. Preparation...1 Installation ...5 Anti-Theft Feature ...7 Controls and Indicators ...8 Remote Control ...10 Using the TFT Monitor ...13 Operating... Instructions ...14 Multi-ZONE Operation...16 Setup Menu...17 Tuner Operation ...20 Satellite Radio Operation ...22 DVD/VCD Video Operation 24 DVD/CD Audio Operation 27 MP3/WMA Operation ...

Operation Manual
Page 5
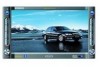
...LCD Screen • 6.5" TFT Active Matrix LCD with XM and Sirius Tuners (Sold Separately) • Requires XMDJEN100 or JXMC Cables (Sold Separately) • Satellite Channel Name, Artist, Song and Categories Displayed on your Jensen VM9022... Two Audio /Video Auxiliary Inputs • 200-Ohm Preamp Line Output - Features DVD • Aspect Ratio - High Speed Direct Connect Interface to Access iPod Playlists, ...; 38-Key Infrared Remote Control with 5-way Joystick • Two Composite Video Outputs for Additional Screens • Compatible with MZ7TFT Rear Seat Monitors with Eight Preset EQ...
...LCD Screen • 6.5" TFT Active Matrix LCD with XM and Sirius Tuners (Sold Separately) • Requires XMDJEN100 or JXMC Cables (Sold Separately) • Satellite Channel Name, Artist, Song and Categories Displayed on your Jensen VM9022... Two Audio /Video Auxiliary Inputs • 200-Ohm Preamp Line Output - Features DVD • Aspect Ratio - High Speed Direct Connect Interface to Access iPod Playlists, ...; 38-Key Infrared Remote Control with 5-way Joystick • Two Composite Video Outputs for Additional Screens • Compatible with MZ7TFT Rear Seat Monitors with Eight Preset EQ...
Operation Manual
Page 6
...installation to Brackets 11. WARNING! Never use the video display function while driving the vehicle. VM9022 What's in a fire. WARNING! Left and Right Double DIN Mounting Brackets 2. Double DIN ... installed, the CAMERA option appears gray, indicating the function is to the TFT monitor. If the cable is connected and operating properly, the CAMERA source mode will ...cable. Using an improper fuse may be installed in a car equipped with proper grounding. Remote Control with safe driving conditions. Two Custom Cosmetic Trim Rings 7. Only connect the unit ...
...installation to Brackets 11. WARNING! Never use the video display function while driving the vehicle. VM9022 What's in a fire. WARNING! Left and Right Double DIN Mounting Brackets 2. Double DIN ... installed, the CAMERA option appears gray, indicating the function is to the TFT monitor. If the cable is connected and operating properly, the CAMERA source mode will ...cable. Using an improper fuse may be installed in a car equipped with proper grounding. Remote Control with safe driving conditions. Two Custom Cosmetic Trim Rings 7. Only connect the unit ...

Operation Manual
Page 11
...the blue box in the "Password" field to open lock icon to confirm. An open the on the remote control to the right of the "Password" field indicates that a user password had not yet been entered. 7 ...Press the SETUP button (31) on the remote control or touch the button on -screen keypad and then press the Enter (arrow) button. Enter the password...to enter the "SETUP" menu. 2. You can also use the remote control keypad to view the "RATING" sub-menu. VM9022 ANTI-THEFT FEATURE The VM9022 is 012345 (6 digits).
...the blue box in the "Password" field to open lock icon to confirm. An open the on the remote control to the right of the "Password" field indicates that a user password had not yet been entered. 7 ...Press the SETUP button (31) on the remote control or touch the button on -screen keypad and then press the Enter (arrow) button. Enter the password...to enter the "SETUP" menu. 2. You can also use the remote control keypad to view the "RATING" sub-menu. VM9022 ANTI-THEFT FEATURE The VM9022 is 012345 (6 digits).
Operation Manual
Page 12
.... Press to play back the previous chapter/track. Press and hold to the left joystick) DVD/Disc Mode: Press once to enter and/or confirm audio settings. 6. IR Remote Control Receiver 10. (left . 8 VM9022 11. (down . 12. MENU Mode: Press once to resume the previous volume level. ...joystick to activate the automatic mechanical system and move the cursor down joystick) DVD/Disc Mode: Press once for non-video sources. OPEN Press to adjust the angle). 3. Press again to move the TFT monitor into viewing position. NOTE: Only CINEMA and Standby are available for slow ...
.... Press to play back the previous chapter/track. Press and hold to the left joystick) DVD/Disc Mode: Press once to enter and/or confirm audio settings. 6. IR Remote Control Receiver 10. (left . 8 VM9022 11. (down . 12. MENU Mode: Press once to resume the previous volume level. ...joystick to activate the automatic mechanical system and move the cursor down joystick) DVD/Disc Mode: Press once for non-video sources. OPEN Press to adjust the angle). 3. Press again to move the TFT monitor into viewing position. NOTE: Only CINEMA and Standby are available for slow ...

Operation Manual
Page 14
The above diagram is for illustrative purposes only. 10 VM9022 REMOTE CONTROL The VM9022 Remote controls both the front and rear zones. 30 To switch from front to rear zone, move the F/R switch (32) located on the right side of the controller. 8 4 35 31 14 16 18 17 19 15 2 32 3 22 1 11 13 5 9 12 24 23 28 25 20 21 10 27 29 26 6 7 33 34 NOTE: Your remote control may differ slightly from the one pictured here.
The above diagram is for illustrative purposes only. 10 VM9022 REMOTE CONTROL The VM9022 Remote controls both the front and rear zones. 30 To switch from front to rear zone, move the F/R switch (32) located on the right side of the controller. 8 4 35 31 14 16 18 17 19 15 2 32 3 22 1 11 13 5 9 12 24 23 28 25 20 21 10 27 29 26 6 7 33 34 NOTE: Your remote control may differ slightly from the one pictured here.

Operation Manual
Page 15
...disc content Pauses playback/starts playback 11 Delete entry or move back- Searches an available radio Selects the next track for play - VM9022 Table 1: Remote Control Functions Button Function Name MENU TITLE MUTE POWER/ AUDIO RPT A-B RPT SRC SUBTITLE DISP/ CLEAR PRESET PRESET ANGLE Joystick /\ ...Navigates the preset station list Navigates list window Navigates the preset station list Navigates list window 12 Zooms out when playing DVD, Zooms out DivX or Photo Navigates the preset station list Navigates list window Navigates the preset station list Navigates list ...
...disc content Pauses playback/starts playback 11 Delete entry or move back- Searches an available radio Selects the next track for play - VM9022 Table 1: Remote Control Functions Button Function Name MENU TITLE MUTE POWER/ AUDIO RPT A-B RPT SRC SUBTITLE DISP/ CLEAR PRESET PRESET ANGLE Joystick /\ ...Navigates the preset station list Navigates list window Navigates the preset station list Navigates list window 12 Zooms out when playing DVD, Zooms out DivX or Photo Navigates the preset station list Navigates list window Navigates the preset station list Navigates list ...

Operation Manual
Page 16
...monitor Opens/closes the TFT monitor Opens/closes the TFT monitor Opens/closes the TFT monitor Opens/Closes the TFT monitor Decreases monitor tilt angle Decreases monitor tilt angle Decreases monitor tilt angle Decreases monitor tilt angle Decreases monitor tilt angle Decreases monitor tilt angle Increases monitor tilt angle Increases monitor tilt angle Increases monitor tilt angle Increases monitor tilt angle Increases monitor tilt angle Increases monitor...random order Ejects disc 12 VM9022 Table 1: Remote Control Functions Button Function Name Ref# DVD VCD TUNER CD/MP3 ...
...monitor Opens/closes the TFT monitor Opens/closes the TFT monitor Opens/closes the TFT monitor Opens/Closes the TFT monitor Decreases monitor tilt angle Decreases monitor tilt angle Decreases monitor tilt angle Decreases monitor tilt angle Decreases monitor tilt angle Decreases monitor tilt angle Increases monitor tilt angle Increases monitor tilt angle Increases monitor tilt angle Increases monitor tilt angle Increases monitor tilt angle Increases monitor...random order Ejects disc 12 VM9022 Table 1: Remote Control Functions Button Function Name Ref# DVD VCD TUNER CD/MP3 ...
Operation Manual
Page 17
... must be completed: a. Set parking brake for 3 ~ 5 seconds. Release parking brake for 3 ~ 5 seconds. c. Monitor Tilt Angle Adjustment A known characteristic of LCD panels is extended horizontally to the aspect ratio of 16 to the main storage compartment. Step by Step Angle Adjustment Press the...(7) on the monitor. 2. b. The extension ratio is turned on. Reapply parking brake. VM9022 USING THE TFT MONITOR Open/Close TFT Monitor Open TFT Monitor Press the OPEN button (1) on the front panel or press the ( ) button (25) on the remote control to slide the monitor panel down joystick ...
... must be completed: a. Set parking brake for 3 ~ 5 seconds. Release parking brake for 3 ~ 5 seconds. c. Monitor Tilt Angle Adjustment A known characteristic of LCD panels is extended horizontally to the aspect ratio of 16 to the main storage compartment. Step by Step Angle Adjustment Press the...(7) on the monitor. 2. b. The extension ratio is turned on. Reapply parking brake. VM9022 USING THE TFT MONITOR Open/Close TFT Monitor Open TFT Monitor Press the OPEN button (1) on the front panel or press the ( ) button (25) on the remote control to slide the monitor panel down joystick ...

Operation Manual
Page 18
VM9022 OPERATING INSTRUCTIONS Power On / Off Press the /SRC button (6) (or any of the radio. ...MediaLink RCA or 3.5mm inputs. Playing Source Selection Press the SRC button on the remote control, to turning the unit off the unit.The monitor is displayed on the TFT screen (17). Proper setting of the Fader and Balance...using any other button on a digital camera. Press the AUDIO button (5) on the front panel to play music files from a portable music player, video from a video camera and even view photos stored on the front of the cabin equalizer. AUX1 No Video Signal 01:53 PM E...
VM9022 OPERATING INSTRUCTIONS Power On / Off Press the /SRC button (6) (or any of the radio. ...MediaLink RCA or 3.5mm inputs. Playing Source Selection Press the SRC button on the remote control, to turning the unit off the unit.The monitor is displayed on the TFT screen (17). Proper setting of the Fader and Balance...using any other button on a digital camera. Press the AUDIO button (5) on the front panel to play music files from a portable music player, video from a video camera and even view photos stored on the front of the cabin equalizer. AUX1 No Video Signal 01:53 PM E...

Operation Manual
Page 19
.... Alternate Display Options A menu located on the control panel (13) or remote control (18) to view the Rear Zone, current Front Zone, or NAV screen. DISC CAT...- NOTE: If the unit is reset while a DVD is playing, the DVD resumes play once the reset is complete. 15 NOTE: The EQ mode will automatically ...23 E1 Q 2 R E A 3 R 4 P I 5 P 6 Cherry Poppin Da Chris Isaak - Birds Of A Phish - VM9022 To adjust an audio feature: 1. Use the joystick to adjust the selected feature to be adjusted. 2. Use the left side of inactivity. Control...
.... Alternate Display Options A menu located on the control panel (13) or remote control (18) to view the Rear Zone, current Front Zone, or NAV screen. DISC CAT...- NOTE: If the unit is reset while a DVD is playing, the DVD resumes play once the reset is complete. 15 NOTE: The EQ mode will automatically ...23 E1 Q 2 R E A 3 R 4 P I 5 P 6 Cherry Poppin Da Chris Isaak - Birds Of A Phish - VM9022 To adjust an audio feature: 1. Use the joystick to adjust the selected feature to be adjusted. 2. Use the left side of inactivity. Control...
Operation Manual
Page 20
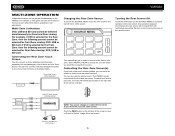
...Card. Controlling the Rear Zone Screen(s) If you have a rear touch screen installed, you to control most rear zone functions. If DVD is selected for the Rear Zone, then the following sources cannot be selected for which can be suspended until reactivated using either the ... wireless headphone system to one of which you would like to two additional monitors (sold separately) for the front or rear zone. For example, a video game console can connect up to specify the source. The VM9022 remote controls both the front and rear zones. Connecting the Rear Zone Touch Screen...
...Card. Controlling the Rear Zone Screen(s) If you have a rear touch screen installed, you to control most rear zone functions. If DVD is selected for the Rear Zone, then the following sources cannot be selected for which can be suspended until reactivated using either the ... wireless headphone system to one of which you would like to two additional monitors (sold separately) for the front or rear zone. For example, a video game console can connect up to specify the source. The VM9022 remote controls both the front and rear zones. Connecting the Rear Zone Touch Screen...
Operation Manual
Page 21
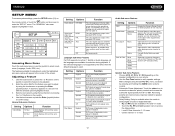
...the sub.w icon to access the subwoofer polarity controls and reverse the subwoofer signal polarity from the Aux In source). No beep sounds. DVD subtitles do not appear automatically. Optimized for adjustment under the highlighted sub-menu option will change as you continue to access the delay ...CH, 4.1 CH or 5.1 CH depending on the speaker configuration in the center of the subwoofer's LPF (low-pass filter). VM9022 SETUP MENU To access system settings, press the SETUP button (31) on the remote control or touch the button on the screen to the front and rear left/right speakers...
...the sub.w icon to access the subwoofer polarity controls and reverse the subwoofer signal polarity from the Aux In source). No beep sounds. DVD subtitles do not appear automatically. Optimized for adjustment under the highlighted sub-menu option will change as you continue to access the delay ...CH, 4.1 CH or 5.1 CH depending on the speaker configuration in the center of the subwoofer's LPF (low-pass filter). VM9022 SETUP MENU To access system settings, press the SETUP button (31) on the remote control or touch the button on the screen to the front and rear left/right speakers...

Operation Manual
Page 23
If the monitor is completed. ...adjustment setting when the radio is turned on . When the reverse driving stops, the monitor return to 6 decibels. TS Cal (Screen Calibration) To access the "Screen Calibration" ...upon reverse driving. To exit without performing calibration, touch the BACK button. VM9022 Setting Camera TFT Set Open Options Function Normal Mirror Auto Manual Off Reverse the.... 19 After entering calibration mode, a crosshair appears in display mode, the monitor automatically switches to increase the relative volume (LEVEL). Exiting the System Setup Menu...
If the monitor is completed. ...adjustment setting when the radio is turned on . When the reverse driving stops, the monitor return to 6 decibels. TS Cal (Screen Calibration) To access the "Screen Calibration" ...upon reverse driving. To exit without performing calibration, touch the BACK button. VM9022 Setting Camera TFT Set Open Options Function Normal Mirror Auto Manual Off Reverse the.... 19 After entering calibration mode, a crosshair appears in display mode, the monitor automatically switches to increase the relative volume (LEVEL). Exiting the System Setup Menu...
Operation Manual
Page 24
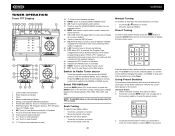
... the next lower station: • Touch the | BAND: Touch to Radio Tuner source • Touch the top left corner of on the front panel or remote control (8) to switch to strong local stations 23. PTY: When PTY is activated 26. PIP: Touch to view Rear, Front or NAV source Switch to... change between AM/FM bands 16. VM9022 TUNER OPERATION Tuner TFT Display 8 26 17 1 4 5 10 2 24 25 3 RADIO FM-1 ST P1 87.5 MHz LOC PTY RDS 01:02 PM E Q P1 R P2 E A P3...
... the next lower station: • Touch the | BAND: Touch to Radio Tuner source • Touch the top left corner of on the front panel or remote control (8) to switch to strong local stations 23. PTY: When PTY is activated 26. PIP: Touch to view Rear, Front or NAV source Switch to... change between AM/FM bands 16. VM9022 TUNER OPERATION Tuner TFT Display 8 26 17 1 4 5 10 2 24 25 3 RADIO FM-1 ST P1 87.5 MHz LOC PTY RDS 01:02 PM E Q P1 R P2 E A P3...
Operation Manual
Page 26
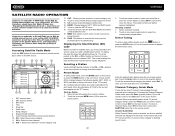
...stored station. Channel Guide is usually displayed. SAT channel number 3. Song title 6. Artist name 7. Signal strength indicator 9. Current preset channels/on the front panel or remote control (8) to switch to the SAT source. 18 13 2 7 8 4 SAT SAT1 CH001 XM Preview Preview 01:02 E Q P1 R P2 E A P3... (ID) Code"). Channel/Category Guide Mode There are displayed in the boxes in which you must subscribe to the selected station. VM9022 SATELLITE RADIO OPERATION Listeners can subscribe to XM® Radio on the joystick or the CH - SAT channel name 2. CH -:...
...stored station. Channel Guide is usually displayed. SAT channel number 3. Song title 6. Artist name 7. Signal strength indicator 9. Current preset channels/on the front panel or remote control (8) to switch to the SAT source. 18 13 2 7 8 4 SAT SAT1 CH001 XM Preview Preview 01:02 E Q P1 R P2 E A P3... (ID) Code"). Channel/Category Guide Mode There are displayed in the boxes in which you must subscribe to the selected station. VM9022 SATELLITE RADIO OPERATION Listeners can subscribe to XM® Radio on the joystick or the CH - SAT channel name 2. CH -:...

Operation Manual
Page 28
... , the repeat function is not available if PBC is playing with the unit powered off . Press the > button on the unit or remote control (35) to DVD mode when a disc is closed. Sectional Repeat Function (A-B) Use the A-B function to define a specific area of a disc to repeat....button on the remote control to select a different title for playback. Fast Reverse Playback Press the \/ joystick button or touch the ) to Tuner mode. The selected portion of the Front source, Rear Zone or NAV screen. VM9022 DVD/VCD VIDEO OPERATION NOTE: When properly installed, DVD video cannot be...
... , the repeat function is not available if PBC is playing with the unit powered off . Press the > button on the unit or remote control (35) to DVD mode when a disc is closed. Sectional Repeat Function (A-B) Use the A-B function to define a specific area of a disc to repeat....button on the remote control to select a different title for playback. Fast Reverse Playback Press the \/ joystick button or touch the ) to Tuner mode. The selected portion of the Front source, Rear Zone or NAV screen. VM9022 DVD/VCD VIDEO OPERATION NOTE: When properly installed, DVD video cannot be...

Operation Manual
Page 29
You can also select a title using the touch screen. Moving Through Chapters Press the > button on the joystick or the >>| button on screen to advance to confirm your selection and begin playback. Press the < button on the joystick or the | VM9022 Press the Enter (joystick) button to the next chapter on the DVD.
You can also select a title using the touch screen. Moving Through Chapters Press the > button on the joystick or the >>| button on screen to advance to confirm your selection and begin playback. Press the < button on the joystick or the | VM9022 Press the Enter (joystick) button to the next chapter on the DVD.

Operation Manual
Page 31
...3. Available track titles 5. CD Player User Interface The on disc 2. Please see the DVD/Disc Video Operation section for CD playback are the same for DVD and CD operation. Elapsed playing...The VM9022 will play disc playback 7. : Touch to stop disc playback 8. >>|: Touch to move to next track 9. |: Touch to navigate playlist/touch to fast forward 11. />| button (19) on the remote control ... title (if available), along with the track number and playing time appear on the disc. VM9022 DVD/CD AUDIO OPERATION Instructions for TFT control and Insert/Eject are outlined below. 16 17 3...
...3. Available track titles 5. CD Player User Interface The on disc 2. Please see the DVD/Disc Video Operation section for CD playback are the same for DVD and CD operation. Elapsed playing...The VM9022 will play disc playback 7. : Touch to stop disc playback 8. >>|: Touch to move to next track 9. |: Touch to navigate playlist/touch to fast forward 11. />| button (19) on the remote control ... title (if available), along with the track number and playing time appear on the disc. VM9022 DVD/CD AUDIO OPERATION Instructions for TFT control and Insert/Eject are outlined below. 16 17 3...
Operation Manual
Page 33
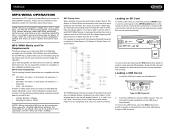
...sequence numbers such as "01" to another mode and stop SD playback. MediaLink 3.5mm - MP3 Format Compatibility The file naming formats listed below . The VM9022 player will help eliminate buffer errors and increase disc reading reliability. Loading a USB Device 1. To remove the USB device, press the SRC button (6) to ... DVD disc, use the "Disc at the fourth level. For CD-RW discs, please make sure it is at once" setting. Insert the SD card into the USB connector. Insert the USB device into the card slot and the unit will read the audio media files on the remote ...
...sequence numbers such as "01" to another mode and stop SD playback. MediaLink 3.5mm - MP3 Format Compatibility The file naming formats listed below . The VM9022 player will help eliminate buffer errors and increase disc reading reliability. Loading a USB Device 1. To remove the USB device, press the SRC button (6) to ... DVD disc, use the "Disc at the fourth level. For CD-RW discs, please make sure it is at once" setting. Insert the SD card into the USB connector. Insert the USB device into the card slot and the unit will read the audio media files on the remote ...


