Operation Manual
Page 1
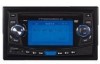
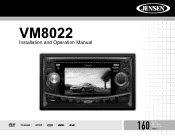
VM8022 Installation and Operation Manual Watts Peak 1 6 0 Watts en Crête Vatios el Máximo 40W x 4
VM8022 Installation and Operation Manual Watts Peak 1 6 0 Watts en Crête Vatios el Máximo 40W x 4
Operation Manual
Page 3
VM8022 TABLE OF CONTENTS Introduction 1 Installation 1 Wiring ...3 Remote Control 4 Operation 5 Tuner Operation 7 Disc/MP3/WMA Playback 8 System Setup Menu 10 USB/SD Operation 12 Care and Maintenance 15 Troubleshooting 16 Specifications 17 i
VM8022 TABLE OF CONTENTS Introduction 1 Installation 1 Wiring ...3 Remote Control 4 Operation 5 Tuner Operation 7 Disc/MP3/WMA Playback 8 System Setup Menu 10 USB/SD Operation 12 Care and Maintenance 15 Troubleshooting 16 Specifications 17 i
Operation Manual
Page 5
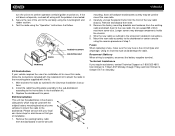
... unit is too small, carefully cut or file as necessary until the radio easily slides into the opening so the wiring can be lost. Follow the wiring diagram carefully and make sure the kit works with an onboard drive or navigation computer, do not disconnect the battery cable. Disconnect Battery Before you have trouble locating a kit or need installation assistance, contact Technical Support at electronics supply stores and car stereo...
... unit is too small, carefully cut or file as necessary until the radio easily slides into the opening so the wiring can be lost. Follow the wiring diagram carefully and make sure the kit works with an onboard drive or navigation computer, do not disconnect the battery cable. Disconnect Battery Before you have trouble locating a kit or need installation assistance, contact Technical Support at electronics supply stores and car stereo...
Operation Manual
Page 6
... step 1. ISO Installation This unit has threaded holes in the Universal Installation instructions. 5. Carefully unsnap the plastic frame from 9:00am to 5:00pm EST on ). VM8022 turn the unit on to confirm operation (vehicle ignition must be on Saturday. 2 Remove the existing factory radio from the existing radio and attach them to the new radio. Save all wiring until the problem is corrected. 3. Remove the factory mounting brackets and...
... step 1. ISO Installation This unit has threaded holes in the Universal Installation instructions. 5. Carefully unsnap the plastic frame from 9:00am to 5:00pm EST on ). VM8022 turn the unit on to confirm operation (vehicle ignition must be on Saturday. 2 Remove the existing factory radio from the existing radio and attach them to the new radio. Save all wiring until the problem is corrected. 3. Remove the factory mounting brackets and...
Operation Manual
Page 7
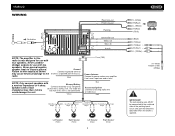
... radio wire or radio fuse. Blue Accessory/Ignition Connect to ground terminal or clean, unpainted part of chassis. VM8022 WIRING Parking NOTE: The amplifier in this radio is applied). Yellow Fuse (15A) Power Antenna Connect to chassis ground. Never combine (bridge) outputs for use with four speakers. Never ground negative speaker leads to power antenna or amplifier. The pink parking wire MUST be connected to the radio. Failure to wire exactly as shown may cause electrical damage to the switched...
... radio wire or radio fuse. Blue Accessory/Ignition Connect to ground terminal or clean, unpainted part of chassis. VM8022 WIRING Parking NOTE: The amplifier in this radio is applied). Yellow Fuse (15A) Power Antenna Connect to chassis ground. Never combine (bridge) outputs for use with four speakers. Never ground negative speaker leads to power antenna or amplifier. The pink parking wire MUST be connected to the radio. Failure to wire exactly as shown may cause electrical damage to the switched...
Operation Manual
Page 8
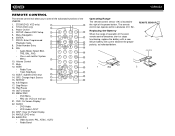
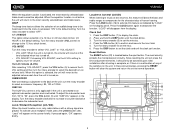
.... Volume Control 11. SUB.T: Subtitle (DVD only) 14. SRC: Change Input Source 15. Stop/Return 18. AUDIO • DVD Audio • VCD Audio L/R/ST 23. DISP: View On Panel Display 24. Replacing the Battery When the range of operation of the power button. Be sure to observe the proper polarity, as indicated below. REMOTE SENSOR (CR 2025) 1 2 4 SEEK • Radio Tune • Track Skip/Seek 13. REPEAT 16. SETUP: Access DVD Setup 5. Menu Navigation 6. PROG...
.... Volume Control 11. SUB.T: Subtitle (DVD only) 14. SRC: Change Input Source 15. Stop/Return 18. AUDIO • DVD Audio • VCD Audio L/R/ST 23. DISP: View On Panel Display 24. Replacing the Battery When the range of operation of the power button. Be sure to observe the proper polarity, as indicated below. REMOTE SENSOR (CR 2025) 1 2 4 SEEK • Radio Tune • Track Skip/Seek 13. REPEAT 16. SETUP: Access DVD Setup 5. Menu Navigation 6. PROG...
Operation Manual
Page 9
... temperatures for more than two seconds to turn the unit on the display panel. With the equalizer function activated, if bass or treble is adjusted, the volume level will return to the unit's audio output signal. Audio Mute Press the MUTE button (21) to OFF. 5 The following menu options: EQ MODE, BEEP, 12/24 MODE (clock), VOL MODE, A-VOL, SUBWOOFER, SUB VOL. In addition, the visibility of operation, as a number ranging from "0" (lowest) to move through...
... temperatures for more than two seconds to turn the unit on the display panel. With the equalizer function activated, if bass or treble is adjusted, the volume level will return to the unit's audio output signal. Audio Mute Press the MUTE button (21) to OFF. 5 The following menu options: EQ MODE, BEEP, 12/24 MODE (clock), VOL MODE, A-VOL, SUBWOOFER, SUB VOL. In addition, the visibility of operation, as a number ranging from "0" (lowest) to move through...
Operation Manual
Page 10
... confirm and move to set function. Turn the rotary encoder to the hour field. 5. Press the DISP button to normal operation. 18 20 VM8022 21 VOL 22 LOUD LO/DX AS SD/MMC 1/ 2 INT 3 RPT 4 RDM 5 6 23 6 Since resetting the unit will return to decrease the subwoofer level. In these circumstances, pressing the RESET button will appear on , only radio stations with a strong signal are played.
... confirm and move to set function. Turn the rotary encoder to the hour field. 5. Press the DISP button to normal operation. 18 20 VM8022 21 VOL 22 LOUD LO/DX AS SD/MMC 1/ 2 INT 3 RPT 4 RDM 5 6 23 6 Since resetting the unit will return to decrease the subwoofer level. In these circumstances, pressing the RESET button will appear on , only radio stations with a strong signal are played.
Operation Manual
Page 11
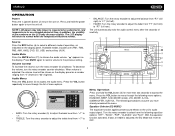
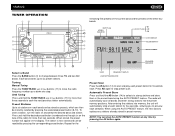
VM8022 21 VOL 22 LOUD LO/DX AS SD/MMC 1/ 2 INT 3 RPT 4 RDM 5 6 23 STEREO INDICATOR FM1: 98.10 MHZ 3 PRESETNUMBER EQUALIZER INDICATOR Select a Band Press the BAND button (3) to six preset stations. Each band stores up to change between three FM and two AM bands. Tuning Manual Tuning Press the TUNE/TRACK >>| or |>| or | VM8022 TUNER OPERATION remaining five presets on the current band and for presets on the other four 18 20 bands.
VM8022 21 VOL 22 LOUD LO/DX AS SD/MMC 1/ 2 INT 3 RPT 4 RDM 5 6 23 STEREO INDICATOR FM1: 98.10 MHZ 3 PRESETNUMBER EQUALIZER INDICATOR Select a Band Press the BAND button (3) to six preset stations. Each band stores up to change between three FM and two AM bands. Tuning Manual Tuning Press the TUNE/TRACK >>| or |>| or | VM8022 TUNER OPERATION remaining five presets on the current band and for presets on the other four 18 20 bands.
Operation Manual
Page 12
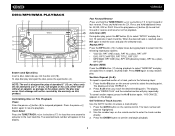
... the remote control to suspend playback. The track number will show "REPEAT A-". 2. Intro Scan (INT) During disc play, press the INT button (9) to select "RANDOM" and play the selected track. The display will become highlighted. 2. Use the number keys on this unit, either with or without an adaptor, as damage to end the scan and play all tracks/files in this product. Controlling Disc or File...
... the remote control to suspend playback. The track number will show "REPEAT A-". 2. Intro Scan (INT) During disc play, press the INT button (9) to select "RANDOM" and play the selected track. The display will become highlighted. 2. Use the number keys on this unit, either with or without an adaptor, as damage to end the scan and play all tracks/files in this product. Controlling Disc or File...
Operation Manual
Page 13
... the fields on the remote control to access the VCD menu. • Use the TUNE/TRACK >>| or | Press the >/|| button (8) or highlight "PLAY" on screen and then press ENTER to access the pro- Use the number buttons on the remote control to begin playback in each field. 4. Press PROG to enter a track number in the numbered order indicated. VCD PlayBack Control (VCD Only) If you...
... the fields on the remote control to access the VCD menu. • Use the TUNE/TRACK >>| or | Press the >/|| button (8) or highlight "PLAY" on screen and then press ENTER to access the pro- Use the number buttons on the remote control to begin playback in each field. 4. Press PROG to enter a track number in the numbered order indicated. VCD PlayBack Control (VCD Only) If you...
Operation Manual
Page 14
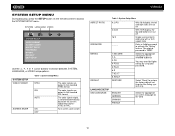
Table 1: System Setup Menu SYSTEM SETUP VIDEO FORMAT NTSC PAL AUTO SCREEN SAVER ON OFF The color signals are output in the standard NTSC format. Turn screen saver on the remote control to restore the factory default settings for the intended audience. Enter a 4-digit password to choose between SYSTEM, LANGUAGE, or VIDEO setup options. SYSTEM SETUP MENU During disc play, press the SETUP button on /off. The color signals are output in the standard PAL format. The color signal output is switched automatically based on...
Table 1: System Setup Menu SYSTEM SETUP VIDEO FORMAT NTSC PAL AUTO SCREEN SAVER ON OFF The color signals are output in the standard NTSC format. Turn screen saver on the remote control to restore the factory default settings for the intended audience. Enter a 4-digit password to choose between SYSTEM, LANGUAGE, or VIDEO setup options. SYSTEM SETUP MENU During disc play, press the SETUP button on /off. The color signals are output in the standard PAL format. The color signal output is switched automatically based on...
Operation Manual
Page 15
... the DVD If you are watching a disc recorded in multiple languages NOTE: Languages are DVD dependent and not all languages may be supported.. Choose the language you would like subtitles to appear in (if available) NOTE: Subtitles are DVD dependent and not all languages may be displayed. 12 - 0 12 - 0 +6 to -6 12 - 0 8 - 0 Use the / cursor buttons to set the video output options EXIT SETUP 11...
... the DVD If you are watching a disc recorded in multiple languages NOTE: Languages are DVD dependent and not all languages may be supported.. Choose the language you would like subtitles to appear in (if available) NOTE: Subtitles are DVD dependent and not all languages may be displayed. 12 - 0 12 - 0 +6 to -6 12 - 0 8 - 0 Use the / cursor buttons to set the video output options EXIT SETUP 11...
Operation Manual
Page 16
..., USB Device using the buttons on the code list may be entered and displayed. Depending on this unit. NOTE: This unit supports FAT 16 and FAT 32 file systems. The unit supports USB 1.1 only, but will also play correctly. Acceptable Medium Formats The following limitations: • Maximum number of nested folders: 8 • Maximum number of files per disc: 999 • Maximum number of software are limited. Entering ID3 Tag This unit supports ID3...
..., USB Device using the buttons on the code list may be entered and displayed. Depending on this unit. NOTE: This unit supports FAT 16 and FAT 32 file systems. The unit supports USB 1.1 only, but will also play correctly. Acceptable Medium Formats The following limitations: • Maximum number of nested folders: 8 • Maximum number of files per disc: 999 • Maximum number of software are limited. Entering ID3 Tag This unit supports ID3...

Operation Manual
Page 17
To remove the USB device, press the SRC button (6) to switch to another mode and stop SD playback. The unit will read the files on the USB device automatically. Loading an SD Card Insert the SD card into the USB jack. The VM8022 player will display folders 3, 4, 6, and 8, but not 2 and 7 since it out, then remove the card. You may not match the order in which...
To remove the USB device, press the SRC button (6) to switch to another mode and stop SD playback. The unit will read the files on the USB device automatically. Loading an SD Card Insert the SD card into the USB jack. The VM8022 player will display folders 3, 4, 6, and 8, but not 2 and 7 since it out, then remove the card. You may not match the order in which...

Operation Manual
Page 18
... screen using the following screen appears: Folder Name File Name Folder List File List Category List The category, folder or file list is displayed. 14 VM8022 The item currently selected will appear highlighted. Use the / cursor buttons to highlight the media type, and then press ENTER to select a folder. 3. File Playback When a disc or device (SD, USB) containing individual music, video and/or photo files is inserted, the following buttons: AUDIO PICTURE VIDEO...
... screen using the following screen appears: Folder Name File Name Folder List File List Category List The category, folder or file list is displayed. 14 VM8022 The item currently selected will appear highlighted. Use the / cursor buttons to highlight the media type, and then press ENTER to select a folder. 3. File Playback When a disc or device (SD, USB) containing individual music, video and/or photo files is inserted, the following buttons: AUDIO PICTURE VIDEO...
Operation Manual
Page 19
... playback and deterioration of your software's recommended procedures for long periods. 5. We recommend using the player. 3. Please follow these guidelines to direct sunlight, high temperatures or high humidity for closing a disc/session. This unit does not support .WAV, .OGG or other formats. Do not expose discs to take care of sound quality. The DVD player will help you extend the life of...
... playback and deterioration of your software's recommended procedures for long periods. 5. We recommend using the player. 3. Please follow these guidelines to direct sunlight, high temperatures or high humidity for closing a disc/session. This unit does not support .WAV, .OGG or other formats. Do not expose discs to take care of sound quality. The DVD player will help you extend the life of...
Operation Manual
Page 20
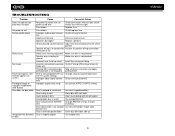
... audio output Blows fuses No image Flashing image or interference appears on screen Prolonged image or improper height/width ratio display Disc does not play back Image blurred, distorted, or dark Cause Corrective Action No power to red wire Check connection with test light; Check wiring and correct tion Volume set too low Increase volume level Speakers damaged Replace speakers Heavily biased volume balance Adjust the channel balance to ground Make sure wire is not compatible with cur- fuse too small Install fuse...
... audio output Blows fuses No image Flashing image or interference appears on screen Prolonged image or improper height/width ratio display Disc does not play back Image blurred, distorted, or dark Cause Corrective Action No power to red wire Check connection with test light; Check wiring and correct tion Volume set too low Increase volume level Speakers damaged Replace speakers Heavily biased volume balance Adjust the channel balance to ground Make sure wire is not compatible with cur- fuse too small Install fuse...
Operation Manual
Page 21
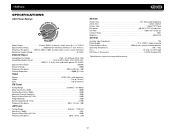
VM8022 SPECIFICATIONS CEA Power Ratings Power Output 13 watts RMS X 4 channels into 4-ohms @ < 1% THD+N Signal to Noise Ratio 70dBA below reference (reference: 1 watt, 4-ohms) Frequency Response . . . . . 20Hz to 20kHz (-3dB), Auxiliary input used as source reference Reference Supply Voltage 14.4VDC DVD/CD Player Compatible Disc Media DVD + R / RW and CD-R / RW Compatible Media Formats CD-DA, MP3, WMA, VCD, SVCD, AVI MPEG1 / 2, XviD, DivX and Kodak picture CD (JPEG...
VM8022 SPECIFICATIONS CEA Power Ratings Power Output 13 watts RMS X 4 channels into 4-ohms @ < 1% THD+N Signal to Noise Ratio 70dBA below reference (reference: 1 watt, 4-ohms) Frequency Response . . . . . 20Hz to 20kHz (-3dB), Auxiliary input used as source reference Reference Supply Voltage 14.4VDC DVD/CD Player Compatible Disc Media DVD + R / RW and CD-R / RW Compatible Media Formats CD-DA, MP3, WMA, VCD, SVCD, AVI MPEG1 / 2, XviD, DivX and Kodak picture CD (JPEG...
Operation Manual
Page 23
... obtain repair or replacement within the U.S.A., Puerto Rico or Canada. • Please package the product securely to quality and customer service, and are not covered by improper installation, mishandling, misuse, neglect, accident, blown fuse, battery leakage, theft or improper storage • Products whose factory serial number/bar code label(s) or markings have other express warranties or liabilities. We recommend using a carrier...
... obtain repair or replacement within the U.S.A., Puerto Rico or Canada. • Please package the product securely to quality and customer service, and are not covered by improper installation, mishandling, misuse, neglect, accident, blown fuse, battery leakage, theft or improper storage • Products whose factory serial number/bar code label(s) or markings have other express warranties or liabilities. We recommend using a carrier...


