Operation Manual
Page 5
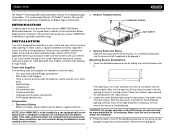
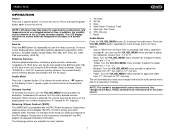
... will be lost. Make sure the unit is designed for the radio chassis. 2. Disconnect Battery Before you have trouble locating a kit or need installation assistance, contact Technical Support at electronics supply stores and car stereo specialty shops. INSTALLATION This unit is mounted within 20° of the tabs outward as necessary until the sleeve easily slides into the dashboard opening . Follow the wiring diagram 1 Do not...
... will be lost. Make sure the unit is designed for the radio chassis. 2. Disconnect Battery Before you have trouble locating a kit or need installation assistance, contact Technical Support at electronics supply stores and car stereo specialty shops. INSTALLATION This unit is mounted within 20° of the tabs outward as necessary until the sleeve easily slides into the dashboard opening . Follow the wiring diagram 1 Do not...
Operation Manual
Page 6
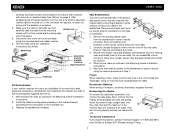
... factory mounting brackets of step 1. Fuses When replacing a fuse, make certain all connections are inserted at 1-800-323-4815 from the existing radio and attach them to the mounting plate supplied with wire nuts or electrical tape. Removing the Radio To remove the radio after installation, first remove the face plate. Test the radio using the "Operation" instructions that follow the instructions included with the installation kit to attach the radio to the new radio. Wire...
... factory mounting brackets of step 1. Fuses When replacing a fuse, make certain all connections are inserted at 1-800-323-4815 from the existing radio and attach them to the mounting plate supplied with wire nuts or electrical tape. Removing the Radio To remove the radio after installation, first remove the face plate. Test the radio using the "Operation" instructions that follow the instructions included with the installation kit to attach the radio to the new radio. Wire...
Operation Manual
Page 7
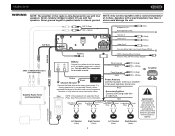
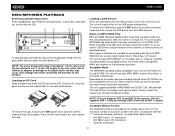
... unit. SAT BUS SAT R (Red) SAT L (White) Antenna Fuse (15A) Subwoofer Out Parking Brake (Pink) (Blue) Camera In Video Out 1 (Yellow) (Yellow) Video Out 2 (Yellow) Camera/Active High Level Input (Green/White) + SWC (Steering Wheel Control) (Requires PAC SWI-PS Interface Adapter) IPOD BUS () (+) JXMC or XMDJEN100 Cables (sold separately) Satellite Radio Tuner (sold separately) jLink iPod Cable (Included) - Left Speaker (Front) Right Speaker (Front) Left Speaker (Rear) Right Speaker (Rear) 3 The pink parking wire MUST be connected for use...
... unit. SAT BUS SAT R (Red) SAT L (White) Antenna Fuse (15A) Subwoofer Out Parking Brake (Pink) (Blue) Camera In Video Out 1 (Yellow) (Yellow) Video Out 2 (Yellow) Camera/Active High Level Input (Green/White) + SWC (Steering Wheel Control) (Requires PAC SWI-PS Interface Adapter) IPOD BUS () (+) JXMC or XMDJEN100 Cables (sold separately) Satellite Radio Tuner (sold separately) jLink iPod Cable (Included) - Left Speaker (Front) Right Speaker (Front) Left Speaker (Rear) Right Speaker (Rear) 3 The pink parking wire MUST be connected for use...
Operation Manual
Page 10
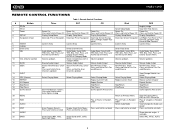
... Power Off Display Setup Menu Down/Up: Screen Navigation; Press and hold to Previous Menu Play all Chapters in Random Order View/Change disc Audio Language Press and hold to Power Off Display Setup Menu Down/Up: Screen Navigation Confirm Entry Magnify Image View DVD Title Screen Power On; Press and hold to set clock Select Playing Mode Display Direct Entry Menu; VM8013HD REMOTE CONTROL FUNCTIONS # Button 1 ZOOM 2 TITLE 3 Power 4 SETUP 5 Navigation Arrows 6 ENTER 7 CLEAR 8 Direct Entry 9 SEL 10 VOL (Volume Control) 11 MUTE 12 SEEK 13 SUB.T 14 SRC (Source...
... Power Off Display Setup Menu Down/Up: Screen Navigation; Press and hold to Previous Menu Play all Chapters in Random Order View/Change disc Audio Language Press and hold to Power Off Display Setup Menu Down/Up: Screen Navigation Confirm Entry Magnify Image View DVD Title Screen Power On; Press and hold to set clock Select Playing Mode Display Direct Entry Menu; VM8013HD REMOTE CONTROL FUNCTIONS # Button 1 ZOOM 2 TITLE 3 Power 4 SETUP 5 Navigation Arrows 6 ENTER 7 CLEAR 8 Direct Entry 9 SEL 10 VOL (Volume Control) 11 MUTE 12 SEEK 13 SUB.T 14 SRC (Source...
Operation Manual
Page 11
... range. Select "SOURCE >> AUX IN" to the A/V IN inputs. Audio Mute Press the (power) button (1) to the previous setting. Press (power) again to restore volume to silence the audio volume. Mute 4. can use the VOL/SEL/MENU rotary encoder to adjust the subwoofer volume from "-14" to "0". • Bass: Turn the VOL/SEL/MENU rotary encoder (2) to adjust the bass level from "+7" to "-7". • Treble: Turn the VOL/SEL/MENU rotary encoder to adjust the treble level from "+7" to "-7". • Balance: Turn the...
... range. Select "SOURCE >> AUX IN" to the A/V IN inputs. Audio Mute Press the (power) button (1) to the previous setting. Press (power) again to restore volume to silence the audio volume. Mute 4. can use the VOL/SEL/MENU rotary encoder to adjust the subwoofer volume from "-14" to "0". • Bass: Turn the VOL/SEL/MENU rotary encoder (2) to adjust the bass level from "+7" to "-7". • Treble: Turn the VOL/SEL/MENU rotary encoder to adjust the treble level from "+7" to "-7". • Balance: Turn the...
Operation Manual
Page 12
... a turn -on volume level. Loud Set When listening to music at the level selected when last turned off. • Adjust: If choosing "Adjust", use the A-VOL setting to be adjusted. Turn the rotary encoder to darken the screen completely. "U.S.A." Turn the VOL/SEL/MENU rotary encoder (2) to set the minutes. 3. With the equalizer function activated, if bass or treble is activated, the most recently selected bass and treble levels. When the equalizer function is adjusted, the EQ Mode will selectively boost certain bass and treble frequencies. VM8013HD Menu Operation...
... a turn -on volume level. Loud Set When listening to music at the level selected when last turned off. • Adjust: If choosing "Adjust", use the A-VOL setting to be adjusted. Turn the rotary encoder to darken the screen completely. "U.S.A." Turn the VOL/SEL/MENU rotary encoder (2) to set the minutes. 3. With the equalizer function activated, if bass or treble is activated, the most recently selected bass and treble levels. When the equalizer function is adjusted, the EQ Mode will selectively boost certain bass and treble frequencies. VM8013HD Menu Operation...
Operation Manual
Page 13
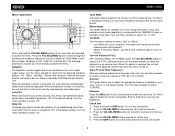
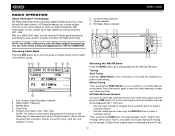
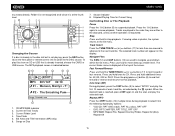
VM8013HD Reset Button The RESET button (22) is a malfunction of any of the switches on the unit. Resetting the unit will clear the system and return the unit to default operation. 20 22 21 9 It should only be activated upon initial installation after all wiring is complete, or if there is located behind the front panel and can only be accessed with the front panel removed. In these circumstances, pressing the RESET button will erase the time and preset memories.
VM8013HD Reset Button The RESET button (22) is a malfunction of any of the switches on the unit. Resetting the unit will clear the system and return the unit to default operation. 20 22 21 9 It should only be activated upon initial installation after all wiring is complete, or if there is located behind the front panel and can only be accessed with the front panel removed. In these circumstances, pressing the RESET button will erase the time and preset memories.
Operation Manual
Page 14
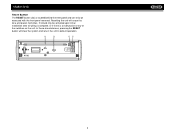
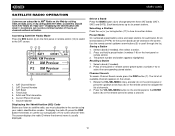
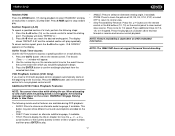
... XM Preview P2 XM Preview 01:02 AM Title: www.xmradio.com 5 6 1. Current Preset Channels 7. Accessing Satellite Radio Mode Press the SRC button (6) on the front panel or remote control (14) to switch to XM® Radio on the Web by visiting www.xmradio.com, or by calling (800) 967-2346. VM8013HD SATELLITE RADIO OPERATION Listeners can receive a limited number of free-to the service using your radio's identification number. SAT Band 4.
... XM Preview P2 XM Preview 01:02 AM Title: www.xmradio.com 5 6 1. Current Preset Channels 7. Accessing Satellite Radio Mode Press the SRC button (6) on the front panel or remote control (14) to switch to XM® Radio on the Web by visiting www.xmradio.com, or by calling (800) 967-2346. VM8013HD SATELLITE RADIO OPERATION Listeners can receive a limited number of free-to the service using your radio's identification number. SAT Band 4.

Operation Manual
Page 15
... the screen. 4. The list of stations in the selected category. 5. A list of available categories appears on the front panel (7) or remote control (23) three times to navigate the list of categories. 3. Press the VOL/SEL/MENU button on the control panel or the ENTER button (6) on the remote control to the channel.) 5. Direct Channel Input 1. Press the VOL/SEL/MENU button to tune to select the third digit of the desired channel (0-9). 2. Turn the...
... the screen. 4. The list of stations in the selected category. 5. A list of available categories appears on the front panel (7) or remote control (23) three times to navigate the list of categories. 3. Press the VOL/SEL/MENU button on the control panel or the ENTER button (6) on the remote control to the channel.) 5. Direct Channel Input 1. Press the VOL/SEL/MENU button to tune to select the third digit of the desired channel (0-9). 2. Turn the...
Operation Manual
Page 16
... AM stations offer HD Radio (digital) broadcasting. Time/Clock 5. Accessing Radio Mode Press the SRC button (6) on the same frequency, which is being broadcast. Source Indicator 8. Tuning Seek Tuning Press the TUNE/TRACK >>| or |>| or | HD Radio broadcasts can include multiple channels on the front panel or remote control (14) to switch to eight additional multicast channels: HD1~HD8. With multicasting, you will receive HD Radio digital broadcasts automatically when tuned to a station...
... AM stations offer HD Radio (digital) broadcasting. Time/Clock 5. Accessing Radio Mode Press the SRC button (6) on the same frequency, which is being broadcast. Source Indicator 8. Tuning Seek Tuning Press the TUNE/TRACK >>| or |>| or | HD Radio broadcasts can include multiple channels on the front panel or remote control (14) to switch to eight additional multicast channels: HD1~HD8. With multicasting, you will receive HD Radio digital broadcasts automatically when tuned to a station...
Operation Manual
Page 17
Program Search To view the Program Type categories when listening to find similar programming by genre. Use the TUNE/TRACK >>| or | Program type categories are listed, allowing listeners to HD Radio broadcasting, press the DISP button on the control panel (7) or remote control (23). VM8013HD will revert to Analog reception. If the digital signal becomes unavailable, the unit will illuminate. When a Program Type category is selected, the radio will start scanning for stations broadcasting in the selected category.
Program Search To view the Program Type categories when listening to find similar programming by genre. Use the TUNE/TRACK >>| or | Program type categories are listed, allowing listeners to HD Radio broadcasting, press the DISP button on the control panel (7) or remote control (23). VM8013HD will revert to Analog reception. If the digital signal becomes unavailable, the unit will illuminate. When a Program Type category is selected, the radio will start scanning for stations broadcasting in the selected category.
Operation Manual
Page 18
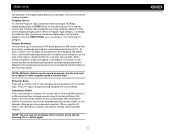
... eject button (21). The unit will read the files on the receiver (or remote control) as damage to use full format rather than quick format to SD Cards, USB Devices. When using the buttons on the card automatically. To remove the card, first press the SRC button (6) to switch to pop it out, then remove the card. The unit will also play MP3/WMA and video directly from the USB connector...
... eject button (21). The unit will read the files on the receiver (or remote control) as damage to use full format rather than quick format to SD Cards, USB Devices. When using the buttons on the card automatically. To remove the card, first press the SRC button (6) to switch to pop it out, then remove the card. The unit will also play MP3/WMA and video directly from the USB connector...
Operation Manual
Page 20
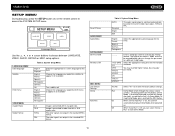
... the fourth level. 1 2 SRC BAND iPod Menu DISP CH/ CAT DIM PGM VM8013HD INT 1 2 RPT RDM 3 4 DN UP 5 6 18 A/V IN Changing the Source If a disc is already in the order they are written to the file menu. Current of each track/file, as indicated by the symbol. Elapsed Playing Time for Current Song Controlling Disc or File Playback Pause Press the 1/>/|| button (8) to...
... the fourth level. 1 2 SRC BAND iPod Menu DISP CH/ CAT DIM PGM VM8013HD INT 1 2 RPT RDM 3 4 DN UP 5 6 18 A/V IN Changing the Source If a disc is already in the order they are written to the file menu. Current of each track/file, as indicated by the symbol. Elapsed Playing Time for Current Song Controlling Disc or File Playback Pause Press the 1/>/|| button (8) to...
Operation Manual
Page 21
...: You cannot view video while driving the car. GOTO Track Time Access Use the GOTO function to turn playback control on the control panel to display the title or chapter list. The display will appear. 2. To cancel section repeat, press the A->B button again. "A-B CANCEL" appears on the remote control. Additional DVD/Video Playback Features • ANGLE: Press to select an alternate viewing angle, if available. • ZOOM: Press to play . When...
...: You cannot view video while driving the car. GOTO Track Time Access Use the GOTO function to turn playback control on the control panel to display the title or chapter list. The display will appear. 2. To cancel section repeat, press the A->B button again. "A-B CANCEL" appears on the remote control. Additional DVD/Video Playback Features • ANGLE: Press to select an alternate viewing angle, if available. • ZOOM: Press to play . When...
Operation Manual
Page 22
... remote control (12) for 1 second and continue to the radio TFT screen. NOTE: Be sure your iPod has the latest Apple firmware installed to navigate the iPod menus. iPod Music Playback The iPod music menu is automatically accessed when an iPod is connected to the unit or the source is changed to iPod while the iPod is plugged into the iPod cable. You can also press and hold for Photo/Video Support. Compatible with iPod 5 or 5.5, iPod Classic, iPod...
... remote control (12) for 1 second and continue to the radio TFT screen. NOTE: Be sure your iPod has the latest Apple firmware installed to navigate the iPod menus. iPod Music Playback The iPod music menu is automatically accessed when an iPod is connected to the unit or the source is changed to iPod while the iPod is plugged into the iPod cable. You can also press and hold for Photo/Video Support. Compatible with iPod 5 or 5.5, iPod Classic, iPod...
Operation Manual
Page 23
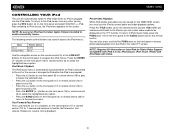
... format. VM8013HD SETUP MENU During disc play, press the SETUP button (4) on the remote control to a different 4-digit code. Smart Picture AUDIO MENU Audio Menu RATING MENU Set Password Parental CTR MISC MENU Use Default Settings Demo Auto Run 19 Table 2: System Setup Menu AUTO Standard Bright Soft The color signal output is Off, you can select "Demo > Run" to appear in yellow text (below the clock), to restore the factory default settings. When "Auto Run" is switched automatically based on the current video input signal...
... format. VM8013HD SETUP MENU During disc play, press the SETUP button (4) on the remote control to a different 4-digit code. Smart Picture AUDIO MENU Audio Menu RATING MENU Set Password Parental CTR MISC MENU Use Default Settings Demo Auto Run 19 Table 2: System Setup Menu AUTO Standard Bright Soft The color signal output is Off, you can select "Demo > Run" to appear in yellow text (below the clock), to restore the factory default settings. When "Auto Run" is switched automatically based on the current video input signal...
Operation Manual
Page 25
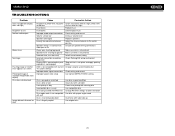
... Disc region code is not compatible with unit Disc is inserted upside down Disc is not pinched Install fuse of car Power wire shorting to ground Speaker wires shorting to yellow wire; check vehicle fuse with test light Replace fuse Check/replace fuse Check wiring and correct Increase volume level Replace speakers Adjust the channel balance to the center position Insulate all speaker wiring connections Make sure wire is not pinched Make sure wire is illegally copied Use disc in contact with test light; VM8013HD TROUBLESHOOTING Problem Does not operate (display does not light...
... Disc region code is not compatible with unit Disc is inserted upside down Disc is not pinched Install fuse of car Power wire shorting to ground Speaker wires shorting to yellow wire; check vehicle fuse with test light Replace fuse Check/replace fuse Check wiring and correct Increase volume level Replace speakers Adjust the channel balance to the center position Insulate all speaker wiring connections Make sure wire is not pinched Make sure wire is illegally copied Use disc in contact with test light; VM8013HD TROUBLESHOOTING Problem Does not operate (display does not light...
Operation Manual
Page 26
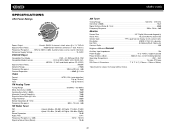
...;42.822mm(H) Screen Type TFT Liquid Crystal Display (LCD) active matrix Resolution 320(W) X 234 (H) sub pixels Dot Pitch 0.2385mm(W)×0.183mm(H) Contrast Ratio 350 Brightness400cd/m2General Auxiliary Input Impedance 10k Power Supply 11 to 16VDC, negative ground Power Antenna (Blue 500mA max, current limited protection Operating Temperature 20C ~ 65C Fuse 15-amp, ATO type DIN Chassis Dimensions 7" X 7" X 2" (178mm x 178mm x 50mm) *Specifications subject to change without notice...
...;42.822mm(H) Screen Type TFT Liquid Crystal Display (LCD) active matrix Resolution 320(W) X 234 (H) sub pixels Dot Pitch 0.2385mm(W)×0.183mm(H) Contrast Ratio 350 Brightness400cd/m2General Auxiliary Input Impedance 10k Power Supply 11 to 16VDC, negative ground Power Antenna (Blue 500mA max, current limited protection Operating Temperature 20C ~ 65C Fuse 15-amp, ATO type DIN Chassis Dimensions 7" X 7" X 2" (178mm x 178mm x 50mm) *Specifications subject to change without notice...
Operation Manual
Page 75
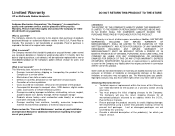
... the sale of this product. Limited Warranty CD or Multimedia Radios/Headunits Audiovox Electronics Corporation ("the Company") is committed to quality and customer service, and are not covered by improper installation, mishandling, misuse, neglect, accident, blown fuse, battery leakage, theft or improper storage • Products whose factory serial number/bar code label(s) or markings have other express warranties or...
... the sale of this product. Limited Warranty CD or Multimedia Radios/Headunits Audiovox Electronics Corporation ("the Company") is committed to quality and customer service, and are not covered by improper installation, mishandling, misuse, neglect, accident, blown fuse, battery leakage, theft or improper storage • Products whose factory serial number/bar code label(s) or markings have other express warranties or...
Quick Start Guide
Page 1
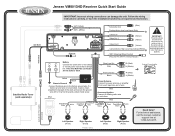
... experienced technician. Battery Connect the yellow wire to work. If a factory ground wire is not provided, locate a clean, unpainted metal part of wire. REAR Green/Black Stripe Red Green Purple/Black Purple Stripe External Power Amplifier Left Speaker (Front) Right Speaker (Front) Left Speaker (Rear) Right Speaker (Rear) Need help? SAT BUS SAT R (Red) SAT L (White) Antenna Fuse (15A) Subwoofer Out (Blue) Parking/Active Low Level Input (Pink) Camera In Video Out 1 (Yellow) (Yellow) Video Out 2 (Yellow) Camera/Active High Level Input (Green...
... experienced technician. Battery Connect the yellow wire to work. If a factory ground wire is not provided, locate a clean, unpainted metal part of wire. REAR Green/Black Stripe Red Green Purple/Black Purple Stripe External Power Amplifier Left Speaker (Front) Right Speaker (Front) Left Speaker (Rear) Right Speaker (Rear) Need help? SAT BUS SAT R (Red) SAT L (White) Antenna Fuse (15A) Subwoofer Out (Blue) Parking/Active Low Level Input (Pink) Camera In Video Out 1 (Yellow) (Yellow) Video Out 2 (Yellow) Camera/Active High Level Input (Green...


