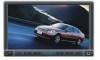
Operation Manual
Page 5
... the unit to installation. WARNING! WARNING! Remote Control with safe driving conditions. WARNING! This is to read all of the Phase Linear UV8020 Mobile Multimedia Receiver. WARNING! Never use the video display function while driving the vehicle. Screen Cleaning Cloth 6. To prevent damage...• Volt meter/test light • Crimp connections • 18 gauge wire for power connections • 16 - 18 gauge speaker wire WARNING! To reduce the risk of federal law. WARNING! Features DVD • Aspect Ratio - Using an improper fuse may be installed in the...
... the unit to installation. WARNING! WARNING! Remote Control with safe driving conditions. WARNING! This is to read all of the Phase Linear UV8020 Mobile Multimedia Receiver. WARNING! Never use the video display function while driving the vehicle. Screen Cleaning Cloth 6. To prevent damage...• Volt meter/test light • Crimp connections • 18 gauge wire for power connections • 16 - 18 gauge speaker wire WARNING! To reduce the risk of federal law. WARNING! Features DVD • Aspect Ratio - Using an improper fuse may be installed in the...

Operation Manual
Page 6
... radio. 2. Save all connections are secure and insulated with local, state and federal laws. Remove the Half Sleeve. 3. a. INSTALL HALF SLEEVE UV8020 TAB TAB DASHBOARD DASHBOARD 3. Longer screws may be used to bend or bow. Locate the series of bend-tabs along the top, bottom and ... SCREW Install Bracket Here BRACKET 4. Please consult with the original factory mounting brackets of the CD player, the chassis must be "on the rear of the dashboard opening so the wiring can be brought through the dash. Remove the existing factory radio from the dashboard or center console...
... radio. 2. Save all connections are secure and insulated with local, state and federal laws. Remove the Half Sleeve. 3. a. INSTALL HALF SLEEVE UV8020 TAB TAB DASHBOARD DASHBOARD 3. Longer screws may be used to bend or bow. Locate the series of bend-tabs along the top, bottom and ... SCREW Install Bracket Here BRACKET 4. Please consult with the original factory mounting brackets of the CD player, the chassis must be "on the rear of the dashboard opening so the wiring can be brought through the dash. Remove the existing factory radio from the dashboard or center console...

Operation Manual
Page 7
... an improper rating could damage the unit and cause a fire. Using a fuse with the UV8020 for installation flexibility. Once proper operation is located next to existing wiring harness. 2. The UV8020 will accept a Double-DIN chassis, but there is usually a small gap between the radio ...and dash piece after installation is corrected. After completing the wiring connections, turn off the ignition switch and proceed...
... an improper rating could damage the unit and cause a fire. Using a fuse with the UV8020 for installation flexibility. Once proper operation is located next to existing wiring harness. 2. The UV8020 will accept a Double-DIN chassis, but there is usually a small gap between the radio ...and dash piece after installation is corrected. After completing the wiring connections, turn off the ignition switch and proceed...
Operation Manual
Page 8
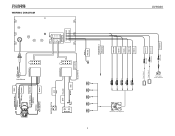
WIRING DIAGRAM Auto Antenna GREEN/BLACK(-) REAR L GREEN(+) WHITE/BLACK(-) WHITE(+) FRONT L GREY/BLACK(-) FRONT R GREY(+) PURPLE(+) PURPLE/BLACK(-) REAR R - BATTERY 4 IGNITION SWITCH ACC RED BATT YELLOW + BLACK GND ANT.CONT BLUE/WHITE PINK (-) PRK SW FILTER/FUSE (15A) External Power Amplifier BLUE RED WHITE RED WHITE GREEN/WHITE (+) REVERSE SUBWOOFER REAR R REAR L FRONT R FRONT L Rear Video 1 Rear Video 2 YELLOW VIDEO OUT 1 YELLOW VIDEO OUT 2 YELLOW CAMERA UV8020 Rear View Video Camera
WIRING DIAGRAM Auto Antenna GREEN/BLACK(-) REAR L GREEN(+) WHITE/BLACK(-) WHITE(+) FRONT L GREY/BLACK(-) FRONT R GREY(+) PURPLE(+) PURPLE/BLACK(-) REAR R - BATTERY 4 IGNITION SWITCH ACC RED BATT YELLOW + BLACK GND ANT.CONT BLUE/WHITE PINK (-) PRK SW FILTER/FUSE (15A) External Power Amplifier BLUE RED WHITE RED WHITE GREEN/WHITE (+) REVERSE SUBWOOFER REAR R REAR L FRONT R FRONT L Rear Video 1 Rear Video 2 YELLOW VIDEO OUT 1 YELLOW VIDEO OUT 2 YELLOW CAMERA UV8020 Rear View Video Camera
Operation Manual
Page 12
...at a time. Composite Video Baseband Signal Parking Brake Inhibit When the pink "Parking" wire is connected to the vehicle brake switch, the front TFT monitor will display video only ...control menu. TILT+ TILT - Table 2: Video Output Modes Playing Source Video Output Modes AM/FM TUNER RGB Mode DVD RGB Mode AUX IN CVBS Mode *CVBS - On-Screen Panel Controls Press and hold the ( ) or ( )... control to adjust the tilt angle in relationship to the source in use previously. 8 UV8020 When the vehicle is the quality of the display in a continuous motion. Monitor Tilt Angle...
...at a time. Composite Video Baseband Signal Parking Brake Inhibit When the pink "Parking" wire is connected to the vehicle brake switch, the front TFT monitor will display video only ...control menu. TILT+ TILT - Table 2: Video Output Modes Playing Source Video Output Modes AM/FM TUNER RGB Mode DVD RGB Mode AUX IN CVBS Mode *CVBS - On-Screen Panel Controls Press and hold the ( ) or ( )... control to adjust the tilt angle in relationship to the source in use previously. 8 UV8020 When the vehicle is the quality of the display in a continuous motion. Monitor Tilt Angle...
Operation Manual
Page 25
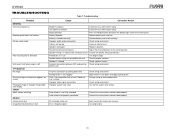
UV8020 TROUBLESHOOTING Table 7: Troubleshooting Problem GENERAL Unit will not power...battery with new one Battery installed incorrectly Remove battery and install correctly Improper audio output connection Check wiring and correct Volume set too low Increase volume level Speakers damaged Replace speakers Heavily biased volume ...shorted Check speaker contact Incorrect connection between ACC and positive Check wiring and correct battery wire Incorrect connection to parking brake wire Parking brake is not engaged DVD is not compatible with current "Video Format" settings Improper video...
UV8020 TROUBLESHOOTING Table 7: Troubleshooting Problem GENERAL Unit will not power...battery with new one Battery installed incorrectly Remove battery and install correctly Improper audio output connection Check wiring and correct Volume set too low Increase volume level Speakers damaged Replace speakers Heavily biased volume ...shorted Check speaker contact Incorrect connection between ACC and positive Check wiring and correct battery wire Incorrect connection to parking brake wire Parking brake is not engaged DVD is not compatible with current "Video Format" settings Improper video...


