Operation Manual
Page 5
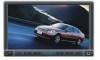
...8226; Directory Search (MP3 / WMA Only) • Direct Track Access via Remote Control • Burn up to 1500 MP3 and WMA Files onto a DVD+R / RW • Random, Repeat and Intro • Play, Pause, Stop, Next Track and Previous Track AM-FM • 30 Station Presets ...We recommend having your UV8020: • Torx type, flat-head and Philips screwdrivers • Wire cutters and strippers • Tools to moisture or water. To reduce the risk of the instructions before beginning the installation. Under these tools and supplies to install your Phase Linear UV8020 installed by a reputable...
...8226; Directory Search (MP3 / WMA Only) • Direct Track Access via Remote Control • Burn up to 1500 MP3 and WMA Files onto a DVD+R / RW • Random, Repeat and Intro • Play, Pause, Stop, Next Track and Previous Track AM-FM • 30 Station Presets ...We recommend having your UV8020: • Torx type, flat-head and Philips screwdrivers • Wire cutters and strippers • Tools to moisture or water. To reduce the risk of the instructions before beginning the installation. Under these tools and supplies to install your Phase Linear UV8020 installed by a reputable...

Operation Manual
Page 6
... screws). Remove the Half Sleeve. 3. Press the metal levers on "). a. INSTALL HALF SLEEVE UV8020 TAB TAB DASHBOARD DASHBOARD 3. Install sleeve into a 2.0 DIN dashboard opening so the wiring can be "on both sides to the dashboard or center console using the holes indicated below. ...ISO INSTALLATION CAUTION: For proper operation of the CD player, the chassis must be brought through the dash. b. ...
... screws). Remove the Half Sleeve. 3. Press the metal levers on "). a. INSTALL HALF SLEEVE UV8020 TAB TAB DASHBOARD DASHBOARD 3. Install sleeve into a 2.0 DIN dashboard opening so the wiring can be "on both sides to the dashboard or center console using the holes indicated below. ...ISO INSTALLATION CAUTION: For proper operation of the CD player, the chassis must be brought through the dash. b. ...

Operation Manual
Page 7
...negative terminal. Carefully slide the radio into place. Complete wiring as illustrated in the wiring diagram on to confirm operation (ignition switch must be present. 3 If there is complete. Connect antenna lead. 3. The UV8020 will fit into four holes on the trim ring will ... the ACC lead to the dash board/cavity. UV8020 CAUTION! Be careful not to existing wiring harness. 2. The 4 tabs on top and bottom of the chassis. 1. Connect wiring adapter to damage the car wiring. 5. After completing the wiring connections, turn off the ignition switch and proceed with...
...negative terminal. Carefully slide the radio into place. Complete wiring as illustrated in the wiring diagram on to confirm operation (ignition switch must be present. 3 If there is complete. Connect antenna lead. 3. The UV8020 will fit into four holes on the trim ring will ... the ACC lead to the dash board/cavity. UV8020 CAUTION! Be careful not to existing wiring harness. 2. The 4 tabs on top and bottom of the chassis. 1. Connect wiring adapter to damage the car wiring. 5. After completing the wiring connections, turn off the ignition switch and proceed with...
Operation Manual
Page 8
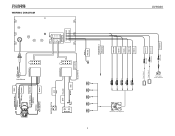
BATTERY 4 IGNITION SWITCH ACC RED BATT YELLOW + BLACK GND ANT.CONT BLUE/WHITE PINK (-) PRK SW FILTER/FUSE (15A) External Power Amplifier BLUE RED WHITE RED WHITE GREEN/WHITE (+) REVERSE SUBWOOFER REAR R REAR L FRONT R FRONT L Rear Video 1 Rear Video 2 YELLOW VIDEO OUT 1 YELLOW VIDEO OUT 2 YELLOW CAMERA UV8020 Rear View Video Camera WIRING DIAGRAM Auto Antenna GREEN/BLACK(-) REAR L GREEN(+) WHITE/BLACK(-) WHITE(+) FRONT L GREY/BLACK(-) FRONT R GREY(+) PURPLE(+) PURPLE/BLACK(-) REAR R -
BATTERY 4 IGNITION SWITCH ACC RED BATT YELLOW + BLACK GND ANT.CONT BLUE/WHITE PINK (-) PRK SW FILTER/FUSE (15A) External Power Amplifier BLUE RED WHITE RED WHITE GREEN/WHITE (+) REVERSE SUBWOOFER REAR R REAR L FRONT R FRONT L Rear Video 1 Rear Video 2 YELLOW VIDEO OUT 1 YELLOW VIDEO OUT 2 YELLOW CAMERA UV8020 Rear View Video Camera WIRING DIAGRAM Auto Antenna GREEN/BLACK(-) REAR L GREEN(+) WHITE/BLACK(-) WHITE(+) FRONT L GREY/BLACK(-) FRONT R GREY(+) PURPLE(+) PURPLE/BLACK(-) REAR R -
Operation Manual
Page 12
...TFT monitor will display video only when the parking brake is engaged. Composite Video Baseband Signal Parking Brake Inhibit When the pink "Parking" wire is taken out of reverse, the monitor returns to close the monitor panel. When the vehicle is connected to the viewing angle. Close ... the vehicle is connected, the monitor automatically switches to adjust the tilt angle in use previously. 8 UV8020 Table 2: Video Output Modes Playing Source Video Output Modes AM/FM TUNER RGB Mode DVD RGB Mode AUX IN CVBS Mode *CVBS - EXIT • TILT+: Touch repeatedly to tilt the ...
...TFT monitor will display video only when the parking brake is engaged. Composite Video Baseband Signal Parking Brake Inhibit When the pink "Parking" wire is taken out of reverse, the monitor returns to close the monitor panel. When the vehicle is connected to the viewing angle. Close ... the vehicle is connected, the monitor automatically switches to adjust the tilt angle in use previously. 8 UV8020 Table 2: Video Output Modes Playing Source Video Output Modes AM/FM TUNER RGB Mode DVD RGB Mode AUX IN CVBS Mode *CVBS - EXIT • TILT+: Touch repeatedly to tilt the ...
Operation Manual
Page 25
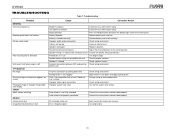
UV8020 TROUBLESHOOTING Table 7: Troubleshooting Problem GENERAL Unit will not power...battery with new one Battery installed incorrectly Remove battery and install correctly Improper audio output connection Check wiring and correct Volume set too low Increase volume level Speakers damaged Replace speakers Heavily biased volume ...shorted Check speaker contact Incorrect connection between ACC and positive Check wiring and correct battery wire Incorrect connection to parking brake wire Parking brake is not engaged DVD is not compatible with current "Video Format" settings Improper video...
UV8020 TROUBLESHOOTING Table 7: Troubleshooting Problem GENERAL Unit will not power...battery with new one Battery installed incorrectly Remove battery and install correctly Improper audio output connection Check wiring and correct Volume set too low Increase volume level Speakers damaged Replace speakers Heavily biased volume ...shorted Check speaker contact Incorrect connection between ACC and positive Check wiring and correct battery wire Incorrect connection to parking brake wire Parking brake is not engaged DVD is not compatible with current "Video Format" settings Improper video...


