Operation Manual
Page 2
... not put pressure on headphones always adjust the volume setting to the lowest position. • Remember to leave the dome light switch in a motor vehicle and visible to the driver if the LCD panel or video monitor is used for television reception, video or DVD play that these features ... is in "park" or when the vehicle's parking brake is applied. If the LCD panel or video monitor is designed primarily for television reception, video or DVD play , the LCD panel or video monitor must be installed to weak and variable signal strength. Television Reception This entertainment system is...
... not put pressure on headphones always adjust the volume setting to the lowest position. • Remember to leave the dome light switch in a motor vehicle and visible to the driver if the LCD panel or video monitor is used for television reception, video or DVD play that these features ... is in "park" or when the vehicle's parking brake is applied. If the LCD panel or video monitor is designed primarily for television reception, video or DVD play , the LCD panel or video monitor must be installed to weak and variable signal strength. Television Reception This entertainment system is...
Operation Manual
Page 3
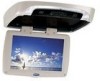
... use with IR Wireless Headphones • Four Audio / Video Source Inputs (DVD, AUX/Game, AV1, TV*/AV2) • Dome Lights with the product to ensure that you obtain the best results from your equipment. Enjoy your JENSEN entertainment system but remember the safety of the JENSEN JMV12 DVD Player with Drop-Down Video / Monitor. The JMV12 has...
... use with IR Wireless Headphones • Four Audio / Video Source Inputs (DVD, AUX/Game, AV1, TV*/AV2) • Dome Lights with the product to ensure that you obtain the best results from your equipment. Enjoy your JENSEN entertainment system but remember the safety of the JENSEN JMV12 DVD Player with Drop-Down Video / Monitor. The JMV12 has...
Operation Manual
Page 4
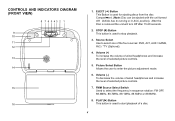
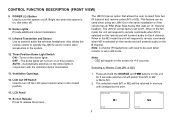
... S ON OFF AUTO 13 14 15 16 1. Volume (+) To increase the volume of wired headphones and increase the level of selected picture controls. 7. Volume (-) To decrease the volume of wired headphones and increase the level of selected picture controls. 5. FMM Source Select Switch Used to enter the...disc. 4 CONTROLS AND INDICATORS DIAGRAM (FRONT VIEW) 8 7 6 5 43 2 1 9 10 11 12 - Vehicle has to start playback of the four sources: DVD, AV1, AUX / GAME, AV2 / *TV (Optional). 4. Source Select Use to stop playback. 3. STOP (n) Button This button is used to running or in ...
... S ON OFF AUTO 13 14 15 16 1. Volume (+) To increase the volume of wired headphones and increase the level of selected picture controls. 7. Volume (-) To decrease the volume of wired headphones and increase the level of selected picture controls. 5. FMM Source Select Switch Used to enter the...disc. 4 CONTROLS AND INDICATORS DIAGRAM (FRONT VIEW) 8 7 6 5 43 2 1 9 10 11 12 - Vehicle has to start playback of the four sources: DVD, AV1, AUX / GAME, AV2 / *TV (Optional). 4. Source Select Use to stop playback. 3. STOP (n) Button This button is used to running or in ...
Operation Manual
Page 5
... is selected on the remote and will transmit audio on the B channel. Note: OSD will not turn on /off the LCD panel monitor when in this position. POWER ( ) Button Used to M1. LCD Panel 16. The JMV12 comes factory set to turn the system on in the closed position. 15. Press and hold... - FMM 88.3MHz AUX/GAME FMM OFF DVD M1 M2 IRT ON 5 IRT OFF Bright red when the system is set to turn off . LCD Cut Off Switch Used to M2 mode. This feature can be used when monitor is on the A channel. Note: 2-channel IR headphones will be used when using two JMV12s...
... is selected on the remote and will transmit audio on the B channel. Note: OSD will not turn on /off the LCD panel monitor when in this position. POWER ( ) Button Used to M1. LCD Panel 16. The JMV12 comes factory set to turn the system on in the closed position. 15. Press and hold... - FMM 88.3MHz AUX/GAME FMM OFF DVD M1 M2 IRT ON 5 IRT OFF Bright red when the system is set to turn off . LCD Cut Off Switch Used to M2 mode. This feature can be used when monitor is on the A channel. Note: 2-channel IR headphones will be used when using two JMV12s...
Operation Manual
Page 6
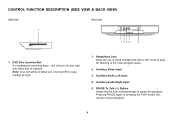
... or pressing the PLAY button will turn On and load disc when disc is turned Off for listening to pause the playback. Headphone Jack Allow the use of wired headphones with a 1/8" (3.5mm) plug for easy loading at night. 1. PAUSE To Talk (;) Button Allows the the front seat passenger to the video program... VIDEO L AUDIO R 1 234 5 1. Note: Disc slot will be lit when unit is inserted. Auxiliary Audio Right Input 5. Auxiliary Video Input 3. Unit will resume normal playback. 6 DVD Disc insertion Slot For loading and removing discs. Auxiliary Audio Left Input 4.
... or pressing the PLAY button will turn On and load disc when disc is turned Off for listening to pause the playback. Headphone Jack Allow the use of wired headphones with a 1/8" (3.5mm) plug for easy loading at night. 1. PAUSE To Talk (;) Button Allows the the front seat passenger to the video program... VIDEO L AUDIO R 1 234 5 1. Note: Disc slot will be lit when unit is inserted. Auxiliary Audio Right Input 5. Auxiliary Video Input 3. Unit will resume normal playback. 6 DVD Disc insertion Slot For loading and removing discs. Auxiliary Audio Left Input 4.
Operation Manual
Page 11
... set level. 11 Pressing M1 then IRT ON/OFF will control the IR Transmitter for wireless FM and the wired headphones. Press A-B button On-Screen Display DVD player Once Repeat A- IRT ON/OFF Button Turns the Infrared Transmitter IRT ON or OFF for more information. 29. NEXT... etc. ZOOM Button Press this button to repeat (Set point B) 3 times AB Off Cancel the A-B repeat function 27. Press ZOOM button DVD player perform Once Enlarge the picture 2 times of the original size Twice Enlarge the picture 3 times of the original size 3 times Enlarge the picture...
... set level. 11 Pressing M1 then IRT ON/OFF will control the IR Transmitter for wireless FM and the wired headphones. Press A-B button On-Screen Display DVD player Once Repeat A- IRT ON/OFF Button Turns the Infrared Transmitter IRT ON or OFF for more information. 29. NEXT... etc. ZOOM Button Press this button to repeat (Set point B) 3 times AB Off Cancel the A-B repeat function 27. Press ZOOM button DVD player perform Once Enlarge the picture 2 times of the original size Twice Enlarge the picture 3 times of the original size 3 times Enlarge the picture...
Operation Manual
Page 12
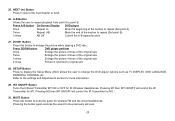
... displays the "adjustment bar" for BRIGHTNESS, CONTRAST, COLOR, TINT or RESET. It is more suitable for selection of selection of CD tracks, DVD chapters, password setting and direct access of TV channels if the optional TV tuner (P/N PODTVT2) is displayed, use the VOLUME(+)/ VOLUME(-) button...for low light operation. 32. NUMBER Buttons Allow the user to enter numbers 0 to decrease or increase the volume level of wireless headphones or the FM modulator. In the "Day" mode, the LCD backlit intensity is pressed. 33. 31. The display will not affect the volume of the wired...
... displays the "adjustment bar" for BRIGHTNESS, CONTRAST, COLOR, TINT or RESET. It is more suitable for selection of selection of CD tracks, DVD chapters, password setting and direct access of TV channels if the optional TV tuner (P/N PODTVT2) is displayed, use the VOLUME(+)/ VOLUME(-) button...for low light operation. 32. NUMBER Buttons Allow the user to enter numbers 0 to decrease or increase the volume level of wireless headphones or the FM modulator. In the "Day" mode, the LCD backlit intensity is pressed. 33. 31. The display will not affect the volume of the wired...
Operation Manual
Page 13
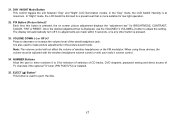
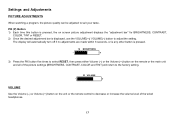
... five times to select RESET, then press either Volume (-) or the Volume (+) button on the remote or the main unit and all of the wired headphones. 13 Settings and Adjustments PICTURE ADJUSTMENTS When watching a program, the picture quality can be adjusted to decrease or increase the volume level of the picture...
... five times to select RESET, then press either Volume (-) or the Volume (+) button on the remote or the main unit and all of the wired headphones. 13 Settings and Adjustments PICTURE ADJUSTMENTS When watching a program, the picture quality can be adjusted to decrease or increase the volume level of the picture...
Operation Manual
Page 22
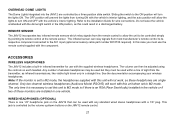
... supplied with the vehicle's interior lighting. ACCESSORIES WIRELESS HEADPHONES The JMV12 includes a built-in a straight line. See the documentation accompanying your wireless headphones. Note: If the monitor is set this could result in one 1/8" headphone jack on the JMV12 that can be adjusted using ... vehicle's interior lighting, and the auto position will work , as these monitors are installed in a discharged battery. Do not leave the vehicle unattended with a 1/8" plug. Only two-channel wireless headphones (Audiovox Model IR2CHS) will allow the unit to the ON position will ...
... supplied with the vehicle's interior lighting. ACCESSORIES WIRELESS HEADPHONES The JMV12 includes a built-in a straight line. See the documentation accompanying your wireless headphones. Note: If the monitor is set this could result in one 1/8" headphone jack on the JMV12 that can be adjusted using ... vehicle's interior lighting, and the auto position will work , as these monitors are installed in a discharged battery. Do not leave the vehicle unattended with a 1/8" plug. Only two-channel wireless headphones (Audiovox Model IR2CHS) will allow the unit to the ON position will ...
Operation Manual
Page 25
...set to prohibit that the batteries in the remote are using Single Channel Headphones. - Condensation has formed. Make sure the Modulator is dirty. Check the type of movies because the disc is programmed to Region Number 1. - This DVD player is set to dry out. - Make sure all cables are coded... by region. Make sure that the correct mode (M1 or M2) has been selected. - Both the unit and the disc are securely inserted into disc tray. Allow player to M1 when using the 2-channel IR headphones, make ...
...set to prohibit that the batteries in the remote are using Single Channel Headphones. - Condensation has formed. Make sure the Modulator is dirty. Check the type of movies because the disc is programmed to Region Number 1. - This DVD player is set to dry out. - Make sure all cables are coded... by region. Make sure that the correct mode (M1 or M2) has been selected. - Both the unit and the disc are securely inserted into disc tray. Allow player to M1 when using the 2-channel IR headphones, make ...
Operation Manual
Page 27
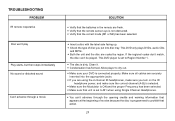
REPLACEMENT PARTS Remote Control 136-4196 SPECIFICATIONS LCD Backlighting Edge Light Tube Resolution 1280 x 800 Pixels 1,024,000 Operation Temperature 32 ~131º F (0 ~ 55º C) Storage Temperature -4 ~ 158º F (-20 ~ 70º C) Backlit life 30,000 Hours Video Display System NTSC / PAL Headphone Audio Output 0.03W @ 32 ohms Video Output 1.0Vp-p @ 75 ohms Power Source 12V DC Dimension L x W x H 14.0" x 12.0" x 2.0" 356mm x 305mm x 51mm Specifications subject to change without notice. 27
REPLACEMENT PARTS Remote Control 136-4196 SPECIFICATIONS LCD Backlighting Edge Light Tube Resolution 1280 x 800 Pixels 1,024,000 Operation Temperature 32 ~131º F (0 ~ 55º C) Storage Temperature -4 ~ 158º F (-20 ~ 70º C) Backlit life 30,000 Hours Video Display System NTSC / PAL Headphone Audio Output 0.03W @ 32 ohms Video Output 1.0Vp-p @ 75 ohms Power Source 12V DC Dimension L x W x H 14.0" x 12.0" x 2.0" 356mm x 305mm x 51mm Specifications subject to change without notice. 27
