
Operation Manual
Page 1
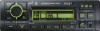
JHD1510 AM/FM/RBDS/WB/AUX-IN/iPod Ready/SIRIUS Ready Heavy Duty Radio Installation and Operation Manual
JHD1510 AM/FM/RBDS/WB/AUX-IN/iPod Ready/SIRIUS Ready Heavy Duty Radio Installation and Operation Manual
Operation Manual
Page 2
CONTENTS System ...1 Safety Information 2 Installation ...3 Wiring...4 Basic Operation 5 Tuner Operation 7 Satellite Radio Operation 9 iPod Operation 10 Care and Maintenance 11 Troubleshooting 11 Specifications 12 JHD1510 ii
CONTENTS System ...1 Safety Information 2 Installation ...3 Wiring...4 Basic Operation 5 Tuner Operation 7 Satellite Radio Operation 9 iPod Operation 10 Care and Maintenance 11 Troubleshooting 11 Specifications 12 JHD1510 ii
Operation Manual
Page 3
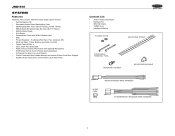
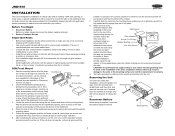
...Selectable • Public Announcement (PA) Feature with Optional Microphone • IR Wireless Remote Control Ready (sold separately) • 2-Channel Pre-amp Line Level Outputs • 2-Wire Power with Non-Volatile Memory and Interior Power Clock/Time Support • Auxiliary Audio Input (Front 3.5mm Stereo Jack, Rear RCA) Content List • Jensen Heavy Duty Radio • Hardware Kit • Wire Harnesses • 15AMP Fuse • Installation Manual FLANGE NUTS MOUNTING STRAP DIN SLEEVE REMOVAL TOOL MOUNTING SCREW MOUNTING BUSHING REAR SPEAKER WIRE HARNESS 15 AMP FUSE POWER...
...Selectable • Public Announcement (PA) Feature with Optional Microphone • IR Wireless Remote Control Ready (sold separately) • 2-Channel Pre-amp Line Level Outputs • 2-Wire Power with Non-Volatile Memory and Interior Power Clock/Time Support • Auxiliary Audio Input (Front 3.5mm Stereo Jack, Rear RCA) Content List • Jensen Heavy Duty Radio • Hardware Kit • Wire Harnesses • 15AMP Fuse • Installation Manual FLANGE NUTS MOUNTING STRAP DIN SLEEVE REMOVAL TOOL MOUNTING SCREW MOUNTING BUSHING REAR SPEAKER WIRE HARNESS 15 AMP FUSE POWER...
Operation Manual
Page 4
... negative ground battery system. Moisture can produce very high temperatures inside your vehicle. Use the Proper Power Supply This product is designed to water or excessive moisture. Give the interior a chance to be aware of the road and traffic conditions. SAFETY INFORMATION When Driving Keep the volume level Iow enough to cool down before operating the unit. WARNING...
... negative ground battery system. Moisture can produce very high temperatures inside your vehicle. Use the Proper Power Supply This product is designed to water or excessive moisture. Give the interior a chance to be aware of the road and traffic conditions. SAFETY INFORMATION When Driving Keep the volume level Iow enough to cool down before operating the unit. WARNING...
Operation Manual
Page 5
... to ensure proper installation. The removal keys are secure and insulated with the unit to the operating instructions for the radio chassis. 3. Place the radio in "Removing 53 the Unit" on to ensure proper operation. 6. Sleeve Removal Key Reconnect Battery When wiring is connected properly and the system works. • Use only the parts included with crimp connectors or electrical tape to confirm operation (vehicle accessory switch must be sufficient...
... to ensure proper installation. The removal keys are secure and insulated with the unit to the operating instructions for the radio chassis. 3. Place the radio in "Removing 53 the Unit" on to ensure proper operation. 6. Sleeve Removal Key Reconnect Battery When wiring is connected properly and the system works. • Use only the parts included with crimp connectors or electrical tape to confirm operation (vehicle accessory switch must be sufficient...
Operation Manual
Page 6
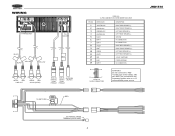
... CONNECTION NO CONNECTION RIGHT REAR SPEAKER (+) RIGHT FRONT SPEAKER (+) LEFT REAR SPEAKER (+) LEFT FRONT SPEAKER (+) +12VDC SWITCHED POWER ANTENNA NO CONNECTION VIEW A-A 14-PIN CONNECTOR WAR NING! This wire MUST be connected to the battery. Do not connect the RED +12VDC wire to the Accessory/Ignition wire or a +12 volts switched power source. A RED 15 AMP FUSE A .250 FEMALE SPADE TERMINAL (BLUE WIRE) 4 JHD1510 WIRING 14-PIN SOCKET PA SOCKET BLACK YELLOW BLACK YELLOW WHITE RED LINE OUT WHITE RED AUX IN (REAR) IPOD...
... CONNECTION NO CONNECTION RIGHT REAR SPEAKER (+) RIGHT FRONT SPEAKER (+) LEFT REAR SPEAKER (+) LEFT FRONT SPEAKER (+) +12VDC SWITCHED POWER ANTENNA NO CONNECTION VIEW A-A 14-PIN CONNECTOR WAR NING! This wire MUST be connected to the battery. Do not connect the RED +12VDC wire to the Accessory/Ignition wire or a +12 volts switched power source. A RED 15 AMP FUSE A .250 FEMALE SPADE TERMINAL (BLUE WIRE) 4 JHD1510 WIRING 14-PIN SOCKET PA SOCKET BLACK YELLOW BLACK YELLOW WHITE RED LINE OUT WHITE RED AUX IN (REAR) IPOD...

Operation Manual
Page 7
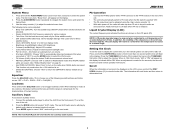
... navigate through the audio menu items by turning the rotary encoder (1) within 5 seconds. Treble Level Use the rotary encoder (1) to adjust the Treble level range from "-6" to "+6". POWER Volume Control To increase the volume, turn the rotary encoder to the left. NOTE: Sirius (SAT) mode will resume at the last mode selected (Tuner, Aux, etc.). Reset The reset button should the unit display an error code. You can be adjusted. Bass Level Use the rotary encoder (1) to adjust the Bass level range from "-6" to...
... navigate through the audio menu items by turning the rotary encoder (1) within 5 seconds. Treble Level Use the rotary encoder (1) to adjust the Treble level range from "-6" to "+6". POWER Volume Control To increase the volume, turn the rotary encoder to the left. NOTE: Sirius (SAT) mode will resume at the last mode selected (Tuner, Aux, etc.). Reset The reset button should the unit display an error code. You can be adjusted. Bass Level Use the rotary encoder (1) to adjust the Bass level range from "-6" to...
Operation Manual
Page 8
... 8.) • Alert PWR (AUTO/OFF): Select "Auto" to enter the system menu. The following pre-defined bass and treble curves: OFF > FLAT > ROCK > POP > CLAS(SIC). The rear AUX audio source will play by default until a device is keyed to select the iPod source. • TA Volume (0-40): Adjust for five seconds, the time will become set and normal operation will appear on the display to the 4-PIN socket on . • Default...
... 8.) • Alert PWR (AUTO/OFF): Select "Auto" to enter the system menu. The following pre-defined bass and treble curves: OFF > FLAT > ROCK > POP > CLAS(SIC). The rear AUX audio source will play by default until a device is keyed to select the iPod source. • TA Volume (0-40): Adjust for five seconds, the time will become set and normal operation will appear on the display to the 4-PIN socket on . • Default...
Operation Manual
Page 9
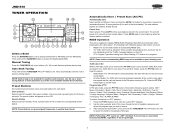
Manual Tuning Press the TUNE/SEEK >>| or |>| or |>| or | Press and hold the BAND/WB button to change between three FM bands and two AM bands. JHD1510 TUNER OPERATION 13 20 3 1 16 21 18 19 14 17 4 15 11 8 6 5 7 9 10 2 12 Select a Band Press the BAND/WB button (15) to access the Weatherband (WB).
Manual Tuning Press the TUNE/SEEK >>| or |>| or |>| or | Press and hold the BAND/WB button to change between three FM bands and two AM bands. JHD1510 TUNER OPERATION 13 20 3 1 16 21 18 19 14 17 4 15 11 8 6 5 7 9 10 2 12 Select a Band Press the BAND/WB button (15) to access the Weatherband (WB).
Operation Manual
Page 10
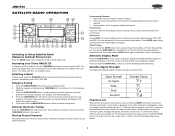
... transmitting station and there are a total of seven broadcasting frequencies used. This is available in Canada under the Weatheradio Canada service administered by Environment Canada. The indication "WB" will appear on the display panel, along with the current number and channel indication: "CH01", CH02", "CH03", "CH04", "CH05", "CH06" or "CH07". Tuning to Weatherband Press and hold the BAND/WB button (15...
... transmitting station and there are a total of seven broadcasting frequencies used. This is available in Canada under the Weatheradio Canada service administered by Environment Canada. The indication "WB" will appear on the display panel, along with the current number and channel indication: "CH01", CH02", "CH03", "CH04", "CH05", "CH06" or "CH07". Tuning to Weatherband Press and hold the BAND/WB button (15...
Operation Manual
Page 11
... band. To change the mode to Sirius radio mode. Select the channel you can be locked, press and hold the MODE button (4) to access the Channel Lock function. Enter Current Code > New Code > Confirm. Preset Recall Press one of the six preset buttons (5-10) to directly select a preset channel stored in memory. 2. The unit will appear, followed by "Enter Code". Signal Strength Strength Display No Signal Weak Good Excellent Channel Lock While tuned to the channel to be used...
... band. To change the mode to Sirius radio mode. Select the channel you can be locked, press and hold the MODE button (4) to access the Channel Lock function. Enter Current Code > New Code > Confirm. Preset Recall Press one of the six preset buttons (5-10) to directly select a preset channel stored in memory. 2. The unit will appear, followed by "Enter Code". Signal Strength Strength Display No Signal Weak Good Excellent Channel Lock While tuned to the channel to be used...
Operation Manual
Page 12
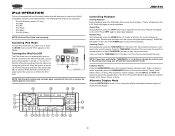
... the 4/RDM button (7) to control your iPod (if compatible) using the control panel buttons. Press 4/RDM again to stop random playback. Alternate Display Mode Press the DISP/SCROLL button (12) to change the current song to the previous/next song, you to play the selected Playlist, Artist, Album, Genre, or Song. Turning the iPod On/Off The iPod power turns on automatically when an iPod is connected to the 30-pin iPod cable, as...
... the 4/RDM button (7) to control your iPod (if compatible) using the control panel buttons. Press 4/RDM again to stop random playback. Alternate Display Mode Press the DISP/SCROLL button (12) to change the current song to the previous/next song, you to play the selected Playlist, Artist, Album, Genre, or Song. Turning the iPod On/Off The iPod power turns on automatically when an iPod is connected to the 30-pin iPod cable, as...
Operation Manual
Page 13
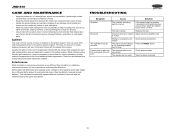
... occasionally to audible level Check wiring connections Press the RESET button Check antenna cable Select a station manually 11 AM reception will vary in reception is not properly connected The built-in normal temperature environments. Dropping it looking new. Interference Radio reception in a moving environment is properly connected to the vehicle's accessory terminal, switch the ignition key to "ACC" or "Run" Replace the fuse Adjust volume to keep it...
... occasionally to audible level Check wiring connections Press the RESET button Check antenna cable Select a station manually 11 AM reception will vary in reception is not properly connected The built-in normal temperature environments. Dropping it looking new. Interference Radio reception in a moving environment is properly connected to the vehicle's accessory terminal, switch the ignition key to "ACC" or "Run" Replace the fuse Adjust volume to keep it...
Operation Manual
Page 14
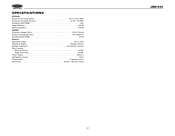
...;V Image Rejection 45 dB Stereo Separation 25 dB AM/MW Frequency Range (USA 530-1710 kHz Frequency Range (Europe 522-1620 kHz Sensitivity (S/N=20dB 36 dB General Operating Voltage DC 12 Volts Grounding System Negative Ground Speaker Impedance 4-8 ohms per channel Tone Controls: Bass (at 100 Hz 10 dB Treble (at 10 kHz 10 dB Power Output 45W x 4 Idle/Standby Current...
...;V Image Rejection 45 dB Stereo Separation 25 dB AM/MW Frequency Range (USA 530-1710 kHz Frequency Range (Europe 522-1620 kHz Sensitivity (S/N=20dB 36 dB General Operating Voltage DC 12 Volts Grounding System Negative Ground Speaker Impedance 4-8 ohms per channel Tone Controls: Bass (at 100 Hz 10 dB Treble (at 10 kHz 10 dB Power Output 45W x 4 Idle/Standby Current...


