Instruction Manual
Page 3
CD6112 TABLE OF CONTENTS Table of Contents i Introduction 1 Installation 2 Wiring Diagram 4 Front Panel Release 5 Operation 6 Tuner Operation 8 CD Player Operation 9 Remote Control 10 Care and Maintenance 11 Troubleshooting 12 Specifications 13 i
CD6112 TABLE OF CONTENTS Table of Contents i Introduction 1 Installation 2 Wiring Diagram 4 Front Panel Release 5 Operation 6 Tuner Operation 8 CD Player Operation 9 Remote Control 10 Care and Maintenance 11 Troubleshooting 12 Specifications 13 i
Instruction Manual
Page 5
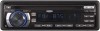
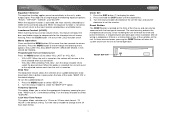
Features CD • CD R / RW Compatible • Last Position Memory • Audible Forward / Reverse Track Search • Random, Repeat and Intro • Play, Pause, Stop, Next Track... Chassis Mounted Rear Auxiliary Inputs General • Infrared Remote Control • Media Adapter Cable (2 meter male 3.5mm to read all of the Jensen CD6112 Mobile Receiver. CD6112 INTRODUCTION Congratulations on your Jensen CD6112 installed by a reputable installation shop. It's a good idea to male RCA cable) • Programmable Volume Control • Three Preset EQ Curves • Loudness •...
Features CD • CD R / RW Compatible • Last Position Memory • Audible Forward / Reverse Track Search • Random, Repeat and Intro • Play, Pause, Stop, Next Track... Chassis Mounted Rear Auxiliary Inputs General • Infrared Remote Control • Media Adapter Cable (2 meter male 3.5mm to read all of the Jensen CD6112 Mobile Receiver. CD6112 INTRODUCTION Congratulations on your Jensen CD6112 installed by a reputable installation shop. It's a good idea to male RCA cable) • Programmable Volume Control • Three Preset EQ Curves • Loudness •...
Instruction Manual
Page 6
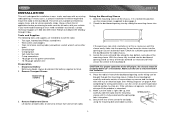
.... Slide the mounting sleeve off the chassis. Do not force the sleeve into the dashboard opening . CAUTION: For proper operation of the CD player, the chassis must be mounted within this limitation. 4. Secure the rear of horizontal. Tools and Supplies The following tools and supplies ... terminal. 2. If the opening is too small, carefully cut or file as many cases, a special installation kit will be brought through Friday. Remove Transport Screws TRANSPORT SCREWS HALF SLEEVE CD6112 MOSFET POWERED / LO/DX LOUD PS/AS DN UP 3. If the unit does not operate, re-...
.... Slide the mounting sleeve off the chassis. Do not force the sleeve into the dashboard opening . CAUTION: For proper operation of the CD player, the chassis must be mounted within this limitation. 4. Secure the rear of horizontal. Tools and Supplies The following tools and supplies ... terminal. 2. If the opening is too small, carefully cut or file as many cases, a special installation kit will be brought through Friday. Remove Transport Screws TRANSPORT SCREWS HALF SLEEVE CD6112 MOSFET POWERED / LO/DX LOUD PS/AS DN UP 3. If the unit does not operate, re-...

Instruction Manual
Page 7
...panels which may damage components inside the chassis. 4. Test the radio using the reverse procedure of an installation kit to the dashboard. Install the radio/mounting plate assembly to the sub-dashboard according to 6:00pm EST Monday through Friday. 3 ...323-4815 from 9:00am to the instructions in the Universal Installation instructions. 4. CD6112 7. ISO Installation This unit has threaded holes in the Universal Installation instructions. 2. Remove the existing factory radio from the front of installation. 1. Carefully unsnap the plastic frame from the dashboard ...
...panels which may damage components inside the chassis. 4. Test the radio using the reverse procedure of an installation kit to the dashboard. Install the radio/mounting plate assembly to the sub-dashboard according to 6:00pm EST Monday through Friday. 3 ...323-4815 from 9:00am to the instructions in the Universal Installation instructions. 4. CD6112 7. ISO Installation This unit has threaded holes in the Universal Installation instructions. 2. Remove the existing factory radio from the front of installation. 1. Carefully unsnap the plastic frame from the dashboard ...
Instruction Manual
Page 11
... HOUR" is the default setting. Reset Button The RESET button is located on the front of the chassis and can only be activated upon initial installation after all wiring is complete or if there is turned on /off. Press EQ (16) to select "VOL LAST" or "VOL ADJ". •...the selection of human hearing. "AREA U.S.A." is the default setting. Turn the rotary encoder (5) clockwise the set the minutes. clockwise to be adjusted. CD6112 Equalizer Selector The equalizer function applies preset sound effects to the 24 hour clock format. To turn the audible beep off . • VOL ADJ: ...
... HOUR" is the default setting. Reset Button The RESET button is located on the front of the chassis and can only be activated upon initial installation after all wiring is complete or if there is turned on /off. Press EQ (16) to select "VOL LAST" or "VOL ADJ". •...the selection of human hearing. "AREA U.S.A." is the default setting. Turn the rotary encoder (5) clockwise the set the minutes. clockwise to be adjusted. CD6112 Equalizer Selector The equalizer function applies preset sound effects to the 24 hour clock format. To turn the audible beep off . • VOL ADJ: ...
Instruction Manual
Page 16
... wire shorting to Make sure wire is not pinched ground Speaker wires shorting Make sure wire is not pinched to ground Incorrect fuse; fuse too Install fuse of correct rating small 12 CD6112 check vehicle fuse with test light;
... wire shorting to Make sure wire is not pinched ground Speaker wires shorting Make sure wire is not pinched to ground Incorrect fuse; fuse too Install fuse of correct rating small 12 CD6112 check vehicle fuse with test light;
Instruction Manual
Page 19
..., excessive temperature, extreme environmental conditions or external natural causes Please review the "Care and Maintenance" section of your Installation and Operation Manual for installation, removal or reinstallation of the product x Consequential damage to compact discs, USB devices, digital media cards, accessories or... or any part thereof, under normal use of your area. This Warranty is authorized to prevent lost packages. Limited Warranty CD or Multimedia Radios/Headunits Audiovox Electronics Corporation ("the Company") is required in the form of an original sales receipt. x ...
..., excessive temperature, extreme environmental conditions or external natural causes Please review the "Care and Maintenance" section of your Installation and Operation Manual for installation, removal or reinstallation of the product x Consequential damage to compact discs, USB devices, digital media cards, accessories or... or any part thereof, under normal use of your area. This Warranty is authorized to prevent lost packages. Limited Warranty CD or Multimedia Radios/Headunits Audiovox Electronics Corporation ("the Company") is required in the form of an original sales receipt. x ...


