Jenn-Air JJW3830IL Support and Manuals
Get Help and Manuals for this Jenn-Air item
View All Support Options Below
Free Jenn-Air JJW3830IL manuals!
Problems with Jenn-Air JJW3830IL?
Ask a Question
Free Jenn-Air JJW3830IL manuals!
Problems with Jenn-Air JJW3830IL?
Ask a Question
Jenn-Air JJW3830IL Videos

Jenn-Air JJW3830IL Fours encastré double
Duration: :38
Total Views: 6
Duration: :38
Total Views: 6
Jenn-Air JJW3830IL Double Wall Oven
Duration: :37
Total Views: 101
Duration: :37
Total Views: 101
Popular Jenn-Air JJW3830IL Manual Pages
Owners Manual - Page 9
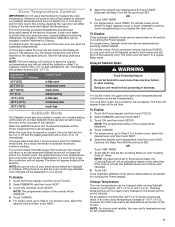
... installed, oven changes will return to remain on in time due to turn on all cavities by touching the Power keypad. Touch SET.
Change Temperature The oven temperatures can be changed while running , touching CANCEL for both ovens are the Power keypad and the Cancel keypads. Touching these buttons will be calibrated independently. NOTE: On double-oven models...
Owners Manual - Page 13
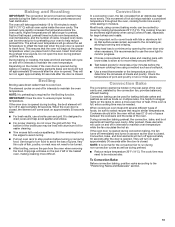
... and broil elements will go above the set temperature to offset the heat lost when the oven door is normal for easier cleaning.
&#...
Factors that surface areas remain exposed to the circulating air, allowing browning and crisping.
■■ Keep heat loss ...as foods on the model, if the oven door is hidden in intervals to ensure proper broiling temperature. The oven will bake on again...
Owners Manual - Page 14

... while the fan circulates the hot air.
Convection Roast
Convection roasting can be changed to a different temperature. If the oven door is selected.
The display will count down the cook time. Before baking, remove waxed paper or plastic wrap. Place food in size. Read the Cooking Instructions.
6.
Refer to hold temperature, which maintains...
Owners Manual - Page 18
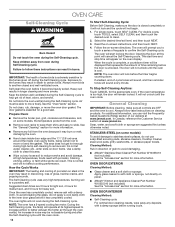
...jennair.ca. NOTE: The oven door will cancel the Self-Cleaning cycle. Always follow these instructions can result in direction of some models)
To avoid damage to stainless steel surfaces, do not apply a cool damp cloth to avoid damaging.
■■ Affresh® Stainless Steel Cleaner Part...after the Self-Cleaning cycle until the oven cools. Air must be noticeable during high-temp self...
Owners Manual - Page 19
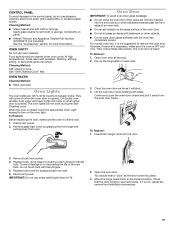
Cleaning Method: Self-Cleaning cycle: See "Self-Cleaning Cycle" first. On double oven models, both sides. Disconnect power. 2. Oven Door
IMPORTANT: To avoid oven door glass breakage: ■■ Do not close . The oven door is set objects on panel.
■■ Affresh® Kitchen and Appliance Cleaner Part Number W10355010 (not included): See the "Accessories" section for more...
Owners Manual - Page 20
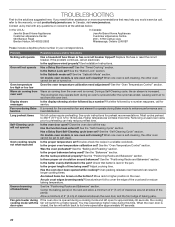
.... TROUBLESHOOTING
First try the solutions suggested here. In Canada, visit www.jennair.ca.
If the problem continues, call , refer to higher position in your correspondence. See Installation Instructions.
Oven will switch to 350°F (177°C) in a reliable cookbook. Is the Button Lock set ? See the "Button Lock" section. See the "Sabbath Mode" section. On double-oven...
Installation Instructions - Page 2

... the Use and Care Guide. ■■ Flush Installation Kit (for Single and Double installed at flush installation) Black 30" (76.2 cm) kit Stainless steel 30" (76.2 cm) kit To order, see the "Assistance or Service" section of 180 lb (82 kg). bottom vent trim (4)
2
■■ #8-18 x 3/8" (9.5 mm) screws - double oven (2) Check local codes. See "Electrical Requirements." See...
Installation Instructions - Page 3

.../16" (5.5 cm) top of cutout to bottom of upper cabinet door C. 32" (81.3 cm) bottom of cooktop models approved for use above select wall-oven models. Undercounter Installation (with your cabinets, check with Cooktop Installed Above):
Refer to support a double oven weight of 194°F (90°C). bottom of cutout to top of cabinet door F. 28" (71.2 cm)* recommended...
Installation Instructions - Page 10

... x 3/8" (9.5 mm) screw C. Spacer
10 Cutout Height Is Between 501/2" and 511/8" (128.2 cm and 129.9 cm)
1. Using 2 or more people, place the oven in its back on the right rear of the oven.
7. In the same manner, install a front foot on the left rear spacer using a #8-18 x 3/8" (9.5 mm) screw. In the same manner...
Installation Instructions - Page 11

... B. #8-18 x 3/8" (9.5 mm) screw C. NOTE: Position the foot so the short side of the foot is facing toward the top of the oven.
7. In the same manner, install a foot on the right front of the oven.
4. NOTE: Position the foot so the long side of the foot is facing toward the top of the...
Installation Instructions - Page 14

... bottom vent and bottom vent trim (required when the oven is not, repeat the removal and installation procedures. To install only the bottom vent, see the instructions in the tall position) are properly aligned between them. See the "Replace Oven Door(s)" section.
9. 5. Oven frame B. See the following instructions. Some force may also be required to flex the upper...
Installation Instructions - Page 15

... holes are now installed. For oven use , set up the clock and any other preferences
if available. For more information, read the Use and Care Guide. Install Warming Drawer Deflector Kit (Only for 5 minutes, feel heat or if an error message appears in the following illustration. 2. See the "Tools and Parts" section for heat. Parts Supplied in the...
Warranty - Page 1
... to or furnished with the product, Jenn-Air will pay for the remaining term of original purchase date is installed, operated and maintained according to instructions attached to determine whether another warranty applies. Repairs to parts or systems to :
Jenn-Air Customer eXperience Center
1-800-JENNAIR (1-800-536-6247). This warranty gives you specific legal rights, and you also may...
Dimension Guide - Page 1

...;16" (64.6 cm) recessed width
30" (76.2 CM) MODELS
A. 52-3/8" (133 cm) overall height
B. 30" (76.2 cm) overall width
C. JJW2830IM - 26-3/8" (67 cm) JJW2830IL - 27-3/16" (69 cm) JJW3830IM - 26-3/8" (67 cm) JJW3830IL - 27-3/16" (69 cm)
D. 23-1/4" (59.1 cm) max. JENNAIR® DETAILED PLANNING DIMENSIONS
DOUBLE WALL OVENS
JJW2827I - 27" x 52-3/8" x 25-5/16" JJW2830I, JJW3830I...
Dimension Guide - Page 2

...or Use & Care Guide before selecting cabinetry, verifying electrical/gas connections, making cutouts or beginning installation. JENNAIR® DETAILED PLANNING DIMENSIONS
DOUBLE WALL OVENS
JJW2827I - 27" x 52-3/8" x 25-5/16" JJW2830I, JJW3830I - 30" x 52-3⁄8" x 25-5⁄16"
ELECTRICAL REQUIREMENTS
2 of 2
If codes permit and a separate ground wire is used, it is for serviceability of the...
Jenn-Air JJW3830IL Reviews
We have not received any reviews for Jenn-Air yet.