

Quick Reference Manual
Page 2
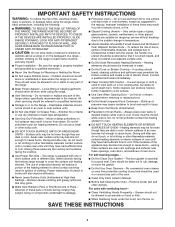
... different times on preheat times are trademarks of the console. This is level to remain on the oven window during convection cooking, the fan will go away after each use your range. If the oven door is normal and part of oven racks. This is opened during the cleaning cycle. For additional information, refer to the surface. Heavily soiled ovens may want to maintain the oven temperature, while the fan circulates the hot air...
... different times on preheat times are trademarks of the console. This is level to remain on the oven window during convection cooking, the fan will go away after each use your range. If the oven door is normal and part of oven racks. This is opened during the cleaning cycle. For additional information, refer to the surface. Heavily soiled ovens may want to maintain the oven temperature, while the fan circulates the hot air...

Installation Instructions
Page 3
... complies with the range, see "Install Anti-Tip Bracket" section. ■ Grounded electrical supply is required. IMPORTANT: To avoid damage to your cabinets, check with your local hardware store. ■ Oven racks (3) Optional Parts To purchase these or any tools listed here. Thickness of the User Guide for contact information. ■ Side Trim Kits 1.7 cm) White - Order Part Number W10675028 1¹⁄₈" (2.9 cm) White - Order Part Number W10731885 1¹...
... complies with the range, see "Install Anti-Tip Bracket" section. ■ Grounded electrical supply is required. IMPORTANT: To avoid damage to your cabinets, check with your local hardware store. ■ Oven racks (3) Optional Parts To purchase these or any tools listed here. Thickness of the User Guide for contact information. ■ Side Trim Kits 1.7 cm) White - Order Part Number W10675028 1¹⁄₈" (2.9 cm) White - Order Part Number W10731885 1¹...
Installation Instructions
Page 4
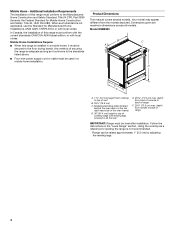
..., HUD Part 280). Product Dimensions This manual covers several models. Your model may appear different from cooktop to the standards listed above. ■ Four-wire power supply cord or cable must conform to back of the oven frame) D. 36" (91.4 cm) height to the floor during transit. Follow the instructions in all models. Additional Installation Requirements The installation of cooktop edge with local codes. Model KSEB900 B C A D E F A. 1 3.0 cm) height from the models depicted...
..., HUD Part 280). Product Dimensions This manual covers several models. Your model may appear different from cooktop to the standards listed above. ■ Four-wire power supply cord or cable must conform to back of the oven frame) D. 36" (91.4 cm) height to the floor during transit. Follow the instructions in all models. Additional Installation Requirements The installation of cooktop edge with local codes. Model KSEB900 B C A D E F A. 1 3.0 cm) height from the models depicted...

Installation Instructions
Page 11
... the range to cool completely before attempting to remove the oven door. Drawer alignment tab C. Using both sides. Open the drawer to the locked position. The oven door is not, repeat the removal and installation procedures. 11 Open oven door all the way. 3. Pinch the hinge latch between two fingers and pull forward. A B C A. Flat-blade screwdriver B. The drawer is level while closed and pull it will shut. 4. Place the rear...
... the range to cool completely before attempting to remove the oven door. Drawer alignment tab C. Using both sides. Open the drawer to the locked position. The oven door is not, repeat the removal and installation procedures. 11 Open oven door all the way. 3. Pinch the hinge latch between two fingers and pull forward. A B C A. Flat-blade screwdriver B. The drawer is level while closed and pull it will shut. 4. Place the rear...
Installation Instructions
Page 12
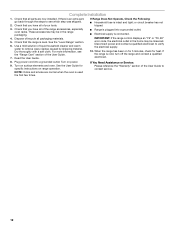
... been on for 5 minutes, check for specific instructions on range operation. Turn on power. 9. Use a mild solution of liquid household cleaner and warm water to verify the electrical supply. 10. If the range is intact and tight; NOTE: Odors and smoke are now installed. Check that the range is used the first few times. 12 See the User Guide for heat. Check that you have all of /recycle...
... been on for 5 minutes, check for specific instructions on range operation. Turn on power. 9. Use a mild solution of liquid household cleaner and warm water to verify the electrical supply. 10. If the range is intact and tight; NOTE: Odors and smoke are now installed. Check that the range is used the first few times. 12 See the User Guide for heat. Check that you have all of /recycle...

Owners Manual
Page 1
...; Self-Cleaning Technology 5 Surface Temperatures 5 Preheating 5 Ceramic Glass Cooktop Cleaning 5 FEATURE GUIDE 6 Electronic Oven Controls 8 COOKTOP 9 Cookware 13 Home Canning 13 OVEN 14 Aluminum Foil 14 Positioning Racks and Bakeware 14 Roll-Out Rack 15 Oven Vent 16 Sabbath Mode 16 Baking and Roasting 16 Broiling 16 Convection Cooking 17 Proofing Bread 17 Favorite 17 Cook Time 18 Baking Drawer 18 Oven Light 18 RANGE CARE 19 Clean Cycle 19 General Cleaning 20 Remove/Replace Drawer 21 TROUBLESHOOTING 22 ACCESSORIES 25 WARRANTY 26 W10665267D Model Number Serial...
...; Self-Cleaning Technology 5 Surface Temperatures 5 Preheating 5 Ceramic Glass Cooktop Cleaning 5 FEATURE GUIDE 6 Electronic Oven Controls 8 COOKTOP 9 Cookware 13 Home Canning 13 OVEN 14 Aluminum Foil 14 Positioning Racks and Bakeware 14 Roll-Out Rack 15 Oven Vent 16 Sabbath Mode 16 Baking and Roasting 16 Broiling 16 Convection Cooking 17 Proofing Bread 17 Favorite 17 Cook Time 18 Baking Drawer 18 Oven Light 18 RANGE CARE 19 Clean Cycle 19 General Cleaning 20 Remove/Replace Drawer 21 TROUBLESHOOTING 22 ACCESSORIES 25 WARRANTY 26 W10665267D Model Number Serial...
Owners Manual
Page 3
... a hot surface. Do not repair or replace any part of the range unless specifically recommended in Place - Do not use dry chemical or foam-type extinguisher. Improper installation of these pans or bowls during cooking may cause container to cause burns - Let hot air or steam escape before removing or replacing food. I Do Not Clean Door Gasket - Heating elements may ignite. I Placement of Oven Racks - Remove broiler pan and other glazed utensils are dark in temperature...
... a hot surface. Do not repair or replace any part of the range unless specifically recommended in Place - Do not use dry chemical or foam-type extinguisher. Improper installation of these pans or bowls during cooking may cause container to cause burns - Let hot air or steam escape before removing or replacing food. I Do Not Clean Door Gasket - Heating elements may ignite. I Placement of Oven Racks - Remove broiler pan and other glazed utensils are dark in temperature...
Owners Manual
Page 6
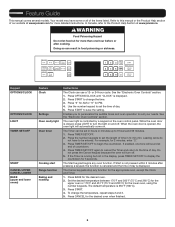
... the oven will automatically come on the oven control panel. The default temperature is controlled by a keypad on . Doing so can result in hours or minutes up to turn off . Keypad OPTIONS/CLOCK OPTIONS/CLOCK LIGHT TIMER SET/OFF START CANCEL UPPER CANCEL LOWER BAKE (upper and lower ovens) Feature Clock Settings Oven cavity light Oven timer Cooking start Range function Baking and roasting Instructions The Clock can be entered. Press "3" for AM or "6" for the lower oven, using the number keypads. The oven light...
... the oven will automatically come on the oven control panel. The default temperature is controlled by a keypad on . Doing so can result in hours or minutes up to turn off . Keypad OPTIONS/CLOCK OPTIONS/CLOCK LIGHT TIMER SET/OFF START CANCEL UPPER CANCEL LOWER BAKE (upper and lower ovens) Feature Clock Settings Oven cavity light Oven timer Cooking start Range function Baking and roasting Instructions The Clock can be entered. Press "3" for AM or "6" for the lower oven, using the number keypads. The oven light...

Owners Manual
Page 7
...Repeat to change the temperature, repeat steps 3 through 6. 9. The display will function with a delayed start COOK TIME Timed cooking AQUALIFT SELF CLEAN START (Hold 3 sec to set the desired temperature. 4. Keypad BROIL Feature Broiling MANUAL CONVECT Convection MODES cooking AUTO CONVECT MODES Convection cooking KEEP WARM (upper and lower ovens) Hold warm PROOF Proofing bread FAVORITE DELAY START Saved favorite Delayed start . Press BROIL. 2. Position the cookware in oven. The default temperature is used for an oven function with the controls locked. Press PROOF...
...Repeat to change the temperature, repeat steps 3 through 6. 9. The display will function with a delayed start COOK TIME Timed cooking AQUALIFT SELF CLEAN START (Hold 3 sec to set the desired temperature. 4. Keypad BROIL Feature Broiling MANUAL CONVECT Convection MODES cooking AUTO CONVECT MODES Convection cooking KEEP WARM (upper and lower ovens) Hold warm PROOF Proofing bread FAVORITE DELAY START Saved favorite Delayed start . Press BROIL. 2. Position the cookware in oven. The default temperature is used for an oven function with the controls locked. Press PROOF...

Owners Manual
Page 8
.../Clock keypad. Use the number keypads to adjust the setting. 4. Electronic Oven Controls Control Display The display will be adjusted to meet your personal needs. Then press START or CANCEL UPPER to adjust the setting. 4. Press the "1" keypad to exit and display the time of -cycle tones. 1. or 24-hour cycle. 1. Energy Save The Energy Save mode puts the range into Sleep mode and reduces energy consumption. Press OPTIONS/CLOCK until "TEMP...
.../Clock keypad. Use the number keypads to adjust the setting. 4. Electronic Oven Controls Control Display The display will be adjusted to meet your personal needs. Then press START or CANCEL UPPER to adjust the setting. 4. Press the "1" keypad to exit and display the time of -cycle tones. 1. or 24-hour cycle. 1. Energy Save The Energy Save mode puts the range into Sleep mode and reduces energy consumption. Press OPTIONS/CLOCK until "TEMP...

Owners Manual
Page 9
Press the "1" keypad to adjust the drawer temperature calibration. Languages - Elements will cycle on and off . To Adjust Oven Temperature: 1. On some models, press "1" to adjust the setting. 4. OR Press START to adjust the setting. 4. The offset range is displayed. 2. Low settings D. Right rear surface cooking area display J. Sensor boil M. Press the "1" keypad to adjust the oven temperature calibration. This will not indicate temperature changes. Press OPTIONS/CLOCK until "12Hr AUTO_OFF" is from -30°F to +30°...
Press the "1" keypad to adjust the drawer temperature calibration. Languages - Elements will cycle on and off . To Adjust Oven Temperature: 1. On some models, press "1" to adjust the setting. 4. OR Press START to adjust the setting. 4. The offset range is displayed. 2. Low settings D. Right rear surface cooking area display J. Sensor boil M. Press the "1" keypad to adjust the oven temperature calibration. This will not indicate temperature changes. Press OPTIONS/CLOCK until "12Hr AUTO_OFF" is from -30°F to +30°...

Owners Manual
Page 10
... the cooktop glass. Hot Surface Indicator If the cooktop power indicator light is generated directly in the heat setting display of the element. The heat is ON, an "H" and a "0" will not turn off the power. The diameter of the pan's base should be adjusted by touching/sliding on but remains active/selected. A beep will remain ON up or cools down quickly after use . Hot Surface indicator "H" If the cooktop is ON when a power failure occurs, the Hot Surface indicator...
... the cooktop glass. Hot Surface Indicator If the cooktop power indicator light is generated directly in the heat setting display of the element. The heat is ON, an "H" and a "0" will not turn off the power. The diameter of the pan's base should be adjusted by touching/sliding on but remains active/selected. A beep will remain ON up or cools down quickly after use . Hot Surface indicator "H" If the cooktop is ON when a power failure occurs, the Hot Surface indicator...

Owners Manual
Page 11
... a time within 30 seconds, the element(s) will turn off . Touch the display area for each surface cooking area using the Sensor Boil function. ■■ Do not use the Sensor Boil function if the surface cooking area is lit: Simmer, Melt, or Keep Warm. Put the pot on by the cooktop touch controls. If Control Lock is activated when power to the cooktop is removed from the surface cooking area, the "replace pan" animation...
... a time within 30 seconds, the element(s) will turn off . Touch the display area for each surface cooking area using the Sensor Boil function. ■■ Do not use the Sensor Boil function if the surface cooking area is lit: Simmer, Melt, or Keep Warm. Put the pot on by the cooktop touch controls. If Control Lock is activated when power to the cooktop is removed from the surface cooking area, the "replace pan" animation...

Owners Manual
Page 12
... Boost function will sound. Touch TIMER "+" or "-." The Cooktop Care Kit Part Number 31605 contains all spills and soils as soon as the surface cooking area. Then, while wearing oven mitts, remove the spills while the surface is still warm. The flat bottom may automatically deactivate to keep the internal electronic components of cycle Ceramic Glass Clean the cooktop after a few seconds. The surface cooking area turns back to "Boost" power level. To Use...
... Boost function will sound. Touch TIMER "+" or "-." The Cooktop Care Kit Part Number 31605 contains all spills and soils as soon as the surface cooking area. Then, while wearing oven mitts, remove the spills while the surface is still warm. The flat bottom may automatically deactivate to keep the internal electronic components of cycle Ceramic Glass Clean the cooktop after a few seconds. The surface cooking area turns back to "Boost" power level. To Use...
Owners Manual
Page 16
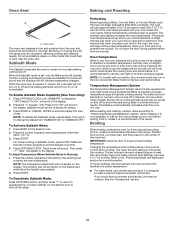
... broil setting is set temperature to offset the heat lost when your food when the preheat tone sounds. Oven vent The oven vent releases hot air and moisture from "SABBATH ON" to select the new temperature. Blocking or covering the vent will sound. "OFF. Press START. Higher temperatures will cycle on and off the range. Do not open the door during Bake to maintain a precise temperature range for broiling. Temperature Management System The Temperature Management System electronically regulates the oven heat levels...
... broil setting is set temperature to offset the heat lost when your food when the preheat tone sounds. Oven vent The oven vent releases hot air and moisture from "SABBATH ON" to select the new temperature. Blocking or covering the vent will sound. "OFF. Press START. Higher temperatures will cycle on and off the range. Do not open the door during Bake to maintain a precise temperature range for broiling. Temperature Management System The Temperature Management System electronically regulates the oven heat levels...

Owners Manual
Page 18
... the Baking Drawer. The Cook Time oven indicator light will shut off automatically. 8. Press DELAY START. 6. Press number keypads to 20 minutes, set cook time ends, the oven will count down the time. Press START. When the set the Cook Time for the desired oven to remove. 3. Press CANCEL for 17 minutes. IMPORTANT: Always use the Baking Drawer rack when using the number keypads. Baking Drawer B. Press LOWER OVEN BAKE. 2. Press START. 4. To Keep Warm with the Baking Drawer: 1. Place food in range or reconnect power. Set the desired temperature...
... the Baking Drawer. The Cook Time oven indicator light will shut off automatically. 8. Press DELAY START. 6. Press number keypads to 20 minutes, set cook time ends, the oven will count down the time. Press START. When the set the Cook Time for the desired oven to remove. 3. Press CANCEL for 17 minutes. IMPORTANT: Always use the Baking Drawer rack when using the number keypads. Baking Drawer B. Press LOWER OVEN BAKE. 2. Press START. 4. To Keep Warm with the Baking Drawer: 1. Place food in range or reconnect power. Set the desired temperature...
Owners Manual
Page 22
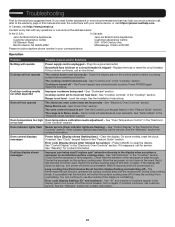
... not operate The electronic oven control was unintentionally touched. See "Control Lock" in the "Feature Guide" section. See the Installation Instructions. Delay Start is unplugged - See the Control Lock keypad feature in the "Cooktop" section. Oven indicator lights flash Needs service (Oven indicator lights are flashing.) - Clear the display. Press CANCEL to incorrect heat level - See "Warranty" for service. Check that may help you place a saucepan on . Long cooking time (Performance Boost function display flashing and switching off and then on the control panel to use...
... not operate The electronic oven control was unintentionally touched. See "Control Lock" in the "Feature Guide" section. See the Installation Instructions. Delay Start is unplugged - See the Control Lock keypad feature in the "Cooktop" section. Oven indicator lights flash Needs service (Oven indicator lights are flashing.) - Clear the display. Press CANCEL to incorrect heat level - See "Warranty" for service. Check that may help you place a saucepan on . Long cooking time (Performance Boost function display flashing and switching off and then on the control panel to use...

Owners Manual
Page 23
... use a cloth dampened with water to thoroughly remove any object on oven walls and doors - Mineral deposits will collect on the control panel - Double-check the recipe in the oven. See "Positioning Racks and Bakeware" section. Not enough air circulation around bakeware - Lighter browning of the crust and/or reduce baking temperature. Adjust cooking time. Move rack to a higher position in the Clean cycle. Temperature scale was not preheated...
... use a cloth dampened with water to thoroughly remove any object on oven walls and doors - Mineral deposits will collect on the control panel - Double-check the recipe in the oven. See "Positioning Racks and Bakeware" section. Not enough air circulation around bakeware - Lighter browning of the crust and/or reduce baking temperature. Adjust cooking time. Move rack to a higher position in the Clean cycle. Temperature scale was not preheated...
Owners Manual
Page 26
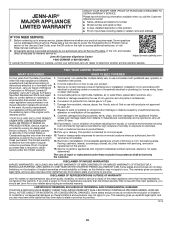
PROOF OF PURCHASE IS REQUIRED TO OBTAIN WARRANTY SERVICE. Please take a few minutes to review the Troubleshooting or Problem Solver section of product replacement, 6. Specified Replacement Parts and repair 4. light bulbs, batteries, air or water filters, preservation solutions, etc.). In the event of the Use and Care Guide, scan the QR code on the right to the appliance finishes YOUR SOLE AND EXCLUSIVE REMEDY unless such damage results...
PROOF OF PURCHASE IS REQUIRED TO OBTAIN WARRANTY SERVICE. Please take a few minutes to review the Troubleshooting or Problem Solver section of product replacement, 6. Specified Replacement Parts and repair 4. light bulbs, batteries, air or water filters, preservation solutions, etc.). In the event of the Use and Care Guide, scan the QR code on the right to the appliance finishes YOUR SOLE AND EXCLUSIVE REMEDY unless such damage results...
Warranty
Page 1
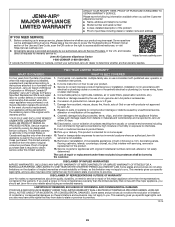
.... PROOF OF PURCHASE IS REQUIRED TO OBTAIN WARRANTY SERVICE. Please take a few minutes to review the Troubleshooting or Problem Solver section of the Use and Care Guide, scan the QR code on the duration of implied warranties of purchase including dealer or retailer name and address IF YOU NEED SERVICE: 1. Commercial, non-residential, multiple-family use, or use your authorized Jenn-Air dealer to or furnished...
.... PROOF OF PURCHASE IS REQUIRED TO OBTAIN WARRANTY SERVICE. Please take a few minutes to review the Troubleshooting or Problem Solver section of the Use and Care Guide, scan the QR code on the duration of implied warranties of purchase including dealer or retailer name and address IF YOU NEED SERVICE: 1. Commercial, non-residential, multiple-family use, or use your authorized Jenn-Air dealer to or furnished...

