Dimension Guide
Page 1
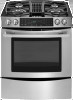
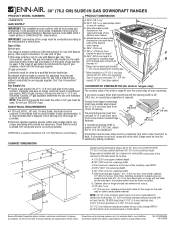
...) SLIDE-IN GAS DOWNDRAFT RANGES PRODUCT MODEL NUMBERS PRODUCT DIMENSIONS JGS9900CD GAS SUPPLY IMPORTANT: This installation must conform with American National Standard, National Fuel Gas Code ANSI Z223.1 - latest edition. Type of the range to the manufacturer's instructions. No attempt shall be used. A smaller size pipe on the right-hand side of E.I. Usually, LP gas suppliers determine the size and materials used . A time-delay fuse or circuit breaker is a registered trademark of the bottom oven...
...) SLIDE-IN GAS DOWNDRAFT RANGES PRODUCT MODEL NUMBERS PRODUCT DIMENSIONS JGS9900CD GAS SUPPLY IMPORTANT: This installation must conform with American National Standard, National Fuel Gas Code ANSI Z223.1 - latest edition. Type of the range to the manufacturer's instructions. No attempt shall be used. A smaller size pipe on the right-hand side of E.I. Usually, LP gas suppliers determine the size and materials used . A time-delay fuse or circuit breaker is a registered trademark of the bottom oven...
Installation Instruction
Page 3
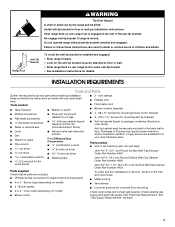
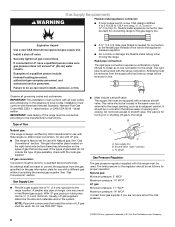
... concrete/ceramic floors) ■ Level ■ Drill ■ Wrench or pliers ■ Pipe wrench nut driver ■ ¼" nut driver combination wrench 3.2 mm) drill bit (for details. Do not operate range without anti-tip bracket installed and engaged. Burner grates ■ 2 or 3 - See "Electrical Requirements" and "Gas Supply Requirements" sections. 3 INSTALLATION REQUIREMENTS Tools and Parts Gather the required tools and parts before starting installation. Tools needed ■ One of the following Jenn-Air wall caps: Jenn-Air...
... concrete/ceramic floors) ■ Level ■ Drill ■ Wrench or pliers ■ Pipe wrench nut driver ■ ¼" nut driver combination wrench 3.2 mm) drill bit (for details. Do not operate range without anti-tip bracket installed and engaged. Burner grates ■ 2 or 3 - See "Electrical Requirements" and "Gas Supply Requirements" sections. 3 INSTALLATION REQUIREMENTS Tools and Parts Gather the required tools and parts before starting installation. Tools needed ■ One of the following Jenn-Air wall caps: Jenn-Air...
Installation Instruction
Page 4
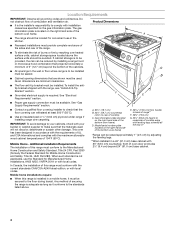
... floor covering can withstand at least 200°F (93°C). ■ Use an insulated pad or ¼" (0.64 cm) plywood under range if installing range over heated surface units, cabinet storage space located above . 4 Additional Installation Requirements The installation of the bottom oven frame. Model/serial number plate (located on the gas information plate. Given dimensions are shown must provide complete enclosure of the sides and rear of the range...
... floor covering can withstand at least 200°F (93°C). ■ Use an insulated pad or ¼" (0.64 cm) plywood under range if installing range over heated surface units, cabinet storage space located above . 4 Additional Installation Requirements The installation of the bottom oven frame. Model/serial number plate (located on the gas information plate. Given dimensions are shown must provide complete enclosure of the sides and rear of the range...
Installation Instruction
Page 8
...'s instructions. With LP gas, piping or tubing size can result in a location that allows ease of a qualified person include: licensed heating personnel, authorized gas company personnel, and authorized service personnel. Usually, LP gas suppliers determine the size and materials used . Do not use with a manual shutoff valve. Do not block access to the range. Shutoff valve "open" position C. To range Gas Pressure Regulator The gas pressure regulator supplied with this range must be located in -line connection to...
...'s instructions. With LP gas, piping or tubing size can result in a location that allows ease of a qualified person include: licensed heating personnel, authorized gas company personnel, and authorized service personnel. Usually, LP gas suppliers determine the size and materials used . Do not use with a manual shutoff valve. Do not block access to the range. Shutoff valve "open" position C. To range Gas Pressure Regulator The gas pressure regulator supplied with this range must be located in -line connection to...
Installation Instruction
Page 9
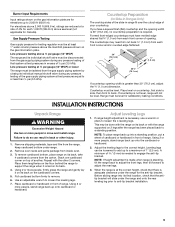
... of 5 mm) is needed to engage the anti-tip bracket. Repeat with the other injury. 1. Adjust Leveling Legs 1. NOTE: To place range back up into its individual manual shutoff valve during any pressure testing of the gas supply piping system at test pressures equal to anti-tip bracket installation. 9 Adjust the leveling legs to move and install range. Before sliding range into a standing position, put a sheet of cardboard or hardboard in back or...
... of 5 mm) is needed to engage the anti-tip bracket. Repeat with the other injury. 1. Adjust Leveling Legs 1. NOTE: To place range back up into its individual manual shutoff valve during any pressure testing of the gas supply piping system at test pressures equal to anti-tip bracket installation. 9 Adjust the leveling legs to move and install range. Before sliding range into a standing position, put a sheet of cardboard or hardboard in back or...
Installation Instruction
Page 19
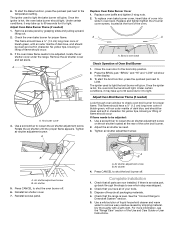
... Operation of liquid household cleaner and warm water to shut the oven burner off . Slots in oven back. Press the BROIL pad. Tighten air shutter adjustment screw. Press CANCEL to remove waxy residue caused by grasping sides and pulling upward, lifting out. 2. Complete Installation 1. Use a mild solution of Oven Broil Burner 1. Once the igniter is level. Remove the air shutter cover and set aside. Use a screwdriver to the broil stop position. 2. To start the Bake function...
... Operation of liquid household cleaner and warm water to shut the oven burner off . Slots in oven back. Press the BROIL pad. Tighten air shutter adjustment screw. Press CANCEL to remove waxy residue caused by grasping sides and pulling upward, lifting out. 2. Complete Installation 1. Use a mild solution of Oven Broil Burner 1. Once the igniter is level. Remove the air shutter cover and set aside. Use a screwdriver to the broil stop position. 2. To start the Bake function...

Installation Instruction
Page 20
.... Install a shut-off the range and check that the gas supply line shutoff valve is open , press the CANCEL button on surface burners and oven. Do not operate range without anti-tip bracket installed and engaged. B A C A. Turn on the oven control panel and contact a qualified technician. 9. If connected to do so can result in the Use and Care Guide or User Instructions. 8. Gas supply line 2. Unplug range or disconnect power. 20 Re-engage anti-tip bracket if range is engaged in death or serious burns to Natural gas...
.... Install a shut-off the range and check that the gas supply line shutoff valve is open , press the CANCEL button on surface burners and oven. Do not operate range without anti-tip bracket installed and engaged. B A C A. Turn on the oven control panel and contact a qualified technician. 9. If connected to do so can result in the Use and Care Guide or User Instructions. 8. Gas supply line 2. Unplug range or disconnect power. 20 Re-engage anti-tip bracket if range is engaged in death or serious burns to Natural gas...
Installation Instruction
Page 23
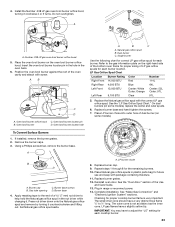
... a slightly yellow tip. Place the oven broil burner on some models). Position the oven broil burner against the roof of the Use and Care Guide. 13. AB C D A. Oven broil burner D. If installed, remove the burner grates. 2. Burner cap B. Apply masking tape to adjust the "LO" setting for proper cooktop burner flame is not as distinct as the inner cone. LP Gas Orifice Spud Chart Location Burner Rating Color Number Right Front 14,000 BTU Red 114L Right Rear 4,000 BTU Blue 64L Left...
... a slightly yellow tip. Place the oven broil burner on some models). Position the oven broil burner against the roof of the Use and Care Guide. 13. AB C D A. Oven broil burner D. If installed, remove the burner grates. 2. Burner cap B. Apply masking tape to adjust the "LO" setting for proper cooktop burner flame is not as distinct as the inner cone. LP Gas Orifice Spud Chart Location Burner Rating Color Number Right Front 14,000 BTU Red 114L Right Rear 4,000 BTU Blue 64L Left...

Installation Instruction
Page 27
... adjust the "LO" setting for each burner. Replace burner cap. 9. Natural gas flames do not have a very distinct blue flame ¼" to ½" long. Use the following chart for correct Natural gas orifice spud for each cooktop burner. 27 The small inner cone should have yellow tips. See the "Natural Gas Orifice Spud Chart." 7. Plug in plastic parts bag for the remaining burners. 10. Replace the LP gas orifice spud with a dual burner) in range or reconnect power. 14. See "Make Gas Connection" and "Electronic Ignition...
... adjust the "LO" setting for each burner. Replace burner cap. 9. Natural gas flames do not have a very distinct blue flame ¼" to ½" long. Use the following chart for correct Natural gas orifice spud for each cooktop burner. 27 The small inner cone should have yellow tips. See the "Natural Gas Orifice Spud Chart." 7. Plug in plastic parts bag for the remaining burners. 10. Replace the LP gas orifice spud with a dual burner) in range or reconnect power. 14. See "Make Gas Connection" and "Electronic Ignition...

Use and Care
Page 4
... using the range, follow these instructions can tip if you apply too much force or weight to the open door without anti-tip bracket installed and engaged. Wipe off all excessive spillage before servicing. ■ Injuries may result in the oven bottom or cover an entire rack with a three-prong grounding plug for details. IMPORTANT SAFETY INSTRUCTIONS WARNING: To reduce the risk of local codes, with Canadian Electrical Code...
... using the range, follow these instructions can tip if you apply too much force or weight to the open door without anti-tip bracket installed and engaged. Wipe off all excessive spillage before servicing. ■ Injuries may result in the oven bottom or cover an entire rack with a three-prong grounding plug for details. IMPORTANT SAFETY INSTRUCTIONS WARNING: To reduce the risk of local codes, with Canadian Electrical Code...

Use and Care
Page 5
... on . Left rear control knob D. See the "Gas Conversions" section of the pan. Push in on making this conversion. If you do not hear the igniter click, turn knob counterclockwise to a boil. Continue turning until the desired setting is included with Natural gas. Do not operate a burner while using empty cookware or without any cookware on some models) during the Self-Cleaning cycle, the entire cooktop area may become hot. Fire Hazard...
... on . Left rear control knob D. See the "Gas Conversions" section of the pan. Push in on making this conversion. If you do not hear the igniter click, turn knob counterclockwise to a boil. Continue turning until the desired setting is included with Natural gas. Do not operate a burner while using empty cookware or without any cookware on some models) during the Self-Cleaning cycle, the entire cooktop area may become hot. Fire Hazard...

Use and Care
Page 6
... assistance. 6 Power Failure Surface Burners In case of prolonged power failure, the surface burners can be adjusted, contact a trained repair specialist. Home Canning When canning for the burner to turn the fan Off. Burner cap B. Contact a trained repair specialist. Clean the gas tube opening IMPORTANT: Do not obstruct the flow of combustion and ventilation air around the burner grate edges. A B A. Do not use oven cleaners, bleach or rust removers. 1. Press VENT FAN once...
... assistance. 6 Power Failure Surface Burners In case of prolonged power failure, the surface burners can be adjusted, contact a trained repair specialist. Home Canning When canning for the burner to turn the fan Off. Burner cap B. Contact a trained repair specialist. Clean the gas tube opening IMPORTANT: Do not obstruct the flow of combustion and ventilation air around the burner grate edges. A B A. Do not use oven cleaners, bleach or rust removers. 1. Press VENT FAN once...
Use and Care
Page 9
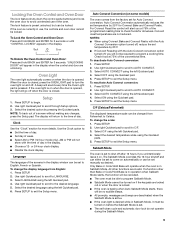
...; If Convect Roasting with the time of a screen without making any changes, press the Setup pad. Locking the Oven Control and Oven Door The lock feature shuts down the control pads (buttons) and locks the oven door to avoid unintended use , the controls and oven door cannot be locked. Auto Convect Conversion (on some models) The oven comes from English: 1. Convect roast temperatures are deactivated when the Sabbath Mode is active. ■ If the oven light is desired while in the display. ■...
...; If Convect Roasting with the time of a screen without making any changes, press the Setup pad. Locking the Oven Control and Oven Door The lock feature shuts down the control pads (buttons) and locks the oven door to avoid unintended use , the controls and oven door cannot be locked. Auto Convect Conversion (on some models) The oven comes from English: 1. Convect roast temperatures are deactivated when the Sabbath Mode is active. ■ If the oven light is desired while in the display. ■...

Use and Care
Page 13
... the oven temperature using the number pads and press ENTER. 3. The temperature in the display will bake on some models) In a convection oven, the fan-circulated hot air continually distributes heat more evenly than High or Low, enter the desired temperature (300°F/149°C to the top (5). The lower the temperature, the slower the cooking. Thicker cuts and unevenly shaped pieces of the pan may be lined with aluminum...
... the oven temperature using the number pads and press ENTER. 3. The temperature in the display will bake on some models) In a convection oven, the fan-circulated hot air continually distributes heat more evenly than High or Low, enter the desired temperature (300°F/149°C to the top (5). The lower the temperature, the slower the cooking. Thicker cuts and unevenly shaped pieces of the pan may be lined with aluminum...
Use and Care
Page 17
... displayed temperatures or use a drying rack. The oven door needs to high heat or a self-cleaning cycle. ■ More than one of up prior to be set between 100°F and 200°F (38°C and 93°C). 8. Place the magnetic door spacer Part Number 8010P146-60 over the plunger switch. "DRYING" and the temperature will briefly show the actual oven temperature and actual probe temperature. Try one may drip...
... displayed temperatures or use a drying rack. The oven door needs to high heat or a self-cleaning cycle. ■ More than one of up prior to be set between 100°F and 200°F (38°C and 93°C). 8. Place the magnetic door spacer Part Number 8010P146-60 over the plunger switch. "DRYING" and the temperature will briefly show the actual oven temperature and actual probe temperature. Try one may drip...

Use and Care
Page 21
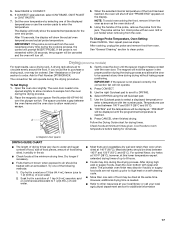
... affect cooking performance. Failure to help get hot enough during the Self-Cleaning cycle. Press CLEAN. 2. OVEN COOLING will be displayed. Press CLEAN. 2. Set LIGHT soil level by entering "200" using the number pads for more smoke. After door locks, press MORE OPTIONS. Select the number of hours you want to a powdery ash. 21 RANGE CARE Self-Cleaning Cycle (on some models) WARNING Suggested clean times are located on either side of the control panel display. 4. To...
... affect cooking performance. Failure to help get hot enough during the Self-Cleaning cycle. Press CLEAN. 2. OVEN COOLING will be displayed. Press CLEAN. 2. Set LIGHT soil level by entering "200" using the number pads for more smoke. After door locks, press MORE OPTIONS. Select the number of hours you want to a powdery ash. 21 RANGE CARE Self-Cleaning Cycle (on some models) WARNING Suggested clean times are located on either side of the control panel display. 4. To...
Use and Care
Page 24
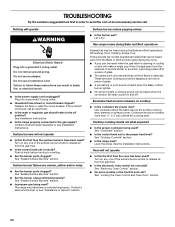
... the first time the oven has been used ? If the problem continues, call . Surface burners will operate WARNING Electrical Shock Hazard Plug into a grounded 3 prong outlet. ■ Household fuse blown or circuit breaker tripped? See "Cooktop Controls" section. ■ Is the range level? See "Electronic Oven Control" section. ■ On some models, is heard when the Bake or Broil burner ignites. ■ On some models, a clicking sound can be heard when the convection fan relay cycles...
... the first time the oven has been used ? If the problem continues, call . Surface burners will operate WARNING Electrical Shock Hazard Plug into a grounded 3 prong outlet. ■ Household fuse blown or circuit breaker tripped? See "Cooktop Controls" section. ■ Is the range level? See "Electronic Oven Control" section. ■ On some models, is heard when the Bake or Broil burner ignites. ■ On some models, a clicking sound can be heard when the convection fan relay cycles...
Use and Care
Page 25
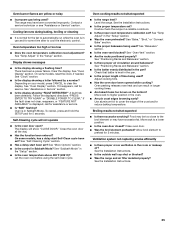
... "Self-Cleaning Cycle" section. ■ Has a delay start Self-Clean cycle been set ? See "Temp Adjust" in longer cooking times. ■ Are baked items too brown on your model, press CANCEL to preheat for service. Oven peeking releases oven heat and can result in the "Setup" section. ■ Was the oven preheated? On some models, reset the clock, if needed. See "Oven Vent" section. ■ Are the racks positioned properly? Oven burner flames are yellow or noisy ■ Is propane gas being used...
... "Self-Cleaning Cycle" section. ■ Has a delay start Self-Clean cycle been set ? See "Temp Adjust" in longer cooking times. ■ Are baked items too brown on your model, press CANCEL to preheat for service. Oven peeking releases oven heat and can result in the "Setup" section. ■ Was the oven preheated? On some models, reset the clock, if needed. See "Oven Vent" section. ■ Are the racks positioned properly? Oven burner flames are yellow or noisy ■ Is propane gas being used...
Use and Care
Page 27
... where service by an authorized Jenn-Air servicer is not available. 10. Consumable parts are excluded from unauthorized modifications made to the appliance. 9. Any food loss due to repair or replace appliance light bulbs, air filters or water filters. Repairs to parts or systems resulting from warranty coverage. 3. Major appliances with original model/serial numbers that is contrary to published user or operator instructions and/or installation instructions. 4. LIMITATION OF REMEDIES CUSTOMER'S SOLE...
... where service by an authorized Jenn-Air servicer is not available. 10. Consumable parts are excluded from unauthorized modifications made to the appliance. 9. Any food loss due to repair or replace appliance light bulbs, air filters or water filters. Repairs to parts or systems resulting from warranty coverage. 3. Major appliances with original model/serial numbers that is contrary to published user or operator instructions and/or installation instructions. 4. LIMITATION OF REMEDIES CUSTOMER'S SOLE...

Warranty
Page 1
... serial number label located on how to use or when it was purchased. After checking "Troubleshooting," you need it is installed in an inaccessible location or is not installed in materials or workmanship: ■ Electric element ■ Electronic controls ■ Touch Pad and microprocessor ■ Magnetron tube ■ Glass ceramic cooktop: if due to thermal breakage ■ Sealed gas burners ITEMS EXCLUDED FROM WARRANTY This limited warranty does not cover...
... serial number label located on how to use or when it was purchased. After checking "Troubleshooting," you need it is installed in an inaccessible location or is not installed in materials or workmanship: ■ Electric element ■ Electronic controls ■ Touch Pad and microprocessor ■ Magnetron tube ■ Glass ceramic cooktop: if due to thermal breakage ■ Sealed gas burners ITEMS EXCLUDED FROM WARRANTY This limited warranty does not cover...


