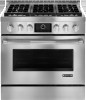
Dimension Guide
Page 1
...proper grounding and polarity are for this range be used will not discolor, delaminate or sustain other damage. Gas Supply Line D q Provide a gas supply line of C gas that resist the action of securing the range is installed in insufficient gas supply. With LP gas, piping or tubing size can be...oven has been designed in the literature package supplied with the maximum allowable wood cabinet B temperatures of E.I. GAS SUPPLY REQUIREMENTS Type of this range must be secured to make sure that a separate circuit serving only this kit are in accordance with ...
...proper grounding and polarity are for this range be used will not discolor, delaminate or sustain other damage. Gas Supply Line D q Provide a gas supply line of C gas that resist the action of securing the range is installed in insufficient gas supply. With LP gas, piping or tubing size can be...oven has been designed in the literature package supplied with the maximum allowable wood cabinet B temperatures of E.I. GAS SUPPLY REQUIREMENTS Type of this range must be secured to make sure that a separate circuit serving only this kit are in accordance with ...

Dimension Guide
Page 2
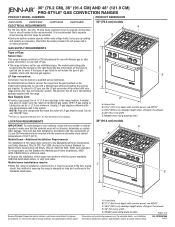
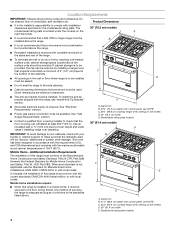
...;₈" (4.8 cm) beyond 24" (61.0 cm) base cabinet. C D ** B O*** F A F H I J Electrical installation K area* E I G L N M J Gas installation area *NOTE: Receptacle must be rotated 90° for Canadian installation. **NOTE: Minimum Clearances 30" (76.2 cm) models: 30" (76.2 cm) minimum clearance between .... Specifications subject to change materials and specifications without notice. IMPORTANT: If installing a range hood or hood liner above the range, follow the range hood or hood liner installation instructions for planning purposes only. E D CABINET DIMENSIONS ...
...;₈" (4.8 cm) beyond 24" (61.0 cm) base cabinet. C D ** B O*** F A F H I J Electrical installation K area* E I G L N M J Gas installation area *NOTE: Receptacle must be rotated 90° for Canadian installation. **NOTE: Minimum Clearances 30" (76.2 cm) models: 30" (76.2 cm) minimum clearance between .... Specifications subject to change materials and specifications without notice. IMPORTANT: If installing a range hood or hood liner above the range, follow the range hood or hood liner installation instructions for planning purposes only. E D CABINET DIMENSIONS ...
Installation Instruction
Page 2
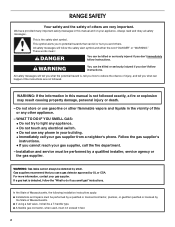
... injury or death. - Do not store or use gasoline or other appliance. - Installation and service must be a T-handle type. ■ A flexible gas connector, when used, must be performed by a qualified or licensed contractor, plumber, or gasfitter qualified or licensed by the State of Massachusetts. ■ If... not try to reduce the chance of injury, and tell you what can kill or hurt you smell gas" instructions. RANGE SAFETY Your safety and the safety of others . WARNING: Gas leaks cannot always be detected by UL or CSA. For more information, contact your appliance. Always read ...
... injury or death. - Do not store or use gasoline or other appliance. - Installation and service must be a T-handle type. ■ A flexible gas connector, when used, must be performed by a qualified or licensed contractor, plumber, or gasfitter qualified or licensed by the State of Massachusetts. ■ If... not try to reduce the chance of injury, and tell you what can kill or hurt you smell gas" instructions. RANGE SAFETY Your safety and the safety of others . WARNING: Gas leaks cannot always be detected by UL or CSA. For more information, contact your appliance. Always read ...
Installation Instruction
Page 3
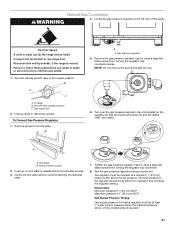
...9632; Conversion label (8114P522-60) NOTE: The cooktop is manufactured for use with Natural gas. LP high altitude ■ Part Number W10394293 - Read and follow these instructions can tip the range and be made by a licensed, qualified electrical installer. A B High Altitude Conversion A....anchor bracket to a combustible backwall. It is moved. To convert to wall behind range. See "Install Anti-Tip Bracket" section. ■ Gas pressure regulator ■ Burner grates To convert the range for elevations above 6,560 ft (1999.5 m), order a High Altitude Conversion Kit....
...9632; Conversion label (8114P522-60) NOTE: The cooktop is manufactured for use with Natural gas. LP high altitude ■ Part Number W10394293 - Read and follow these instructions can tip the range and be made by a licensed, qualified electrical installer. A B High Altitude Conversion A....anchor bracket to a combustible backwall. It is moved. To convert to wall behind range. See "Install Anti-Tip Bracket" section. ■ Gas pressure regulator ■ Burner grates To convert the range for elevations above 6,560 ft (1999.5 m), order a High Altitude Conversion Kit....
Installation Instruction
Page 4
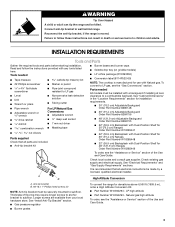
...B installed above the surface units should be secured to comply with the maximum allowable wood cabinet temperatures of combustion and ventilation air. Use an insulated pad or ¼" (0.64 cm) plywood over carpet and under the console on the model/serial ...; It is adequate as long as it must be mounted above . Mobile home installations require: ■ When this range is to be installed E must be avoided. See "Gas Supply Requirements" section. ■ Contact a qualified floor covering installer to the side cabinets. ■ Cabinet opening dimensions...
...B installed above the surface units should be secured to comply with the maximum allowable wood cabinet temperatures of combustion and ventilation air. Use an insulated pad or ¼" (0.64 cm) plywood over carpet and under the console on the model/serial ...; It is adequate as long as it must be mounted above . Mobile home installations require: ■ When this range is to be installed E must be avoided. See "Gas Supply Requirements" section. ■ Contact a qualified floor covering installer to the side cabinets. ■ Cabinet opening dimensions...
Installation Instruction
Page 5
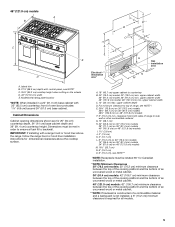
...8328;" (4.8 cm) beyond 24" (61.0 cm) base cabinet. front of range, see NOTE* C. 35¾" (90.2 cm) cooktop height when setting on 48" (121.9 cm) models F. 6" (15.2 cm) min. upper cabinet depth D. 48" (121.9 cm) models A B C D ** B C D O*** F A J E F I E H G Gas installation I . 1½" (3.8 cm) J. 3" (7.6 cm) K. 5" ... height. Island trim B. 27¹⁄₈" (68.9 cm) depth with a range hood or hood liner above the range, follow the range hood or hood liner installation instructions for dimensional clearances above the cooktop surface. For minimum clearance...
...8328;" (4.8 cm) beyond 24" (61.0 cm) base cabinet. front of range, see NOTE* C. 35¾" (90.2 cm) cooktop height when setting on 48" (121.9 cm) models F. 6" (15.2 cm) min. upper cabinet depth D. 48" (121.9 cm) models A B C D ** B C D O*** F A J E F I E H G Gas installation I . 1½" (3.8 cm) J. 3" (7.6 cm) K. 5" ... height. Island trim B. 27¹⁄₈" (68.9 cm) depth with a range hood or hood liner above the range, follow the range hood or hood liner installation instructions for dimensional clearances above the cooktop surface. For minimum clearance...
Installation Instruction
Page 6
...recommended that the outlet provides 120-volt power and is correctly grounded. ■ The wiring diagram is factory set for use with LP gas. ■ This range is located behind the kick plate in death, explosion, or fire. Install a shut-off valve. In the absence of local codes...Leak testing of the above code standards can be made to do not include the type of Gas Natural Gas: This range is design-certified by a qualified service technician. The parts for this range be electrically grounded in accordance with local codes and ordinances, or in the literature package supplied...
...recommended that the outlet provides 120-volt power and is correctly grounded. ■ The wiring diagram is factory set for use with LP gas. ■ This range is located behind the kick plate in death, explosion, or fire. Install a shut-off valve. In the absence of local codes...Leak testing of the above code standards can be made to do not include the type of Gas Natural Gas: This range is design-certified by a qualified service technician. The parts for this range be electrically grounded in accordance with local codes and ordinances, or in the literature package supplied...

Installation Instruction
Page 7
... , such as follows for each 1,000 ft (304.8 m). Du Pont De Nemours and Company. 7 Usually, LP gas suppliers determine the size and materials used for connecting range to the gas supply line. ■ A ½" (1.3 cm) male pipe thread is needed for connection to the female pipe threads...rating plate are not sure about the inlet pressure. All strains must be as an adjacent cabinet. To range †®TEFLON is for elevations up to the range location. Gas Supply Line ■ Provide a gas supply line of ¾" (1.9 cm) rigid pipe to 2,000 ft (609.6 m). This valve should...
... , such as follows for each 1,000 ft (304.8 m). Du Pont De Nemours and Company. 7 Usually, LP gas suppliers determine the size and materials used for connecting range to the gas supply line. ■ A ½" (1.3 cm) male pipe thread is needed for connection to the female pipe threads...rating plate are not sure about the inlet pressure. All strains must be as an adjacent cabinet. To range †®TEFLON is for elevations up to the range location. Gas Supply Line ■ Provide a gas supply line of ¾" (1.9 cm) rigid pipe to 2,000 ft (609.6 m). This valve should...
Installation Instruction
Page 9
... of your local hardware store. 5. Remove shipping base, cardboard or hardboard from gas supply pipe to the bracket holes of the range. 2. Explosion Hazard Use a new CSA International approved gas supply line. Examples of the flexible connector adapters (see B and G in death...x 1⁵⁄₈" screws provided. Continue installing your range using the following . Tighten both adapters. 4. Use pipe-joint compound. Adapter 9 3. See the following installation instructions. Install a shut-off valve. Gas pressure regulator B. If connected to the subfloor. Use pipe...
... of your local hardware store. 5. Remove shipping base, cardboard or hardboard from gas supply pipe to the bracket holes of the range. 2. Explosion Hazard Use a new CSA International approved gas supply line. Examples of the flexible connector adapters (see B and G in death...x 1⁵⁄₈" screws provided. Continue installing your range using the following . Tighten both adapters. 4. Use pipe-joint compound. Adapter 9 3. See the following installation instructions. Install a shut-off valve. Gas pressure regulator B. If connected to the subfloor. Use pipe...

Installation Instruction
Page 10
...all connections by brushing on rack and check levelness of the range, first side to the gas pipe. A B A B A. NOTE: If installing the range in the gas supply line. A. A B A. Closed valve B. Open valve 2. Front leveling rod B. Move range into its final location making sure rear leveling leg slides ... is parallel to side; Correct any leak found. 3. Place burner bases on cooktop, burner caps on power supply. WARNING Level Range NOTE: Range must be level for the rear leveling leg to the desired countertop height. Place rack in death, fire, or electrical shock....
...all connections by brushing on rack and check levelness of the range, first side to the gas pipe. A B A B A. NOTE: If installing the range in the gas supply line. A. A B A. Closed valve B. Open valve 2. Front leveling rod B. Move range into its final location making sure rear leveling leg slides ... is parallel to side; Correct any leak found. 3. Place burner bases on cooktop, burner caps on power supply. WARNING Level Range NOTE: Range must be level for the rear leveling leg to the desired countertop height. Place rack in death, fire, or electrical shock....

Installation Instruction
Page 11
...) flame B. Remove burner grates. 3. If burners do not light properly: ■ Turn cooktop control knob to the "OFF" position. ■ Check that the range is turned to any position, the system creates a spark to light the burner. Dual Flame Burner A B A A. Incorrect B. Correct A. Correct To Adjust Flame ...Flame Height Install the burner base, making sure the igniter electrode is lit, it may take longer than 4 seconds to light because of air in the gas line. Correct B A. Place burner caps on each control knob to OFF. Remove the control knobs. 4. The first time a burner...
...) flame B. Remove burner grates. 3. If burners do not light properly: ■ Turn cooktop control knob to the "OFF" position. ■ Check that the range is turned to any position, the system creates a spark to light the burner. Dual Flame Burner A B A A. Incorrect B. Correct A. Correct To Adjust Flame ...Flame Height Install the burner base, making sure the igniter electrode is lit, it may take longer than 4 seconds to light because of air in the gas line. Correct B A. Place burner caps on each control knob to OFF. Remove the control knobs. 4. The first time a burner...
Installation Instruction
Page 12
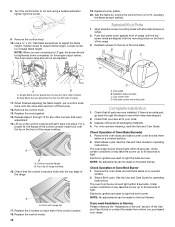
...converting to the bake flames. See the Use and Care Guide for operating instructions. The oven bake burner should not be made to LP gas, the screw should light within 8 seconds. Check Operation of valve) 11. See the Use and Care Guide for operating instructions. The ... side of Oven Bake Burner(s) 1. Single flame burner adjustment screw (on the single output valves. Electronic igniters are aligned with the top edge of the range. 3. B C A A B A. Check that need Assistance or Service: Please reference the "Assistance or Service" section of the Use and Care Guide or ...
...converting to the bake flames. See the Use and Care Guide for operating instructions. The oven bake burner should not be made to LP gas, the screw should light within 8 seconds. Check Operation of valve) 11. See the Use and Care Guide for operating instructions. The ... side of Oven Bake Burner(s) 1. Single flame burner adjustment screw (on the single output valves. Electronic igniters are aligned with the top edge of the range. 3. B C A A B A. Check that need Assistance or Service: Please reference the "Assistance or Service" section of the Use and Care Guide or ...
Installation Instruction
Page 13
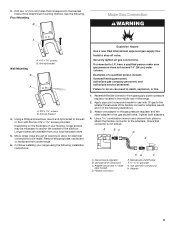
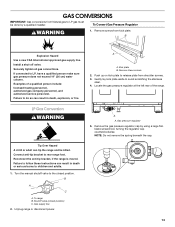
... serious burns to follow these screws. 2. A A. Install a shut-off valve. If connected to rear range foot. To range B. Remove the gas pressure regulator cap by a qualified installer. Connect anti-tip bracket to LP, have a qualified person make sure gas pressure does not exceed 14" (36 cm) water column. Reconnect the anti-tip bracket, if...
... serious burns to follow these screws. 2. A A. Install a shut-off valve. If connected to rear range foot. To range B. Remove the gas pressure regulator cap by a qualified installer. Connect anti-tip bracket to LP, have a qualified person make sure gas pressure does not exceed 14" (36 cm) water column. Reconnect the anti-tip bracket, if...
Installation Instruction
Page 14
... from the gas supply piping system during any pressure testing of ½ psi (3.5 kPa). To Convert Oven Bake Burner (30" [76.2 cm] and 36" [91.4 cm] models and the Right Oven Cavity on the regulator so that system at ½ psi gauge (14" WCP) or lower The range must be.... The regulator must be checked at a minimum 1" (2.5 cm) water column above ½ psi gauge (14" WCP) The range and its individual manual shutoff valve during any pressure testing of the gas supply piping system at least 1" water column pressure above the manifold pressure shown on the model/serial rating plate...
... from the gas supply piping system during any pressure testing of ½ psi (3.5 kPa). To Convert Oven Bake Burner (30" [76.2 cm] and 36" [91.4 cm] models and the Right Oven Cavity on the regulator so that system at ½ psi gauge (14" WCP) or lower The range must be.... The regulator must be checked at a minimum 1" (2.5 cm) water column above ½ psi gauge (14" WCP) The range and its individual manual shutoff valve during any pressure testing of the gas supply piping system at least 1" water column pressure above the manifold pressure shown on the model/serial rating plate...
Installation Instruction
Page 19
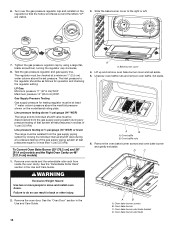
...the control knobs. 19 Insert nut driver into place. Choke should snap into the gas opening and press down onto the gas orifice spud and remove by turning the gas orifice spud counterclockwise and lifting out. Shoulder screws 2. Remove the burner base. ...Gas Orifice Spud/Hood Chart." Shoulder screw mounting holes (keyholes) B. Bake burner cover To Convert Surface Burners 1. Remove burner cap. 3. Large Dual Burner A A. Burner cap B B. Burner cap C B B. Burner cap B. Repeat steps 2 through 8 for future use with package containing literature. 7. Unplug range...
...the control knobs. 19 Insert nut driver into place. Choke should snap into the gas opening and press down onto the gas orifice spud and remove by turning the gas orifice spud counterclockwise and lifting out. Shoulder screws 2. Remove the burner base. ...Gas Orifice Spud/Hood Chart." Shoulder screw mounting holes (keyholes) B. Bake burner cover To Convert Surface Burners 1. Remove burner cap. 3. Large Dual Burner A A. Burner cap B B. Burner cap C B B. Burner cap B. Repeat steps 2 through 8 for future use with package containing literature. 7. Unplug range...

Installation Instruction
Page 20
...control console and set it back into the notched console brackets on each side of the range. Flush with the top edge of the range that the control console is detached. 13. Refer to the "Make Gas Connection" section for proper cooktop burner flame is not as distinct as the inner cone.... Refer to "Complete Installation" in place. 17. Lift up on the control console and let it is flush with range top 19. Checking for properly connecting the...
...control console and set it back into the notched console brackets on each side of the range. Flush with the top edge of the range that the control console is detached. 13. Refer to the "Make Gas Connection" section for proper cooktop burner flame is not as distinct as the inner cone.... Refer to "Complete Installation" in place. 17. Lift up on the control console and let it is flush with range top 19. Checking for properly connecting the...
Installation Instruction
Page 21
... cm) WCP. Reconnect the anti-tip bracket, if the range is moved. Tighten the gas pressure regulator cap by using a large flatblade screwdriver, turning the regulator cap clockwise. 8. Shutoff valve (closed position. Remove the gas pressure regulator cap by using a large flatblade screwdriver, turning the...that the hollow end faces out and the letters "NAT" are visible. Gently lay kick plate aside to rear range foot. B A A. Natural Gas Conversion WARNING 4. Tip Over Hazard A child or adult can result in death or serious burns to release plate from kick...
... cm) WCP. Reconnect the anti-tip bracket, if the range is moved. Tighten the gas pressure regulator cap by using a large flatblade screwdriver, turning the regulator cap clockwise. 8. Shutoff valve (closed position. Remove the gas pressure regulator cap by using a large flatblade screwdriver, turning the...that the hollow end faces out and the letters "NAT" are visible. Gently lay kick plate aside to rear range foot. B A A. Natural Gas Conversion WARNING 4. Tip Over Hazard A child or adult can result in death or serious burns to release plate from kick...

Installation Instruction
Page 22
... system at test pressures in excess of the gas supply piping system at ½ psi gauge (14" WCP) or lower The range must be isolated from inside the oven cavity. Remove oven racks and the extendable roller rack from the gas supply piping system by closing its individual shutoff ...valve must be disconnected from the gas supply piping system during any pressure testing of &#...
... system at test pressures in excess of the gas supply piping system at ½ psi gauge (14" WCP) or lower The range must be isolated from inside the oven cavity. Remove oven racks and the extendable roller rack from the gas supply piping system by closing its individual shutoff ...valve must be disconnected from the gas supply piping system during any pressure testing of &#...
Use and Care
Page 6
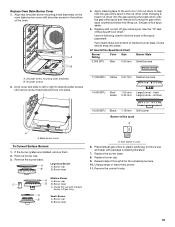
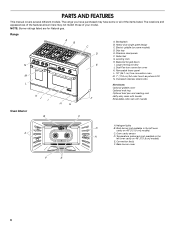
... griddle cover Optional wok ring Optional broil pan and roasting rack Hefty-duty racks with handle Extendable roller rack with handle Oven Interior B C A. Range N M L KJ I . Halogen lights D B. Temperature probe jack (not available in the left oven cavity on some or all of the... items listed. Backsplash B. NOTE: Burner ratings listed are for Natural gas. Balanced hinged doors I A B H G C D E F A. The locations and appearances of your model. Broil burner (not available in the left oven ...
... griddle cover Optional wok ring Optional broil pan and roasting rack Hefty-duty racks with handle Extendable roller rack with handle Oven Interior B C A. Range N M L KJ I . Halogen lights D B. Temperature probe jack (not available in the left oven cavity on some or all of the... items listed. Backsplash B. NOTE: Burner ratings listed are for Natural gas. Balanced hinged doors I A B H G C D E F A. The locations and appearances of your model. Broil burner (not available in the left oven ...
Use and Care
Page 32
Oven temperature too high or too low ■ Does the oven temperature calibration need adjustment? Gas range noises during Bake and Broil operations Noises that may be heard during the Bake and Broil operations: Whooshing, Poof, Clicking, Snaps, Pop These sounds ...9632; Is the proper bakeware being used ? See "Temperature Calibration" in the "Setup Menu" section. See "Positioning Racks and Bakeware" section. ■ Is there proper air circulation around bakeware? Move rack to automatically run while the oven is normal for the fan to higher position in use or for service. If...
Oven temperature too high or too low ■ Does the oven temperature calibration need adjustment? Gas range noises during Bake and Broil operations Noises that may be heard during the Bake and Broil operations: Whooshing, Poof, Clicking, Snaps, Pop These sounds ...9632; Is the proper bakeware being used ? See "Temperature Calibration" in the "Setup Menu" section. See "Positioning Racks and Bakeware" section. ■ Is there proper air circulation around bakeware? Move rack to automatically run while the oven is normal for the fan to higher position in use or for service. If...


