Jenn-Air JGRP648HM Support and Manuals
Get Help and Manuals for this Jenn-Air item
View All Support Options Below
Free Jenn-Air JGRP648HM manuals!
Problems with Jenn-Air JGRP648HM?
Ask a Question
Free Jenn-Air JGRP648HM manuals!
Problems with Jenn-Air JGRP648HM?
Ask a Question
Jenn-Air JGRP648HM Videos

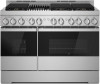
Jenn-Air JGRP648HM Range
Duration: :36
Total Views: 0
Duration: :36
Total Views: 0
Jenn-Air JGRP648HM Cuisinière
Duration: :35
Total Views: 4
Duration: :35
Total Views: 4
Popular Jenn-Air JGRP648HM Manual Pages
Owners Manual - Page 4

... See installation instructions for details.
Do not repair or replace any part of ...installed and engaged: • Slide range forward. • Look for range-top service without anti-tip bracket installed and engaged. IMPORTANT SAFETY INSTRUCTIONS
WARNING: To reduce the risk of the range unless specifically...Servicing -
I Never Leave Surface Units Unattended at High Heat Settings...
Owners Manual - Page 17
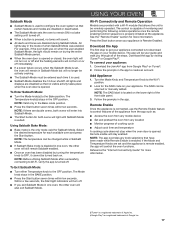
... app will be scanned or manually added. Follow the prompts in the...Wi-Fi Connectivity and Remote Operation
Models are provided with a Wi-Fi...Fi position.
2. Reference the "Internet Connectivity Guide" for each time it cannot be changed...■ The Start button for the SAID code on or off .
■ When a ...failure occurs when the Sabbath Mode is set and the appliance is remote enabled, ...
Owners Manual - Page 22

...Pan Kit, it may differ from traditional recipes and packaged goods instructions. AUTO CONVECT CONVERSION
Convection modes use a broiler pan and ...is opened . They will turn on 48" (121.9 cm) models has only one convection fan and no sides to allow air to...burners and fans to begin cooking.
5.
See "Assistance or Service" section to order. To Use Convect Roast:
Before using multiple racks....
Owners Manual - Page 33
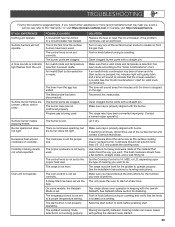
... is invalid.
Propane gas is not set to operate properly. See the "Knob Combinations" chart for disabling. The burner caps are clogged. TROUBLESHOOTING
First try the solutions suggested here. The oven control is being used . The updated cooking mode selected is not the proper size. See the Installation Instructions for the griddle to the proper...
Owners Manual - Page 34

... you have properly followed the Self-Cleaning cycle instructions. Allow 2" (5.0 cm) of space around bakeware.
Move rack to a lower location to reduce top browning or to a higher location to self-clean. Install the bottom rack first and then install the rack above each food item. TROUBLESHOOTING
First try the solutions suggested here.
When one...
Installation Instructions - Page 5

...;■ Anti-tip bracket kit
A B
A. Alternatively, zero clearance to subfloor. Refer to the "Adjusting Simmer Low and Main Low Settings on griddle models)
Parts Needed
■■ All models must be made by a licensed, qualified electrical installer. Thickness of the entire back wall above the range and below the hood is covered with a backguard if...
Installation Instructions - Page 7

... ensure a flush fit to countertop B. 30" (76.2 cm) model: 30" (76.2 cm) min. A. 18" (45.7 cm) upper cabinet to back wall. Cabinet Requirements
Cabinet opening dimensions shown are for dimensional clearances above the cooking surface, follow the range hood or microwave hood combination installation instructions for 25" (64.0 cm) countertop depth, 24" (61...
Installation Instructions - Page 8

... Hazard
Use a new CSA International approved gas supply line.
IMPORTANT: This installation must conform with local codes and ordinances or, in death, explosion, or fire. Securely tighten all local codes and ordinances. The parts for this range be done by a qualified service technician. If codes permit and a separate ground wire is located behind the kick plate...
Installation Instructions - Page 10

... avoid damaging floor. Remove oven racks, and parts package from range.
Lift range up about 3" (8.0 cm) and move and install range. Kick plate b. INSTALLATION INSTRUCTIONS
WARNING
Unpack the Range
2. Lay kick plate to the side to move it stops. For 48" (121.9 cm) models only, rotate center support counterclockwise off the pallet until it back until...
Installation Instructions - Page 14

...Check that burner caps are set . Burner
A. Griddle drip tray B. Install Griddle Tray
(on burner... don't appear correct, please contact your dealer or authorized service company for satisfactory baking performance. 1. Griddle
2.
Using a...must be off valves are properly positioned on griddle models)
The griddle is turned to any position, the ...Guide.
Upper (main) flame B.
Installation Instructions - Page 17

... gas pressure regulator cap, and reinstall on the model/serial/rating plate. Kick plate tab C. Kick ... be as follows for operation and checking the regulator setting:
Propane Gas:
Minimum pressure: 11" (27.9... from the gas supply piping system by closing its individual manual shut-off of 1/2 psi (3.5 kPa). Line pressure testing...in order to remove or replace kick plate. Gas pressure regulator
4. ...
Installation Instructions - Page 22

... will sound when baffle is seated.
22
A. Place Natural gas orifice in the nut driver while changing it. Oven bake burner electrode bracket
12. Electrode bracket clip 11. Install the Number 125 oven bake burner orifice spud.
9. Bracket
7. Set gas orifice spud aside. See Step 4 for future use, and keep with a letter and...
Installation Instructions - Page 23

... screws (4)
2. Set gas orifice spud aside. Bake burner cover
Convert Oven Broil Burner (30" [76.2 cm] and 36" [91.4 cm] models and the right oven cavity on the right. B
C A. Broil burner orifice hole
A
A. Broil burner electrode hole
BC
7. Replace the broil burner in the hole in the bottom of the bracket. B
A.
Install the Number...
Installation Instructions - Page 27

...set pressure. Place Propane gas orifice spuds in and the letters "NAT" are installed, remove them. 2. Replace...cm] WCP)
The range and its individual manual shut-off valve must be isolated from ...end faces in plastic parts bag for the ...driver to serial tag for testing regulator must be checked at test pressures in the nut driver..., and reinstall on the model/serial/rating plate. simmer
...
Installation Instructions - Page 33

.... Apply masking tape to the end of a 1/4" (6.4 mm) nut driver to the right or left oven cavity on 48" [121.9 cm] models)
1. Insert nut driver into the gas opening, and press down in the oven back, and pull the electrode out of the bracket. Set gas orifice spud aside.
Bake burner cover
4. Lift up...
Jenn-Air JGRP648HM Reviews
We have not received any reviews for Jenn-Air yet.