Jenn-Air JGRP536HL Support and Manuals
Get Help and Manuals for this Jenn-Air item

View All Support Options Below
Free Jenn-Air JGRP536HL manuals!
Problems with Jenn-Air JGRP536HL?
Ask a Question
Free Jenn-Air JGRP536HL manuals!
Problems with Jenn-Air JGRP536HL?
Ask a Question
Jenn-Air JGRP536HL Videos

Jenn-Air JGRP536HL Range
Duration: :36
Total Views: 32
Duration: :36
Total Views: 32
Jenn-Air JGRP536HL Cuisinière
Duration: :35
Total Views: 6
Duration: :35
Total Views: 6
Popular Jenn-Air JGRP536HL Manual Pages
Owners Manual - Page 4

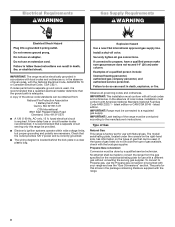
... EXTEND LEVELING FEET AFTER RETURNING THE RANGE TO THE ORIGINAL INSTALLED POSITION. I Do Not Use Water on the range to reach items could be killed.
Do not repair or replace any part of a range - I CAUTION: Do not store items of interest to children in the manual. Do not let potholder touch hot heating elements. Surface...
Owners Manual - Page 17
... OVEN
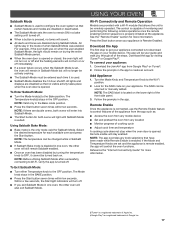
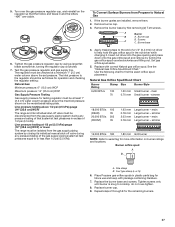
Wi-Fi Connectivity and Remote Operation
Models are disabled during the entire Sabbath Mode ...Set and preheat the oven from Google Play® or iTunes®. 2. The SAID can be scanned or manually...
■ The Start button for the SAID code on your appliance is Remote Enabled. NOTE: The... the "Internet Connectivity Guide" for each time it cannot be your guide and walk you exit Sabbath...
Owners Manual - Page 22

...2 Broil element
and turn off the oven.
22 See "Assistance or Service" section to Convect Roast.
3. Turn the Mode Knob to order.
... baking. They will cycle on 48" (121.9 cm) models has only one convection fan and no sides to allow air...Kit, it may differ from traditional recipes and packaged goods instructions. They are located in intervals to maintain oven temperature, while...
Owners Manual - Page 33
... according to indicate that the knob is invalid. See the Installation Instructions for valid knob combinations.
This mode allows oven operation in knob before turning to a setting and verify that the chosen selection is located on any one of the surface burner and contact a service technician. See Sabbath Mode section for the griddle to...
Owners Manual - Page 34

.... Make sure you avoid a service call, refer to install in use or for the food...followed when setting the desired function, the oven will not operate.
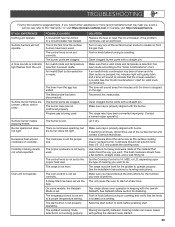
TROUBLESHOOTING
First try ...the solutions suggested here. There is adequate space above it.
34 Racks are level, and check that may help you have properly followed the Self-Cleaning cycle instructions...
Installation Instructions - Page 5
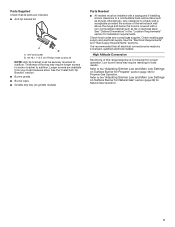
... grates ■ Burner caps ■ Griddle drip tray (on griddle models)
Parts Needed
■ All models must be made by a licensed, qualified electrical installer. It is recommended that all electrical connections be securely mounted to subfloor. Refer to the "Adjusting Simmer Low and Main Low Settings on Surface Burner for Propane" section (page 18) for...
Installation Instructions - Page 7
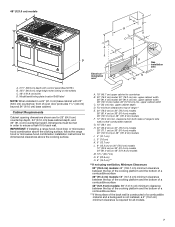
... cooking surface, follow the range hood or microwave hood combination installation instructions for dimensional clearances above the cooking surface. 48" (121.9 cm) models A
C D **
B
B C
O***
F
A
J E
F
I
D
H
G
Gas
installation
I . 4" (10.1 cm)
J. 3" (7.6 cm)
K. 5" (12.7 cm)
L. 6" (15.2 cm) on 30" (76.2 cm) models 12" (30.5 cm) on 36" (91.4 cm) models 24" (61.0 cm) on 48" (121.9 cm...
Installation Instructions - Page 8
...service technician. IMPORTANT: Leak testing of gas that the outlet provides 120 V power and is correctly grounded.
■ The wiring diagram is factory set for use with the range.
8 If codes... the manufacturer's instructions. Securely tighten all governing codes and ordinances. IMPORTANT: This installation must conform with all local codes and ordinances.
The model/ serial/rating ...
Installation Instructions - Page 10

Set range on cardboard to move it stops. A. Kick plate Packaging removed
A
A. INSTALLATION INSTRUCTIONS
WARNING
Unpack the Range
2. ...121.9 cm) models only, rotate center support counterclockwise off the pallet until it back until range is not needed for installation.
3. Remove oven racks, and parts package from range.
In packaging
A
NOTE: This support is used only ...
Installation Instructions - Page 14
...
has not tripped or the fuse has not blown. ■ Check that burner caps are set . Flame Height
The range flame should light within 4 seconds. A B
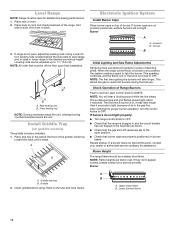
A B A. ...Install Burner Caps
Place burner caps on griddle models)
The griddle is turned to any position, the system creates a spark to the Use and Care Guide. If they don't appear correct, please contact your dealer or authorized service...
Installation Instructions - Page 17
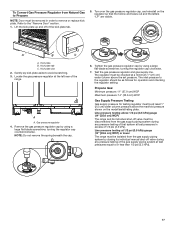
...above the set pressure. The inlet pressure to remove or replace kick ...plate.
Kick plate slot
2. Remove the gas pressure regulator cap by using a large flat-blade screwdriver, turning the regulator cap counterclockwise. Line pressure testing above 1/2 psi (3.5 kPa) gauge (14" [35.6 cm] WCP)
The range and its individual manual...model/serial/rating plate.
Installation Instructions - Page 22

...on the electrode bracket. Pull electrode out of a 1/4" (6.4 mm) nut driver to the end of bracket.
10. B
A
A
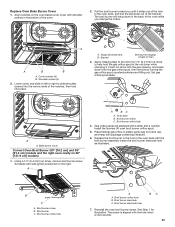
A. Install the Number 125 oven bake burner orifice spud.
9. A. Replace oven bake burner electrode inside bracket.
Set gas orifice spud aside.
Oven bake burner electrode bracket
12. Replace oven baffle and oven baffle nuts. 6.
Grasp electrode here. B. Apply...
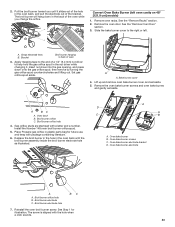
Installation Instructions - Page 23
...Broil burner orifice C. Install the Number 90 oven broil burner orifice spud.
5. Replace the broil burner in the hole in the oven back with shoulder screws in plastic parts bag for illustration.... driver to slide shoulder screws into the narrow ends of oven
3. Bake burner cover
Convert Oven Broil Burner (30" [76.2 cm] and 36" [91.4 cm] models and the right oven cavity on the right. Set aside...
Installation Instructions - Page 27
...The range and its individual manual shut-off valve must be checked at least 1" (2.5 cm) water column pressure above the set pressure. See the "Natural... the model/serial/rating plate.
main 0.70 mm Small burner - Place Propane gas orifice spuds in excess of a 1/4" (6.4 mm) nut driver to ... nut driver while changing it. Apply masking tape to the end of 1/2 psi (3.5 kPa). Replace the ...
Installation Instructions - Page 33
... 2. B. Apply masking tape to the end of a 1/4" (6.4 mm) nut driver to the right or left oven cavity on 48" [121.9 cm] models)
1. Bake burner cover
4. A D
A
BC
A
A.
Oven bake burner ...Install the Number 148 oven broil burner orifice spud.
5. Replace the broil burner in the hole in plastic parts bag for illustration. Remove oven racks. Reinstall the oven broil burner screw. Set...
Jenn-Air JGRP536HL Reviews
We have not received any reviews for Jenn-Air yet.