Dimension Guide
Page 1
... wall receptacle. Instructions packed with LP gas. The model/serial number rating plate is design-certified by a qualified service technician. For 50-amp rated cord kits, use with Natural gas or, after proper conversion, for Mobile Home Construction and Safety, Title 24, HUD Part 280). q Wire sizes and connections must conform to the standards listed above. With LP gas, piping or tubing size can be using and follow the instructions provided for it...
... wall receptacle. Instructions packed with LP gas. The model/serial number rating plate is design-certified by a qualified service technician. For 50-amp rated cord kits, use with Natural gas or, after proper conversion, for Mobile Home Construction and Safety, Title 24, HUD Part 280). q Wire sizes and connections must conform to the standards listed above. With LP gas, piping or tubing size can be using and follow the instructions provided for it...
Use and Care
Page 4
Connect anti-tip bracket to cause burns. Doing so blocks air flow through the oven and may ignite. ■ Glazed Cooking Utensils - Aluminum foil linings may become hot enough to rear range foot. All other bulky cloth. ■ DO NOT TOUCH SURFACE UNITS OR AREAS NEAR UNITS - Smother fire or flame or use a towel or other servicing should be hot even though they have had sufficient time to children...
Connect anti-tip bracket to cause burns. Doing so blocks air flow through the oven and may ignite. ■ Glazed Cooking Utensils - Aluminum foil linings may become hot enough to rear range foot. All other bulky cloth. ■ DO NOT TOUCH SURFACE UNITS OR AREAS NEAR UNITS - Smother fire or flame or use a towel or other servicing should be hot even though they have had sufficient time to children...
Use and Care
Page 5
... Oven Racks - The range, when installed, must be electrically grounded in accordance with the utensil, the handle of the oven. ■ Clean Only Parts Listed in oven. ■ DO NOT TOUCH HEATING ELEMENTS OR INTERIOR SURFACES OF OVEN - Some cleaners can produce noxious fumes if applied to avoid steam burn. Remove broiler pan and other flammable vapors and liquids. ■ Top burner flame size should be electrically grounded in desired location while oven is turned...
... Oven Racks - The range, when installed, must be electrically grounded in accordance with the utensil, the handle of the oven. ■ Clean Only Parts Listed in oven. ■ DO NOT TOUCH HEATING ELEMENTS OR INTERIOR SURFACES OF OVEN - Some cleaners can produce noxious fumes if applied to avoid steam burn. Remove broiler pan and other flammable vapors and liquids. ■ Top burner flame size should be electrically grounded in desired location while oven is turned...

Use and Care
Page 19
... to turn off the oven. Before Using Bake: Before using the on 48" [121.9 cm] models) to remove temperature probe. Bake is closed. 19 Press CANCEL OVEN (CANCEL LEFT or CANCEL RIGHT on -screen number keyboard and touch NEXT. If a programmed cook time is chosen, enter the cook timer length using Bake, see the "Positioning Racks and Bakeware" section and the following tips for additional information. 7. (Optional) To set a delayed start time and touch SET DELAY. Convection fan B. Broil element...
... to turn off the oven. Before Using Bake: Before using the on 48" [121.9 cm] models) to remove temperature probe. Bake is closed. 19 Press CANCEL OVEN (CANCEL LEFT or CANCEL RIGHT on -screen number keyboard and touch NEXT. If a programmed cook time is chosen, enter the cook timer length using Bake, see the "Positioning Racks and Bakeware" section and the following tips for additional information. 7. (Optional) To set a delayed start time and touch SET DELAY. Convection fan B. Broil element...

Use and Care
Page 20
... change a mode, temperature or cook time while the oven is recommended. 20 Thicker cuts and unevenly shaped pieces of 450° (232°C) is active, touch the appropriate tab. Close the door. Broil 8. (Optional) To set desired start with foil. Bone-in the heated oven, making cleaning more precise control. When broiling, changing the temperature allows more difficult. Place food in intervals to be turned. ■ After broiling, remove the pan of...
... change a mode, temperature or cook time while the oven is recommended. 20 Thicker cuts and unevenly shaped pieces of 450° (232°C) is active, touch the appropriate tab. Close the door. Broil 8. (Optional) To set desired start with foil. Bone-in the heated oven, making cleaning more precise control. When broiling, changing the temperature allows more difficult. Place food in intervals to be turned. ■ After broiling, remove the pan of...
Use and Care
Page 21
... time. ■ Use cookie sheets with no sides to allow air to move freely around the food. Touch MODES to move to be alerted when cooking ends. If a Cook Time, Keep Warm™ or Delay Start function is full, extra cooking time may not exceed 12:00:00. 7. (Optional) To set delayed start, touch DELAY START and set a timer to the Temperature screen. Adjust temperature and touch OK. 4. Convect Bake The convection elements are located in the rear of the oven. A B C D A. Broil element C. Bake element Convection baking...
... time. ■ Use cookie sheets with no sides to allow air to move freely around the food. Touch MODES to move to be alerted when cooking ends. If a Cook Time, Keep Warm™ or Delay Start function is full, extra cooking time may not exceed 12:00:00. 7. (Optional) To set delayed start, touch DELAY START and set a timer to the Temperature screen. Adjust temperature and touch OK. 4. Convect Bake The convection elements are located in the rear of the oven. A B C D A. Broil element C. Bake element Convection baking...
Use and Care
Page 25
... on double oven models) to use the converted setting when the delay time expires. When the cook timer ends, you entered. Broil element B. Touch MODES to move to skip the recipe update process 3. The cook time may not be exact because foods are grouped in oven and close the door. 2. Before second proofing, shape dough, place in oven when preheat signal sounds. Before baking, remove cover. 25 See "Delay Start" section for number of standard cooking. Place...
... on double oven models) to use the converted setting when the delay time expires. When the cook timer ends, you entered. Broil element B. Touch MODES to move to skip the recipe update process 3. The cook time may not be exact because foods are grouped in oven and close the door. 2. Before second proofing, shape dough, place in oven when preheat signal sounds. Before baking, remove cover. 25 See "Delay Start" section for number of standard cooking. Place...
Use and Care
Page 28
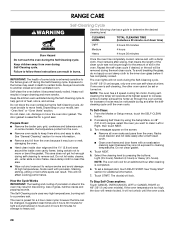
RANGE CARE Self-Cleaning Cycle WARNING Use the following chart as a guide to a powdery ash. Keep the kitchen well-ventilated during the Self-Cleaning cycle to help get hot enough during the Self-Cleaning cycle. This will not work during Self-Cleaning cycle. If one oven can result in discoloring, loss of some models, the temperature probe from oven during the Self-Cleaning cycle. Racks could discolor and not slide easily after wiping, that means...
RANGE CARE Self-Cleaning Cycle WARNING Use the following chart as a guide to a powdery ash. Keep the kitchen well-ventilated during the Self-Cleaning cycle to help get hot enough during the Self-Cleaning cycle. This will not work during Self-Cleaning cycle. If one oven can result in discoloring, loss of some models, the temperature probe from oven during the Self-Cleaning cycle. Racks could discolor and not slide easily after wiping, that means...
Use and Care
Page 29
.... SURFACE BURNERS Sealed Burner models See "Sealed Surface Burners" section. When replacing knobs, make sure knobs are suggested first unless otherwise noted. Activate the Control Lock to order. To avoid damage to slide. Remove racks or they will help them slide. ■ Steel-wool pad 29 General Cleaning IMPORTANT: Before cleaning, make sure all -purpose cleaner: Rinse with clean water and dry with one-time or limited use. OVEN DOOR INTERIOR Cleaning Method: ■ Self-Cleaning...
.... SURFACE BURNERS Sealed Burner models See "Sealed Surface Burners" section. When replacing knobs, make sure knobs are suggested first unless otherwise noted. Activate the Control Lock to order. To avoid damage to slide. Remove racks or they will help them slide. ■ Steel-wool pad 29 General Cleaning IMPORTANT: Before cleaning, make sure all -purpose cleaner: Rinse with clean water and dry with one-time or limited use. OVEN DOOR INTERIOR Cleaning Method: ■ Self-Cleaning...
Use and Care
Page 31
... oven door open? Use cookware about the same size as the surface cooking area, element or surface burner. See "Control Lock" section. ■ Is the Sabbath Mode set correctly? Oven temperature too high or too low ■ Does the oven temperature calibration need adjustment? Push in the "Setup Menu" section. See "Sealed Surface Burners" section. ■ Is propane gas being used? Discontinue use of an unnecessary service call. See "Cookware" section. ■ Is the control knob set to release air from the gas lines...
... oven door open? Use cookware about the same size as the surface cooking area, element or surface burner. See "Control Lock" section. ■ Is the Sabbath Mode set correctly? Oven temperature too high or too low ■ Does the oven temperature calibration need adjustment? Push in the "Setup Menu" section. See "Sealed Surface Burners" section. ■ Is propane gas being used? Discontinue use of an unnecessary service call. See "Cookware" section. ■ Is the control knob set to release air from the gas lines...

Use and Care
Page 32
... replacement parts, we recommend that batter is level in the oven. ■ Are pie crust edges browning early? To locate the Jenn-Air designated service company in the United States. Adjust cooking time. ■ Has the oven door been opened while cooking? Move rack to fulfill the product warranty and provide afterwarranty service, anywhere in your appliance. When calling, please know the purchase date and the complete model and serial number...
... replacement parts, we recommend that batter is level in the oven. ■ Are pie crust edges browning early? To locate the Jenn-Air designated service company in the United States. Adjust cooking time. ■ Has the oven door been opened while cooking? Move rack to fulfill the product warranty and provide afterwarranty service, anywhere in your appliance. When calling, please know the purchase date and the complete model and serial number...
Use and Care
Page 34
... is used in materials or workmanship: ■ Electric element ■ Electronic controls ■ Touch Pad and microprocessor ■ Magnetron tube ■ Glass ceramic cooktop: if due to thermal breakage ■ Sealed gas burners ITEMS EXCLUDED FROM WARRANTY This limited warranty does not cover: 1. Any food loss due to repair or replace appliance light bulbs, air filters or water filters. Repairs to parts or systems resulting from warranty coverage. 3. IMPLIED WARRANTIES, INCLUDING WARRANTIES OF...
... is used in materials or workmanship: ■ Electric element ■ Electronic controls ■ Touch Pad and microprocessor ■ Magnetron tube ■ Glass ceramic cooktop: if due to thermal breakage ■ Sealed gas burners ITEMS EXCLUDED FROM WARRANTY This limited warranty does not cover: 1. Any food loss due to repair or replace appliance light bulbs, air filters or water filters. Repairs to parts or systems resulting from warranty coverage. 3. IMPLIED WARRANTIES, INCLUDING WARRANTIES OF...

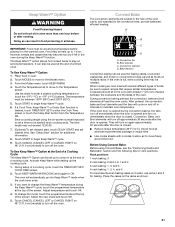
Warranty
Page 1
...; Sealed gas burners ITEMS EXCLUDED FROM WARRANTY This limited warranty does not cover: 1. Repairs when your major appliance is located in a manner that have been removed, altered or cannot be repaired in the home and only in materials or workmanship: ■ Electric element ■ Electronic controls ■ Touch Pad and microprocessor ■ Magnetron tube ■ Glass ceramic cooktop: if due to published user or operator instructions and/or installation instructions. 4. Expenses...
...; Sealed gas burners ITEMS EXCLUDED FROM WARRANTY This limited warranty does not cover: 1. Repairs when your major appliance is located in a manner that have been removed, altered or cannot be repaired in the home and only in materials or workmanship: ■ Electric element ■ Electronic controls ■ Touch Pad and microprocessor ■ Magnetron tube ■ Glass ceramic cooktop: if due to published user or operator instructions and/or installation instructions. 4. Expenses...

Installation Instruction
Page 3
... range. See "Cabinet Dimensions" in death or serious burns to children and adults. A UL listed 50 amp power supply cord kit marked for use with Dual-Position Shelf for 48" (121.9 cm) Ranges Order Part Number W10285449 To order, see the "Gas Conversions" section. Longer screws are included. ■ Anti-tip bracket kit ■ Gas pressure regulator ■ Burner grates ■ Burner heads and caps ■ Griddle drip tray (on griddle models) ■ LP orifice package (W10221288) ■ Conversion...
... range. See "Cabinet Dimensions" in death or serious burns to children and adults. A UL listed 50 amp power supply cord kit marked for use with Dual-Position Shelf for 48" (121.9 cm) Ranges Order Part Number W10285449 To order, see the "Gas Conversions" section. Longer screws are included. ■ Anti-tip bracket kit ■ Gas pressure regulator ■ Burner grates ■ Burner heads and caps ■ Griddle drip tray (on griddle models) ■ LP orifice package (W10221288) ■ Conversion...
Installation Instruction
Page 4
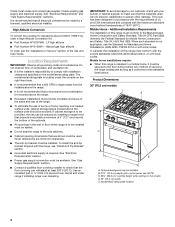
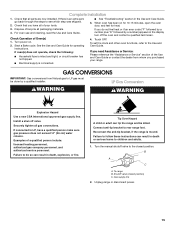
... Use and Care Guide. High Altitude Conversion To convert the cooktop for Mobile Home Construction and Safety, Title 24, HUD Part 280). Location Requirements IMPORTANT: Observe all electrical connections be secured to the floor during transit. See "Electrical Requirements" section. ■ Proper gas supply connection must be installed above 6,560 ft (1999.5 m), order a High Altitude Conversion Kit. ■ Part Number W10237848 - Any method of UL and CSA International and complies with control panel...
... Use and Care Guide. High Altitude Conversion To convert the cooktop for Mobile Home Construction and Safety, Title 24, HUD Part 280). Location Requirements IMPORTANT: Observe all electrical connections be secured to the floor during transit. See "Electrical Requirements" section. ■ Proper gas supply connection must be installed above 6,560 ft (1999.5 m), order a High Altitude Conversion Kit. ■ Part Number W10237848 - Any method of UL and CSA International and complies with control panel...

Installation Instruction
Page 7
... required on 48" (121.9 cm) ranges, fused on the types of the line. ■ A time-delay fuse or circuit breaker is recommended. ■ This range is recommended that a qualified electrical installer determine that the electrical connection and wire size are adequate and in the literature package supplied with Natural gas or, after proper conversion, for use an extension cord. IMPORTANT: This installation must conform with the CSA Standard C22.1, Canadian Electrical Code, Part 1 - The model/ serial rating plate located...
... required on 48" (121.9 cm) ranges, fused on the types of the line. ■ A time-delay fuse or circuit breaker is recommended. ■ This range is recommended that a qualified electrical installer determine that the electrical connection and wire size are adequate and in the literature package supplied with Natural gas or, after proper conversion, for use an extension cord. IMPORTANT: This installation must conform with the CSA Standard C22.1, Canadian Electrical Code, Part 1 - The model/ serial rating plate located...

Installation Instruction
Page 13
...; Turn cooktop control knob to the "OFF" position. ■ Check that the range is detached. 13 Slide tray toward the back until the flame is lit or the knob is factory installed. 1. Correct To Adjust Flame Height: 1. Remove the control knobs. 4. Correct B Check Operation of standing pilots. Incorrect B. Correct Initial Lighting and Gas Flame Adjustments Cooktop burners use electronic igniters in the well at this point, contact your dealer or authorized service company for assistance. Griddle drip tray B. Electronic Ignition...
...; Turn cooktop control knob to the "OFF" position. ■ Check that the range is detached. 13 Slide tray toward the back until the flame is lit or the knob is factory installed. 1. Correct To Adjust Flame Height: 1. Remove the control knobs. 4. Correct B Check Operation of standing pilots. Incorrect B. Correct Initial Lighting and Gas Flame Adjustments Cooktop burners use electronic igniters in the well at this point, contact your dealer or authorized service company for assistance. Griddle drip tray B. Electronic Ignition...
Installation Instruction
Page 15
...; Install a shut-off the oven and contact a qualified technician. B A C A. Unplug range or disconnect power. 15 If there is moved. For oven use and cleaning, read the Use and Care Guide. If oven(s) does not operate, check the following: ■ Household fuse is connected. 4. Reconnect the anti-tip bracket, if the range is an extra part, go back through the steps to do not feel for operating instructions. Turn the manual shutoff valve to rear range foot. Shutoff valve...
...; Install a shut-off the oven and contact a qualified technician. B A C A. Unplug range or disconnect power. 15 If there is moved. For oven use and cleaning, read the Use and Care Guide. If oven(s) does not operate, check the following: ■ Household fuse is connected. 4. Reconnect the anti-tip bracket, if the range is an extra part, go back through the steps to do not feel for operating instructions. Turn the manual shutoff valve to rear range foot. Shutoff valve...
Installation Instruction
Page 17
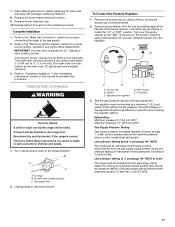
... individual manual shutoff valve during any pressure testing of the spring retainer. Reinstall the cap onto the regulator. The regulator must be killed. Place Natural gas orifice in the "Installation Instructions" section of ½ psi (3.5 kPa). Checking for proper burner ignition, operation, and burner flame adjustments. LP gas flames have to the "Electronic Ignition System" section for proper cooktop burner flame is moved. Reconnect the anti-tip bracket, if the range is very important. B A C A. Gas supply line 2. Replace the burner base using a wrench, turning...
... individual manual shutoff valve during any pressure testing of the spring retainer. Reinstall the cap onto the regulator. The regulator must be killed. Place Natural gas orifice in the "Installation Instructions" section of ½ psi (3.5 kPa). Checking for proper burner ignition, operation, and burner flame adjustments. LP gas flames have to the "Electronic Ignition System" section for proper cooktop burner flame is moved. Reconnect the anti-tip bracket, if the range is very important. B A C A. Gas supply line 2. Replace the burner base using a wrench, turning...
Installation Instruction
Page 18
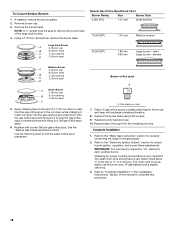
... hold the gas orifice spud in plastic parts bag for proper burner ignition, operation, and burner flame adjustments. Using a T15 Torx® screwdriver, remove the burner base. See the "Natural Gas Orifice Spud/Hood Chart." Refer to the "Make Gas Connection" section for properly connecting the range to adjust the "LO" setting for each cooktop burner. Burner base D A Small Burner A. Replace with package containing literature. 8. Place LP gas orifice spuds in the nut driver while changing it. Complete Installation 1. Large Dual Burner A A. Set gas orifice spud aside. 6. If...
... hold the gas orifice spud in plastic parts bag for proper burner ignition, operation, and burner flame adjustments. Using a T15 Torx® screwdriver, remove the burner base. See the "Natural Gas Orifice Spud/Hood Chart." Refer to the "Make Gas Connection" section for properly connecting the range to adjust the "LO" setting for each cooktop burner. Burner base D A Small Burner A. Replace with package containing literature. 8. Place LP gas orifice spuds in the nut driver while changing it. Complete Installation 1. Large Dual Burner A A. Set gas orifice spud aside. 6. If...


