
Instruction Manual
Page 4
...to-understand as possible, we have adapted the following methods: • Button and control operations are not going to operate the System for purchasing a JVC product. How to Read This Manual To make this example, 2 seconds). • If no user serviceable parts inside the System. If you want...you press and hold until the entire procedure is complete or until you get out. Indicates that you want is only possible Remote ONLY using the remote control. Indicates that you press the button briefly and repeatedly until an option you press the button briefly. Indicates that this...
...to-understand as possible, we have adapted the following methods: • Button and control operations are not going to operate the System for purchasing a JVC product. How to Read This Manual To make this example, 2 seconds). • If no user serviceable parts inside the System. If you want...you press and hold until the entire procedure is complete or until you get out. Indicates that you want is only possible Remote ONLY using the remote control. Indicates that you press the button briefly and repeatedly until an option you press the button briefly. Indicates that this...

Instruction Manual
Page 5
... Information 18 Learning More about This System 18 Troubleshooting 19 Maintenance 20 Specifications 21 Parts Index 22 2 Contents Getting Started 3 Step 1: Unpack 3 Step 2: Prepare the Remote Control 3 Step 3: Hook Up 4 Before Operating the System 6 Daily Operations-Playback 7 Listening to the Radio 8 Playable Media and Files 9 Playing Back a Disc 9 Playing Back a USB...
... Information 18 Learning More about This System 18 Troubleshooting 19 Maintenance 20 Specifications 21 Parts Index 22 2 Contents Getting Started 3 Step 1: Unpack 3 Step 2: Prepare the Remote Control 3 Step 3: Hook Up 4 Before Operating the System 6 Daily Operations-Playback 7 Listening to the Radio 8 Playable Media and Files 9 Playing Back a Disc 9 Playing Back a USB...

Instruction Manual
Page 6
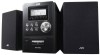
... and speakers (see pages 4 and 5). Getting Started Step 1:Unpack the package and check the accessories. Step 2: Prepare the Remote Control Insert the batteries into the remote control by matching the polarity (+ and -) correctly. • If the range or effectiveness of each piece supplied. •... FM antenna (1) • AM loop antenna (1) • Remote control (1) • Batteries (2) If any item is missing, consult your dealer immediately. Step 1: Unpack After unpacking, check to be sure that you...
... and speakers (see pages 4 and 5). Getting Started Step 1:Unpack the package and check the accessories. Step 2: Prepare the Remote Control Insert the batteries into the remote control by matching the polarity (+ and -) correctly. • If the range or effectiveness of each piece supplied. •... FM antenna (1) • AM loop antenna (1) • Remote control (1) • Batteries (2) If any item is missing, consult your dealer immediately. Step 1: Unpack After unpacking, check to be sure that you...
Instruction Manual
Page 11
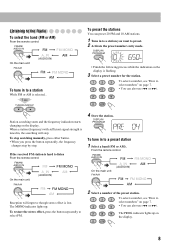
... stations. 1 Tune in to select numbers" on page 7. 4 5 6 • You can also use 4 or x. 7 8 9 The PROG. If the received FM station is lost. From the remote control: FM/AM/ AUDIO IN FM FM MONO A_IN AM (AUDIO IN) On the main unit: FM FM MONO AM 2 Select a number of the preset... starts and the frequency indication starts changing on the display. To stop . To restore the stereo effect, press the button repeatedly to listen From the remote control: FM/AM/ AUDIO IN FM FM MONO A_IN AM (AUDIO IN) On the main unit: FM FM MONO AM Reception will stop searching manually...
... stations. 1 Tune in to select numbers" on page 7. 4 5 6 • You can also use 4 or x. 7 8 9 The PROG. If the received FM station is lost. From the remote control: FM/AM/ AUDIO IN FM FM MONO A_IN AM (AUDIO IN) On the main unit: FM FM MONO AM 2 Select a number of the preset... starts and the frequency indication starts changing on the display. To stop . To restore the stereo effect, press the button repeatedly to listen From the remote control: FM/AM/ AUDIO IN FM FM MONO A_IN AM (AUDIO IN) On the main unit: FM FM MONO AM Reception will stop searching manually...

Instruction Manual
Page 13
... To select a track/group To select a track: PRESET Selects the next tracks. Playing Back Other Equipment To connect other equipment. To locate a track directly and Remote start play back an MP3/WMA file, you want is shown on page 7. 4 5 6 7 8 9 0 10 Portable audio player, etc. Stereo mini...reverses the track. DISPLAY/ PROGRAM ID3 ON ID3 OFF ID3/WMA tag information is reached. Selects the previous groups. To select AUDIO IN From the remote control: FM/AM/ AUDIO IN FM A_IN (AUDIO IN) On the main unit: FM MONO AM • When you play ONLY 1 2 ...
... To select a track/group To select a track: PRESET Selects the next tracks. Playing Back Other Equipment To connect other equipment. To locate a track directly and Remote start play back an MP3/WMA file, you want is shown on page 7. 4 5 6 7 8 9 0 10 Portable audio player, etc. Stereo mini...reverses the track. DISPLAY/ PROGRAM ID3 ON ID3 OFF ID3/WMA tag information is reached. Selects the previous groups. To select AUDIO IN From the remote control: FM/AM/ AUDIO IN FM A_IN (AUDIO IN) On the main unit: FM MONO AM • When you play ONLY 1 2 ...
Instruction Manual
Page 14
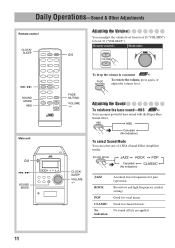
...: VOLUME 4, x SOUND MODE HBS Main unit 4, x SOUND MODE FADE MUTING VOLUME +/- Adjusting the Sound To reinforce the bass sound-HBS Remote ONLY You can adjust the volume level from level 0 ("VOL MIN") to level 31 ("VOL MAX"). Boosts low and high frequencies. (initial... setting) Good for classical music. Good for vocal music. CLOCK/ SLEEP VOLUME +/- Daily Operations-Sound & Other Adjustments Remote control CLOCK/ SLEEP Adjusting the Volume You can enjoy powerful bass sound with the Hyper-Bass Sound effect. SOUND MODE JAZZ ROCK POP Canceled (...
...: VOLUME 4, x SOUND MODE HBS Main unit 4, x SOUND MODE FADE MUTING VOLUME +/- Adjusting the Sound To reinforce the bass sound-HBS Remote ONLY You can adjust the volume level from level 0 ("VOL MIN") to level 31 ("VOL MAX"). Boosts low and high frequencies. (initial... setting) Good for classical music. Good for vocal music. CLOCK/ SLEEP VOLUME +/- Daily Operations-Sound & Other Adjustments Remote control CLOCK/ SLEEP Adjusting the Volume You can enjoy powerful bass sound with the Hyper-Bass Sound effect. SOUND MODE JAZZ ROCK POP Canceled (...

Instruction Manual
Page 16
.../ PROGRAM PROG. TUNING/GROUP Track number Program step Program step PROG. CD For MP3/WMA: (1) Select a group. Advanced Disc/USB Mass Storage Class Device Operations Remote control Number buttons CD 6 4, x TUNING/ GROUP K, 5 RANDOM DISPLAY/ PROGRAM USB MEMORY 6 STOP 7 REPEAT Programming the Playing Order-
.../ PROGRAM PROG. TUNING/GROUP Track number Program step Program step PROG. CD For MP3/WMA: (1) Select a group. Advanced Disc/USB Mass Storage Class Device Operations Remote control Number buttons CD 6 4, x TUNING/ GROUP K, 5 RANDOM DISPLAY/ PROGRAM USB MEMORY 6 STOP 7 REPEAT Programming the Playing Order-

Instruction Manual
Page 18
To skip a track: To pause: CD To stop: STOP or USB MEMORY Playing Repeatedly-Repeat Play Remote ONLY You can play back all the tracks in the random order. For audio CD: REPEAT REPEAT1 REPEAT Canceled (No indication) For MP3/WMA: REPEAT ... (or the program during Random Play. Repeats all the tracks at random. 1 Select the source. Repeats all tracks are played. Playing at Random-Random Play Remote ONLY You can play back tracks repeatedly.
To skip a track: To pause: CD To stop: STOP or USB MEMORY Playing Repeatedly-Repeat Play Remote ONLY You can play back all the tracks in the random order. For audio CD: REPEAT REPEAT1 REPEAT Canceled (No indication) For MP3/WMA: REPEAT ... (or the program during Random Play. Repeats all the tracks at random. 1 Select the source. Repeats all tracks are played. Playing at Random-Random Play Remote ONLY You can play back tracks repeatedly.
Instruction Manual
Page 19
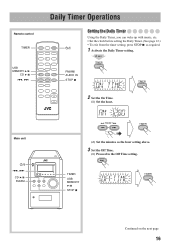
Remote control TIMER USB MEMORY 6 CD 6 4, x Daily Timer Operations FM/AM/ AUDIO IN STOP 7 Setting the Daily Timer Using the Daily Timer, you can wake up ...
Remote control TIMER USB MEMORY 6 CD 6 4, x Daily Timer Operations FM/AM/ AUDIO IN STOP 7 Setting the Daily Timer Using the Daily Timer, you can wake up ...
Instruction Manual
Page 22
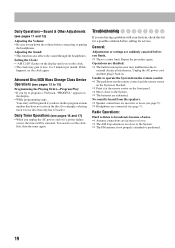
... due to program an item number that only has 12 tracks). Troubleshooting If you finish. ] There is heard from the remote control. ] The path between the remote control and the remote sensor on the front panel. ] Move closer to 2 minutes per month. Daily Timer Operations (see pages 16 and 17...7). If this list for a possible solution before connecting or putting the headphones. Unplug the AC power cord and then plug it at the remote sensor on the System is not properly extended or positioned. 19 Radio Operations: Hard to listen to broadcasts because of noise. ] Antenna connections ...
... due to program an item number that only has 12 tracks). Troubleshooting If you finish. ] There is heard from the remote control. ] The path between the remote control and the remote sensor on the front panel. ] Move closer to 2 minutes per month. Daily Timer Operations (see pages 16 and 17...7). If this list for a possible solution before connecting or putting the headphones. Unplug the AC power cord and then plug it at the remote sensor on the System is not properly extended or positioned. 19 Radio Operations: Hard to listen to broadcasts because of noise. ] Antenna connections ...

Instruction Manual
Page 25
Remote control 16, 17 12 7, 8, 10 7, 9, 13 - 15, 17 10, 12 - 17 8, 10, 13 15 11 11 USB MEMORY AUDIO IN 7, 12, 17 8, 10, 13, 14 7, 8, 10, 17 7, 9, 13 - 15, 17 9, 13 - 16 11 15 7, 11 Main unit 7, 12, 17 10, 12 - 14, 16, 17 8, 10, 13 7, 8, 17 7, 9, 13, 14, 17 7, 10 9, 13, 14, 16 7 9 Remote sensor 6 16, 17 12 8, 10, 13, 14 7, 11 7, 9, 13, 14, 17 11 9, 10 22 Parts Index Refer to the pages to see how to use the buttons and controls.
Remote control 16, 17 12 7, 8, 10 7, 9, 13 - 15, 17 10, 12 - 17 8, 10, 13 15 11 11 USB MEMORY AUDIO IN 7, 12, 17 8, 10, 13, 14 7, 8, 10, 17 7, 9, 13 - 15, 17 9, 13 - 16 11 15 7, 11 Main unit 7, 12, 17 10, 12 - 14, 16, 17 8, 10, 13 7, 8, 17 7, 9, 13, 14, 17 7, 10 9, 13, 14, 16 7 9 Remote sensor 6 16, 17 12 8, 10, 13, 14 7, 11 7, 9, 13, 14, 17 11 9, 10 22 Parts Index Refer to the pages to see how to use the buttons and controls.


