Instructions
Page 3
...regarder directement avec des instruments optiques. 4. TH-D60: 30.7 kg/68 lbs TH-D50/TH-D5/TH-D4: 23.7 kg/53 lbs G-2 This equipment generates, uses and can cause hearing loss. CAUTION: (For U.S.A.) Visible and/or invisible class II laser radiation when open the...l'appareil. CAUTION! CAUTION: Excessive sound pressure from that interference will not occur in accordance with optical instruments. 4. Do not view directly with the instructions, may cause harmful interference to part 15 of the following measures: Reorient or relocate the receiving antenna. PRODUIT LASER CLASSE 1 2....
...regarder directement avec des instruments optiques. 4. TH-D60: 30.7 kg/68 lbs TH-D50/TH-D5/TH-D4: 23.7 kg/53 lbs G-2 This equipment generates, uses and can cause hearing loss. CAUTION: (For U.S.A.) Visible and/or invisible class II laser radiation when open the...l'appareil. CAUTION! CAUTION: Excessive sound pressure from that interference will not occur in accordance with optical instruments. 4. Do not view directly with the instructions, may cause harmful interference to part 15 of the following measures: Reorient or relocate the receiving antenna. PRODUIT LASER CLASSE 1 2....

Instructions
Page 4
... control 5 Connecting the speakers and subwoofer 5 Speaker layout 6 Connecting the antennas 7 Connecting a TV 7 Connecting external components 8 Connecting the AC power cord 9 Basic and common operations 10 Sound and monitor settings 12 Sound settings and adjustments 12 Scanning mode setting 14 Disc/file playback 15 Basic playback 15 Using the disc menu 17 Locating a desired scene or song 17 Changing the playback mode 18 Advanced operations 19 Special playback for button operations Press the button briefly. Illustrations for DVD Audio 20 Operation from the on-screen...
... control 5 Connecting the speakers and subwoofer 5 Speaker layout 6 Connecting the antennas 7 Connecting a TV 7 Connecting external components 8 Connecting the AC power cord 9 Basic and common operations 10 Sound and monitor settings 12 Sound settings and adjustments 12 Scanning mode setting 14 Disc/file playback 15 Basic playback 15 Using the disc menu 17 Locating a desired scene or song 17 Changing the playback mode 18 Advanced operations 19 Special playback for button operations Press the button briefly. Illustrations for DVD Audio 20 Operation from the on-screen...
Instructions
Page 5
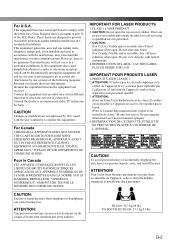
... are no user-serviceable parts inside the System, turn off the TV's main power switch or unplug it near a heating device. Be especially careful that children do not pull the speaker cords. To clean the System • Use a soft cloth. Follow the relevant instructions on the TV's main power switch again. Notes on installing the System • Select a location which is connected to the wall outlet...
... are no user-serviceable parts inside the System, turn off the TV's main power switch or unplug it near a heating device. Be especially careful that children do not pull the speaker cords. To clean the System • Use a soft cloth. Follow the relevant instructions on the TV's main power switch again. Notes on installing the System • Select a location which is connected to the wall outlet...

Instructions
Page 6
...) Audio CD A disc recorded in the DVD VR format Audio/video files on a disc ( 4) Types of DVD Video DVD Video players and DVD Video discs have their characteristics. USB mass storage class device A USB flash memory device, hard disk drive, multimedia card reader, digital camera, etc. DVD-R/-RW: This System does not support "multiborder" discs. This System cannot recognize a USB mass storage class device whose Region Code numbers include "1." Some discs/devices/files may require operations that an PAL video signal...
...) Audio CD A disc recorded in the DVD VR format Audio/video files on a disc ( 4) Types of DVD Video DVD Video players and DVD Video discs have their characteristics. USB mass storage class device A USB flash memory device, hard disk drive, multimedia card reader, digital camera, etc. DVD-R/-RW: This System does not support "multiborder" discs. This System cannot recognize a USB mass storage class device whose Region Code numbers include "1." Some discs/devices/files may require operations that an PAL video signal...

Instructions
Page 8
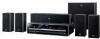
... accessories Connecting the speakers and subwoofer If anything is missing, contact your dealer immediately. • Remote control (x 1) • Batteries (x 2) • FM antenna (x 1) • AM loop antenna (x 1) • Composite video cord (x 1) • Connector for the System, use speakers of the same speaker impedance (SPEAKER IMPEDANCE) indicated on the rear of the remote control decreases, replace both to the center unit and to the q terminals. 5 TH-D50/TH-D5/TH-D4: For front and surround speakers (x 16...
... accessories Connecting the speakers and subwoofer If anything is missing, contact your dealer immediately. • Remote control (x 1) • Batteries (x 2) • FM antenna (x 1) • AM loop antenna (x 1) • Composite video cord (x 1) • Connector for the System, use speakers of the same speaker impedance (SPEAKER IMPEDANCE) indicated on the rear of the remote control decreases, replace both to the center unit and to the q terminals. 5 TH-D50/TH-D5/TH-D4: For front and surround speakers (x 16...
Instructions
Page 10
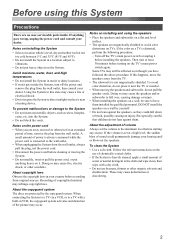
... Digital Content Protection) source, allow a few seconds for either satellite or terrestrial signal strength ( 25) AM and FM antennas Make sure the antenna conductors do not touch any other terminals, connecting cords or power cords. Extend it until the best reception is as DVD Audio even when the HDMI AUDIO OUT setting is "ON" ( 24). * This setting is available only when the speaker position mode is set to view the playback picture. Where "Channel...
... Digital Content Protection) source, allow a few seconds for either satellite or terrestrial signal strength ( 25) AM and FM antennas Make sure the antenna conductors do not touch any other terminals, connecting cords or power cords. Extend it until the best reception is as DVD Audio even when the HDMI AUDIO OUT setting is "ON" ( 24). * This setting is available only when the speaker position mode is set to view the playback picture. Where "Channel...
Instructions
Page 11
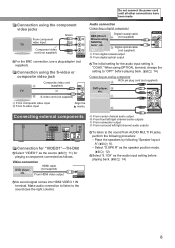
... surround left/right channel audio outputs To listen to the sound from AUDIO MULTI IN jacks, perform the following "Speaker layout A" ( 6). - Connection using the S-video or composite video jack Composite video cord (supplied) TV or Audio connection Connecting a digital component DBS (Direct Broadcasting Digital coaxial cable (not supplied) Satellite) tuner, etc. HDMI cable (not supplied) From HDMI video output No sound signal comes into HDMI VIDEO 1 IN terminal. Make audio connection to listen to "OPT" before playing back. ( 14) 8 Do not connect the power cord until...
... surround left/right channel audio outputs To listen to the sound from AUDIO MULTI IN jacks, perform the following "Speaker layout A" ( 6). - Connection using the S-video or composite video jack Composite video cord (supplied) TV or Audio connection Connecting a digital component DBS (Direct Broadcasting Digital coaxial cable (not supplied) Satellite) tuner, etc. HDMI cable (not supplied) From HDMI video output No sound signal comes into HDMI VIDEO 1 IN terminal. Make audio connection to listen to "OPT" before playing back. ( 14) 8 Do not connect the power cord until...
Instructions
Page 12
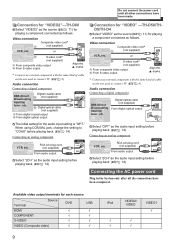
...) Select "OPT" as the one used to "COAX" before playing back. ( 14) Connecting an analog component VCR, etc. Video connection Composite video cord* (not supplied) VCR, etc. When using COAXIAL jack, change the setting to connect TV. ( 8) Audio connection Connecting a digital component DBS (Direct Broadcasting Satellite) tuner, etc. Available video output terminals for the audio input setting is "OPT." Digital optical cable (not supplied) From digital optical output The initial setting for each source Source Terminal HDMI COMPONENT S-VIDEO VIDEO (Composite video) DVD...
...) Select "OPT" as the one used to "COAX" before playing back. ( 14) Connecting an analog component VCR, etc. Video connection Composite video cord* (not supplied) VCR, etc. When using COAXIAL jack, change the setting to connect TV. ( 8) Audio connection Connecting a digital component DBS (Direct Broadcasting Satellite) tuner, etc. Available video output terminals for the audio input setting is "OPT." Digital optical cable (not supplied) From digital optical output The initial setting for each source Source Terminal HDMI COMPONENT S-VIDEO VIDEO (Composite video) DVD...
Instructions
Page 13
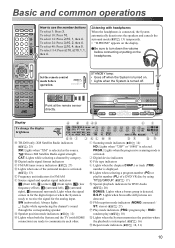
... to receive the signal for the analog input. B Digital audio signal format indicators C FM/AM tuner source indicators ( 27) D Lights when one of a DVD VR disc by category. G Speaker position mode indicators ( 12) H Lights when both the System and the TV (with headphones When the headphones is connected, the System automatically deactivates the speakers and cancels the surround mode ( 13) temporarily. • "H.PHONE" appears on the display. To select 40: Press...
... to receive the signal for the analog input. B Digital audio signal format indicators C FM/AM tuner source indicators ( 27) D Lights when one of a DVD VR disc by category. G Speaker position mode indicators ( 12) H Lights when both the System and the TV (with headphones When the headphones is connected, the System automatically deactivates the speakers and cancels the surround mode ( 13) temporarily. • "H.PHONE" appears on the display. To select 40: Press...
Instructions
Page 14
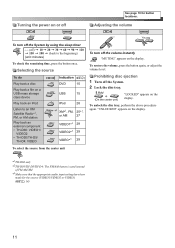
... 1 Turn off the System. 2 Lock the disc tray. «Hold (On the center unit) "LOCKED" appears on the display. *1TH-D60 only *2TH-D50/TH-D5/TH-D4: The FM/AM button is used instead of FM/AM/XM. *3Make sure that the appropriate audio input setting have been made for button locations. To restore the volume, press the button again, or adjust the volume level. Selecting the source To do Play back a disc Play...
... 1 Turn off the System. 2 Lock the disc tray. «Hold (On the center unit) "LOCKED" appears on the display. *1TH-D60 only *2TH-D50/TH-D5/TH-D4: The FM/AM button is used instead of FM/AM/XM. *3Make sure that the appropriate audio input setting have been made for button locations. To restore the volume, press the button again, or adjust the volume level. Selecting the source To do Play back a disc Play...
Instructions
Page 15
...*1, VIDEO2 TH-D50/TH-D5/TH-D4: DVD, USB, IPod, VIDEO - The surround mode ( 13) is set to your speaker layout ( 6). For speaker layout A S.SPK R • The R indicator lights on the selected speaker position mode (see below) are also changed automatically: - You can also make adjustments from the LEVEL menu ( 24) when the speaker position mode is changed, the following two groups of sources: - Sound settings and adjustments As the speaker position mode is "S.SPK R." *1With "COAX" or "OPT" selected as the audio input setting...
...*1, VIDEO2 TH-D50/TH-D5/TH-D4: DVD, USB, IPod, VIDEO - The surround mode ( 13) is set to your speaker layout ( 6). For speaker layout A S.SPK R • The R indicator lights on the selected speaker position mode (see below) are also changed automatically: - You can also make adjustments from the LEVEL menu ( 24) when the speaker position mode is changed, the following two groups of sources: - Sound settings and adjustments As the speaker position mode is "S.SPK R." *1With "COAX" or "OPT" selected as the audio input setting...
Instructions
Page 16
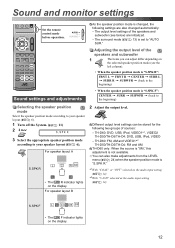
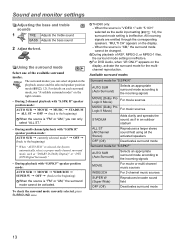
...) * When "AUTO SUR" is selected, the System automatically selects a proper multi-channel surround mode, such as "DOLBY D (Dolby Digital)" or "DTS (DTS Digital Surround)." • During playback with "5.1CH" selected as if in an outdoor stadium ALL ST (All Channel Stereo) Reproduces a larger stereo sound field using all the activated speakers OFF (Off) Deactivates surround mode Surround mode for the multichannel reproduction. Sound and monitor settings Adjusting the bass and treble sounds 1 TRE Adjusts the treble sound BASS Adjusts the bass sound 2 Adjust the level. TH-D60...
...) * When "AUTO SUR" is selected, the System automatically selects a proper multi-channel surround mode, such as "DOLBY D (Dolby Digital)" or "DTS (DTS Digital Surround)." • During playback with "5.1CH" selected as if in an outdoor stadium ALL ST (All Channel Stereo) Reproduces a larger stereo sound field using all the activated speakers OFF (Off) Deactivates surround mode Surround mode for the multichannel reproduction. Sound and monitor settings Adjusting the bass and treble sounds 1 TRE Adjusts the treble sound BASS Adjusts the bass sound 2 Adjust the level. TH-D60...

Instructions
Page 18
... class device Operating the touch sensor panel You can deactivate the screen saver function. ( 23) When several types of these buttons, it lights briefly in blue. USB mass storage class device 2 Turn on the System, then select "USB" as the source. ( 11) 2 (On the center unit) 3 Place a disc on the TV. ( 22) 15 Press 3 (play . ( 23) For messages and icons appearing on the display, see "Messages...
... class device Operating the touch sensor panel You can deactivate the screen saver function. ( 23) When several types of these buttons, it lights briefly in blue. USB mass storage class device 2 Turn on the System, then select "USB" as the source. ( 11) 2 (On the center unit) 3 Place a disc on the TV. ( 22) 15 Press 3 (play . ( 23) For messages and icons appearing on the display, see "Messages...
Instructions
Page 19
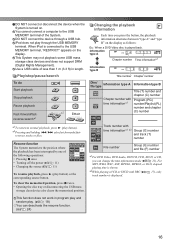
... (C) number Program (PG) number/Playlist (PL) number and chapter (C) number *1To return to normal playback, press 3 (play button) or the corresponding source button. This System may not playback some USB mass storage class devices and does not support DRM (Digital Rights Management). This function does not work in length. When iPod is connected to the USB MEMORY terminal of the following operations: • Pressing 7 once • Turning off the power...
... (C) number Program (PG) number/Playlist (PL) number and chapter (C) number *1To return to normal playback, press 3 (play button) or the corresponding source button. This System may not playback some USB mass storage class devices and does not support DRM (Digital Rights Management). This function does not work in length. When iPod is connected to the USB MEMORY terminal of the following operations: • Pressing 7 once • Turning off the power...
Instructions
Page 20
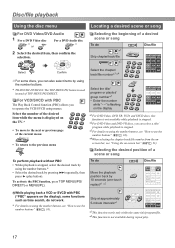
..., then press 3 (play . 17 Disc/file playback Using the disc menu Locating a desired scene or song For DVD Video/DVD Audio 1 For a DVD Video disc * or For a DVD Audio disc * 2 Select the desired item, then confirm the selection. Select the number of TOP MENU/PG/DIRECT. Select the chapter/ track/file number*3 *4 Select the title/ program or playlist/ group number*3 • Enter the number while "- -" is flashing on the display *1For DVD Video, DVD VR, VCD, and SVCD discs, this function is not available...
..., then press 3 (play . 17 Disc/file playback Using the disc menu Locating a desired scene or song For DVD Video/DVD Audio 1 For a DVD Video disc * or For a DVD Audio disc * 2 Select the desired item, then confirm the selection. Select the number of TOP MENU/PG/DIRECT. Select the chapter/ track/file number*3 *4 Select the title/ program or playlist/ group number*3 • Enter the number while "- -" is flashing on the display *1For DVD Video, DVD VR, VCD, and SVCD discs, this function is not available...

Instructions
Page 27
... its HDMI terminal, make the setting on the external component. Select the audio signal output to the TV connected to the multi-channel software (except 1channel and 2-channel sources). AUTO: Select this to 0 ms for the furthest speaker from the HDMI MONITOR OUT terminal (ON) or not (OFF). • For selecting whether the external component emits the audio signal through its own Registration Code for the source "DVD" or "USB." You can enjoy powerful audio even at low volume level while playing Dolby Digital software. Select...
... its HDMI terminal, make the setting on the external component. Select the audio signal output to the TV connected to the multi-channel software (except 1channel and 2-channel sources). AUTO: Select this to 0 ms for the furthest speaker from the HDMI MONITOR OUT terminal (ON) or not (OFF). • For selecting whether the external component emits the audio signal through its own Registration Code for the source "DVD" or "USB." You can enjoy powerful audio even at low volume level while playing Dolby Digital software. Select...
Instructions
Page 30
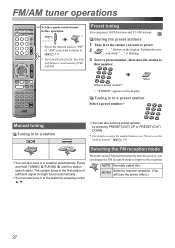
... will lose the stereo effect.) 27 Storing the preset stations 1 Tune in is used instead of sufficient signal strength found automatically. AUTO Normally select this. MONO Select to a station automatically. You can change the FM reception mode to that number. Selecting the FM reception mode You can preset 30 FM stations and 15 AM stations. Preset tuning You can also tune in to . ( 11) * TH-D50/TH-D5/TH-D4: The FM/ AM button is noisy...
... will lose the stereo effect.) 27 Storing the preset stations 1 Tune in is used instead of sufficient signal strength found automatically. AUTO Normally select this. MONO Select to a station automatically. You can change the FM reception mode to that number. Selecting the FM reception mode You can preset 30 FM stations and 15 AM stations. Preset tuning You can also tune in to . ( 11) * TH-D50/TH-D5/TH-D4: The FM/ AM button is noisy...
Instructions
Page 34
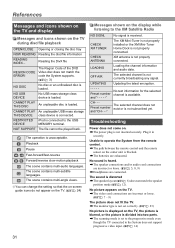
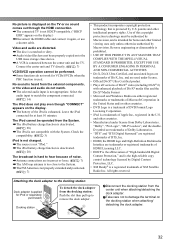
... Mini-Tuner Home Dock is loaded. ZThe video cord connections are connected. ZThe scanning mode is set correctly. ( 23) No picture is not set to the progressive mode even though the TV connected to operate the System from the remote control. CANNOT PLAY An unplayable USB mass storage THIS DEVICE class device is not subscribed yet. The selected channel does not Preset number exist or is connected. Plug it in securely. ZThe speaker connections and/or audio cord connections...
... Mini-Tuner Home Dock is loaded. ZThe video cord connections are connected. ZThe scanning mode is set correctly. ( 23) No picture is not set to the progressive mode even though the TV connected to operate the System from the remote control. CANNOT PLAY An unplayable USB mass storage THIS DEVICE class device is not subscribed yet. The selected channel does not Preset number exist or is connected. Plug it in securely. ZThe speaker connections and/or audio cord connections...
Instructions
Page 35
... display.) ZDisconnect the HDMI cable and connect it again, or use a shorter cable. No sound is connected between the center unit and the TV. Select the audio input to damage the terminal on the display. ZThe source is exhausted. ZA VCR is heard from Dolby Laboratories. The iPod cannot be performed. Take care not to match the component connected. ( 14) The iPod does not play even though "CONNECT" appears on the docking station...
... display.) ZDisconnect the HDMI cable and connect it again, or use a shorter cable. No sound is connected between the center unit and the TV. Select the audio input to damage the terminal on the display. ZThe source is exhausted. ZA VCR is heard from Dolby Laboratories. The iPod cannot be performed. Take care not to match the component connected. ( 14) The iPod does not play even though "CONNECT" appears on the docking station...
Instructions
Page 36
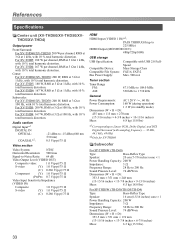
...: 64 dB Video Output Level (VIDEO OUT) Composite video: 1.0 V(p-p)/75 Ω S-video (Y): 1.0 V(p-p)/75 Ω (C): 0.286 V(p-p)/75 Ω Component (Y): 1.0 V(p-p)/75 Ω (PB/PR): 0.7 V(p-p)/75 Ω Video Input Sensitivity/Impedance (VIDEO IN) Composite: 1.0 V(p-p)/75 Ω S-video (Y): 1.0 V(p-p)/75 Ω (C): 0.286 V(p-p)/75 Ω HDMI HDMI Input (VIDEO 1 IN)*2: PASS THROUGH (up to 225 MHz) HDMI Output (MONITOR OUT): 480p/720p/1080i USB storage USB Specification: Compatible Device: Compatible File System: Bus Power Supply: Compatible with USB 2.0 FullSpeed...
...: 64 dB Video Output Level (VIDEO OUT) Composite video: 1.0 V(p-p)/75 Ω S-video (Y): 1.0 V(p-p)/75 Ω (C): 0.286 V(p-p)/75 Ω Component (Y): 1.0 V(p-p)/75 Ω (PB/PR): 0.7 V(p-p)/75 Ω Video Input Sensitivity/Impedance (VIDEO IN) Composite: 1.0 V(p-p)/75 Ω S-video (Y): 1.0 V(p-p)/75 Ω (C): 0.286 V(p-p)/75 Ω HDMI HDMI Input (VIDEO 1 IN)*2: PASS THROUGH (up to 225 MHz) HDMI Output (MONITOR OUT): 480p/720p/1080i USB storage USB Specification: Compatible Device: Compatible File System: Bus Power Supply: Compatible with USB 2.0 FullSpeed...


