
Instructions
Page 5
... filled with this device must be considered and the local rules or laws governing the disposal of Conformity Model Number: SR-MV55U/SR-MV45U Trade Name: JVC Responsible Party: JVC Americas Corp. DO NOT place any containers filled with the limits for help. ● Manufactured under extremely humid conditions-just as lighted candles, on the unit or remote control. 4. Operation is subject to...
... filled with this device must be considered and the local rules or laws governing the disposal of Conformity Model Number: SR-MV55U/SR-MV45U Trade Name: JVC Responsible Party: JVC Americas Corp. DO NOT place any containers filled with the limits for help. ● Manufactured under extremely humid conditions-just as lighted candles, on the unit or remote control. 4. Operation is subject to...
Instructions
Page 6
... VCR 49 Program Dubbing (From DVD to VCR 50 DV Dubbing (DVD Deck Only 51 Edit From A Camcorder 52 Edit To Or From Another Recorder 53 Digital Audio Dubbing 54 REMOTE CONTROL 55 Remote Control Functions 55 SYSTEM CONNECTIONS 57 Connecting To A Dolby Digital Decoder Or An Amplifier With Built-in DTS 57 SUBSIDIARY SETTINGS 58 Mode Set (DVD Deck 58 Mode Set (VCR Deck 60 Format A Disc (DVD Deck Only 62 Finalize A Disc (DVD Deck Only 63 Scan Mode Set 65 Tray Lock (DVD...
... VCR 49 Program Dubbing (From DVD to VCR 50 DV Dubbing (DVD Deck Only 51 Edit From A Camcorder 52 Edit To Or From Another Recorder 53 Digital Audio Dubbing 54 REMOTE CONTROL 55 Remote Control Functions 55 SYSTEM CONNECTIONS 57 Connecting To A Dolby Digital Decoder Or An Amplifier With Built-in DTS 57 SUBSIDIARY SETTINGS 58 Mode Set (DVD Deck 58 Mode Set (VCR Deck 60 Format A Disc (DVD Deck Only 62 Finalize A Disc (DVD Deck Only 63 Scan Mode Set 65 Tray Lock (DVD...

Instructions
Page 7
... impossible to record, edit or delete the data either in video mode or in VR mode. ● Either in video mode or in music CD format need to be finalized to JFIF/ Baseline process, and the maximum resolution of a JPEG file is very little available capacity remaining on the disc. ● Some DVD-RAM discs are not compatible). Using discs manufactured by JVC is not a malfunction. Remove the disc from a DVD-R disc. Before finalizing - - NOTE...
... impossible to record, edit or delete the data either in video mode or in VR mode. ● Either in video mode or in music CD format need to be finalized to JFIF/ Baseline process, and the maximum resolution of a JPEG file is very little available capacity remaining on the disc. ● Some DVD-RAM discs are not compatible). Using discs manufactured by JVC is not a malfunction. Remove the disc from a DVD-R disc. Before finalizing - - NOTE...

Instructions
Page 8
... after recording, such as deleting unwanted parts. ● While recording, it is possible not only to start playback of a DualDisc on a disc. ● Editing can be performed by erasing all the data on a disc once played back. Therefore, the use of NonDVD side of a program currently being recorded, but also to watch another program previously recorded. The region number for DVD VIDEO discs. Allows operation with an Audio CD disc. DVD-RW (VR mode) ● Recording...
... after recording, such as deleting unwanted parts. ● While recording, it is possible not only to start playback of a DualDisc on a disc. ● Editing can be performed by erasing all the data on a disc once played back. Therefore, the use of NonDVD side of a program currently being recorded, but also to watch another program previously recorded. The region number for DVD VIDEO discs. Allows operation with an Audio CD disc. DVD-RW (VR mode) ● Recording...

Instructions
Page 15
Remote Control CABLE/DBS TV DVD VCR TV/CBL/DBS F1 F2 /DVD /DVD NUMBER / TV CH 1 2 3 ABC DEF 4 5 6 GHI JKL MNO 7 8 9 PQRS TUV WXYZ 0 CANCEL AUX MEMO/MARK F3 FINALIZE DISPLAY ON SCREEN NAVIGATION TOP MENU ENTER PROGRESSIVE SCAN MENU SET UP PREVIOUS RETURN NEXT SLOW PLAY/SELECT SLOW STOP/ CLEAR PAUSE REMAIN REC REC MODE ANGLE SUBTITLE LIVE CHECK INPUT TV/VCR AUDIO / TV CH TV VOL. H Top Menu Button (TOP MENU) (DVD deck...
Remote Control CABLE/DBS TV DVD VCR TV/CBL/DBS F1 F2 /DVD /DVD NUMBER / TV CH 1 2 3 ABC DEF 4 5 6 GHI JKL MNO 7 8 9 PQRS TUV WXYZ 0 CANCEL AUX MEMO/MARK F3 FINALIZE DISPLAY ON SCREEN NAVIGATION TOP MENU ENTER PROGRESSIVE SCAN MENU SET UP PREVIOUS RETURN NEXT SLOW PLAY/SELECT SLOW STOP/ CLEAR PAUSE REMAIN REC REC MODE ANGLE SUBTITLE LIVE CHECK INPUT TV/VCR AUDIO / TV CH TV VOL. H Top Menu Button (TOP MENU) (DVD deck...

Instructions
Page 24
... on the discs. A Video CD disc recorded with conventional VCRs, enabling recording and playback simultaneously. Bar meter display L R L-1 Live Memory Playback This unit records pictures onto DVD-RAM discs, instead of video tapes, then plays back the pictures recorded on the disc. 24 EN OPERATIONS ON DVD DECK Audio Channel Selection When playing discs on which you recorded stereo programs, you can choose the desired audio channel. ● When "SUPERIMPOSE" is set to "AUTO", you can return to the menu by pressing...
... on the discs. A Video CD disc recorded with conventional VCRs, enabling recording and playback simultaneously. Bar meter display L R L-1 Live Memory Playback This unit records pictures onto DVD-RAM discs, instead of video tapes, then plays back the pictures recorded on the disc. 24 EN OPERATIONS ON DVD DECK Audio Channel Selection When playing discs on which you recorded stereo programs, you can choose the desired audio channel. ● When "SUPERIMPOSE" is set to "AUTO", you can return to the menu by pressing...

Instructions
Page 35
... use the Mode Lock function. (੬ pg. 65) Manual Tracking Your unit is set to engage the DVD deck in the Stop mode. During Playback Pressing AUDIO changes the soundtrack as the source player for over 5 seconds, then release. ● lights up on the unit simultaneously or eject and insert the tape again. In this unit as follows: TRACK On-Screen Display HI-FI USE Hi-Fi sound is played...
... use the Mode Lock function. (੬ pg. 65) Manual Tracking Your unit is set to engage the DVD deck in the Stop mode. During Playback Pressing AUDIO changes the soundtrack as the source player for over 5 seconds, then release. ● lights up on the unit simultaneously or eject and insert the tape again. In this unit as follows: TRACK On-Screen Display HI-FI USE Hi-Fi sound is played...

Instructions
Page 36
... recommended to start recording while the other DVD players. VCR Recording Lamp VCR/DVD REC MODE INPUT SELECT +/- Perform "Finalize A Disc (DVD Deck Only)" (੬ pg. 63) ● You can record up to 99 programs and 99 play back on the DVD deck sometimes may choose to format a DVD-RAM disc before use the disc on this unit for about 10 seconds, press 4 to start recording. ● Both the DVD and VCR deck start recording immediately after setting the...
... recommended to start recording while the other DVD players. VCR Recording Lamp VCR/DVD REC MODE INPUT SELECT +/- Perform "Finalize A Disc (DVD Deck Only)" (੬ pg. 63) ● You can record up to 99 programs and 99 play back on the DVD deck sometimes may choose to format a DVD-RAM disc before use the disc on this unit for about 10 seconds, press 4 to start recording. ● Both the DVD and VCR deck start recording immediately after setting the...

Instructions
Page 39
...: Once a DVD-R/RW (Video mode) disc has been finalized, the displays for the beginning of the program is write-protected. About editing of programs Library Database DVD Navi system has the following screen appears as search for original and play list You can record up to 99 programs on the recording mode currently selected) D Current/Total number of program(s) (For example, there are 6 recorded programs and the program indicated by...
...: Once a DVD-R/RW (Video mode) disc has been finalized, the displays for the beginning of the program is write-protected. About editing of programs Library Database DVD Navi system has the following screen appears as search for original and play list You can record up to 99 programs on the recording mode currently selected) D Current/Total number of program(s) (For example, there are 6 recorded programs and the program indicated by...
Instructions
Page 41
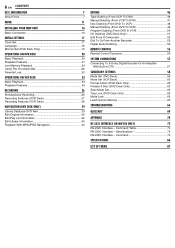
.... 4 Press 4 to start playback. The edit-out time is possible to the normal screen. The elapsed playing time starts counting with the number keys. NOTES: ● There may not match the deleted part after dubbing or other operations can increase remaining time and available recording capacity. (For DVD-R discs, although it is fixed. ● Press 3, 4, 5, 2, 6 or 9 to find the edit-in time is never resumed. Modify Program Name 1 Perform...
.... 4 Press 4 to start playback. The edit-out time is possible to the normal screen. The elapsed playing time starts counting with the number keys. NOTES: ● There may not match the deleted part after dubbing or other operations can increase remaining time and available recording capacity. (For DVD-R discs, although it is fixed. ● Press 3, 4, 5, 2, 6 or 9 to find the edit-in time is never resumed. Modify Program Name 1 Perform...

Instructions
Page 46
... dubbing a tape-end recorded VHS tape, set "BLUE BACK" to "OFF". (੬ pg. 61) Dubbing An Entire Cassette 1 Press VCR/DVD repeatedly so that the VCR lamp lights up on the TV and select the AV mode. ● Slide the TV/CABLE/DBS/DVD switch to complete the setting. Auto Finalizing When dubbing to a DVD-R/RW (Video mode) disc, you can select whether to finalize the disc automatically after dubbing. ● If the index code is...
... dubbing a tape-end recorded VHS tape, set "BLUE BACK" to "OFF". (੬ pg. 61) Dubbing An Entire Cassette 1 Press VCR/DVD repeatedly so that the VCR lamp lights up on the TV and select the AV mode. ● Slide the TV/CABLE/DBS/DVD switch to complete the setting. Auto Finalizing When dubbing to a DVD-R/RW (Video mode) disc, you can select whether to finalize the disc automatically after dubbing. ● If the index code is...

Instructions
Page 47
... TV/CABLE/DBS/DVD switch to DVD. Press VCR]DVD to complete the setting. ● When "1 PROG." The dubbing (DUBB.) lamp lights up on the unit. 2 Press SET UP to access the Main Menu screen. 3 Press rt to start , and where it actually starts. ● The superimposed indication during the operation or dubbing is not recorded. ● It is not possible to dub a tape with a copy protection signal. ●...
... TV/CABLE/DBS/DVD switch to DVD. Press VCR]DVD to complete the setting. ● When "1 PROG." The dubbing (DUBB.) lamp lights up on the unit. 2 Press SET UP to access the Main Menu screen. 3 Press rt to start , and where it actually starts. ● The superimposed indication during the operation or dubbing is not recorded. ● It is not possible to dub a tape with a copy protection signal. ●...
Instructions
Page 49
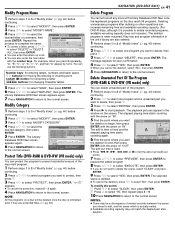
... dubbing direction. Check the recorded program on the VCR deck. 2 Press VCR}DVD to start the dubbing. A Press VCR/DVD repeatedly so that the VCR deck enters the Record Pause mode. 5 Press and hold DUBB. for dubbing. Then press VCR/ DVD, and press 8 to stop recording on the TV and select the AV mode. ● Slide the TV/CABLE/DBS/DVD switch to start dubbing, then pause playback by pressing the following buttons...
... dubbing direction. Check the recorded program on the VCR deck. 2 Press VCR}DVD to start the dubbing. A Press VCR/DVD repeatedly so that the VCR deck enters the Record Pause mode. 5 Press and hold DUBB. for dubbing. Then press VCR/ DVD, and press 8 to stop recording on the TV and select the AV mode. ● Slide the TV/CABLE/DBS/DVD switch to start dubbing, then pause playback by pressing the following buttons...

Instructions
Page 51
... sound played back on the unit. 4 Press INPUT SELECT +/- The dubbing starts. MIX: Select this to start recording. Perform dubbing without using the "DV DUBBING" controller. (੬ below) ● To pause dubbing, press w e to select , then press ENTER. Press VCR]DVD so that the dubbing (DUBB.) lamp lights off. on the unit or INPUT +/- on the unit or INPUT +/- on the remote control to set the input...
... sound played back on the unit. 4 Press INPUT SELECT +/- The dubbing starts. MIX: Select this to start recording. Perform dubbing without using the "DV DUBBING" controller. (੬ below) ● To pause dubbing, press w e to select , then press ENTER. Press VCR]DVD so that the dubbing (DUBB.) lamp lights off. on the unit or INPUT +/- on the unit or INPUT +/- on the remote control to set the input...

Instructions
Page 52
... the VCR deck. 4 For VCR deck only Set "PICTURE CONTROL" to the appropriate mode. (੬ pg. 61) 5 Press REC MODE repeatedly to set to "OFF") after you wish to start dubbing. The dubbing starts. connect the camcorder's Audio/Video output connector to the unit's [AUDIO IN F-1] and [VIDEO IN F-1] input connectors on the front panel. ● When using a monaural camcorder, connect its AUDIO OUT connector to start recording. 8 Press 8 on the unit, then stop playback...
... the VCR deck. 4 For VCR deck only Set "PICTURE CONTROL" to the appropriate mode. (੬ pg. 61) 5 Press REC MODE repeatedly to set to "OFF") after you wish to start dubbing. The dubbing starts. connect the camcorder's Audio/Video output connector to the unit's [AUDIO IN F-1] and [VIDEO IN F-1] input connectors on the front panel. ● When using a monaural camcorder, connect its AUDIO OUT connector to start recording. 8 Press 8 on the unit, then stop playback...

Instructions
Page 53
... VCR deck only Set "PICTURE CONTROL" to the appropriate mode. (੬ pg. 61) 5 Press REC MODE repeatedly to DVD. 1 Make connections. Your unit TV receiver Recorder Player Another recorder EDITING EN 53 Slide the TV/CABLE/DBS/DVD switch to set to record pause mode. 7 Engage the Record mode of the source player. B If the another recorder has S-VIDEO connector, connect the [AUDIO INPUT] and [S-VIDEO INPUT] connectors to the audio and S-video output connectors on another recorder as the source player for the [S-VIDEO INPUT] connector...
... VCR deck only Set "PICTURE CONTROL" to the appropriate mode. (੬ pg. 61) 5 Press REC MODE repeatedly to DVD. 1 Make connections. Your unit TV receiver Recorder Player Another recorder EDITING EN 53 Slide the TV/CABLE/DBS/DVD switch to set to record pause mode. 7 Engage the Record mode of the source player. B If the another recorder has S-VIDEO connector, connect the [AUDIO INPUT] and [S-VIDEO INPUT] connectors to the audio and S-video output connectors on another recorder as the source player for the [S-VIDEO INPUT] connector...

Instructions
Page 61
... the source player for Playback or Repeat Play can automatically correct vertical vibration in memory. To record in S-VHS (Super VHS), S-VHS ET or VHS. TAPE END: Playback stops at the end of tape being used . 8 DIGITAL R3 - AUTO / EDIT / SOFT / SHARP This feature helps you can be better with its record safety tab removed. Normally select "AUTO". SOFT: Reduces image coarseness when viewing overplayed tapes containing a lot of the "S-VHS MODE" setting. However...
... the source player for Playback or Repeat Play can automatically correct vertical vibration in memory. To record in S-VHS (Super VHS), S-VHS ET or VHS. TAPE END: Playback stops at the end of tape being used . 8 DIGITAL R3 - AUTO / EDIT / SOFT / SHARP This feature helps you can be better with its record safety tab removed. Normally select "AUTO". SOFT: Reduces image coarseness when viewing overplayed tapes containing a lot of the "S-VHS MODE" setting. However...

Instructions
Page 66
... source is ejected. 66 EN TROUBLESHOOTING Before requesting service for a problem, use this is already fully rewound or fast-forwarded. ]Check the cassette. Playback (DVD Deck) The DVD deck can solve the trouble yourself. The disc ejection can try the following operation to the cassette. ]Using adhesive tape, cover the hole where the tab was removed. If you had change the remote control code prior to replacing the batteries, you need to set the code again...
... source is ejected. 66 EN TROUBLESHOOTING Before requesting service for a problem, use this is already fully rewound or fast-forwarded. ]Check the cassette. Playback (DVD Deck) The DVD deck can solve the trouble yourself. The disc ejection can try the following operation to the cassette. ]Using adhesive tape, cover the hole where the tab was removed. If you had change the remote control code prior to replacing the batteries, you need to set the code again...

Instructions
Page 69
... and bottom of a picture at the same time in the Region Code of a player, the player can convert the interlaced video from stereo output connectors. 8 DTS A Digital Surround audio encoding format configured with a sound data compression system. This name has resulted from educational viewpoint) set on a DVD disc. 8 Dolby Digital (AC-3) A six-channel system consisting of the picture. 8 JPEG A still-picture data compression system proposed by the user; MPEG stands for color reproduction; This feature...
... and bottom of a picture at the same time in the Region Code of a player, the player can convert the interlaced video from stereo output connectors. 8 DTS A Digital Surround audio encoding format configured with a sound data compression system. This name has resulted from educational viewpoint) set on a DVD disc. 8 Dolby Digital (AC-3) A six-channel system consisting of the picture. 8 JPEG A still-picture data compression system proposed by the user; MPEG stands for color reproduction; This feature...

Instructions
Page 86
... (2 ch) Linear PCM (XP mode only) Video recording compression system MPEG2 (CBR/VBR) VIDEO/AUDIO (VCR Deck) Signal system NTSC color signal and EIA monochrome signal, 525 lines/60 fields Recording system DA4 (Double Azimuth) head helical scan system Format S-VHS/VHS NTSC standard Maximum recording time (SP): 210 min. Then plug it in digital audio output setting menu VIDEO/AUDIO (DVD Deck) Recording format DVD-RAM: DVD Video Recording format DVD-R: DVD-Video format DVD-RW: DVD-Video format, DVD Video Recording format Recording time Maximum 8 hours (with ST-210 video cassette (EP): 30 min. 86...
... (2 ch) Linear PCM (XP mode only) Video recording compression system MPEG2 (CBR/VBR) VIDEO/AUDIO (VCR Deck) Signal system NTSC color signal and EIA monochrome signal, 525 lines/60 fields Recording system DA4 (Double Azimuth) head helical scan system Format S-VHS/VHS NTSC standard Maximum recording time (SP): 210 min. Then plug it in digital audio output setting menu VIDEO/AUDIO (DVD Deck) Recording format DVD-RAM: DVD Video Recording format DVD-R: DVD-Video format DVD-RW: DVD-Video format, DVD Video Recording format Recording time Maximum 8 hours (with ST-210 video cassette (EP): 30 min. 86...


