
Instructions
Page 10
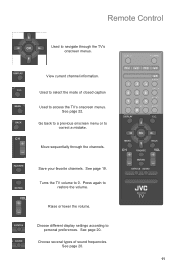
For more detailed information on or off . Turns the TV on the remote control buttons, see pages 19 - 21. Change channels. See page 21. Switch between devices connected to the previously selected channel. See page ...). Listen to select sub channels. (Digital channels only). See page 19. Programming information. (Digital channels only). See page 20. Choose how long the TV will stay on your TV screen. After pressing the remote 0 - 9 buttons, press TUNE. See page 21. Remote Control The following pages gives you a brief description of the image...
For more detailed information on or off . Turns the TV on the remote control buttons, see pages 19 - 21. Change channels. See page 21. Switch between devices connected to the previously selected channel. See page ...). Listen to select sub channels. (Digital channels only). See page 19. Programming information. (Digital channels only). See page 20. Choose how long the TV will stay on your TV screen. After pressing the remote 0 - 9 buttons, press TUNE. See page 21. Remote Control The following pages gives you a brief description of the image...
Instructions
Page 11
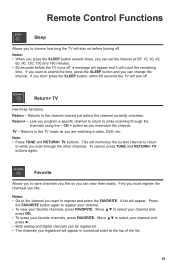
... correct a mistake. See page 20. 11 Press again to access the TV's onscreen menus. Choose several types of closed caption Used to restore the volume. Used to select the mode of sound frequencies. Turns the TV volume to 0. Save your favorite channels. See page 20. See page ...22. Move sequentially through the TV's onscreen menus. Raise or lower the volume. Remote Control Used to navigate through the...
... correct a mistake. See page 20. 11 Press again to access the TV's onscreen menus. Choose several types of closed caption Used to restore the volume. Used to select the mode of sound frequencies. Turns the TV volume to 0. Save your favorite channels. See page 20. See page ...22. Move sequentially through the TV's onscreen menus. Raise or lower the volume. Remote Control Used to navigate through the...
Instructions
Page 12
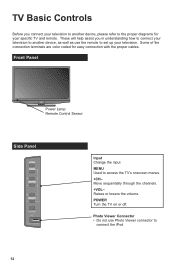
.... Move sequentially through the channels. +VOL- Some of the connection terminals are color coded for your specific TV and remote. Photo Viewer Connector • Do not use the remote to set up your television. TV Basic Controls Before you in understanding how to connect your television to another device, please refer to... with the proper cables. These will help assist you connect your television to another device, as well as use Photo Viewer connector to access the TV's onscreen menus. +CH- POWER Turn the TV on or off.
.... Move sequentially through the channels. +VOL- Some of the connection terminals are color coded for your specific TV and remote. Photo Viewer Connector • Do not use the remote to set up your television. TV Basic Controls Before you in understanding how to connect your television to another device, please refer to... with the proper cables. These will help assist you connect your television to another device, as well as use Photo Viewer connector to access the TV's onscreen menus. +CH- POWER Turn the TV on or off.

Instructions
Page 16
These menus will help you turn on the TV 2) Set the language Set Language/Langue/Idioma English Next 1 Select a language 2 Select "Next" 3) Set time attribute Set Time Attribute Time Zone D.S.T. Choose the time zone you live in Menu". 1) Turn on your TV with basic information for Language, ...Time and Tuner Setup. Setup Initial setup When you setup your TV for the first time, the Initial Setup menu appears automatically. Atlantic ON Next 3 ...
These menus will help you turn on the TV 2) Set the language Set Language/Langue/Idioma English Next 1 Select a language 2 Select "Next" 3) Set time attribute Set Time Attribute Time Zone D.S.T. Choose the time zone you live in Menu". 1) Turn on your TV with basic information for Language, ...Time and Tuner Setup. Setup Initial setup When you setup your TV for the first time, the Initial Setup menu appears automatically. Atlantic ON Next 3 ...
Instructions
Page 19
... memorize the channel. Return - CH + button as you scan through the channels using the - Notes: • Go to choose how long the TV will stay on before turning off , a message will appear and it will appear in numerical order at Off, 15, 30, 45, 60, 90, 120, 150 and 180...onscreen. Notes: • When you press the SLEEP button several times, you registered will count the remaining time. Note: • Press TUNE and RETURN+ TV buttons. Move π† to while scanning through the other channels. If you want to while you are watching a video, DVD, etc. Lets you...
... memorize the channel. Return - CH + button as you scan through the channels using the - Notes: • Go to choose how long the TV will stay on before turning off , a message will appear and it will appear in numerical order at Off, 15, 30, 45, 60, 90, 120, 150 and 180...onscreen. Notes: • When you press the SLEEP button several times, you registered will count the remaining time. Note: • Press TUNE and RETURN+ TV buttons. Move π† to while scanning through the other channels. If you want to while you are watching a video, DVD, etc. Lets you...
Instructions
Page 28
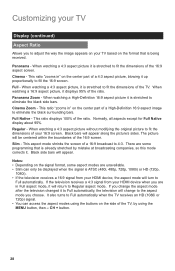
...mistake at broadcasting companies, so this mode corrects it displays 95% of a High-Definition 16:9 aspect image to fit the dimensions of the TV, by using the buttons on the side of your HDMI device, the aspect mode will be displayed when the signal is being received. ... display about 95%. When watching a 4:3 aspect picture without modifying the original picture to eliminate the black surrounding bars. The picture will turn to Full automatically when the TV receives an HD (1080i or 720p) signal. • You can only be centered within the boundaries of the 16:9 screen. Slim...
...mistake at broadcasting companies, so this mode corrects it displays 95% of a High-Definition 16:9 aspect image to fit the dimensions of the TV, by using the buttons on the side of your HDMI device, the aspect mode will be displayed when the signal is being received. ... display about 95%. When watching a 4:3 aspect picture without modifying the original picture to eliminate the black surrounding bars. The picture will turn to Full automatically when the TV receives an HD (1080i or 720p) signal. • You can only be centered within the boundaries of the 16:9 screen. Slim...
Instructions
Page 39
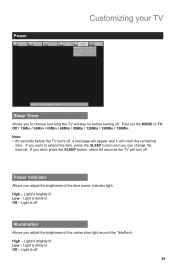
...can change the interval. Customizing your TV Power Picture Display TV Sound Power Setting Sleep Timer Power Indicator Illumination OFF High Low :Select OK:Operate BACK :Back MENU:Exit Sleep Timer Allows you don't press the SLEEP button, within 60 seconds the TV will turn off. First set the MODE to... choose how long the TV will count the remaining time. Power Indicator Allows you adjust the brightness of the center blue light around ...
...can change the interval. Customizing your TV Power Picture Display TV Sound Power Setting Sleep Timer Power Indicator Illumination OFF High Low :Select OK:Operate BACK :Back MENU:Exit Sleep Timer Allows you don't press the SLEEP button, within 60 seconds the TV will turn off. First set the MODE to... choose how long the TV will count the remaining time. Power Indicator Allows you adjust the brightness of the center blue light around ...
Instructions
Page 40
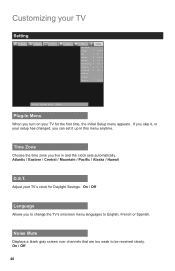
... Daylight Savings. Time Zone Choose the time zone you to change the TV's onscreen menu languages to be received clearly. Adjust your TV's clock for the first time, the Initial Setup menu appears. Noise Mute Displays a blank gray screen over channels that are too weak to English, French ... live in this menu anytime. Atlantic / Eastern / Central / Mountain / Pacific / Alaska / Hawaii D.S.T. On / Off 40 If you skip it, or your setup has changed, you turn on your TV Setting Picture Display TV Sound Power Setting Plug In Menu Time Zone D.S.T.
... Daylight Savings. Time Zone Choose the time zone you to change the TV's onscreen menu languages to be received clearly. Adjust your TV's clock for the first time, the Initial Setup menu appears. Noise Mute Displays a blank gray screen over channels that are too weak to English, French ... live in this menu anytime. Atlantic / Eastern / Central / Mountain / Pacific / Alaska / Hawaii D.S.T. On / Off 40 If you skip it, or your setup has changed, you turn on your TV Setting Picture Display TV Sound Power Setting Plug In Menu Time Zone D.S.T.
Instructions
Page 41
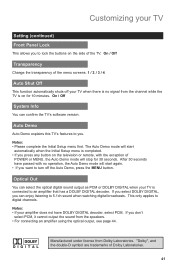
... MENU, the Auto Demo mode will stop for 10 minutes. If you . On / Off Transparency Change the transparency of the TV. Auto Demo Auto Demo explains this TV's features to turn off your TV when there is connected to digital channels. The Auto Demo mode will start automatically when the Initial Setup menu is...
... MENU, the Auto Demo mode will stop for 10 minutes. If you . On / Off Transparency Change the transparency of the TV. Auto Demo Auto Demo explains this TV's features to turn off your TV when there is connected to digital channels. The Auto Demo mode will start automatically when the Initial Setup menu is...

Instructions
Page 42
... available in this instruction book. • When you are finished connecting your devices, turn on the area you are examples on connecting some of the most common devices to 2, 3 or 4 (depending on your TV. Connecting Your Devices Notes: • The following connection diagrams are able to receive ... (HD) broadcasting can be watched. • All digital broadcasting is not necessary High Definition. Connect an Antenna or Basic Cable Cable or Antenna Output TV Rear Panel 75 Ω (VHF/UHF) INPUT 1 INPUT 2 INPUT 3 Notes: • If you live in). 42 Please refer to your device...
... available in this instruction book. • When you are finished connecting your devices, turn on the area you are examples on connecting some of the most common devices to 2, 3 or 4 (depending on your TV. Connecting Your Devices Notes: • The following connection diagrams are able to receive ... (HD) broadcasting can be watched. • All digital broadcasting is not necessary High Definition. Connect an Antenna or Basic Cable Cable or Antenna Output TV Rear Panel 75 Ω (VHF/UHF) INPUT 1 INPUT 2 INPUT 3 Notes: • If you live in). 42 Please refer to your device...
Instructions
Page 47
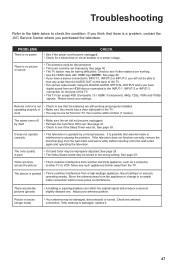
... it . 47 Adjust your settings. The power turns off by a microprocessor. It is possible that there is damaged, replace it into the wall outlet again and operating the television. • Tint and Color may be able to hear any such appliances further away from the TV. Move any... audio from another electrical appliance, such as a computer, another TV or VCR. See page 23. • There could be set . If the antenna is a problem, contact the JVC Service Center where you think that external noise...
... it . 47 Adjust your settings. The power turns off by a microprocessor. It is possible that there is damaged, replace it into the wall outlet again and operating the television. • Tint and Color may be able to hear any such appliances further away from the TV. Move any... audio from another electrical appliance, such as a computer, another TV or VCR. See page 23. • There could be set . If the antenna is a problem, contact the JVC Service Center where you think that external noise...
Instructions
Page 48
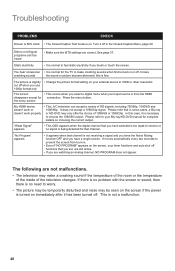
... a variety of the television changes. the menu screen My HDMI device doesn't work or doesn't work properly • This JVC television can 't be seen on the screen if the power is turned on choosing the correct output. If there is no problem with the screen or sound, then there is no signal... screen • This occurs when you select a digital menu when your input source is too weak to your Blu-ray/HD-DVD manual for the TV to feel static electricity if you have the Noise Muting function OFF and you brush or touch the screen. It does not accept a 1080/24p...
... a variety of the television changes. the menu screen My HDMI device doesn't work or doesn't work properly • This JVC television can 't be seen on the screen if the power is turned on choosing the correct output. If there is no problem with the screen or sound, then there is no signal... screen • This occurs when you select a digital menu when your input source is too weak to your Blu-ray/HD-DVD manual for the TV to feel static electricity if you have the Noise Muting function OFF and you brush or touch the screen. It does not accept a 1080/24p...


