Instructions
Page 5
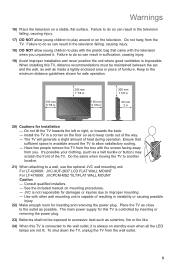
...150 mm 5 7/8 in 200 mm 7 7/8 in 150 mm 5 7/8 in 200 mm 7 7/8 in 50 mm 2 in a corner on mounting procedures. - For LT-42X899: JVC-XUF-2637 LCD FLAT WALL MOUNT For LT-47X899: JVCPCM-MS2 TILT/FLAT WALL MOUNT Caution - Consult qualified installers. - The main power supply for installation - Place the... injury. 18) DO NOT allow satisfactory cooling. - See the included manual on the floor so as a belt buckle or button) may scratch the front of heat during operation. JVC is impossible. Do not tilt the TV towards the left or right, or towards the back. - Failure to...
...150 mm 5 7/8 in 200 mm 7 7/8 in 150 mm 5 7/8 in 200 mm 7 7/8 in 50 mm 2 in a corner on mounting procedures. - For LT-42X899: JVC-XUF-2637 LCD FLAT WALL MOUNT For LT-47X899: JVCPCM-MS2 TILT/FLAT WALL MOUNT Caution - Consult qualified installers. - The main power supply for installation - Place the... injury. 18) DO NOT allow satisfactory cooling. - See the included manual on the floor so as a belt buckle or button) may scratch the front of heat during operation. JVC is impossible. Do not tilt the TV towards the left or right, or towards the back. - Failure to...
Instructions
Page 6
...not a malfunction of the FCC Rules. However, there is receiving through the RF input), every channel number available from your cable company for their JVC TV remote control to select channels. We have an important note for customers who subscribe to basic cable services (do not have a separate cable box)... and plan to use their cable box and remote, or manually deselect them using the edit / skip feature on page 25. 6 This equipment generates, uses and can radiate radio frequency energy and, if not ...
...not a malfunction of the FCC Rules. However, there is receiving through the RF input), every channel number available from your cable company for their JVC TV remote control to select channels. We have an important note for customers who subscribe to basic cable services (do not have a separate cable box)... and plan to use their cable box and remote, or manually deselect them using the edit / skip feature on page 25. 6 This equipment generates, uses and can radiate radio frequency energy and, if not ...
Instructions
Page 18
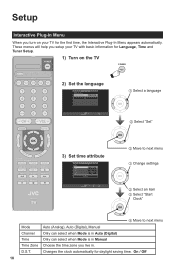
... Select Operate Exit MENU 3) Set time attribute > Set Clock Mode Channel Time Time Zone D.S.T Interactive Plug-In Menu Manual - - -- : -- -- Pacific Off Start Clock Select Operate Back BACK Exit MENU RM-C1430 TV 1 Select a language OK 2 Select "Set" OK 3 Move to next menu 1 Change settings OK 2 Select an...select when Mode is in Manual Time Zone Choose the time zone you turn on the TV POWER POWER MENU MODE TV STB VCR DVD AUDIO INPUT V1 V2 V3 V4 V5 1 2 3 4 5 6 7 8 9 RETURN + TUNE 0 TV - CH + - These menus will help you setup your TV for the first time, the...
... Select Operate Exit MENU 3) Set time attribute > Set Clock Mode Channel Time Time Zone D.S.T Interactive Plug-In Menu Manual - - -- : -- -- Pacific Off Start Clock Select Operate Back BACK Exit MENU RM-C1430 TV 1 Select a language OK 2 Select "Set" OK 3 Move to next menu 1 Change settings OK 2 Select an...select when Mode is in Manual Time Zone Choose the time zone you turn on the TV POWER POWER MENU MODE TV STB VCR DVD AUDIO INPUT V1 V2 V3 V4 V5 1 2 3 4 5 6 7 8 9 RETURN + TUNE 0 TV - CH + - These menus will help you setup your TV for the first time, the...

Instructions
Page 26
... Menu. Tuner Diagnostic (Service Use Only) Set Clock The set clock function is a bar graph displaying the state of the Digital Antenna Level. Customizing your TV Initial setup (Continued) Channel Summary (Continued) >> Station Channel You can set the channel label by pressing the 10 key pad. Find Channel Allows you to...
... Menu. Tuner Diagnostic (Service Use Only) Set Clock The set clock function is a bar graph displaying the state of the Digital Antenna Level. Customizing your TV Initial setup (Continued) Channel Summary (Continued) >> Station Channel You can set the channel label by pressing the 10 key pad. Find Channel Allows you to...
Instructions
Page 32
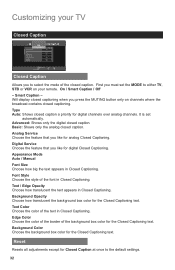
... Closed Captioning. Background Color Choose the background box color for analog Closed Captioning. First you press the MUTING button only on your TV Closed Caption Closed Caption Aa Closed Caption Type Analog Service Digital Service Appearance Mode Font Size Font Style Page 1/2 Off Auto CC1 ...Shows only the analog closed caption. Background Opacity Choose how translucent the background box color for Closed Caption at once to either TV, STB or VCR on channels where the broadcast contains closed caption. Reset Resets all adjustments except for the Closed Captioning text. Appearance...
... Closed Captioning. Background Color Choose the background box color for analog Closed Captioning. First you press the MUTING button only on your TV Closed Caption Closed Caption Aa Closed Caption Type Analog Service Digital Service Appearance Mode Font Size Font Style Page 1/2 Off Auto CC1 ...Shows only the analog closed caption. Background Opacity Choose how translucent the background box color for Closed Caption at once to either TV, STB or VCR on channels where the broadcast contains closed caption. Reset Resets all adjustments except for the Closed Captioning text. Appearance...

Instructions
Page 42
...to the external device's manual. If "HDMI CEC" does not work correctly: • When HDMI CEC enabled device is compliant with a single remote. CEC (Consumer Electronics Control) is received, refer to label all Video Input Label settings. 42 Send status of the TV to the HDMI CEC ...enabled device - • When switching the TV's external input or channel. • When switching the TV's menu language. • Information regarding behavior of the device when status...
...to the external device's manual. If "HDMI CEC" does not work correctly: • When HDMI CEC enabled device is compliant with a single remote. CEC (Consumer Electronics Control) is received, refer to label all Video Input Label settings. 42 Send status of the TV to the HDMI CEC ...enabled device - • When switching the TV's external input or channel. • When switching the TV's menu language. • Information regarding behavior of the device when status...
Instructions
Page 47
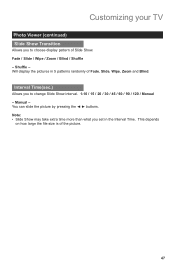
Manual - Shuffle - Note: • Slide Show may take extra time more than what you set in 5 patterns randomly of Fade, Slide, Wipe, Zoom and Blind. Fade / ... on how large the file size is of Slide Show. Interval Time(sec.) Allows you to choose display pattern of the picture. 47 Customizing your TV Photo Viewer (continued) Slide Show Transition Allows you to change Slide Show interval. 1-10 / 15 / 20 / 30 / 45 / 60 / 90 / 120...
Manual - Shuffle - Note: • Slide Show may take extra time more than what you set in 5 patterns randomly of Fade, Slide, Wipe, Zoom and Blind. Fade / ... on how large the file size is of Slide Show. Interval Time(sec.) Allows you to choose display pattern of the picture. 47 Customizing your TV Photo Viewer (continued) Slide Show Transition Allows you to change Slide Show interval. 1-10 / 15 / 20 / 30 / 45 / 60 / 90 / 120...
Instructions
Page 48
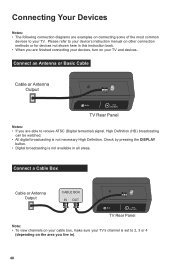
...Antenna Output CABLE BOX IN OUT IR IN 75 Ω (VHF/UHF) TV Rear Panel Note: • To view channels on your cable box, make sure your TV and devices. Please refer to your device's instruction manual on other connection methods or for devices not shown here in this instruction ...book. • When you are finished connecting your devices, turn on your TV's channel is set to 2, 3 or 4 (...
...Antenna Output CABLE BOX IN OUT IR IN 75 Ω (VHF/UHF) TV Rear Panel Note: • To view channels on your cable box, make sure your TV and devices. Please refer to your device's instruction manual on other connection methods or for devices not shown here in this instruction ...book. • When you are finished connecting your devices, turn on your TV's channel is set to 2, 3 or 4 (...
Instructions
Page 50
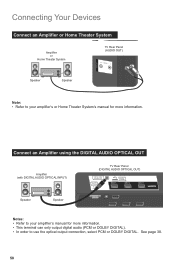
.... See page 38. 50 Connect an Amplifier using the DIGITAL AUDIO OPTICAL OUT Amplifier (with DIGITAL AUDIO OPTICAL INPUT) Speaker Speaker TV Rear Panel (DIGITAL AUDIO OPTICAL OUT) DIGITAL AUDIO OPTICAL OUT PC IN (D-SUB) INPUT 5 PHOTO VIEWER INPUT 2 INPUT 1 Notes: ... digital audio (PCM or DOLBY DIGITAL). • In order to your amplifier's or Home Theater System's manual for more information. AUDIO - Connecting Your Devices Connect an Amplifier or Home Theater System Amplifier or Home Theater System UDIOFOORUHTDMI 1 R AUDIO INPUT L TV Rear Panel (AUDIO OUT) R -
.... See page 38. 50 Connect an Amplifier using the DIGITAL AUDIO OPTICAL OUT Amplifier (with DIGITAL AUDIO OPTICAL INPUT) Speaker Speaker TV Rear Panel (DIGITAL AUDIO OPTICAL OUT) DIGITAL AUDIO OPTICAL OUT PC IN (D-SUB) INPUT 5 PHOTO VIEWER INPUT 2 INPUT 1 Notes: ... digital audio (PCM or DOLBY DIGITAL). • In order to your amplifier's or Home Theater System's manual for more information. AUDIO - Connecting Your Devices Connect an Amplifier or Home Theater System Amplifier or Home Theater System UDIOFOORUHTDMI 1 R AUDIO INPUT L TV Rear Panel (AUDIO OUT) R -

Instructions
Page 51
... L R - IR IN 75 Ω (VHF/UHF) TV Rear Panel 51 Notes: • To watch your Digital TV device, make sure your TV is displaying INPUT 1 by pressing the V1 button on your IR Device's manual for more information. Connecting Your Devices UDIOFOORUHTDMI 1 INPUT 3 Connect a Digital TV Device PR TV PRB ear Panel S-VIDEO FOR HDMI 1 VIDEO...
... L R - IR IN 75 Ω (VHF/UHF) TV Rear Panel 51 Notes: • To watch your Digital TV device, make sure your TV is displaying INPUT 1 by pressing the V1 button on your IR Device's manual for more information. Connecting Your Devices UDIOFOORUHTDMI 1 INPUT 3 Connect a Digital TV Device PR TV PRB ear Panel S-VIDEO FOR HDMI 1 VIDEO...

Instructions
Page 52
... the equipment that is connected to detect this occurs, manually select 1080p on your remote control. • Some decoders may fail to the HDMI. • This TV can accept 480i, 480p, 720p, 1080i and 1080p signals via HDMI. • This JVC television can accept a variety of HDMI Licensing LLC. ..., 1080/30p, 1080/24p and 720/60p. • Please use a High Speed HDMI™ Cable. Connecting Your Devices Connect a Blu-ray or HDMI Device TV Rear Panel (INPUT 2) DIGITAL AUDIO OPTICAL OUT PC IN (D-SUB) INPUT 5 PHOTO VIEWER INPUT 2 INPUT 1 Blu-ray / HDMI Compatible Device Notes: •...
... the equipment that is connected to detect this occurs, manually select 1080p on your remote control. • Some decoders may fail to the HDMI. • This TV can accept 480i, 480p, 720p, 1080i and 1080p signals via HDMI. • This JVC television can accept a variety of HDMI Licensing LLC. ..., 1080/30p, 1080/24p and 720/60p. • Please use a High Speed HDMI™ Cable. Connecting Your Devices Connect a Blu-ray or HDMI Device TV Rear Panel (INPUT 2) DIGITAL AUDIO OPTICAL OUT PC IN (D-SUB) INPUT 5 PHOTO VIEWER INPUT 2 INPUT 1 Blu-ray / HDMI Compatible Device Notes: •...
Instructions
Page 53
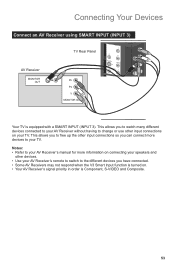
... Panel PR PB Y MONITOR OUT UDIOFOORUHTDMI 1 INPUT 3 Y PR PB S-VIDEO VIDEO R - L UDIO AOUUDTIO OUT Your TV is turned on your AV Receiver without having to your TV. Notes: • Refer to your speakers and other input connections so you have connected. • Some AV Receivers may not respond when the V3 Smart... up the other devices. • Use your AV Receiver's remote to switch to the different devices you can connect more devices to your AV Receiver's manual for more information on connecting your...
... Panel PR PB Y MONITOR OUT UDIOFOORUHTDMI 1 INPUT 3 Y PR PB S-VIDEO VIDEO R - L UDIO AOUUDTIO OUT Your TV is turned on your AV Receiver without having to your TV. Notes: • Refer to your speakers and other input connections so you have connected. • Some AV Receivers may not respond when the V3 Smart... up the other devices. • Use your AV Receiver's remote to switch to the different devices you can connect more devices to your AV Receiver's manual for more information on connecting your...
Instructions
Page 54
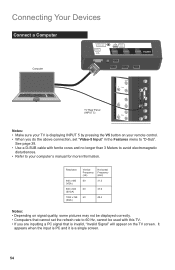
...Vertical Frequency (Hz) Horizontal Frequency (kHz) 60 31.5 60 37.9 60 48.4 Notes: • Depending on your computer's manual for more information. L Notes: • Make sure your TV is a single screen. 54 L Y PR PB VIDEO R - Connecting Your Devices Connect a Computer DIGITAL AUDIO OPTICAL OUT PC... IN (D-SUB) INPUT 5 PHOTO VIEWER INPUT 2 INPUT 1 RS-232C Computer TV Rear Panel (INPUT 5) INPUT 4 INPUT 5 VIDEO R - AUDIO - It appears when the input is PC and it is displaying INPUT 5 by...
...Vertical Frequency (Hz) Horizontal Frequency (kHz) 60 31.5 60 37.9 60 48.4 Notes: • Depending on your computer's manual for more information. L Notes: • Make sure your TV is a single screen. 54 L Y PR PB VIDEO R - Connecting Your Devices Connect a Computer DIGITAL AUDIO OPTICAL OUT PC... IN (D-SUB) INPUT 5 PHOTO VIEWER INPUT 2 INPUT 1 RS-232C Computer TV Rear Panel (INPUT 5) INPUT 4 INPUT 5 VIDEO R - AUDIO - It appears when the input is PC and it is displaying INPUT 5 by...
Instructions
Page 55
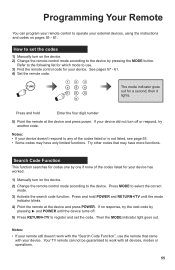
.... How to set the code. Refer to the following list for your device did not turn off . 5) Press RETURN+/TV to register and set the codes 1) Manually turn on the device. 2) Change the remote control mode according to the device by pressing the MODE button. Press and ...", use . 3) Find the remote control code for a second, then it lights. See pages 57 - 61. 4) Set the remote code. If your device has worked. 1) Manually turn on the device. 2) Change the remote control mode according to the device. TUNE 1 2 3 4 5 6 7 8 9 0 The mode indicator goes out for your device...
.... How to set the code. Refer to the following list for your device did not turn off . 5) Press RETURN+/TV to register and set the codes 1) Manually turn on the device. 2) Change the remote control mode according to the device by pressing the MODE button. Press and ...", use . 3) Find the remote control code for a second, then it lights. See pages 57 - 61. 4) Set the remote code. If your device has worked. 1) Manually turn on the device. 2) Change the remote control mode according to the device. TUNE 1 2 3 4 5 6 7 8 9 0 The mode indicator goes out for your device...
Instructions
Page 56
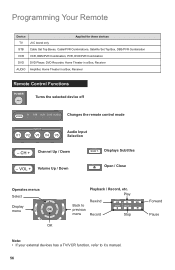
...SLEEP ML/MTS SWAP SELECT Stop Forward Pause Note: • If your external devices has a TV/VCR function, refer to it's manual. 56 SUB T. CH + Channel Up / Down - Programming Your Remote Device Applied for these devices TV JVC brand only STB Cable Set Top Boxes, Cable/PVR Combinations, Satellite Set Top Box, DBS/..., DVD Recorder, Home Theater in a Box, Receiver AUDIO Amplifier, Home Theater in a Box, Receiver Remote Control Functions POWER Turns the selected device off MODE TV STB VCR DVD AUDIO Changes the remote control mode INPUT V1 V2 V3 V4 V5 Audio Input Selection -
...SLEEP ML/MTS SWAP SELECT Stop Forward Pause Note: • If your external devices has a TV/VCR function, refer to it's manual. 56 SUB T. CH + Channel Up / Down - Programming Your Remote Device Applied for these devices TV JVC brand only STB Cable Set Top Boxes, Cable/PVR Combinations, Satellite Set Top Box, DBS/..., DVD Recorder, Home Theater in a Box, Receiver AUDIO Amplifier, Home Theater in a Box, Receiver Remote Control Functions POWER Turns the selected device off MODE TV STB VCR DVD AUDIO Changes the remote control mode INPUT V1 V2 V3 V4 V5 Audio Input Selection -


