
Instructions
Page 2
... back). The lightning flash with an extension cord, receptacle or other outlet unless the blades can be sure to disconnect both the power plug from the power source specified on the unit. 2. Do not allow objects or liquid into the cabinet openings. 5. Do not attempt to the presence... it yourself or remove the rear cover. Changes or modifications not approved by JVC could void the warranty. * When you don't use this TV set for a long period of mercury. Avoid damaging the AC plug and power cord. 3. IMPORTANT RECYCLING INFORMATION This product has a fluorescent lamp that may ...
... back). The lightning flash with an extension cord, receptacle or other outlet unless the blades can be sure to disconnect both the power plug from the power source specified on the unit. 2. Do not allow objects or liquid into the cabinet openings. 5. Do not attempt to the presence... it yourself or remove the rear cover. Changes or modifications not approved by JVC could void the warranty. * When you don't use this TV set for a long period of mercury. Avoid damaging the AC plug and power cord. 3. IMPORTANT RECYCLING INFORMATION This product has a fluorescent lamp that may ...

Instructions
Page 3
... sources such as radiators, heat registers, stoves, or other . • As an "ENERGY STAR®" partner, JVC has determined that produce heat. 9) Do not defeat the safety purpose of the obsolete outlet. 10) Protect the power cord from being walked on or pinched particularly at plugs, convenience receptacles, and the point where...
... sources such as radiators, heat registers, stoves, or other . • As an "ENERGY STAR®" partner, JVC has determined that produce heat. 9) Do not defeat the safety purpose of the obsolete outlet. 10) Protect the power cord from being walked on or pinched particularly at plugs, convenience receptacles, and the point where...

Instructions
Page 4
... CHANNEL - OPERATE + VOLUME - When installing this apparatus during operation. Do not tilt the TV towards the left or right, or towards the back. - Install the TV in any way, such as power-supply cord or plug is damaged, liquid has been spilled or objects have fallen into the apparatus...when unused for long periods of time. 14) Refer all servicing to the minimum distance guidelines shown for installation - 13) Unplug this TV, distance recommendations must be placed on the floor so as inside a tightly enclosed area or piece of furniture. Ensure that sufficient space is ...
... CHANNEL - OPERATE + VOLUME - When installing this apparatus during operation. Do not tilt the TV towards the left or right, or towards the back. - Install the TV in any way, such as power-supply cord or plug is damaged, liquid has been spilled or objects have fallen into the apparatus...when unused for long periods of time. 14) Refer all servicing to the minimum distance guidelines shown for installation - 13) Unplug this TV, distance recommendations must be placed on the floor so as inside a tightly enclosed area or piece of furniture. Ensure that sufficient space is ...

Instructions
Page 7
... Lock Code 33 Language 34 Closed Caption 34 Auto Shut Off 35 XDS ID 35 Noise Muting 35 Front Panel Lock 36 Position Adjustment 36 Power Indicator 37 Picture Adjust 38 Picture Settings 38 Adjust Picture Settings 38 Color Temperature 39 Digital Noise Clear 39 Natural Cinema 39 Reset 40 Sound... 45 Input 45 Display 46 Sleep Timer 46 Sound 47 Video Status 47 TheaterPro D6500K 47 OK 47 Back 47 Aspect 48 Aspect Ratios 48 TV/CATV Slide Switch 49 VCR/DVD Slide Switch 49 VCR Buttons 49 DVD Buttons 49 Appendices 50 No Program 50 Troubleshooting 51 Warranty 52 Authorized...
... Lock Code 33 Language 34 Closed Caption 34 Auto Shut Off 35 XDS ID 35 Noise Muting 35 Front Panel Lock 36 Position Adjustment 36 Power Indicator 37 Picture Adjust 38 Picture Settings 38 Adjust Picture Settings 38 Color Temperature 39 Digital Noise Clear 39 Natural Cinema 39 Reset 40 Sound... 45 Input 45 Display 46 Sleep Timer 46 Sound 47 Video Status 47 TheaterPro D6500K 47 OK 47 Back 47 Aspect 48 Aspect Ratios 48 TV/CATV Slide Switch 49 VCR/DVD Slide Switch 49 VCR Buttons 49 DVD Buttons 49 Appendices 50 No Program 50 Troubleshooting 51 Warranty 52 Authorized...

Instructions
Page 8
...Camcorders and DVD players. MENU BACK VCR CHANNEL VCR/DVD PREV NEXT POWER TV/VCR REW REC PLAY FF STOP PAUSE STILL/PAUSE RM-C1271G TV AA Alkaline AA Alkaline Two AA Batteries Once you have all of a JVC LCD Flat Television. If you're anxious to start using your purchase of ...the following items. In addition to this guide, your new television, please check to your television. Quick Setup Unpacking your TV Thank you for your television right away, a...
...Camcorders and DVD players. MENU BACK VCR CHANNEL VCR/DVD PREV NEXT POWER TV/VCR REW REC PLAY FF STOP PAUSE STILL/PAUSE RM-C1271G TV AA Alkaline AA Alkaline Two AA Batteries Once you have all of a JVC LCD Flat Television. If you're anxious to start using your purchase of ...the following items. In addition to this guide, your new television, please check to your television. Quick Setup Unpacking your TV Thank you for your television right away, a...

Instructions
Page 9
Rear Panel Diagram AUDIO OUT INPUT 3 INPUT 2 L - R L I VIDEO AUDIO I R VIDEO SVIDEO L I AUDIO I R VIDEO SVIDEO L I AUDIO I R INPUT 1 Y Pb Pr 75Ω (VHF/UHF) In the rear cover Side Panel Diagram INPUT MENU + CHANNEL - + VOLUME - POWER OPERATE 9 These will help assist you connect your television to another device, as well as use the remote to the proper diagrams for your television. AUDIO - Quick Setup TV Model NOTE: Before you in understanding how to connect your television to another device, please refer to set up your specific TV and remote.
Rear Panel Diagram AUDIO OUT INPUT 3 INPUT 2 L - R L I VIDEO AUDIO I R VIDEO SVIDEO L I AUDIO I R VIDEO SVIDEO L I AUDIO I R INPUT 1 Y Pb Pr 75Ω (VHF/UHF) In the rear cover Side Panel Diagram INPUT MENU + CHANNEL - + VOLUME - POWER OPERATE 9 These will help assist you connect your television to another device, as well as use the remote to the proper diagrams for your television. AUDIO - Quick Setup TV Model NOTE: Before you in understanding how to connect your television to another device, please refer to set up your specific TV and remote.

Instructions
Page 10
VOL + CH - MENU BACK VCR CHANNEL VCR/DVD PREV NEXT POWER TV/VCR REW REC PLAY FF STOP PAUSE STILL/PAUSE RM-C1271G TV RM-C1271G Note: • For information on remote control buttons, see pages 44 - 49. 10 Quick Setup TV Remote Control TV CATV VCR DVD POWER INPUT DISPLAY 1 SLEEP TIMER 4 SOUND 7 VIDEO STATUS 100+ THEATER PRO ASPECT 23 56 89 0 RETURN+ MUTING OK CH + VOL -
VOL + CH - MENU BACK VCR CHANNEL VCR/DVD PREV NEXT POWER TV/VCR REW REC PLAY FF STOP PAUSE STILL/PAUSE RM-C1271G TV RM-C1271G Note: • For information on remote control buttons, see pages 44 - 49. 10 Quick Setup TV Remote Control TV CATV VCR DVD POWER INPUT DISPLAY 1 SLEEP TIMER 4 SOUND 7 VIDEO STATUS 100+ THEATER PRO ASPECT 23 56 89 0 RETURN+ MUTING OK CH + VOL -

Instructions
Page 12
... on programming your remote control to install the batteries (included). The top and bottom buttons will scan forward and back through the channels using JVC's Hyperscan feature, press and hold CH+ or CH-. These buttons are also marked with four arrows and are used for instructions on the ...back of the remote. • Make sure the TV/CATV switch is set to control a VCR. POWER TV CATV V V VCR DVD 12 See pages 19 - 22. VOL + CH - To move rapidly through the available channels. MUTING OK CH...
... on programming your remote control to install the batteries (included). The top and bottom buttons will scan forward and back through the channels using JVC's Hyperscan feature, press and hold CH+ or CH-. These buttons are also marked with four arrows and are used for instructions on the ...back of the remote. • Make sure the TV/CATV switch is set to control a VCR. POWER TV CATV V V VCR DVD 12 See pages 19 - 22. VOL + CH - To move rapidly through the available channels. MUTING OK CH...
Instructions
Page 13
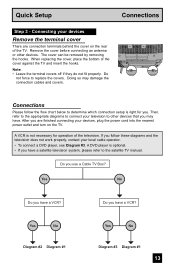
Connecting your devices, plug the power cord into the nearest power outlet and turn on the rear of the TV. The cover can be removed... by removing the hooks. Do not force to other devices. Doing so may have a satellite television system, please refer to determine which connection setup is right for operation of the cover against the TV...Remove the terminal cover There are connection terminals behind the cover on the TV. Do you use a Cable TV Box? When replacing the cover, place the bottom of the television. ...
Connecting your devices, plug the power cord into the nearest power outlet and turn on the rear of the TV. The cover can be removed... by removing the hooks. Do not force to other devices. Doing so may have a satellite television system, please refer to determine which connection setup is right for operation of the cover against the TV...Remove the terminal cover There are connection terminals behind the cover on the TV. Do you use a Cable TV Box? When replacing the cover, place the bottom of the television. ...

Instructions
Page 16
... the side of the television. 1) Plug a headphone jack into the RIGHT AUDIO IN on the back of the TV. Note: • If your camcorder is a mono sound model it to the back of the TV. 2) Connect a white cable from the camcorder RIGHT AUDIO OUT, into the headphone jack on the television's side... composite cable from the camcorder VIDEO OUT, into the VIDEO IN on the back of the TV, OR connect an S-Video cable from the camcorder to the LEFT AUDIO IN on the back of the TV. 3) Connect a red cable from the camcorder LEFT AUDIO OUT, into the LEFT AUDIO IN on the...
... the side of the television. 1) Plug a headphone jack into the RIGHT AUDIO IN on the back of the TV. Note: • If your camcorder is a mono sound model it to the back of the TV. 2) Connect a white cable from the camcorder RIGHT AUDIO OUT, into the headphone jack on the television's side... composite cable from the camcorder VIDEO OUT, into the VIDEO IN on the back of the TV, OR connect an S-Video cable from the camcorder to the LEFT AUDIO IN on the back of the TV. 3) Connect a red cable from the camcorder LEFT AUDIO OUT, into the LEFT AUDIO IN on the...

Instructions
Page 19
... selector switch to "CATV". 3) Press and hold down the DISPLAY button, then enter the first code number listed with cable box and satellite codes for power on page 22. Cable Box CODES ABC 024 Archer 032, 025 Cableview 051, 032 Citizen 022, 051 Curtis 058, 059 Diamond 024, 032, 025 Eagle...
... selector switch to "CATV". 3) Press and hold down the DISPLAY button, then enter the first code number listed with cable box and satellite codes for power on page 22. Cable Box CODES ABC 024 Archer 032, 025 Cableview 051, 032 Citizen 022, 051 Curtis 058, 059 Diamond 024, 032, 025 Eagle...

Instructions
Page 20
...8226; To record, hold down the DISPLAY button, then enter the first code number listed with VCR codes for power on/off, play, stop, fast-forward, rewind, pause, record, channel up/down operation. 1) Find the ...VCR brand from the list of codes shown below. 2) Slide the first 2-way selector switch to "TV" and the other 2-way selector switch to "VCR". 3) Press and hold down the REC button on page...083, 084, 081, 000, 001 Hitachi 023, 045, 058, 027, 081, 093 Instant Replay 024, 023 Jensen 003 JVC 000, 001, 002, 003, 004, 005 Kenwood LXI 003, 004, 064, 005 027, 064, 058, 065, 066...
...8226; To record, hold down the DISPLAY button, then enter the first code number listed with VCR codes for power on/off, play, stop, fast-forward, rewind, pause, record, channel up/down operation. 1) Find the ...VCR brand from the list of codes shown below. 2) Slide the first 2-way selector switch to "TV" and the other 2-way selector switch to "VCR". 3) Press and hold down the REC button on page...083, 084, 081, 000, 001 Hitachi 023, 045, 058, 027, 081, 093 Instant Replay 024, 023 Jensen 003 JVC 000, 001, 002, 003, 004, 005 Kenwood LXI 003, 004, 064, 005 027, 064, 058, 065, 066...

Instructions
Page 21
... work properly. If so, use the DVD player's remote. DVD Player Aiwa Apex Denon Hitachi JVC Kenwood Konka Mitsubishi Onkyo Oritron Panasonic Philips Pioneer Raite CODES 043 040 020, 037 030, 031 000... 042 020 027, 032 21 Remote Programming DVD Codes The remote control is programmed with DVD codes for power on/off, play, stop, fast-forward, rewind, previous/next chapter, tray open/close, and still/...DVD player brand from the list of codes shown below. 2) Slide the first 2-way selector switch to "TV" and the other 2-way selector switch to "DVD". 3) Press and hold down the DISPLAY button, then...
... work properly. If so, use the DVD player's remote. DVD Player Aiwa Apex Denon Hitachi JVC Kenwood Konka Mitsubishi Onkyo Oritron Panasonic Philips Pioneer Raite CODES 043 040 020, 037 030, 031 000... 042 020 027, 032 21 Remote Programming DVD Codes The remote control is programmed with DVD codes for power on/off, play, stop, fast-forward, rewind, previous/next chapter, tray open/close, and still/...DVD player brand from the list of codes shown below. 2) Slide the first 2-way selector switch to "TV" and the other 2-way selector switch to "DVD". 3) Press and hold down the DISPLAY button, then...

Instructions
Page 22
... 2-way selector switch to "TV" and the other 2-way selector switch to exit. If there was no response, repeat Step 3. The codes are now set . If there was no response, repeat Step 3. Hold for at least three seconds and release. 3) Press the VCR or DVD POWER button, and see if the...and there is no response, use the remote control that came with your equipment. 5) Press RETURN+ to "VCR" or "DVD". 2) Press the VCR or DVD POWER and RETURN+ buttons. Remote Programming Search Codes Cable/Satellite Search Codes Function 1) Slide the first 2-Way Mode Selector switch to exit. 22
... 2-way selector switch to "TV" and the other 2-way selector switch to exit. If there was no response, repeat Step 3. The codes are now set . If there was no response, repeat Step 3. Hold for at least three seconds and release. 3) Press the VCR or DVD POWER button, and see if the...and there is no response, use the remote control that came with your equipment. 5) Press RETURN+ to "VCR" or "DVD". 2) Press the VCR or DVD POWER and RETURN+ buttons. Remote Programming Search Codes Cable/Satellite Search Codes Function 1) Slide the first 2-Way Mode Selector switch to exit. 22

Instructions
Page 25
...Menus INITIAL SETUP PREVIOUS LANGUAGE ENG. FRAN. NOISE CLEAR NATURAL CINEMA LOW OFF AUTO Note: • When the Menu button on the TV side panel is pressed, the FRONT PANEL CONTROL menu between INITIAL SETUP 03 and PICTURE ADJUST will appear. INITIAL SETUP PREVIOUS NOISE MUTING ...FRONT PANEL LOCK POSITION ADJUSTMENT POWER INDICATOR ON OFF OFF NEXT PAGE SELECT OPERATE (1/3) MENU EXIT INITIAL SETUP 01 CLOCK / TIMERS PREVIOUS SET CLOCK ON / OFF TIMER RESET...
...Menus INITIAL SETUP PREVIOUS LANGUAGE ENG. FRAN. NOISE CLEAR NATURAL CINEMA LOW OFF AUTO Note: • When the Menu button on the TV side panel is pressed, the FRONT PANEL CONTROL menu between INITIAL SETUP 03 and PICTURE ADJUST will appear. INITIAL SETUP PREVIOUS NOISE MUTING ...FRONT PANEL LOCK POSITION ADJUSTMENT POWER INDICATOR ON OFF OFF NEXT PAGE SELECT OPERATE (1/3) MENU EXIT INITIAL SETUP 01 CLOCK / TIMERS PREVIOUS SET CLOCK ON / OFF TIMER RESET...
Instructions
Page 33
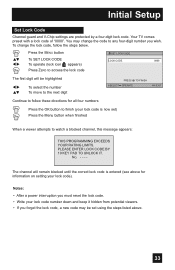
Your TV comes preset with a lock code of "0000". You may be highlighted √® π† To select the number To move to the next digit ... SELECT OPERATE MENU EXIT Continue to follow the steps below. PLEASE ENTER LOCK CODE BY 10 KEY PAD TO UNLOCK IT. NO. - - - - Notes: • After a power interruption you must reset the lock code. • Write your lock code). The channel will be set ) Press the Menu button when finished When a viewer...
Your TV comes preset with a lock code of "0000". You may be highlighted √® π† To select the number To move to the next digit ... SELECT OPERATE MENU EXIT Continue to follow the steps below. PLEASE ENTER LOCK CODE BY 10 KEY PAD TO UNLOCK IT. NO. - - - - Notes: • After a power interruption you must reset the lock code. • Write your lock code). The channel will be set ) Press the Menu button when finished When a viewer...
Instructions
Page 35
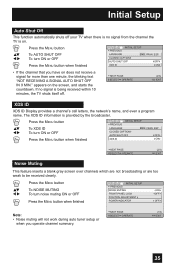
... XDS ID To turn noise muting ON or OFF Press the MENU button when finished INITIAL SETUP PREVIOUS NOISE MUTING FRONT PANEL LOCK POSITION ADJUSTMENT POWER INDICATOR ON OFF OFF Note: • Noise muting will not work during auto tuner setup or when you have on the screen, and starts the... countdown. FRAN. If no signal from the channel the TV is on. π† √® Press the MENU button To AUTO SHUT OFF To turn ON or OFF Press the MENU button when finished...
... XDS ID To turn noise muting ON or OFF Press the MENU button when finished INITIAL SETUP PREVIOUS NOISE MUTING FRONT PANEL LOCK POSITION ADJUSTMENT POWER INDICATOR ON OFF OFF Note: • Noise muting will not work during auto tuner setup or when you have on the screen, and starts the... countdown. FRAN. If no signal from the channel the TV is on. π† √® Press the MENU button To AUTO SHUT OFF To turn ON or OFF Press the MENU button when finished...

Instructions
Page 36
.... • When the arrow disappears, while you are adjusting the position, the position is at it back in the following ways: • Unplug the power cord, and plug it 's maximum limit. • If you select regular size with aspect, position adjustment option is set to adjust the position of the... ON or OFF Press the MENU button when finished INITIAL SETUP PREVIOUS NOISE MUTING FRONT PANEL LOCK POSITION ADJUSTMENT POWER INDICATOR ON OFF OFF You can turn ON/OFF the TV, press the power button for FRONT PANEL LOCK will remain ON. Do this case, the OSD for more than 3 seconds. In ...
.... • When the arrow disappears, while you are adjusting the position, the position is at it back in the following ways: • Unplug the power cord, and plug it 's maximum limit. • If you select regular size with aspect, position adjustment option is set to adjust the position of the... ON or OFF Press the MENU button when finished INITIAL SETUP PREVIOUS NOISE MUTING FRONT PANEL LOCK POSITION ADJUSTMENT POWER INDICATOR ON OFF OFF You can turn ON/OFF the TV, press the power button for FRONT PANEL LOCK will remain ON. Do this case, the OSD for more than 3 seconds. In ...
Instructions
Page 37
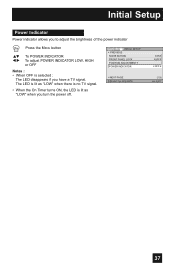
...as "LOW" when you have a TV signal. INITIAL SETUP PREVIOUS NOISE MUTING FRONT PANEL LOCK POSITION ADJUSTMENT POWER INDICATOR NEXT PAGE SELECT OPERATE ON OFF OFF (1/3) MENU EXIT 37 Initial Setup Power Indicator Power indicator allows you to adjust the brightness of the power indicator Press the MENU button π&#...8224; √® To POWER INDICATOR To adjust POWER INDICATOR LOW, HIGH or OFF Notes : • When OFF is lit as "LOW" when there is no TV signal. • When the On Timer ...
...as "LOW" when you have a TV signal. INITIAL SETUP PREVIOUS NOISE MUTING FRONT PANEL LOCK POSITION ADJUSTMENT POWER INDICATOR NEXT PAGE SELECT OPERATE ON OFF OFF (1/3) MENU EXIT 37 Initial Setup Power Indicator Power indicator allows you to adjust the brightness of the power indicator Press the MENU button π&#...8224; √® To POWER INDICATOR To adjust POWER INDICATOR LOW, HIGH or OFF Notes : • When OFF is lit as "LOW" when there is no TV signal. • When the On Timer ...
Instructions
Page 42
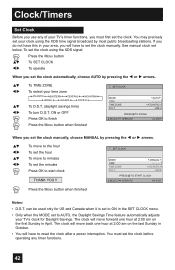
...public broadcasting stations. SET CLOCK MODE TIME TIME ZONE D.S.T. Clock/Timers Set Clock Before you use any of your TV's timer functions, you must set the clock before operating any timer functions. 42 You may precisely set your clock ... finished Notes: • D.S.T. ON or OFF Press OK to AUTO, the Daylight Savings Time feature automatically adjusts your TV's clock for US and Canada when it is set to ON in your time zone ATLANTIC EASTERN CENTRAL MOUNTAIN HAWAII ALASKA...SELECT OPERATE MENU EXIT When you do not have to reset the clock after a power interruption.
...public broadcasting stations. SET CLOCK MODE TIME TIME ZONE D.S.T. Clock/Timers Set Clock Before you use any of your TV's timer functions, you must set the clock before operating any timer functions. 42 You may precisely set your clock ... finished Notes: • D.S.T. ON or OFF Press OK to AUTO, the Daylight Savings Time feature automatically adjusts your TV's clock for US and Canada when it is set to ON in your time zone ATLANTIC EASTERN CENTRAL MOUNTAIN HAWAII ALASKA...SELECT OPERATE MENU EXIT When you do not have to reset the clock after a power interruption.


