
Instructions
Page 5
...is detected and appears as available for scanning. Avoiding Ghost Images Displaying fixed images for extended periods of time can contact your screen. For example... Even though every channel is not a malfunction of your television. If you want to sequentially scan those channels you...• DVD discs, video tapes, laser discs • Broadcast, cable, satellite channels or digital television tuners/converters. TV on your cable company for their JVC TV remote control to note that you run the Auto Tuner Setup (which detects and programs all be marked as available, you...
...is detected and appears as available for scanning. Avoiding Ghost Images Displaying fixed images for extended periods of time can contact your screen. For example... Even though every channel is not a malfunction of your television. If you want to sequentially scan those channels you...• DVD discs, video tapes, laser discs • Broadcast, cable, satellite channels or digital television tuners/converters. TV on your cable company for their JVC TV remote control to note that you run the Auto Tuner Setup (which detects and programs all be marked as available, you...
Instructions
Page 6
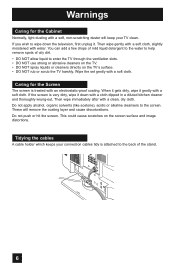
...it . Do not push or hit the screen. Wipe the set gently with a clean, dry cloth. If the screen is attached to wipe down with water. Do not apply alcohol, organic solvents (like acetone), acidic or alkaline cleansers to enter the TV through the ventilation slots. • DO NOT... use strong or abrasive cleaners on the TV. • DO NOT spray liquids or cleaners directly on the screen surface and image distortions. Then wipe gently with a soft cloth, ...
...it . Do not push or hit the screen. Wipe the set gently with a clean, dry cloth. If the screen is attached to wipe down with water. Do not apply alcohol, organic solvents (like acetone), acidic or alkaline cleansers to enter the TV through the ventilation slots. • DO NOT... use strong or abrasive cleaners on the TV. • DO NOT spray liquids or cleaners directly on the screen surface and image distortions. Then wipe gently with a soft cloth, ...

Instructions
Page 18
...made , tighten the screw to HDMI adapter this setting only effects the HDMI INPUT-1 jack and that this connection must be displayed on the screen, the horizontal balance may be slightly shifted. AUDIO AUDIO AUDIO COMPONENT AUDIO COMPONENT INPUT 3 S-VIDEO Y VIDEO PB L PR R INPUT ...4 INPUT 5 / INPUT 1 AUDIO AUDIO OUT Y VIDEO VIDEO PB L L L PR R R R TV Rear Panel After the connections have been made to "Analog". Notes: • If 480p signals (640x480 or 720x480) are displayed on your television. 3) Connect a...
...made , tighten the screw to HDMI adapter this setting only effects the HDMI INPUT-1 jack and that this connection must be displayed on the screen, the horizontal balance may be slightly shifted. AUDIO AUDIO AUDIO COMPONENT AUDIO COMPONENT INPUT 3 S-VIDEO Y VIDEO PB L PR R INPUT ...4 INPUT 5 / INPUT 1 AUDIO AUDIO OUT Y VIDEO VIDEO PB L L L PR R R R TV Rear Panel After the connections have been made to "Analog". Notes: • If 480p signals (640x480 or 720x480) are displayed on your television. 3) Connect a...

Instructions
Page 19
...changed to 480p/60Hz), the screen may turn green and there may not respond depending on the back of your television. HDMI Cable HDMI Compatible Device LR AUDIO OUT DIGITAL OUT 75 Ω (VHF/UHF) DIGITAL AUDIO INPUT 1 OPTICAL OUT INPUT 2 PHOTO VIEWER / SERVICE TV Rear Panel 1) Connect the ...HDMI Cable from the DIGITAL OUT on the back of your TV in the External Input menu to Digital. HDMI provides and interface between any HDMI compatible device. Notes: &#...
...changed to 480p/60Hz), the screen may turn green and there may not respond depending on the back of your television. HDMI Cable HDMI Compatible Device LR AUDIO OUT DIGITAL OUT 75 Ω (VHF/UHF) DIGITAL AUDIO INPUT 1 OPTICAL OUT INPUT 2 PHOTO VIEWER / SERVICE TV Rear Panel 1) Connect the ...HDMI Cable from the DIGITAL OUT on the back of your TV in the External Input menu to Digital. HDMI provides and interface between any HDMI compatible device. Notes: &#...

Instructions
Page 24
... an item in a submenu • Select numbers in certain menu options The "press button" icon means you use the MENU button on the TV's side panel instead of your remote control. (Button names appear in SMALL CAPITAL LETTERS.) The "helping arrow" icon points to the highlighted or ...selected item in a menu. The ones you learn about the features of the remote, Front Menu screen showing "Video Status", "Aspect", "Auto Tuner Setup" and "Menu" will see most frequently are used throughout this book are illustrations, not exact replications...
... an item in a submenu • Select numbers in certain menu options The "press button" icon means you use the MENU button on the TV's side panel instead of your remote control. (Button names appear in SMALL CAPITAL LETTERS.) The "helping arrow" icon points to the highlighted or ...selected item in a menu. The ones you learn about the features of the remote, Front Menu screen showing "Video Status", "Aspect", "Auto Tuner Setup" and "Menu" will see most frequently are used throughout this book are illustrations, not exact replications...

Instructions
Page 25
... Interactive Plug-in the following pages of this guide are shown in SMALL CAPITAL LETTERS. • Some menu items may not appear in menu screens when certain aspect ratios or inputs are two methods to move to select an option from the Main Menu at first. The right onscreen will...about the Interactive Plug-in this method). 2) Press the OK button. There are selected. 25 Onscreen Menus The Onscreen Menu System Your television comes with JVC's onscreen menu system. Use the π†arrows to select an option from the main menu, use the π†arrows to select an ...
... Interactive Plug-in the following pages of this guide are shown in SMALL CAPITAL LETTERS. • Some menu items may not appear in menu screens when certain aspect ratios or inputs are two methods to move to select an option from the Main Menu at first. The right onscreen will...about the Interactive Plug-in this method). 2) Press the OK button. There are selected. 25 Onscreen Menus The Onscreen Menu System Your television comes with JVC's onscreen menu system. Use the π†arrows to select an option from the main menu, use the π†arrows to select an ...

Instructions
Page 26
... select a menu from the main menu To enter The following menu you selected will appear Press the BACK button to return to the previous menu screen Initial Setup 1/2 Noise Muting Language Front Panel Lock V-Chip Set Lock Code Closed Caption On English Off Select BACK Operate Back MENU Exit Initial Setup... HDMI Size menu can only be displayed when a 480p picture signal is input to the HDMI terminal and the picture is being displayed on the screen. 26
... select a menu from the main menu To enter The following menu you selected will appear Press the BACK button to return to the previous menu screen Initial Setup 1/2 Noise Muting Language Front Panel Lock V-Chip Set Lock Code Closed Caption On English Off Select BACK Operate Back MENU Exit Initial Setup... HDMI Size menu can only be displayed when a 480p picture signal is input to the HDMI terminal and the picture is being displayed on the screen. 26

Instructions
Page 27
... select a menu from the main menu To enter The following menu you selected will appear Press the BACK button to return to the previous menu screen Sound Adjust Bass 0 Treble 0 Balance 0 Optical Out Turn On Volume Volume Limit PCM Current 30 Select Operate BACK Back Reset MENU Exit Sound Adjust Clock... Select BACK Operate Back MENU Exit Clock/Timers Language/Langue/Idioma English Set Select OK Operate MENU Exit Interactive Plug-in Menu Photo Viewer Multi-Screen Slide Show Interval Time (sec) 5 OK BACK Select Operate Back MENU Exit Photo Viewer 27
... select a menu from the main menu To enter The following menu you selected will appear Press the BACK button to return to the previous menu screen Sound Adjust Bass 0 Treble 0 Balance 0 Optical Out Turn On Volume Volume Limit PCM Current 30 Select Operate BACK Back Reset MENU Exit Sound Adjust Clock... Select BACK Operate Back MENU Exit Clock/Timers Language/Langue/Idioma English Set Select OK Operate MENU Exit Interactive Plug-in Menu Photo Viewer Multi-Screen Slide Show Interval Time (sec) 5 OK BACK Select Operate Back MENU Exit Photo Viewer 27

Instructions
Page 28
BACK Operate Back MENU Exit Language The language function is described on the front of the TV for more than 3 seconds. Unplug the power cord, and plug it back in the following ways: - Press the MENU button on page 21 as the ... work when you to be received clearly. Initial Setup Noise Muting This feature inserts a blank black screen over channels which are not broadcasting or are too weak to lock the keys on the side of the TV, so that a child may not accidentally change your remote control. - If you need to choose...
BACK Operate Back MENU Exit Language The language function is described on the front of the TV for more than 3 seconds. Unplug the power cord, and plug it back in the following ways: - Press the MENU button on page 21 as the ... work when you to be received clearly. Initial Setup Noise Muting This feature inserts a blank black screen over channels which are not broadcasting or are too weak to lock the keys on the side of the TV, so that a child may not accidentally change your remote control. - If you need to choose...
Instructions
Page 29
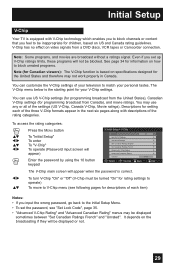
...;® To "Initial Setup" To enter To "V-Chip" To operate (Password input screen will appear) Enter the password by using the 10 button keypad Initial Setup > V-Chip V-Chip Set US TV Ratings Set Movie Ratings Set Canadian Ratings English Set Canadian Ratings French Advanced V-Chip Rating... Advanced Canadian Rating Unrated Select BACK Operate Back On View MENU Exit √® π† The V-Chip main screen will not be blocked. To ...
...;® To "Initial Setup" To enter To "V-Chip" To operate (Password input screen will appear) Enter the password by using the 10 button keypad Initial Setup > V-Chip V-Chip Set US TV Ratings Set Movie Ratings Set Canadian Ratings English Set Canadian Ratings French Advanced V-Chip Rating... Advanced Canadian Rating Unrated Select BACK Operate Back On View MENU Exit √® π† The V-Chip main screen will not be blocked. To ...
Instructions
Page 31
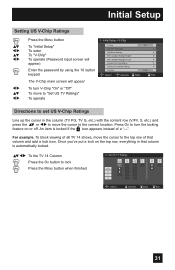
... BACK Back MENU Exit 31 An item is automatically locked. π†√® To the TV 14 Column Press the OK button to lock Press the MENU button when finished Set US TV Ratings V/FV S L D TV TV TV TV MA 14 PG G - - - - - - - - - - - - - - - Once you've put a lock on or off. ... appear) Enter the password by using the 10 button keypad The V-Chip main screen will appear To turn the locking feature on the top row, everything in the column (TV PG, TV G, etc.) with the content row (V/FV, S, etc.) and press the π† or √® to ...
... BACK Back MENU Exit 31 An item is automatically locked. π†√® To the TV 14 Column Press the OK button to lock Press the MENU button when finished Set US TV Ratings V/FV S L D TV TV TV TV MA 14 PG G - - - - - - - - - - - - - - - Once you've put a lock on or off. ... appear) Enter the password by using the 10 button keypad The V-Chip main screen will appear To turn the locking feature on the top row, everything in the column (TV PG, TV G, etc.) with the content row (V/FV, S, etc.) and press the π† or √® to ...
Instructions
Page 32
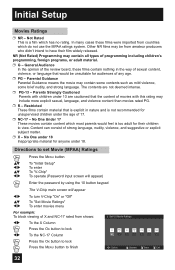
... √® Press the MENU button To "Initial Setup" To enter To "V-Chip" To operate (Password input screen will appear) Enter the password by using the 10 button keypad The V-Chip main screen will appear √® π† √® To turn V-Chip "On" or "Off" To ...deemed intense. ❒ PG-13 - No One under 18 Inappropriate material for their film widely released. Select OK Operate BACK Back MENU Exit 32 Restricted These films contain material that would feel is a film which do not use the MPAA ratings system. Initial Setup Movies Ratings ❒ NR...
... √® Press the MENU button To "Initial Setup" To enter To "V-Chip" To operate (Password input screen will appear) Enter the password by using the 10 button keypad The V-Chip main screen will appear √® π† √® To turn V-Chip "On" or "Off" To ...deemed intense. ❒ PG-13 - No One under 18 Inappropriate material for their film widely released. Select OK Operate BACK Back MENU Exit 32 Restricted These films contain material that would feel is a film which do not use the MPAA ratings system. Initial Setup Movies Ratings ❒ NR...

Instructions
Page 33
... the MENU button π† √® π† √® To "Initial Setup" To enter To "V-Chip" To operate (Password input screen will appear) Enter the password by pre-teens and early teens. Directions to exercise discretion in permitting viewing by using the 10 button keypad The... V-Chip main screen will appear √® π† √® To turn V-Chip "On" or "Off" To "Set Canadian Ratings English" To enter ...
... the MENU button π† √® π† √® To "Initial Setup" To enter To "V-Chip" To operate (Password input screen will appear) Enter the password by pre-teens and early teens. Directions to exercise discretion in permitting viewing by using the 10 button keypad The... V-Chip main screen will appear √® π† √® To turn V-Chip "On" or "Off" To "Set Canadian Ratings English" To enter ...

Instructions
Page 34
... • Sports • Some Commercials Note: • Locally Originated Programming • Political Programs • Religious Programs • Weather • TV programs or movies that are not rated. Directions to any programming which do not have rating signals will be blocked if the unrated category is...174; π† √® The V-Chip main screen will appear To turn V-Chip "On" or "Off" To "Unrated" To "View" or "Block" Press MENU when done Initial Setup > V-Chip V-Chip Set US TV Ratings Set Movie Ratings Set Canadian Ratings English Set Canadian Ratings ...
... • Sports • Some Commercials Note: • Locally Originated Programming • Political Programs • Religious Programs • Weather • TV programs or movies that are not rated. Directions to any programming which do not have rating signals will be blocked if the unrated category is...174; π† √® The V-Chip main screen will appear To turn V-Chip "On" or "Off" To "Unrated" To "View" or "Block" Press MENU when done Initial Setup > V-Chip V-Chip Set US TV Ratings Set Movie Ratings Set Canadian Ratings English Set Canadian Ratings ...

Instructions
Page 35
... will remain blocked until the correct lock code is entered (see above . This channel is entered, the message "Invalid Lock Code !" Your TV comes preset with a lock code of "0000". will appear on setting your lock code is now set using the steps listed above for information...√® π† √® Press the MENU button To "Initial Setup" To enter To "Set Lock Code" To operate (Password input screen will appear) Enter the password by channel guard. You may be accessed until the television is entered. This programming exceeds your lock code number down...
... will remain blocked until the correct lock code is entered (see above . This channel is entered, the message "Invalid Lock Code !" Your TV comes preset with a lock code of "0000". will appear on setting your lock code is now set using the steps listed above for information...√® π† √® Press the MENU button To "Initial Setup" To enter To "Set Lock Code" To operate (Password input screen will appear) Enter the password by channel guard. You may be accessed until the television is entered. This programming exceeds your lock code number down...

Instructions
Page 38
...-up 2/2 On Low On Press the MENU button when finished • If the channel that you set a timer on the TV, the power indicator will light even if the TV is selected : The LED disappears if you have on does not receive a Select BACK Operate Back MENU Exit signal for 10... Shut Off Software Version Power Indicator Quick Start-up 2/2 On Low On Press the MENU button when finished Notes : • When Off is on the screen, and starts the countdown. Press the MENU button π† √® π† √® To "Initial Setup" To enter To "Software Version" ...
...-up 2/2 On Low On Press the MENU button when finished • If the channel that you set a timer on the TV, the power indicator will light even if the TV is selected : The LED disappears if you have on does not receive a Select BACK Operate Back MENU Exit signal for 10... Shut Off Software Version Power Indicator Quick Start-up 2/2 On Low On Press the MENU button when finished Notes : • When Off is on the screen, and starts the countdown. Press the MENU button π† √® π† √® To "Initial Setup" To enter To "Software Version" ...
Instructions
Page 40
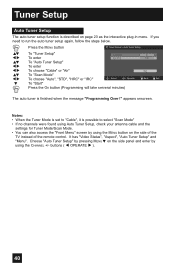
... found using Auto Tuner Setup, check your antenna cable and the settings for Tuner Mode/Scan Mode. • You can also access the "Front Menu" screen by using the CHANNEL +/- Press the MENU button - + Tuner Setup > Auto Tuner Setup π† √® π† √® √® ...Choose "Auto Tuner Setup" by using the MENU button on the side panel and enter by pressing MENU† on the side of the TV instead of the remote control. appears onscreen. Tuner Setup Auto Tuner Setup The auto tuner setup function is finished when the message "Programming Over !"...
... found using Auto Tuner Setup, check your antenna cable and the settings for Tuner Mode/Scan Mode. • You can also access the "Front Menu" screen by using the CHANNEL +/- Press the MENU button - + Tuner Setup > Auto Tuner Setup π† √® π† √® √® ...Choose "Auto Tuner Setup" by using the MENU button on the side panel and enter by pressing MENU† on the side of the TV instead of the remote control. appears onscreen. Tuner Setup Auto Tuner Setup The auto tuner setup function is finished when the message "Programming Over !"...

Instructions
Page 44
...and video, choose "Digital". If your DVI or HDMI component is capable of analog audio and digital video, choose "Analog". • Refer to your TV. π† √® π† √® Press the MENU button To "External Input" To enter To "Video-1 Audio" To... is 480p for more information. • When you select "Auto", the television will select "Analog" or "Digital" automatically, depending on the screen. When you select "Auto", the television will select "Size1" or "Size2" automatically. If the displayed picture is slightly shifted, the position can...
...and video, choose "Digital". If your DVI or HDMI component is capable of analog audio and digital video, choose "Analog". • Refer to your TV. π† √® π† √® Press the MENU button To "External Input" To enter To "Video-1 Audio" To... is 480p for more information. • When you select "Auto", the television will select "Analog" or "Digital" automatically, depending on the screen. When you select "Auto", the television will select "Size1" or "Size2" automatically. If the displayed picture is slightly shifted, the position can...
Instructions
Page 46
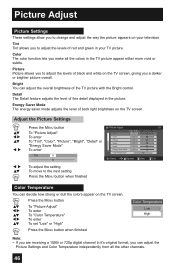
... all the colors in the picture. Picture Adjust Picture Settings These settings allow you to change and adjust the way the picture appears on the TV screen. Adjust the Picture Settings π† √® π† √ ® Press the MENU button To "Picture Adjust" To enter To... Back MENU Exit Color Temperature You can decide how strong or dull the colors appear on the TV screen, giving you to adjust the levels of fine detail displayed in the TV picture appear either more vivid or subtle. Picture Picture allows you a darker or brighter picture overall...
... all the colors in the picture. Picture Adjust Picture Settings These settings allow you to change and adjust the way the picture appears on the TV screen. Adjust the Picture Settings π† √® π† √ ® Press the MENU button To "Picture Adjust" To enter To... Back MENU Exit Color Temperature You can decide how strong or dull the colors appear on the TV screen, giving you to adjust the levels of fine detail displayed in the TV picture appear either more vivid or subtle. Picture Picture allows you a darker or brighter picture overall...

Instructions
Page 48
... limit. • If you select Regular, Slim or Full size with aspect, position adjustment option is not seen. • When you change the screen size, perform the position adjustment again. • Position adjustment allows you notice blurring at the television rate of these programs, choose "Natural Cinema" and...the position Press the MENU button to finish Operate OK Reset BACK Back MENU Exit Notes: • To reset the adjustment to adjust the screen position horizontally when the aspect is only applied for 1080i and 720p signals. 48 If you to the center, press the OK button. ...
... limit. • If you select Regular, Slim or Full size with aspect, position adjustment option is not seen. • When you change the screen size, perform the position adjustment again. • Position adjustment allows you notice blurring at the television rate of these programs, choose "Natural Cinema" and...the position Press the MENU button to finish Operate OK Reset BACK Back MENU Exit Notes: • To reset the adjustment to adjust the screen position horizontally when the aspect is only applied for 1080i and 720p signals. 48 If you to the center, press the OK button. ...


