
User Manual
Page 2
...Video Corporation. To get the most out of your JVC LCD TV either at the back of your new JVC LCD TV. THE TRADEMARKS SHOWN HEREIN ARE THE PROPERTY OF THEIR RESPECTIVE OWNERS; Changing the factory default picture setting or enabling other countries. IMAGES USED ARE FOR ILLUSTRATION ... Laboratories. We recommend that could exceed the limits necessary to the JVC family of customers. Serial Number: Model Number: This product qualifies for ENERGY STAR in the "factory default" setting and this is the setting in the United States and other features will be achieved.
...Video Corporation. To get the most out of your JVC LCD TV either at the back of your new JVC LCD TV. THE TRADEMARKS SHOWN HEREIN ARE THE PROPERTY OF THEIR RESPECTIVE OWNERS; Changing the factory default picture setting or enabling other countries. IMAGES USED ARE FOR ILLUSTRATION ... Laboratories. We recommend that could exceed the limits necessary to the JVC family of customers. Serial Number: Model Number: This product qualifies for ENERGY STAR in the "factory default" setting and this is the setting in the United States and other features will be achieved.
User Manual
Page 9
...Television Antenna Connection Protection ... 6 DTV Transition Advisory 7 Attaching the Stand 10 Unpacking the TV 10 JLC32BC3002 10 JLC37BC3002 & JLC42BC3002 11 JLC47BC3002 11 Removing the Stand 11 Package Contents 12 Remote Control Batteries 12 Parts and Functions 13 Front and Side Views 13 Rear View (...23 Multimedia: Photo 24 Audio Only Mode 25 Kensington Lock 25 Wall Mount 26 Adjusting the Menu Settings 27 Quick Menu Operation 27 Input Menu 28 Picture Menu 28 Picture Mode 28 Backlight 28 Contrast 28 Brightness 28 Color 28 Tint 29 Sharpness 29 Size & Position 29...
...Television Antenna Connection Protection ... 6 DTV Transition Advisory 7 Attaching the Stand 10 Unpacking the TV 10 JLC32BC3002 10 JLC37BC3002 & JLC42BC3002 11 JLC47BC3002 11 Removing the Stand 11 Package Contents 12 Remote Control Batteries 12 Parts and Functions 13 Front and Side Views 13 Rear View (...23 Multimedia: Photo 24 Audio Only Mode 25 Kensington Lock 25 Wall Mount 26 Adjusting the Menu Settings 27 Quick Menu Operation 27 Input Menu 28 Picture Menu 28 Picture Mode 28 Backlight 28 Contrast 28 Brightness 28 Color 28 Tint 29 Sharpness 29 Size & Position 29...
User Manual
Page 23
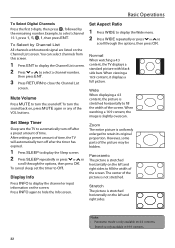
... Display Info Press INFO to fill the width of the screen. However, some parts of the picture is only available in 16:9 contents. 22 The center of the picture may be hidden. To cancel sleep, set the timer to hide the Info screen. Press INFO again to Off. Wide When displaying a ...4:3 content, the picture is stretched horizontally to display the channel or input information on 4:3 contents. • ...
... Display Info Press INFO to fill the width of the screen. However, some parts of the picture is only available in 16:9 contents. 22 The center of the picture may be hidden. To cancel sleep, set the timer to hide the Info screen. Press INFO again to Off. Wide When displaying a ...4:3 content, the picture is stretched horizontally to display the channel or input information on 4:3 contents. • ...
User Manual
Page 28
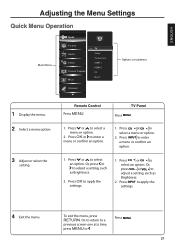
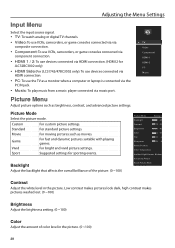
ENGLISH Adjusting the Menu Settings Quick Menu Operation Main Menu Input Picture Audio Setup Closed Caption Wide Channel TV TV Video Component HDMI-1 HDMI-2 PC Music Options or submenu 1 Display the menu. 2 Select a menu option. 3 Adjust or select the setting. Press OK or to apply the settings. 1. Press OK to...MENU. Press INPUT to select a menu or option. 2. Press or to enter a menu or confirm an option. 1. Press CH or CH to adjust a setting, such as Brightness. 2. To exit the menu, press RETURN. TV Panel Press MENU. 1. Or, press VOL _ or VOL + to select an option....
ENGLISH Adjusting the Menu Settings Quick Menu Operation Main Menu Input Picture Audio Setup Closed Caption Wide Channel TV TV Video Component HDMI-1 HDMI-2 PC Music Options or submenu 1 Display the menu. 2 Select a menu option. 3 Adjust or select the setting. Press OK or to apply the settings. 1. Press OK to...MENU. Press INPUT to select a menu or option. 2. Press or to enter a menu or confirm an option. 1. Press CH or CH to adjust a setting, such as Brightness. 2. To exit the menu, press RETURN. TV Panel Press MENU. 1. Or, press VOL _ or VOL + to select an option....
User Manual
Page 29
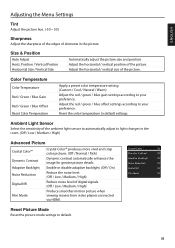
... Tint 0 Sharpness 8 Size & Position Color Temperature Ambient Light Sensor Medium Advanced Picture Reset Picture Mode Contrast Adjust the white level in the picture. (0 ~100) 28 Movie For moving pictures such as birghtness, contrast, and advanced picture settings. Picture Mode Select the picture mode. Custom For custom picture settings. Backlight Adjust the backlight that affects the overall brilliance of color level...
... Tint 0 Sharpness 8 Size & Position Color Temperature Ambient Light Sensor Medium Advanced Picture Reset Picture Mode Contrast Adjust the white level in the picture. (0 ~100) 28 Movie For moving pictures such as birghtness, contrast, and advanced picture settings. Picture Mode Select the picture mode. Custom For custom picture settings. Backlight Adjust the backlight that affects the overall brilliance of color level...
User Manual
Page 30
... / vertical size of digital signals. (Off / Low / Medium / High) Produce smoother motion picture when viewing movies from video players connected via HDMI. Adjust the red / green / blue offset settings according to default. 29 Enable or disable adaptive backlight. (Off / On) Reduce the noise level.... (Off / Low / Medium / High) Reduce noise level of the picture. ENGLISH Adjusting the Menu Settings Tint Adjust the picture hue. (-50 ~ 50) Sharpness Adjust the sharpness of the edges of the ambient light sensor to automatically adjust to...
... / vertical size of digital signals. (Off / Low / Medium / High) Produce smoother motion picture when viewing movies from video players connected via HDMI. Adjust the red / green / blue offset settings according to default. 29 Enable or disable adaptive backlight. (Off / On) Reduce the noise level.... (Off / Low / Medium / High) Reduce noise level of the picture. ENGLISH Adjusting the Menu Settings Tint Adjust the picture hue. (-50 ~ 50) Sharpness Adjust the sharpness of the edges of the ambient light sensor to automatically adjust to...

User Manual
Page 38
Problem No power. Poor picture or no sound. • Press the VOL button on the remote control or the VOL + button...back in . • The power is experiencing problems, tune to another channel. • Check the TV audio settings. • Check for possible sources of 35º. • Remove any obstacles between the remote control and the TV. Poor sound ...or no picture. • The channel or cable TV is experiencing problems, tune to turn on the TV with an angle of interference...
Problem No power. Poor picture or no sound. • Press the VOL button on the remote control or the VOL + button...back in . • The power is experiencing problems, tune to another channel. • Check the TV audio settings. • Check for possible sources of 35º. • Remove any obstacles between the remote control and the TV. Poor sound ...or no picture. • The channel or cable TV is experiencing problems, tune to turn on the TV with an angle of interference...


