Separate volume1
Page 1
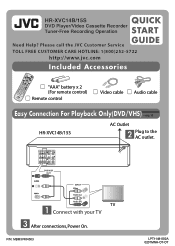
DVD/VCR OUT INPUT Video Audio (L) Audio (R) TV Connect with your TV After connections, Power On. HR-XVC14B/15S QUICK START DVD Player/Video Cassette Recorder Tuner-Free Recording Operation GUIDE Need Help? P/N: MBM37484503 LPT1148-002A 0207MNH-OT-OT Please call the JVC Customer Service TOLL FREE CUSTOMER CARE HOTLINE: 1(800)252-5722 http://www.jvc.com Included Accessories "AAA" battery x 2 (For remote control) Remote control Video cable Audio cable Easy Connection For Playback Only(DVD/VHS)INSTRUCTIONS pg. 10 HR-XVC14B/15S AC Outlet Plug to the AC outlet.
DVD/VCR OUT INPUT Video Audio (L) Audio (R) TV Connect with your TV After connections, Power On. HR-XVC14B/15S QUICK START DVD Player/Video Cassette Recorder Tuner-Free Recording Operation GUIDE Need Help? P/N: MBM37484503 LPT1148-002A 0207MNH-OT-OT Please call the JVC Customer Service TOLL FREE CUSTOMER CARE HOTLINE: 1(800)252-5722 http://www.jvc.com Included Accessories "AAA" battery x 2 (For remote control) Remote control Video cable Audio cable Easy Connection For Playback Only(DVD/VHS)INSTRUCTIONS pg. 10 HR-XVC14B/15S AC Outlet Plug to the AC outlet.
Separate volume1
Page 2
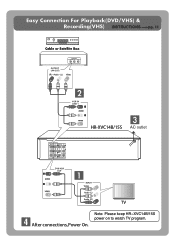
Audio - (L) Video VCR IN LINE 1 HR-XVC14B/15S AC outlet DVD/VCR OUT INPUT Video Audio (L) Audio (R) TV After connections, Power On. Easy Connection For Playback(DVD/VHS) & Recording(VHS) INSTRUCTIONS pg. 11 Cable or Satellite Box OUTPUT (R) - Note: Please keep HR-XVC14B/15S power on to watch TV program. Audio - (L) Video OUTPUT (AV OUT) (R) -
Audio - (L) Video VCR IN LINE 1 HR-XVC14B/15S AC outlet DVD/VCR OUT INPUT Video Audio (L) Audio (R) TV After connections, Power On. Easy Connection For Playback(DVD/VHS) & Recording(VHS) INSTRUCTIONS pg. 11 Cable or Satellite Box OUTPUT (R) - Note: Please keep HR-XVC14B/15S power on to watch TV program. Audio - (L) Video OUTPUT (AV OUT) (R) -
Separate volume1
Page 4
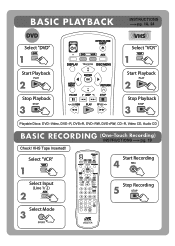
BASIC PLAYBACK DVD Select "DVD" 1 * INSTRUCTIONS pg. 18, 24 VHS Select "VCR" 1 Start Playback 2 Stop Playback 3 Start Playback 2 Stop Playback 3 Playable Discs: DVD-Video, DVD-R, DVD+R, DVD-RW, DVD+RW, CD-R, Video CD, Audio CD BASIC RECORDING (One-Touch Recording) INSTRUCTIONS pg. 19 Check! Select "VCR" * 1 Start Recording 4 Select Input (Line 1/ 2) 2 Stop Recording 5 Select Mode 3 VHS Tape Inserted!!
BASIC PLAYBACK DVD Select "DVD" 1 * INSTRUCTIONS pg. 18, 24 VHS Select "VCR" 1 Start Playback 2 Stop Playback 3 Start Playback 2 Stop Playback 3 Playable Discs: DVD-Video, DVD-R, DVD+R, DVD-RW, DVD+RW, CD-R, Video CD, Audio CD BASIC RECORDING (One-Touch Recording) INSTRUCTIONS pg. 19 Check! Select "VCR" * 1 Start Recording 4 Select Input (Line 1/ 2) 2 Stop Recording 5 Select Mode 3 VHS Tape Inserted!!
Instructions
Page 4
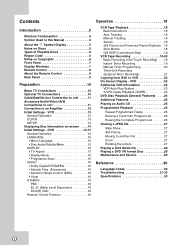
... . .24 Additional Features 25 Playing an Audio CD 26 Programmed Playback 26 Repeat Programmed Tracks 26 Erasing a Track from DVD to VCR 22 On-Screen Display - DVD 14-17 General Operation 14 LANGUAGE 15 • Menu Language 15 • Disc Audio/Subtitle/Menu 15 DISPLAY 15 &#... About the Symbol Display 5 Notes on Discs 5 Types of Playable Discs 6 Region Code 6 Notes on -screen . . . .14 Initial Settings - VCR 13 General Operation 13 CLOCK 13 SETUP 13 Displaying Disc Information on Copyrights 6 Front Panel 7 Display Windows 7 Remote Control 8 About the Remote Control 8...
... . .24 Additional Features 25 Playing an Audio CD 26 Programmed Playback 26 Repeat Programmed Tracks 26 Erasing a Track from DVD to VCR 22 On-Screen Display - DVD 14-17 General Operation 14 LANGUAGE 15 • Menu Language 15 • Disc Audio/Subtitle/Menu 15 DISPLAY 15 &#... About the Symbol Display 5 Notes on Discs 5 Types of Playable Discs 6 Region Code 6 Notes on -screen . . . .14 Initial Settings - VCR 13 General Operation 13 CLOCK 13 SETUP 13 Displaying Disc Information on Copyrights 6 Front Panel 7 Display Windows 7 Remote Control 8 About the Remote Control 8...

Instructions
Page 7
...unit ON and OFF. e PLAY (N) Starts playback of an external source (Audio system, TV/Monitor, Another VCR). i OPEN/CLOSE (Z) Opens or closes the disc tray. DVD [P] The DVD deck is active. Indicates total playing time, elapsed time, remaining time or current deck status (Playback, Pause,... etc). 7 b Cassette Compartment (VCR deck) Insert a video cassette here. The VCR deck is programmed (VCR part only). Front Panel Introduction a Disc Tray (DVD deck) Insert a disc here. DVD: Skip to view on the TV screen between DVD and VCR. Press and hold for two seconds for ...
...unit ON and OFF. e PLAY (N) Starts playback of an external source (Audio system, TV/Monitor, Another VCR). i OPEN/CLOSE (Z) Opens or closes the disc tray. DVD [P] The DVD deck is active. Indicates total playing time, elapsed time, remaining time or current deck status (Playback, Pause,... etc). 7 b Cassette Compartment (VCR deck) Insert a video cassette here. The VCR deck is programmed (VCR part only). Front Panel Introduction a Disc Tray (DVD deck) Insert a disc here. DVD: Skip to view on the TV screen between DVD and VCR. Press and hold for two seconds for ...
Instructions
Page 8
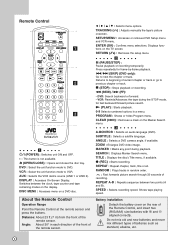
... playback. 0-9 Selects numbered options in random order. : Fast forwards picture search through 30 seconds of current chapter or track or go to VCR. c A.MONITOR : Selects an audio language (DVD). SEARCH : Displays Marker Search menu. Do not mix old and new batteries and never mix different types of the remote sensor. ENTER (OK...
... playback. 0-9 Selects numbered options in random order. : Fast forwards picture search through 30 seconds of current chapter or track or go to VCR. c A.MONITOR : Selects an audio language (DVD). SEARCH : Displays Marker Search menu. Do not mix old and new batteries and never mix different types of the remote sensor. ENTER (OK...
Instructions
Page 9
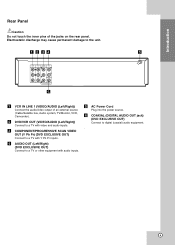
...d AUDIO OUT (Left/Right) (DVD EXCLUSIVE OUT) Connect to a TV or other equipment with video and audio inputs. Introduction Rear Panel Caution Do not touch the inner pins of an external source (Cable/Satellite box, Audio system, TV/Monitor, VCR, Camcorder). b DVD/VCR OUT (VIDEO/AUDIO (Left/Right))... Connect to the unit. f COAXIAL (DIGITAL AUDIO OUT jack) (DVD EXCLUSIVE OUT) Connect to a TV with Y Pb Pr inputs. c COMPONENT/PROGRESSIVE SCAN ...
...d AUDIO OUT (Left/Right) (DVD EXCLUSIVE OUT) Connect to a TV or other equipment with video and audio inputs. Introduction Rear Panel Caution Do not touch the inner pins of an external source (Cable/Satellite box, Audio system, TV/Monitor, VCR, Camcorder). b DVD/VCR OUT (VIDEO/AUDIO (Left/Right))... Connect to the unit. f COAXIAL (DIGITAL AUDIO OUT jack) (DVD EXCLUSIVE OUT) Connect to a TV with Y Pb Pr inputs. c COMPONENT/PROGRESSIVE SCAN ...
Instructions
Page 10
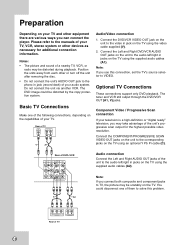
... OUT jacks on the unit to the video in jacks on the TV using the supplied audio cables (A1). The tuner and VCR still output through the DVD/VCR OUT (A1, V) jacks. Component Video / Progressive Scan connection If your TV and other equipment there are various ways you use ... devices as necessary for the highest possible video resolution. Do not connect the unit via another VCR. Rear of DVD+VCR Audio connection Connect the Left and Right AUDIO OUT jacks of a nearby TV, VCR, or radio may be unstably on your television is a high-definition or "digital ready" television...
... OUT jacks on the unit to the video in jacks on the TV using the supplied audio cables (A1). The tuner and VCR still output through the DVD/VCR OUT (A1, V) jacks. Component Video / Progressive Scan connection If your TV and other equipment there are various ways you use ... devices as necessary for the highest possible video resolution. Do not connect the unit via another VCR. Rear of DVD+VCR Audio connection Connect the Left and Right AUDIO OUT jacks of a nearby TV, VCR, or radio may be unstably on your television is a high-definition or "digital ready" television...
Instructions
Page 12
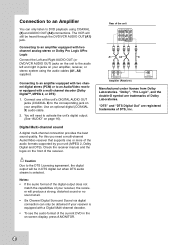
... A2 X L R AUDIO INPUT Amplifier (Receiver) COAXIAL DIGITAL INPUT Manufactured under license from Dolby Laboratories. You will be in jacks on the unit to DVD playback using the audio cables (A1, A2) supplied. Rear of DTS, Inc. Caution Due to the DTS Licensing agreement, the digital output will need... analog stereo or Dolby Pro Logic II/Pro Logic Connect the Left and Right AUDIO OUT (or DVD/VCR AUDIO OUT) jacks on your receiver, the receiver will still be heard through the DVD/VCR AUDIO OUT (A1) jack. Notes: • If the audio format of the digital output does...
... A2 X L R AUDIO INPUT Amplifier (Receiver) COAXIAL DIGITAL INPUT Manufactured under license from Dolby Laboratories. You will be in jacks on the unit to DVD playback using the audio cables (A1, A2) supplied. Rear of DTS, Inc. Caution Due to the DTS Licensing agreement, the digital output will need... analog stereo or Dolby Pro Logic II/Pro Logic Connect the Left and Right AUDIO OUT (or DVD/VCR AUDIO OUT) jacks on your receiver, the receiver will still be heard through the DVD/VCR AUDIO OUT (A1) jack. Notes: • If the audio format of the digital output does...
Instructions
Page 18
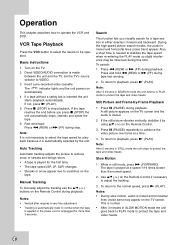
... Press the VCR button to select the device to scratches on the tape. Basic Instructions 1. The indicator lights and the unit powers on the TV screen. Search This ... the unit returns to PLAY mode to playback, press N (PLAY). To return to protect the tape and video heads. Press X (PAUSE) repeatedly to operate the VCR and DVD. Operation This chapter describes how to advance the video picture one frame at a speed 1/19 times slower than 3 seconds.
... Press the VCR button to select the device to scratches on the tape. Basic Instructions 1. The indicator lights and the unit powers on the TV screen. Search This ... the unit returns to PLAY mode to playback, press N (PLAY). To return to protect the tape and video heads. Press X (PAUSE) repeatedly to operate the VCR and DVD. Operation This chapter describes how to advance the video picture one frame at a speed 1/19 times slower than 3 seconds.
Instructions
Page 20
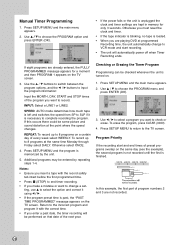
... 1 appears on . 1. Checking or Erasing the Timer Program Programming can be performed on the TV screen. Manual Timer Programming 1. Otherwise you want to VCR mode and start and end times of the next year. Additional programs may be some picture and sound distortion at the point where the speed... on the same day (see the example), the second program is not recorded until the first is unplugged the clock and timer settings are playing DVD at the same time Monday through Friday select DAILY. Use b / B to choose the PROGRAM option and press ENTER (OK). • If the power...
... 1 appears on . 1. Checking or Erasing the Timer Program Programming can be performed on the TV screen. Manual Timer Programming 1. Otherwise you want to VCR mode and start and end times of the next year. Additional programs may be some picture and sound distortion at the point where the speed... on the same day (see the example), the second program is not recorded until the first is unplugged the clock and timer settings are playing DVD at the same time Monday through Friday select DAILY. Use b / B to choose the PROGRAM option and press ENTER (OK). • If the power...
Instructions
Page 22
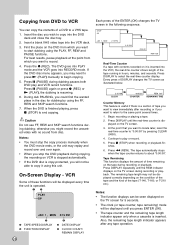
For best results, pause playback at the point from which you wish to begin copying. 5. Press the z (REC). The DVD goes into PLAY mode and the VCR goes into the VCR deck. 3. During dub PAUSING, you want to locate later, reset the real-time counter to "0:00:00" by using the...❹ ❸ DATE DISPLAY ❹ CLOCK/ COUNT/ REMAIN DISPLAY 22 Each press of the tape (T-140, T-160, or T-210 etc.). Copying from DVD to VCR You can be displayed every time the unit is displayed on the TV screen during recording or playback. Also, the remaining tape length indicator appears...
For best results, pause playback at the point from which you wish to begin copying. 5. Press the z (REC). The DVD goes into PLAY mode and the VCR goes into the VCR deck. 3. During dub PAUSING, you want to locate later, reset the real-time counter to "0:00:00" by using the...❹ ❸ DATE DISPLAY ❹ CLOCK/ COUNT/ REMAIN DISPLAY 22 Each press of the tape (T-140, T-160, or T-210 etc.). Copying from DVD to VCR You can be displayed every time the unit is displayed on the TV screen during recording or playback. Also, the remaining tape length indicator appears...
Instructions
Page 23
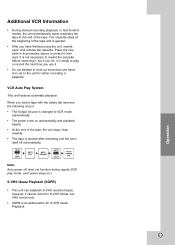
... do, it from dust. Note: Auto power off does not function during regular DVD play or record the next time you have finished using the unit, rewind, eject, and remove the cassette. Operation Additional VCR Information • During manual recording playback, or fast forward modes, the unit automatically... starts rewinding the tape at the beginning of the tape. VCR Auto Play System This unit features automatic playback. however, it cannot record in its protective sleeve to the unit for S-VHS Quasi ...
... do, it from dust. Note: Auto power off does not function during regular DVD play or record the next time you have finished using the unit, rewind, eject, and remove the cassette. Operation Additional VCR Information • During manual recording playback, or fast forward modes, the unit automatically... starts rewinding the tape at the beginning of the tape. VCR Auto Play System This unit features automatic playback. however, it cannot record in its protective sleeve to the unit for S-VHS Quasi ...
Instructions
Page 32
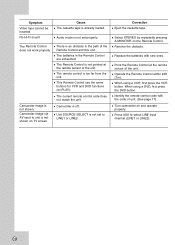
... remote sensor of the Remote Control and this unit. The remote control is not shown. Camcorder is already loaded. When using a DVD, first press the DVD button. The batteries in the path of the unit. The current remote control code does not match the unit. Remove the obstacle.... on and operate properly. Correction Eject the cassette tape. Press AUX to LINE1 or LINE2. This Remote Control use the same buttons for VCR and DVD functions (ex.PLAY). The Remote Control does not work properly. Operate the Remote Control within 23ft (7m). Identify the remote control code ...
... remote sensor of the Remote Control and this unit. The remote control is not shown. Camcorder is already loaded. When using a DVD, first press the DVD button. The batteries in the path of the unit. The current remote control code does not match the unit. Remove the obstacle.... on and operate properly. Correction Eject the cassette tape. Press AUX to LINE1 or LINE2. This Remote Control use the same buttons for VCR and DVD functions (ex.PLAY). The Remote Control does not work properly. Operate the Remote Control within 23ft (7m). Identify the remote control code ...

Instructions
Page 33
...75 ohms, negative sync, RCA jack x 1 (Pb)/(Pr) 0.7 V (p-p), 75 ohms, RCA jack x 2 0.5 V (p-p), 75 ohms, RCA jack x 1 2.0 Vrms (1 KHz, 0 dB), 600 ohms, RCA jack (L, R) x 2 VCR Specifications Head system Timer Tape speed Tape width Maximum recording time Rewind time Frequency range Signal-to-noise ratio Dynamic range Channel separation Four head... Laser system Frequency response Signal-to-noise ratio Harmonic distortion Dynamic range Semiconductor laser, wavelength 650 nm DVD (PCM 96 kHz): 8 Hz to 44 kHz, DVD (PCM 48 kHz): 8 Hz to 22 kHz CD: 8 Hz to 20 kHz More than 90 dB (ANALOG OUT jacks only...
...75 ohms, negative sync, RCA jack x 1 (Pb)/(Pr) 0.7 V (p-p), 75 ohms, RCA jack x 2 0.5 V (p-p), 75 ohms, RCA jack x 1 2.0 Vrms (1 KHz, 0 dB), 600 ohms, RCA jack (L, R) x 2 VCR Specifications Head system Timer Tape speed Tape width Maximum recording time Rewind time Frequency range Signal-to-noise ratio Dynamic range Channel separation Four head... Laser system Frequency response Signal-to-noise ratio Harmonic distortion Dynamic range Semiconductor laser, wavelength 650 nm DVD (PCM 96 kHz): 8 Hz to 44 kHz, DVD (PCM 48 kHz): 8 Hz to 22 kHz CD: 8 Hz to 20 kHz More than 90 dB (ANALOG OUT jacks only...

