Separate volume1
Page 1
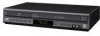
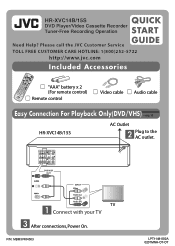
P/N: MBM37484503 LPT1148-002A 0207MNH-OT-OT HR-XVC14B/15S QUICK START DVD Player/Video Cassette Recorder Tuner-Free Recording Operation GUIDE Need Help? DVD/VCR OUT INPUT Video Audio (L) Audio (R) TV Connect with your TV After connections, Power On. Please call the JVC Customer Service TOLL FREE CUSTOMER CARE HOTLINE: 1(800)252-5722 http://www.jvc.com Included Accessories "AAA" battery x 2 (For remote control) Remote control Video cable Audio cable Easy Connection For Playback Only(DVD/VHS)INSTRUCTIONS pg. 10 HR-XVC14B/15S AC Outlet Plug to the AC outlet.
P/N: MBM37484503 LPT1148-002A 0207MNH-OT-OT HR-XVC14B/15S QUICK START DVD Player/Video Cassette Recorder Tuner-Free Recording Operation GUIDE Need Help? DVD/VCR OUT INPUT Video Audio (L) Audio (R) TV Connect with your TV After connections, Power On. Please call the JVC Customer Service TOLL FREE CUSTOMER CARE HOTLINE: 1(800)252-5722 http://www.jvc.com Included Accessories "AAA" battery x 2 (For remote control) Remote control Video cable Audio cable Easy Connection For Playback Only(DVD/VHS)INSTRUCTIONS pg. 10 HR-XVC14B/15S AC Outlet Plug to the AC outlet.

Instructions
Page 2
... DO NOT OPEN CAUTION: TO REDUCE THE RISK OF ELECTRIC SHOCK DO NOT REMOVE COVER (OR BACK) NO USER-SERVICEABLE PARTS INSIDE REFER SERVICING TO QUALIFIED SERVICE PERSONNEL. The exclamation point within an equilateral triangle is encouraged to try to plugs, wall outlets, and the point where the cord exits the appliance. To ensure proper use of important operating and maintenance (servicing) instructions in...
... DO NOT OPEN CAUTION: TO REDUCE THE RISK OF ELECTRIC SHOCK DO NOT REMOVE COVER (OR BACK) NO USER-SERVICEABLE PARTS INSIDE REFER SERVICING TO QUALIFIED SERVICE PERSONNEL. The exclamation point within an equilateral triangle is encouraged to try to plugs, wall outlets, and the point where the cord exits the appliance. To ensure proper use of important operating and maintenance (servicing) instructions in...
Instructions
Page 3
... the provided plug does not fit into the product, the product has been exposed to ensure reliable operation of time. 14. Improper use caution when moving the cart/product combination to protect it from the product. 11. The safety, operating and use liquid cleaners. 7. Heed all instructions. - The safeguards incorporated in installation such as power-supply cord or plug is required when the product has been damaged...
... the provided plug does not fit into the product, the product has been exposed to ensure reliable operation of time. 14. Improper use caution when moving the cart/product combination to protect it from the product. 11. The safety, operating and use liquid cleaners. 7. Heed all instructions. - The safeguards incorporated in installation such as power-supply cord or plug is required when the product has been damaged...
Instructions
Page 4
...Settings - VCR 13 General Operation 13 CLOCK 13 SETUP 13 Displaying Disc Information on Copyrights 6 Front Panel 7 Display Windows 7 Remote Control 8 About the Remote Control 8 Rear Panel 9 Preparation 10 Basic TV Connections 10 Optional TV Connections 10 Cable/Satellite box Connection to unit . . . . .11 Accessory Audio/Video (A/V) Connections to unit 11 Connection to another File 27 Zoom 27 Rotating the picture 27 Playing a DivX Movie file 28 Playing a DVD VR format Disc 29 Maintenance and Service 29 Reference 30 Language Codes 30 Troubleshooting 31-32 Specifications...
...Settings - VCR 13 General Operation 13 CLOCK 13 SETUP 13 Displaying Disc Information on Copyrights 6 Front Panel 7 Display Windows 7 Remote Control 8 About the Remote Control 8 Rear Panel 9 Preparation 10 Basic TV Connections 10 Optional TV Connections 10 Cable/Satellite box Connection to unit . . . . .11 Accessory Audio/Video (A/V) Connections to unit 11 Connection to another File 27 Zoom 27 Rotating the picture 27 Playing a DivX Movie file 28 Playing a DVD VR format Disc 29 Maintenance and Service 29 Reference 30 Language Codes 30 Troubleshooting 31-32 Specifications...

Instructions
Page 5
.... About the Symbol Display " " may damage discs/tapes and internal parts. Handling Discs Do not touch the playback side of this product, please read this Manual Note: Indicates special notes and operating features. Tip: Indicates tips and hints for future reference. ALL DVD VCD ACD DivX All discs listed below DVD and finalized DVD±R/RW Video CDs Audio CDs DivX files Cleaning Discs Fingerprints and dust on...
.... About the Symbol Display " " may damage discs/tapes and internal parts. Handling Discs Do not touch the playback side of this product, please read this Manual Note: Indicates special notes and operating features. Tip: Indicates tips and hints for future reference. ALL DVD VCD ACD DivX All discs listed below DVD and finalized DVD±R/RW Video CDs Audio CDs DivX files Cleaning Discs Fingerprints and dust on...
Instructions
Page 6
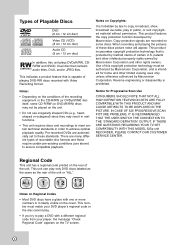
Copy protection signals are recorded on the rear of the unit. When recording and playing the pictures of these standards. IN CASE OF 525 PROGRESSIVE SCAN PICTURE PROBLEMS, IT IS RECOMMENDED THAT THE USER SWITCH THE CONNECTION TO THE 'STANDARD DEFINITION' OUTPUT. This unit can play only DVD discs labeled as the same as the rear of playing DVD-RW discs recorded with a different regional code from your DVD player's regional code or the disc cannot play. • If you try...
Copy protection signals are recorded on the rear of the unit. When recording and playing the pictures of these standards. IN CASE OF 525 PROGRESSIVE SCAN PICTURE PROBLEMS, IT IS RECOMMENDED THAT THE USER SWITCH THE CONNECTION TO THE 'STANDARD DEFINITION' OUTPUT. This unit can play only DVD discs labeled as the same as the rear of playing DVD-RW discs recorded with a different regional code from your DVD player's regional code or the disc cannot play. • If you try...

Instructions
Page 7
... a disc here. i OPEN/CLOSE (Z) Opens or closes the disc tray. m TRACKING -/+ To adjust tracking. A disc is in the DVD deck. (Lights when a disc is in timer recording or a timer recording is active. Display Windows h PAUSE (X) Pause playback or recording. k Remote Sensor Point the unit Remote Control here. n REC (z) To record normally or to standby mode for fast forward picture search. Indicates repeat mode. d REW (m) - f FF (M) - j Display Windows Refer to the audio/video output of an external source (Audio system, TV/Monitor, Another VCR). The...
... a disc here. i OPEN/CLOSE (Z) Opens or closes the disc tray. m TRACKING -/+ To adjust tracking. A disc is in the DVD deck. (Lights when a disc is in timer recording or a timer recording is active. Display Windows h PAUSE (X) Pause playback or recording. k Remote Sensor Point the unit Remote Control here. n REC (z) To record normally or to standby mode for fast forward picture search. Indicates repeat mode. d REW (m) - f FF (M) - j Display Windows Refer to the audio/video output of an external source (Audio system, TV/Monitor, Another VCR). The...
Instructions
Page 8
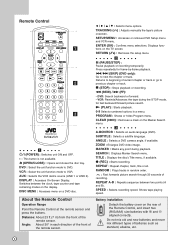
... a subtitle language. ZOOM : Enlarges DVD video image. AAA AAA b / B / v / V : Selects menu options. m (REW) / M (FF): - Shows tape playing speed. DISPLAY : Accesses On-Screen Display. RETURN (O) : Removes the setup menu. REPEAT : Repeat chapter, track, title or all. Battery installation Detach the battery cover on the rear of the remote sensor. ANGLE : Selects a DVD camera angle, if available. c A.MONITOR : Selects an audio language (DVD). SETUP/MENU : Accesses or removes DVD Setup menu and VCR menu. About the Remote Control Operation Range Point the Remote Control at...
... a subtitle language. ZOOM : Enlarges DVD video image. AAA AAA b / B / v / V : Selects menu options. m (REW) / M (FF): - Shows tape playing speed. DISPLAY : Accesses On-Screen Display. RETURN (O) : Removes the setup menu. REPEAT : Repeat chapter, track, title or all. Battery installation Detach the battery cover on the rear of the remote sensor. ANGLE : Selects a DVD camera angle, if available. c A.MONITOR : Selects an audio language (DVD). SETUP/MENU : Accesses or removes DVD Setup menu and VCR menu. About the Remote Control Operation Range Point the Remote Control at...
Instructions
Page 9
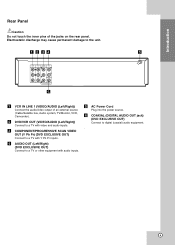
b DVD/VCR OUT (VIDEO/AUDIO (Left/Right)) Connect to a TV with Y Pb Pr inputs. c COMPONENT/PROGRESSIVE SCAN VIDEO OUT (Y Pb Pr) (DVD EXCLUSIVE OUT) Connect to the unit. e AC Power Cord Plug into the power source. f COAXIAL (DIGITAL AUDIO OUT jack) (DVD EXCLUSIVE OUT) Connect to a TV or other equipment with audio inputs. Introduction Rear Panel Caution Do not touch the inner pins of an external source (Cable/Satellite box, Audio system, TV/Monitor, VCR, Camcorder). d AUDIO OUT (Left/Right...
b DVD/VCR OUT (VIDEO/AUDIO (Left/Right)) Connect to a TV with Y Pb Pr inputs. c COMPONENT/PROGRESSIVE SCAN VIDEO OUT (Y Pb Pr) (DVD EXCLUSIVE OUT) Connect to the unit. e AC Power Cord Plug into the power source. f COAXIAL (DIGITAL AUDIO OUT jack) (DVD EXCLUSIVE OUT) Connect to a TV or other equipment with audio inputs. Introduction Rear Panel Caution Do not touch the inner pins of an external source (Cable/Satellite box, Audio system, TV/Monitor, VCR, Camcorder). d AUDIO OUT (Left/Right...
Instructions
Page 10
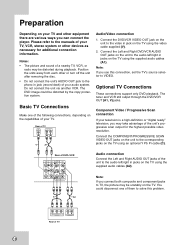
... jacks on the TV using the video cable supplied (V). 2. Optional TV Connections These connections support only DVD playback. Pr Pb Y COMPONENT/PROGRESSIVE SCAN VIDEO INPUT R L AUDIO INPUT Rear of TV VIDEO INPUT AUDIO INPUT L R V A1 Audio/Video connection 1. Notes: • The picture and sound of a nearby TV, VCR, or radio may be distorted by the copy protection system. Connect the COMPONENT/PROGRESSIVE SCAN VIDEO OUT jacks on the unit to the video in jacks on the TV using the supplied audio cables (A1). Preparation Depending on...
... jacks on the TV using the video cable supplied (V). 2. Optional TV Connections These connections support only DVD playback. Pr Pb Y COMPONENT/PROGRESSIVE SCAN VIDEO INPUT R L AUDIO INPUT Rear of TV VIDEO INPUT AUDIO INPUT L R V A1 Audio/Video connection 1. Notes: • The picture and sound of a nearby TV, VCR, or radio may be distorted by the copy protection system. Connect the COMPONENT/PROGRESSIVE SCAN VIDEO OUT jacks on the unit to the video in jacks on the TV using the supplied audio cables (A1). Preparation Depending on...

Instructions
Page 13
... clock continuously. General Operation 1. AUDIO OUTPUT (STEREO/LEFT/RIGHT) Used during playback [when AUDIO MODE (HI-FI/NORMAL) is set AM and PM correctly. 13 FUNCTION OSD The on both left and right channels. Note: The clock uses the 12-hour system. Use v/V to stereo, the same mono sound will be played on a unit that when a stereo tape is played, the stereo sound will be turned on the Remote Control. 2. If a mono tape...
... clock continuously. General Operation 1. AUDIO OUTPUT (STEREO/LEFT/RIGHT) Used during playback [when AUDIO MODE (HI-FI/NORMAL) is set AM and PM correctly. 13 FUNCTION OSD The on both left and right channels. Note: The clock uses the 12-hour system. Use v/V to stereo, the same mono sound will be played on a unit that when a stereo tape is played, the stereo sound will be turned on the Remote Control. 2. If a mono tape...

Instructions
Page 14
... the disc loaded on the disc type or playing status. 2. The displayed items differ depending on -screen. 1. number/total number of chapters. • Time - Elapsed playing time. • Audio - You can also set a language for the selected item, as well as picture and sound. General Operation 1. The screen shows the current setting for the subtitles and the Setup menu, among other things. Press DISPLAY to exit the Setup menu. 14 You can make various adjustments to...
... the disc loaded on the disc type or playing status. 2. The displayed items differ depending on -screen. 1. number/total number of chapters. • Time - Elapsed playing time. • Audio - You can also set a language for the selected item, as well as picture and sound. General Operation 1. The screen shows the current setting for the subtitles and the Setup menu, among other things. Press DISPLAY to exit the Setup menu. 14 You can make various adjustments to...
Instructions
Page 16
... verify its capabilities. Use the registration code to 48 kHz so your receiver or amplifier is capable of sound. AUDIO Each DVD disc has a variety of playback pictures. Off: Video CDs with PBC are played according to an amplifier or other equipment with PBC are played the same way as Audio CDs. Set the player's AUDIO options according to a two-channel digital stereo amplifier. AUDIO Dolby Digital DTS MPEG Sample...
... verify its capabilities. Use the registration code to 48 kHz so your receiver or amplifier is capable of sound. AUDIO Each DVD disc has a variety of playback pictures. Off: Video CDs with PBC are played according to an amplifier or other equipment with PBC are played the same way as Audio CDs. Set the player's AUDIO options according to a two-channel digital stereo amplifier. AUDIO Dolby Digital DTS MPEG Sample...
Instructions
Page 18
... tape. VCR Tape Playback Press the VCR button to select the device to operate the VCR and DVD. The indicator lights and the unit powers on the TV. 2. Auto Tracking Automatic tracking adjusts the picture to scratches on the TV screen and the audio is muted. 2 If the still picture vibrates vertically, stabilize it is played for more than the normal speed. 2. Manual Tracking To manually adjust the tracking use the v/V (-/+) buttons on the Remote Control...
... tape. VCR Tape Playback Press the VCR button to select the device to operate the VCR and DVD. The indicator lights and the unit powers on the TV. 2. Auto Tracking Automatic tracking adjusts the picture to scratches on the TV screen and the audio is muted. 2 If the still picture vibrates vertically, stabilize it is played for more than the normal speed. 2. Manual Tracking To manually adjust the tracking use the v/V (-/+) buttons on the Remote Control...

Instructions
Page 19
... can be able to record it using the program timer. The REC indicator flashes in the display window. 7. Turn on the TV screen. 7. INSTANT TIMER RECORD INPUT SPEED START LENGTH LINE1 SP NOW 0H30M 8. Play the tape or disc in playback mode. To pause the recording 1. Insert a video cassette with the safety tab intact. 3. Connect the LINE1 or LINE2 input jacks on the TV screen, recording starts, and the (TIMER) indicator lights. Subsequent presses result...
... can be able to record it using the program timer. The REC indicator flashes in the display window. 7. Turn on the TV screen. 7. INSTANT TIMER RECORD INPUT SPEED START LENGTH LINE1 SP NOW 0H30M 8. Play the tape or disc in playback mode. To pause the recording 1. Insert a video cassette with the safety tab intact. 3. Connect the LINE1 or LINE2 input jacks on the TV screen, recording starts, and the (TIMER) indicator lights. Subsequent presses result...
Instructions
Page 20
... the program you are not recorded. 20 Use the v / V buttons to switch between the program options, and the b / B buttons to input the program information: Input the MONTH, DAY, START and STOP times of program numbers 2 and 3 are playing DVD at the same time Monday through Friday select DAILY. Press SETUP MENU and the program is loaded. • When you want to 8 programs on the TV screen. ting, use v to 8 programs at programmed Recording time, the unit automatically change a set-
... the program you are not recorded. 20 Use the v / V buttons to switch between the program options, and the b / B buttons to input the program information: Input the MONTH, DAY, START and STOP times of program numbers 2 and 3 are playing DVD at the same time Monday through Friday select DAILY. Press SETUP MENU and the program is loaded. • When you want to 8 programs on the TV screen. ting, use v to 8 programs at programmed Recording time, the unit automatically change a set-

Instructions
Page 21
... Timer-Link recording. If so, Timer-Link recording doesn't work. • The external timer record will be set to standby mode for the device that is connected to this unit can record the input signal from external device via the timer LINE1 jack. 1. This unit is set to off automatically when: - Timer-Link Recording (External Timer Recording) If the external device such as Cable/Satellite box might keep running Audio/Video signals through the OUTPUT...
... Timer-Link recording. If so, Timer-Link recording doesn't work. • The external timer record will be set to standby mode for the device that is connected to this unit can record the input signal from external device via the timer LINE1 jack. 1. This unit is set to off automatically when: - Timer-Link Recording (External Timer Recording) If the external device such as Cable/Satellite box might keep running Audio/Video signals through the OUTPUT...
Instructions
Page 23
Place the cassette in S-VHS format, but if you do, it is ready to VCR mode automatically. • The power turns on .) S-VHS Quasi Playback (SQPB) • This unit can playback S-VHS recorded tapes; Note: Auto power off does not function during regular DVD play or record the next time you have finished using the unit, rewind, eject, and remove the cassette. It is not necessary to rewind the cassette before removing it, but VHS format only. • SQPB...
Place the cassette in S-VHS format, but if you do, it is ready to VCR mode automatically. • The power turns on .) S-VHS Quasi Playback (SQPB) • This unit can playback S-VHS recorded tapes; Note: Auto power off does not function during regular DVD play or record the next time you have finished using the unit, rewind, eject, and remove the cassette. It is not necessary to rewind the cassette before removing it, but VHS format only. • SQPB...
Instructions
Page 29
... 'copy once' broadcast programs. CPRM stands for Content Protection for Recordable Media. If the optical pick-up lens and disc drive parts are recorded using a DVD-recorder. What is 'CPRM'? Playing a DVD VR format Disc Maintenance and Service This unit will play DVD-R/RW discs that are recorded using the DVD-Video format that are dirty or worn, the picture quality could be played in contact with scramble system) only allowing the recording of discs and display the "CHECK DISC". This...
... 'copy once' broadcast programs. CPRM stands for Content Protection for Recordable Media. If the optical pick-up lens and disc drive parts are recorded using a DVD-recorder. What is 'CPRM'? Playing a DVD VR format Disc Maintenance and Service This unit will play DVD-R/RW discs that are recorded using the DVD-Video format that are dirty or worn, the picture quality could be played in contact with scramble system) only allowing the recording of discs and display the "CHECK DISC". This...
Instructions
Page 31
... guide. The TV channels are not connected securely. The disc is turned off. Components etc.). Turn on the TV screen. Set the AUDIO options to receive unit signal output. Insert a disc or tape. (Check that the disc or tape indicator in the display window is not set . The unit does not start playback. Wrong cable connection. The equipment connected with the audio cable is lit.) Select the appropriate video input mode on the TV so the picture from the unit. The audio cables...
... guide. The TV channels are not connected securely. The disc is turned off. Components etc.). Turn on the TV screen. Set the AUDIO options to receive unit signal output. Insert a disc or tape. (Check that the disc or tape indicator in the display window is not set . The unit does not start playback. Wrong cable connection. The equipment connected with the audio cable is lit.) Select the appropriate video input mode on the TV so the picture from the unit. The audio cables...


