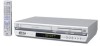
Instruction Manual
Page 2
... the building, as close to Part 15 of your new unit. Increase the separation between the equipment and receiver. DO NOT OPEN COVERS AND DO NOT REPAIR YOURSELF. Declaration of cable entry as practical. Consult the dealer or an experienced radio/TV technician for purchasing the JVC DVD player & VHS video cassette recorder. Address: 1700 Valley Road Wayne, N.J. 07470 Telephone Number: 973-317...
... the building, as close to Part 15 of your new unit. Increase the separation between the equipment and receiver. DO NOT OPEN COVERS AND DO NOT REPAIR YOURSELF. Declaration of cable entry as practical. Consult the dealer or an experienced radio/TV technician for purchasing the JVC DVD player & VHS video cassette recorder. Address: 1700 Valley Road Wayne, N.J. 07470 Telephone Number: 973-317...
Instruction Manual
Page 3
... wall outlets, extension cords, or integral convenience receptacles as recommended by the manufacturer. Power Lines An outside antenna or cable system is connected to the product, be sure the antenna or cable system is provided or the manufacturer's instructions have been adhered to the operating instructions. 3. This is intended to operate from battery power, or other electric light or power circuits, or where...
... wall outlets, extension cords, or integral convenience receptacles as recommended by the manufacturer. Power Lines An outside antenna or cable system is connected to the product, be sure the antenna or cable system is provided or the manufacturer's instructions have been adhered to the operating instructions. 3. This is intended to operate from battery power, or other electric light or power circuits, or where...
Instruction Manual
Page 6
... on-screen bar 47 JPEG Files Playback 49 CONTENTS EDITING (VCR DECK) 52 Edit From A Camcorder 52 Edit To Or From Another Video Recorder .......... 53 Dubbing (from DVD to VCR 54 EDITING (DVD DECK) 55 Digital Audio Dubbing 55 REMOTE 56 Remote Control Functions 56 Connecting To A Dolby Digital Decoder or An Amplifier With A Built-in DTS (DVD deck only 57 SUBSIDIARY SETTINGS 58 Mode Set (VCR deck 58 Mode Set (DVD deck 61 Child Lock 64 TROUBLESHOOTING...
... on-screen bar 47 JPEG Files Playback 49 CONTENTS EDITING (VCR DECK) 52 Edit From A Camcorder 52 Edit To Or From Another Video Recorder .......... 53 Dubbing (from DVD to VCR 54 EDITING (DVD DECK) 55 Digital Audio Dubbing 55 REMOTE 56 Remote Control Functions 56 Connecting To A Dolby Digital Decoder or An Amplifier With A Built-in DTS (DVD deck only 57 SUBSIDIARY SETTINGS 58 Mode Set (VCR deck 58 Mode Set (DVD deck 61 Child Lock 64 TROUBLESHOOTING...

Instruction Manual
Page 7
... use discs with the following types of discs cannot be played using this unit does not play back audio signals recorded in MIXMODE CD, CD-G, CD-EXTRA, and CD TEXT. ● The image may be sometimes poor or noisy due to video Number of subtitles Number of angles Recorded under the standard 4:3 aspect ratio Screen includes black bands at top and bottom of image which has a standard 4:3 aspect ratio (letter box) Video playback is...
... use discs with the following types of discs cannot be played using this unit does not play back audio signals recorded in MIXMODE CD, CD-G, CD-EXTRA, and CD TEXT. ● The image may be sometimes poor or noisy due to video Number of subtitles Number of angles Recorded under the standard 4:3 aspect ratio Screen includes black bands at top and bottom of image which has a standard 4:3 aspect ratio (letter box) Video playback is...

Instruction Manual
Page 12
A TV Power Button (TV POWER) ੬ See above. The Remote can also be used to operate a JVC's TV after setting the TV/VCR/ DVD switch to the left. NOTE: If the Remote doesn't work properly, remove its batteries, wait a short time, replace the batteries and then try again. B TV/VCR/DVD switch ੬ pg. 15, 17, 18, 26, 31, 40, 50 C DVD Button ੬ pg. 17, 19, 40, 50, 61 D VCR Button ੬ pg. 18, 22...
A TV Power Button (TV POWER) ੬ See above. The Remote can also be used to operate a JVC's TV after setting the TV/VCR/ DVD switch to the left. NOTE: If the Remote doesn't work properly, remove its batteries, wait a short time, replace the batteries and then try again. B TV/VCR/DVD switch ੬ pg. 15, 17, 18, 26, 31, 40, 50 C DVD Button ੬ pg. 17, 19, 40, 50, 61 D VCR Button ੬ pg. 18, 22...

Instruction Manual
Page 13
... when the AC power cord is first connected to "4 CH" if the Channel 3 is powered on, the clock and tuner channels are being set the VCR channel to a TV with AV input connectors - C Connect the supplied RF cable between the AUDIO/VIDEO OUTPUT connectors on the rear panel of the unit and the TV's audio/video input connectors. ● Set your TV to AV mode. ● For switching the TV's mode, refer to the instruction manual of your...
... when the AC power cord is first connected to "4 CH" if the Channel 3 is powered on, the clock and tuner channels are being set the VCR channel to a TV with AV input connectors - C Connect the supplied RF cable between the AUDIO/VIDEO OUTPUT connectors on the rear panel of the unit and the TV's audio/video input connectors. ● Set your TV to AV mode. ● For switching the TV's mode, refer to the instruction manual of your...
Instruction Manual
Page 14
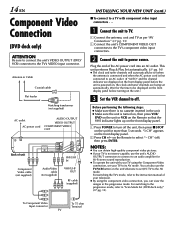
... set your TV using the component video connection, you can view the images in the unit. ● Make sure the unit is not stereo-capable, use the TV/VCR button on the Remote to the instruction manual of your TV is turned on, then press VCR/ DVD on the unit or VCR on the Remote so that the VHS indicator lights up on , the clock and tuner channels are displayed on the front display panel before turning...
... set your TV using the component video connection, you can view the images in the unit. ● Make sure the unit is not stereo-capable, use the TV/VCR button on the Remote to the instruction manual of your TV is turned on, then press VCR/ DVD on the unit or VCR on the Remote so that the VHS indicator lights up on , the clock and tuner channels are displayed on the front display panel before turning...

Instruction Manual
Page 15
... equipped with component video connectors supports the progressive video input, you make the setting, start from step A again. B Select the DVD deck. Scan Mode Set (DVD deck only) This unit supports the progressive scan system (eg. 480p*) as well as the conventional interlaced scan system (eg. 480i*). Press POWER. NOTE: When the progressive scan mode is selected, the Progressive mode indicator ( ) lights up on the front display panel. C Switch the mode. On the Remote Press DVD so that the DVD indicator lights up on...
... equipped with component video connectors supports the progressive video input, you make the setting, start from step A again. B Select the DVD deck. Scan Mode Set (DVD deck only) This unit supports the progressive scan system (eg. 480p*) as well as the conventional interlaced scan system (eg. 480i*). Press POWER. NOTE: When the progressive scan mode is selected, the Progressive mode indicator ( ) lights up on the front display panel. C Switch the mode. On the Remote Press DVD so that the DVD indicator lights up on...
Instruction Manual
Page 16
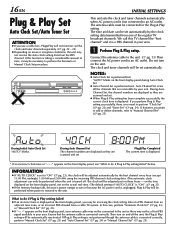
...; pg. 13) Then connect the AC power cord to perform the Semiauto or Manual Clock Set procedure. The clock and tuner channels will be adjusted automatically by your area. During Auto Channel Set, the channel numbers are displayed as they are scanned and set the clock and tuner channels separately. (੬ pg. 22 - 24) ● Depending on areas or reception conditions, the unit may not receive the Auto clock setting data from a cable TV system. If...
...; pg. 13) Then connect the AC power cord to perform the Semiauto or Manual Clock Set procedure. The clock and tuner channels will be adjusted automatically by your area. During Auto Channel Set, the channel numbers are displayed as they are scanned and set the clock and tuner channels separately. (੬ pg. 22 - 24) ● Depending on areas or reception conditions, the unit may not receive the Auto clock setting data from a cable TV system. If...

Instruction Manual
Page 17
...:9 aspect ratio. Letter Box Black bands appear at the top and bottom of the image are produced for wide-screen TVs. ● Turn on the TV and select the VCR channel (or AV mode). ● Slide the TV/VCR/DVD switch on the front display panel. F Return to the right. While viewing a wide screen picture, the black bars do not appear; On the unit Press VCR/DVD repeatedly so that the DVD indicator lights...
...:9 aspect ratio. Letter Box Black bands appear at the top and bottom of the image are produced for wide-screen TVs. ● Turn on the TV and select the VCR channel (or AV mode). ● Slide the TV/VCR/DVD switch on the front display panel. F Return to the right. While viewing a wide screen picture, the black bars do not appear; On the unit Press VCR/DVD repeatedly so that the DVD indicator lights...

Instruction Manual
Page 26
... VHS indicator lights up on the front display panel. If the tape is not possible with this unit. Simply place the recorded cassette into a VHS Cassette Adapter and it will record regular VHS signals only. • S-VHS recording is advanced past the start point. 26 EN Basic Playback ● Turn on the TV and select the VCR channel (or AV mode). ● Slide the TV/VCR/DVD switch on the Remote to remove...
... VHS indicator lights up on the front display panel. If the tape is not possible with this unit. Simply place the recorded cassette into a VHS Cassette Adapter and it will record regular VHS signals only. • S-VHS recording is advanced past the start point. 26 EN Basic Playback ● Turn on the TV and select the VCR channel (or AV mode). ● Slide the TV/VCR/DVD switch on the Remote to remove...
Instruction Manual
Page 39
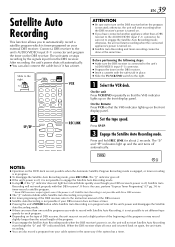
.... ● Slide the TV/VCR/DVD switch to the right. The "N" and "#" indicators light up and the unit turns off . On the Remote Press VCR so that the VHS indicator lights up on the front display panel. After recording, the unit's power shuts off , Satellite Auto Recording will not start recording when the connected appliance's power is timer-programed on your DBS receiver does not have connected another appliance other than the...
.... ● Slide the TV/VCR/DVD switch to the right. The "N" and "#" indicators light up and the unit turns off . On the Remote Press VCR so that the VHS indicator lights up on the front display panel. After recording, the unit's power shuts off , Satellite Auto Recording will not start recording when the connected appliance's power is timer-programed on your DBS receiver does not have connected another appliance other than the...

Instruction Manual
Page 53
E Engage the Record Pause mode of the source player. Engage the Play mode of the recording deck. A Make connections. C Set the input mode of the recording deck. See "PICTURE CONTROL" on the front display panel. Slide the TV/VCR/DVD switch on the Remote to the audio/video output connectors on another recorder. G Start the recording deck. connect its instruction manual. to select "F-1." ● When using your unit as the source player ... ... F Start the source player. Engage the Record mode of recording deck. Locate the point...
E Engage the Record Pause mode of the source player. Engage the Play mode of the recording deck. A Make connections. C Set the input mode of the recording deck. See "PICTURE CONTROL" on the front display panel. Slide the TV/VCR/DVD switch on the Remote to the audio/video output connectors on another recorder. G Start the recording deck. connect its instruction manual. to select "F-1." ● When using your unit as the source player ... ... F Start the source player. Engage the Record mode of recording deck. Locate the point...

Instruction Manual
Page 56
.../VCR/DVD switch on the unit. B Display the code. You can respond to the right. Press 4 PLAY on the Remote, go to B, C or D code signals. The code currently set appears on the front display panel. ● If the code displayed on the front display panel is different from the mains, the code currently set remains. 7 STOP POWER 3 PLAY Each of four codes (A, B, C or D). A Change the remote control code. C Change the unit's code. Slide to set to respond to the unit. VCR Number...
.../VCR/DVD switch on the unit. B Display the code. You can respond to the right. Press 4 PLAY on the Remote, go to B, C or D code signals. The code currently set appears on the front display panel. ● If the code displayed on the front display panel is different from the mains, the code currently set remains. 7 STOP POWER 3 PLAY Each of four codes (A, B, C or D). A Change the remote control code. C Change the unit's code. Slide to set to respond to the unit. VCR Number...

Instruction Manual
Page 60
... MIX 8 AUTO POWER OFF 3H OFF SUBSIDIARY SETTINGS (cont.) * The default setting is set to "ON." ● To watch recordings with poor signals, set to "ON," the TV screen becomes all blue when receiving a channel not in use the A.MONITOR button on both the Hi-Fi and normal tracks. ● When this function to "ON"; NOTE: When you can select the sound track(s) to listen to while playing back...
... MIX 8 AUTO POWER OFF 3H OFF SUBSIDIARY SETTINGS (cont.) * The default setting is set to "ON." ● To watch recordings with poor signals, set to "ON," the TV screen becomes all blue when receiving a channel not in use the A.MONITOR button on both the Hi-Fi and normal tracks. ● When this function to "ON"; NOTE: When you can select the sound track(s) to listen to while playing back...

Instruction Manual
Page 62
... the type of the device connected to DIGITAL AUDIO OUT connector on -screen display or menu is unclear or noisy, or the oblique lines of unit. DOLBY DIGITAL/PCM: Select this mode when you play back a disc containing both Dolby Digital and DTS logos. This setting affects only the analog audio output signal from the AUDIO OUTPUT connectors (DVD) when playing back a DVD VIDEO disc recorded with relatively a few moments. ● If the playback picture is displayed for playing back a video source disc with surround multichannel audio.
... the type of the device connected to DIGITAL AUDIO OUT connector on -screen display or menu is unclear or noisy, or the oblique lines of unit. DOLBY DIGITAL/PCM: Select this mode when you play back a disc containing both Dolby Digital and DTS logos. This setting affects only the analog audio output signal from the AUDIO OUTPUT connectors (DVD) when playing back a DVD VIDEO disc recorded with relatively a few moments. ● If the playback picture is displayed for playing back a video source disc with surround multichannel audio.
Instruction Manual
Page 65
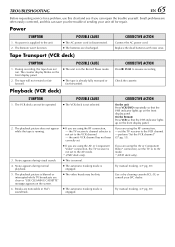
... the front display panel. set the TV to the VCR channel. - On the Remote Press VCR so that the VHS indicator lights up on the screen. 6. On the unit Press VCR/DVD repeatedly so that the VHS indicator lights up on the front display panel. 2. The tape will not rewind or fastforward. TROUBLESHOOTING EN 65 Before requesting service for repair. The playback picture does not appear while the tape is not selected. Use a dry...
... the front display panel. set the TV to the VCR channel. - On the Remote Press VCR so that the VHS indicator lights up on the screen. 6. On the unit Press VCR/DVD repeatedly so that the VHS indicator lights up on the front display panel. 2. The tape will not rewind or fastforward. TROUBLESHOOTING EN 65 Before requesting service for repair. The playback picture does not appear while the tape is not selected. Use a dry...

Instruction Manual
Page 67
... input mode. Replace the disc. (Record files using adhesive tape, cassette loaded has had its disc characteristics or recording conditions. TV broadcasts cannot be performed. Set to their file names. ● Files are been turned on the front display panel won't stop blinking. Next time make sure you have been recorded in a format compliant with ISO 9660. ● The different types of files are recorded to the disc. ● No JPEG files are recorded to record the entire program...
... input mode. Replace the disc. (Record files using adhesive tape, cassette loaded has had its disc characteristics or recording conditions. TV broadcasts cannot be performed. Set to their file names. ● Files are been turned on the front display panel won't stop blinking. Next time make sure you have been recorded in a format compliant with ISO 9660. ● The different types of files are recorded to the disc. ● No JPEG files are recorded to record the entire program...

Instruction Manual
Page 71
...) head helical scan system Signal-to-noise ratio: 45 dB Horizontal resolution : 230 lines Frequency range : 70 Hz to 10,000 Hz (Normal audio) 20 Hz to Channel 3 when shipped) 75 ohms, unbalanced TIMER Clock reference Program capacity : Quartz : 1-year programmable timer/ 8 programs ACCESSORIES Provided accessories : RF cable, Infrared remote control unit, "AA" battery x 2 Specifications shown are for SP mode unless otherwise specified. with T-210 video cassette (EP...
...) head helical scan system Signal-to-noise ratio: 45 dB Horizontal resolution : 230 lines Frequency range : 70 Hz to 10,000 Hz (Normal audio) 20 Hz to Channel 3 when shipped) 75 ohms, unbalanced TIMER Clock reference Program capacity : Quartz : 1-year programmable timer/ 8 programs ACCESSORIES Provided accessories : RF cable, Infrared remote control unit, "AA" battery x 2 Specifications shown are for SP mode unless otherwise specified. with T-210 video cassette (EP...
Instruction Manual
Page 72
... M Manual Clock Set 23 Manual Tracking 30 Mode Set (DVD deck) AUDIO LANGUAGE 20 D. RANGE COMPRESSION 63 DIGITAL AUDIO OUTPUT 62 DOWN MIX 63 MENU LANGUAGE 20 MONITOR TYPE 17, 62 ON SCREEN GUIDE 64 ON SCREEN LANGUAGE 19 PICTURE SOURCE 62 RESUME 64 SCREEN SAVER 62 SUBTITLE 20 Mode Set (VCR deck) 2ND AUDIO RECORD 60 AUDIO MONITOR 60 AUTO POWER OFF 60 AUTO SP]EP TIMER 59 BLUE BACK 60 PICTURE CONTROL 59 SUPERIMPOSE 59 VIDEO STABILIZER 60 Monitor Set (DVD deck) MONITOR TYPE 17, 62 N Next Function...
... M Manual Clock Set 23 Manual Tracking 30 Mode Set (DVD deck) AUDIO LANGUAGE 20 D. RANGE COMPRESSION 63 DIGITAL AUDIO OUTPUT 62 DOWN MIX 63 MENU LANGUAGE 20 MONITOR TYPE 17, 62 ON SCREEN GUIDE 64 ON SCREEN LANGUAGE 19 PICTURE SOURCE 62 RESUME 64 SCREEN SAVER 62 SUBTITLE 20 Mode Set (VCR deck) 2ND AUDIO RECORD 60 AUDIO MONITOR 60 AUTO POWER OFF 60 AUTO SP]EP TIMER 59 BLUE BACK 60 PICTURE CONTROL 59 SUPERIMPOSE 59 VIDEO STABILIZER 60 Monitor Set (DVD deck) MONITOR TYPE 17, 62 N Next Function...


