Instructions
Page 4
... could result in a risk of the other products (including amplifiers) that are required, be sure the antenna or cable system is damaged. Read the owner's manual of fire or electric shock. 16. OUTDOOR ANTENNA GROUNDING If an outside antenna or cable system is connected to the unit, be sure the service...
... could result in a risk of the other products (including amplifiers) that are required, be sure the antenna or cable system is damaged. Read the owner's manual of fire or electric shock. 16. OUTDOOR ANTENNA GROUNDING If an outside antenna or cable system is connected to the unit, be sure the service...
Instructions
Page 7
... 19 To ADD/DELETE channels 20 Noise elimination 20 Auto clock setting 21 Manual clock setting 23 Loading and Unloading a Cassette Tape ....... 24 Tape Playback operation... a TV program 28 Instant Timer Recording (ITR 30 Timer Recording 31 Advanced Function of VCR section Stereo Recording and Playback 33 Separate Audio Program (SAP 33 Duplicating a video tape ... angles 45 Title selection 45 DVD menu 45 Advanced Function of DVD section Parental control 46 Temporary disabling of rating level by DVD disc 47 Setting menu language ...YOUR JVC SERVICE CENTER 58 LIMITED WARRANTY 59 7
... 19 To ADD/DELETE channels 20 Noise elimination 20 Auto clock setting 21 Manual clock setting 23 Loading and Unloading a Cassette Tape ....... 24 Tape Playback operation... a TV program 28 Instant Timer Recording (ITR 30 Timer Recording 31 Advanced Function of VCR section Stereo Recording and Playback 33 Separate Audio Program (SAP 33 Duplicating a video tape ... angles 45 Title selection 45 DVD menu 45 Advanced Function of DVD section Parental control 46 Temporary disabling of rating level by DVD disc 47 Setting menu language ...YOUR JVC SERVICE CENTER 58 LIMITED WARRANTY 59 7
Instructions
Page 10
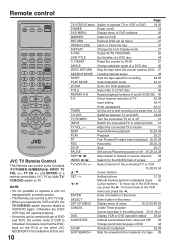
...To move Down in playback mode 26 / Cursor buttons - SLOW A.MONITOR SET CANCEL SSEKAIRPCH VCR/DVD/TV JVC TV Remote Control This Remote can control a JVC TV only. • When you operate the VCR or DVD, the TV/VCR/DVD switch must be slided to TV. RESET Reset the counter to 00:00 27 ANGLE Change... Cursor buttons SET -/+ Setting buttons 31,32 Manual tracking buttons in the VCR menu you press the . To move Up in the setting mode 23,31,39,41 OSD Display VCR or DVD operation status 29,52 A.MONITOR Switches sound between TV and VCR 18,29 TV POWER Turn the connected TV ...
...To move Down in playback mode 26 / Cursor buttons - SLOW A.MONITOR SET CANCEL SSEKAIRPCH VCR/DVD/TV JVC TV Remote Control This Remote can control a JVC TV only. • When you operate the VCR or DVD, the TV/VCR/DVD switch must be slided to TV. RESET Reset the counter to 00:00 27 ANGLE Change... Cursor buttons SET -/+ Setting buttons 31,32 Manual tracking buttons in the VCR menu you press the . To move Up in the setting mode 23,31,39,41 OSD Display VCR or DVD operation status 29,52 A.MONITOR Switches sound between TV and VCR 18,29 TV POWER Turn the connected TV ...

Instructions
Page 16
...Manual provided with Audio/Video Output Use the supplied AUDIO/VIDEO Cord. Input BS Tuner ANT. output 16 VHF/UHF Antenna TV 75 ohm Coaxial Cable (not supplied) DVD/VCR To ANT. Output Audio (L) Output 75 ohm Coaxial Cable (supplied) Audio (R) Output To ANT. TV Audio (L) Output Video Output DVD/VCR...TV) R CH. 34 Video Output ANT. Playback Connection The exact arrangement you use to interconnect various video and audio components to the DVD/VCR is dependent on the model and features of each component for the location of video and audio inputs and outputs. Input AUDIO/VIDEO ...
...Manual provided with Audio/Video Output Use the supplied AUDIO/VIDEO Cord. Input BS Tuner ANT. output 16 VHF/UHF Antenna TV 75 ohm Coaxial Cable (not supplied) DVD/VCR To ANT. Output Audio (L) Output 75 ohm Coaxial Cable (supplied) Audio (R) Output To ANT. TV Audio (L) Output Video Output DVD/VCR...TV) R CH. 34 Video Output ANT. Playback Connection The exact arrangement you use to interconnect various video and audio components to the DVD/VCR is dependent on the model and features of each component for the location of video and audio inputs and outputs. Input AUDIO/VIDEO ...
Instructions
Page 18
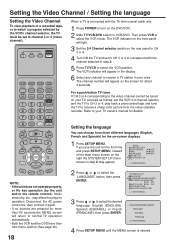
Then press VCR to your TV owner's manual for details. The channel number will appear on the screen for more than 60 seconds,the MENU screen will return to channel 3 or 4 (video channel). TV VOL 0 TIMER TV/VCR PLAY REW FF REC SKIP /INDEX STOP TV/VCR CH + PAUSE SKIP ...page 36). 18 Setting the language You can choose from the video cassette recorder. The VCR indicator will light. 3 Set the 3/4 Channel selector switch on the DVD/VCR. 2 Slide TV/VCR/DVD switch to select the VCR position. Setting the Video Channel / Setting the language Setting the Video Channel To view ...
Then press VCR to your TV owner's manual for details. The channel number will appear on the screen for more than 60 seconds,the MENU screen will return to channel 3 or 4 (video channel). TV VOL 0 TIMER TV/VCR PLAY REW FF REC SKIP /INDEX STOP TV/VCR CH + PAUSE SKIP ...page 36). 18 Setting the language You can choose from the video cassette recorder. The VCR indicator will light. 3 Set the 3/4 Channel selector switch on the DVD/VCR. 2 Slide TV/VCR/DVD switch to select the VCR position. Setting the Video Channel / Setting the language Setting the Video Channel To view ...
Instructions
Page 20
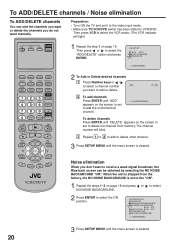
...3 Repeat 1 to 2 to add or delete other channel. 3 Press SETUP MENU until "DELETE" appears on page 19. The channel number will light) TV VCR DVD POWER 1 Repeat the step 1 on the screen to set to add the unmemorized channel. 〈+/-/0-9/ENTER/MENU〉 To delete channels Press ENTER until the... screen is cleared. CH 003 2 To add channels Press ENTER until the menu screen is cleared. Noise elimination When you do not want manually. To ADD/DELETE channels / Noise elimination To ADD/DELETE channels You can add the channels you want or delete the channels you don't ...
...3 Repeat 1 to 2 to add or delete other channel. 3 Press SETUP MENU until "DELETE" appears on page 19. The channel number will light) TV VCR DVD POWER 1 Repeat the step 1 on the screen to set to add the unmemorized channel. 〈+/-/0-9/ENTER/MENU〉 To delete channels Press ENTER until the... screen is cleared. CH 003 2 To add channels Press ENTER until the menu screen is cleared. Noise elimination When you do not want manually. To ADD/DELETE channels / Noise elimination To ADD/DELETE channels You can add the channels you want or delete the channels you don't ...

Instructions
Page 21
...ANGLE SEARCH MODE TITLE REPEAT A-B TV POWER INPUT • When shipped from factory, the AUTO CLOCK option is not set automatically, set the clock manually. (See page 23) Canadian Viewers: Please see steps 1~2 on P.19) is set automatically, you may recognize the wrong station for the AUTO CLOCK...• With cable box connection, if the Auto Clock Setting is unsuccessful, please select the PBS channel carrying the XDS information, then turn the DVD/VCR on, and if the clock is set to the video channel 3 or 4. You can correct the clock by receiving XDS (Extended Data Service) ...
...ANGLE SEARCH MODE TITLE REPEAT A-B TV POWER INPUT • When shipped from factory, the AUTO CLOCK option is not set automatically, set the clock manually. (See page 23) Canadian Viewers: Please see steps 1~2 on P.19) is set automatically, you may recognize the wrong station for the AUTO CLOCK...• With cable box connection, if the Auto Clock Setting is unsuccessful, please select the PBS channel carrying the XDS information, then turn the DVD/VCR on, and if the clock is set to the video channel 3 or 4. You can correct the clock by receiving XDS (Extended Data Service) ...

Instructions
Page 22
...setting You can set to the video channel 3 or 4. SLOW A.MONITOR SET CANCEL SSEKAIRPCH VCR/DVD/TV 1 Repeat the step 1 on the first Sunday in April you set the Daylight saving time automatically or manually. ON: for manual setting (forward one hour) OFF: for automatic setting (read XDS in the signal) ...TIME ON OFF AUTO 〈+/-/ENTER/MENU〉 When you want to set the Daylight Saving Time manually, on page 21 and press or to select the VCR mode. (The VCR indicator will light) DVD MENU DISPLAY SP/EP PLAY MODE MARKER A.TRK SUB TITLE ZOOM RETURN OPEN/ CLOSE C.RESET ZERO ...
...setting You can set to the video channel 3 or 4. SLOW A.MONITOR SET CANCEL SSEKAIRPCH VCR/DVD/TV 1 Repeat the step 1 on the first Sunday in April you set the Daylight saving time automatically or manually. ON: for manual setting (forward one hour) OFF: for automatic setting (read XDS in the signal) ...TIME ON OFF AUTO 〈+/-/ENTER/MENU〉 When you want to set the Daylight Saving Time manually, on page 21 and press or to select the VCR mode. (The VCR indicator will light) DVD MENU DISPLAY SP/EP PLAY MODE MARKER A.TRK SUB TITLE ZOOM RETURN OPEN/ CLOSE C.RESET ZERO ...

Instructions
Page 23
...repeatedly until the item you want to select the "CLOCK SET" option, then press ENTER. Manual clock setting Preparation: • Turn ON the TV and set to the video input mode. • Make sure TV/VCR/DVD switch has been slided to "8:30 AM" March, 23 (SAT), 2002. 1 Press SETUP ...the timer settings will appear. 2 Press or to set them correctly. Then press VCR to select the VCR mode. (The VCR indicator will light) EXAMPLE: Setting the clock to VCR/DVD. The VCR menu screen will be lost. TV VCR DVD POWER DVD MENU DISPLAY SP/EP PLAY MODE MARKER A.TRK SUB TITLE ZOOM RETURN OPEN/ ...
...repeatedly until the item you want to select the "CLOCK SET" option, then press ENTER. Manual clock setting Preparation: • Turn ON the TV and set to the video input mode. • Make sure TV/VCR/DVD switch has been slided to "8:30 AM" March, 23 (SAT), 2002. 1 Press SETUP ...the timer settings will appear. 2 Press or to set them correctly. Then press VCR to select the VCR mode. (The VCR indicator will light) EXAMPLE: Setting the clock to VCR/DVD. The VCR menu screen will be lost. TV VCR DVD POWER DVD MENU DISPLAY SP/EP PLAY MODE MARKER A.TRK SUB TITLE ZOOM RETURN OPEN/ ...

Instructions
Page 26
...To resume normal playback: Press PLAY. Frame by frame. Press or to select AUTO REPEAT. 2 Then press ENTER to playback: Press PLAY or PAUSE. "MANUAL TR." If the still picture jitters excessively, press SET + or - To return to select [ON] or [OFF]. Press SETUP MENU to return to... stabilize the still picture. Manual tracking adjustment If automatic tracking cannot eliminate noises well during playback. "AUTO TR." MENU TIMER REC SET AUTO REPEAT ON OFF SAP ON OFF SURROUND...
...To resume normal playback: Press PLAY. Frame by frame. Press or to select AUTO REPEAT. 2 Then press ENTER to playback: Press PLAY or PAUSE. "MANUAL TR." If the still picture jitters excessively, press SET + or - To return to select [ON] or [OFF]. Press SETUP MENU to return to... stabilize the still picture. Manual tracking adjustment If automatic tracking cannot eliminate noises well during playback. "AUTO TR." MENU TIMER REC SET AUTO REPEAT ON OFF SAP ON OFF SURROUND...
Instructions
Page 54
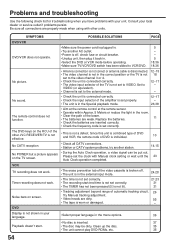
... proper language in the room. • Clear the path of the beam. • The batteries are properly made when using with other JVC RECEIVER/TV is not effective. • This is not a defect. Problems and troubleshooting Use the following check list for troubleshooting when you have...the clock with your local dealer or service outlet if problems persist. Since this unit is combined type of DVD and VCR, the remote code of automatic tracking circuit. 26 Try Manual tracking adjustment. • Video heads are inserted correctly. • Check the frequency code is individual. 10...
... proper language in the room. • Clear the path of the beam. • The batteries are properly made when using with other JVC RECEIVER/TV is not effective. • This is not a defect. Problems and troubleshooting Use the following check list for troubleshooting when you have...the clock with your local dealer or service outlet if problems persist. Since this unit is combined type of DVD and VCR, the remote code of automatic tracking circuit. 26 Try Manual tracking adjustment. • Video heads are inserted correctly. • Check the frequency code is individual. 10...
Instructions
Page 55
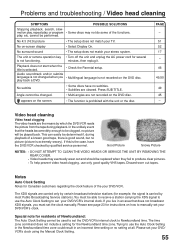
... enough to Newfoundland time. This can easily be replaced when they fail to set your DVD/VCR's internal clock. Please see page 23 for several is not functioning. Trying to manually set your DVD/VCR's clock. No 4:3 (16:9) picture • The setup does not match your stereo... 52 17 - 46 49,50 49 45 - If this is carried by which the DVD/VCR reads the picture from the tape during playback of the functions. Please set the clock manually. Discard worn out tapes. Problems and troubleshooting / Video head cleaning SYMPTOMS POSSIBLE SOLUTIONS Stopping ...
... enough to Newfoundland time. This can easily be replaced when they fail to set your DVD/VCR's internal clock. Please see page 23 for several is not functioning. Trying to manually set your DVD/VCR's clock. No 4:3 (16:9) picture • The setup does not match your stereo... 52 17 - 46 49,50 49 45 - If this is carried by which the DVD/VCR reads the picture from the tape during playback of the functions. Please set the clock manually. Discard worn out tapes. Problems and troubleshooting / Video head cleaning SYMPTOMS POSSIBLE SOLUTIONS Stopping ...

Instructions
Page 59
...be rendered by the toll-free number. All products and parts thereof may be FREE FROM DEFECTIVE MATERIALS AND WORKMANSHIP from state to a JVC authorized service center with a copy of God, and cosmetic damage; 5. WHAT YOU MUST DO FOR WARRANTY SERVICE: Return your product to ..., faulty installation, lack of purchase); Signal reception problems and failures due to the nearest JVC Factory Service Center, the name and location of dealer: 59 Batteries (except that occurs in the Owner's Manual, normal maintenance, video and audio head cleaning; 4. THE DURATION OF ANY IMPLIED WARRANTIES ...
...be rendered by the toll-free number. All products and parts thereof may be FREE FROM DEFECTIVE MATERIALS AND WORKMANSHIP from state to a JVC authorized service center with a copy of God, and cosmetic damage; 5. WHAT YOU MUST DO FOR WARRANTY SERVICE: Return your product to ..., faulty installation, lack of purchase); Signal reception problems and failures due to the nearest JVC Factory Service Center, the name and location of dealer: 59 Batteries (except that occurs in the Owner's Manual, normal maintenance, video and audio head cleaning; 4. THE DURATION OF ANY IMPLIED WARRANTIES ...
