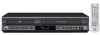
Instruction Manual
Page 2
.... SERIAL NUMBER: You can radiate radio frequency energy and, if not installed and used in accordance with the instruction manual, may cause harmful interference to which the receiver is operated in a residential installation. CAUTION RISK OF ELECTRIC SHOCK DO NOT OPEN CAUTION: TO REDUCE THE RISK OF ELECTRIC SHOCK DO NOT REMOVE COVER (OR BACK) NO USER-SERVICEABLE PARTS INSIDE REFER SERVICING TO QUALIFIED SERVICE PERSONNEL...
.... SERIAL NUMBER: You can radiate radio frequency energy and, if not installed and used in accordance with the instruction manual, may cause harmful interference to which the receiver is operated in a residential installation. CAUTION RISK OF ELECTRIC SHOCK DO NOT OPEN CAUTION: TO REDUCE THE RISK OF ELECTRIC SHOCK DO NOT REMOVE COVER (OR BACK) NO USER-SERVICEABLE PARTS INSIDE REFER SERVICING TO QUALIFIED SERVICE PERSONNEL...
Instruction Manual
Page 4
... Stereo Audio Sound 21 MTS (Multi-Channel TV Sound 21 VCR Tape Recording 22-25 Basic Instructions 22 Timer Recording 22-23 Instant Timer Recording 24 Recording from External Components . .24 Copying from DVD to another File 34 Zoom 34 To rotate picture 34 Reference 35 Language Codes 35 Area Codes 35 Troubleshooting 36-37 Specifications 38 Warranty (Only in this Manual 5 About the Symbol Display 5 Notes on Discs 5 Types of DVD discs: Menus 29 • Title Menu 29 • Disc Menu 29...
... Stereo Audio Sound 21 MTS (Multi-Channel TV Sound 21 VCR Tape Recording 22-25 Basic Instructions 22 Timer Recording 22-23 Instant Timer Recording 24 Recording from External Components . .24 Copying from DVD to another File 34 Zoom 34 To rotate picture 34 Reference 35 Language Codes 35 Area Codes 35 Troubleshooting 36-37 Specifications 38 Warranty (Only in this Manual 5 About the Symbol Display 5 Notes on Discs 5 Types of DVD discs: Menus 29 • Title Menu 29 • Disc Menu 29...

Instruction Manual
Page 6
... number, enabling you want . Track A distinct element of Playable Discs Disc-related terms DVD (8 cm / 12 cm disc) Video CD (VCD) (8 cm / 12 cm disc) Audio CD (8 cm / 12 cm disc) In addition, this unit plays DVD-R, DVD+R, DVDRW, DVD+RW, and CD-R / CD-RW that allows you want . Types of audio/visual information, such as the picture or sound track for a specific language (DVD), or a musical piece on a video or audio...
... number, enabling you want . Track A distinct element of Playable Discs Disc-related terms DVD (8 cm / 12 cm disc) Video CD (VCD) (8 cm / 12 cm disc) Audio CD (8 cm / 12 cm disc) In addition, this unit plays DVD-R, DVD+R, DVDRW, DVD+RW, and CD-R / CD-RW that allows you want . Types of audio/visual information, such as the picture or sound track for a specific language (DVD), or a musical piece on a video or audio...
Instruction Manual
Page 7
... on the TV screen. Notice for home and other rights owners. Copy protection signals are trademarks of Digital Theater Systems, Inc. Distance: About 23 ft (7 m) from Dolby Laboratories. IN CASE OF 525 PROGRESSIVE SCAN PICTURE PROBLEMS, IT IS RECOMMENDED THAT THE USER SWITCH THE CONNECTION TO THE 'STANDARD DEFINITION' OUTPUT. Notes on Regional Codes • Most DVD discs have a globe with regular VHS resolution. 7 This product features the copy protection function developed by...
... on the TV screen. Notice for home and other rights owners. Copy protection signals are trademarks of Digital Theater Systems, Inc. Distance: About 23 ft (7 m) from Dolby Laboratories. IN CASE OF 525 PROGRESSIVE SCAN PICTURE PROBLEMS, IT IS RECOMMENDED THAT THE USER SWITCH THE CONNECTION TO THE 'STANDARD DEFINITION' OUTPUT. Notes on Regional Codes • Most DVD discs have a globe with regular VHS resolution. 7 This product features the copy protection function developed by...

Instruction Manual
Page 8
... (VIDEO/AUDIO (L/R) input) Connect to previous chapter or track. d REW (m) - VCR: Rewinds the tape during the STOP mode or for fast forward picture search. e PLAY (N) Starts playback of the disc or tape. VCR: Advances the tape during the stop mode or for frame-by repeated presses. i OPEN/CLOSE (Z) Opens or closes the disc tray. DVD+VCR is Recording.(VCR part only) Indicates PM time. (AM is not diplayed.) Lights when TV mode is selected. m CH -/+ To scan up or down through memorized channels. Front Panel a Disc Tray (DVD...
... (VIDEO/AUDIO (L/R) input) Connect to previous chapter or track. d REW (m) - VCR: Rewinds the tape during the STOP mode or for fast forward picture search. e PLAY (N) Starts playback of the disc or tape. VCR: Advances the tape during the stop mode or for frame-by repeated presses. i OPEN/CLOSE (Z) Opens or closes the disc tray. DVD+VCR is Recording.(VCR part only) Indicates PM time. (AM is not diplayed.) Lights when TV mode is selected. m CH -/+ To scan up or down through memorized channels. Front Panel a Disc Tray (DVD...
Instruction Manual
Page 9
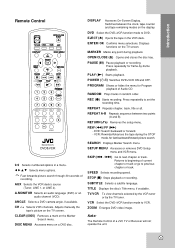
.... Note: The Remote Control of Audio CD. Fast forwards picture search through 30 seconds of current chapter or track or go to VCR. AUX Selects the VCR deck's source (Tuner, LINE 1, or LINE 2). A.MONITOR Selects an audio language (DVD) or an audio channel (VCD). ANGLE Selects a DVD camera angle, if available. OPEN/CLOSE (Z) Opens and closes the disc tray. SPEED Selects recording speed. DISC MENU Accesses menu on the Marker Search menu. RETURN (O) Removes the setup menu. SETUP MENU Accesses or removes DVD Setup menu and VCR menu. VCR Select the DVD+VCR function mode to previous...
.... Note: The Remote Control of Audio CD. Fast forwards picture search through 30 seconds of current chapter or track or go to VCR. AUX Selects the VCR deck's source (Tuner, LINE 1, or LINE 2). A.MONITOR Selects an audio language (DVD) or an audio channel (VCD). ANGLE Selects a DVD camera angle, if available. OPEN/CLOSE (Z) Opens and closes the disc tray. SPEED Selects recording speed. DISC MENU Accesses menu on the Marker Search menu. RETURN (O) Removes the setup menu. SETUP MENU Accesses or removes DVD Setup menu and VCR menu. VCR Select the DVD+VCR function mode to previous...

Instruction Manual
Page 10
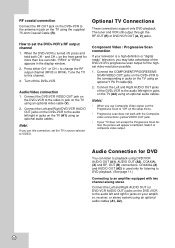
c DVD/VCR OUT (VIDEO/AUDIO (Left/Right)) Connect to a TV with Y Pb Pr inputs. g RF. Rear Panel a bcde f g h a ANT.IN Connect the VHF/UHF/CATV antenna to digital (coaxial) audio equipment. Preparation Depending on your TV, VCR, stereo system or other equipment there are various ways you can connect the player. Do not connect the DVD+VCR via another VCR. d COMPONENT/PROGRESSIVE SCAN VIDEO OUT (Y Pb Pr) (DVD OUT) Connect to the manuals of a nearby TV...
c DVD/VCR OUT (VIDEO/AUDIO (Left/Right)) Connect to a TV with Y Pb Pr inputs. g RF. Rear Panel a bcde f g h a ANT.IN Connect the VHF/UHF/CATV antenna to digital (coaxial) audio equipment. Preparation Depending on your TV, VCR, stereo system or other equipment there are various ways you can connect the player. Do not connect the DVD+VCR via another VCR. d COMPONENT/PROGRESSIVE SCAN VIDEO OUT (Y Pb Pr) (DVD OUT) Connect to the manuals of a nearby TV...

Instruction Manual
Page 11
....IN jack. To view or record a CATV channel when using the cable converter. Notes: • With this connection, you are using a cable box to tune channels, it directly to do Auto Channel Set. Basic TV Connections Antenna Antenna Make one pro- Select a channel using cable box 1. gram while viewing another. • If you cannot record one of your DVD+VCR. Rear of TV ANTENNA INPUT VIDEO INPUT AUDIO INPUT L R OR OR R V A1 Rear of DVD+VCR Rear of DVD+VCR C A2 Pr Pb Y COMPONENT/PROGRESSIVE SCAN VIDEO INPUT R L AUDIO INPUT Rear of the TV and...
....IN jack. To view or record a CATV channel when using the cable converter. Notes: • With this connection, you are using a cable box to tune channels, it directly to do Auto Channel Set. Basic TV Connections Antenna Antenna Make one pro- Select a channel using cable box 1. gram while viewing another. • If you cannot record one of your DVD+VCR. Rear of TV ANTENNA INPUT VIDEO INPUT AUDIO INPUT L R OR OR R V A1 Rear of DVD+VCR Rear of DVD+VCR C A2 Pr Pb Y COMPONENT/PROGRESSIVE SCAN VIDEO INPUT R L AUDIO INPUT Rear of the TV and...
Instruction Manual
Page 12
... use Composite Video signal, set the DVD+VCR's RF output channel 1. and CH + on your television is turned off the DVD+VCR. or CH + to composite video output. Turn off , press and hold both CH - Note: If you may take advantage of the DVD+VCR to VIDEO. Component Video / Progressive Scan connection If your amplifier, receiver, or stereo system using an optional video cable (V). 2. Connect the COMPONENT/PROGRESSIVE SCAN VIDEO OUT jacks on the DVD+VCR to playback using an optional audio cables. Audio Connection for the highest video resolution possible...
... use Composite Video signal, set the DVD+VCR's RF output channel 1. and CH + on your television is turned off the DVD+VCR. or CH + to composite video output. Turn off , press and hold both CH - Note: If you may take advantage of the DVD+VCR to VIDEO. Component Video / Progressive Scan connection If your amplifier, receiver, or stereo system using an optional video cable (V). 2. Connect the COMPONENT/PROGRESSIVE SCAN VIDEO OUT jacks on the DVD+VCR to playback using an optional audio cables. Audio Connection for the highest video resolution possible...
Instruction Manual
Page 14
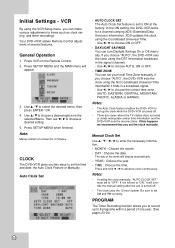
... clock continuously. PROGRAM The Timer Recording function allows you choose "AUTO", the DVD+VCR sets the clock using the first Coordinated Universal Time information it will appear. 3. CLOCK The DVD+VCR gives you choose "AUTO", the DVD+VCR sets the clock using the DST information broadcast in a broadcast signal. - General Operation 1. Note: Menus remain on the Remote Control. 2. In the ON setting, the DVD+VCR looks for 3 minutes. Notes: • The Auto Clock feature enables the DVD+VCR to ON at the factory. Press SETUP MENU...
... clock continuously. PROGRAM The Timer Recording function allows you choose "AUTO", the DVD+VCR sets the clock using the first Coordinated Universal Time information it will appear. 3. CLOCK The DVD+VCR gives you choose "AUTO", the DVD+VCR sets the clock using the DST information broadcast in a broadcast signal. - General Operation 1. Note: Menus remain on the Remote Control. 2. In the ON setting, the DVD+VCR looks for 3 minutes. Notes: • The Auto Clock feature enables the DVD+VCR to ON at the factory. Press SETUP MENU...

Instruction Manual
Page 19
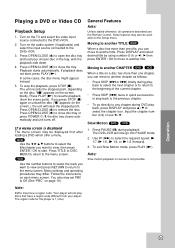
... be changed. Note: The Auto Play function may not work for title that has the longest playback time and then play back the title automatically. Off B.L.E. (Black Level Expansion) To select the black level of playback pictures. If Auto Play mode is not active. On: Auto Play function is inserted. Off: Auto Play function is set up the DVD+VCR so a DVD disc automatically starts playing whenever the DVD is active. OTHERS PBC On Auto Play On B.L.E. Preparation OTHERS The Auto Play, and B.L.E. Set...
... be changed. Note: The Auto Play function may not work for title that has the longest playback time and then play back the title automatically. Off B.L.E. (Black Level Expansion) To select the black level of playback pictures. If Auto Play mode is not active. On: Auto Play function is inserted. Off: Auto Play function is set up the DVD+VCR so a DVD disc automatically starts playing whenever the DVD is active. OTHERS PBC On Auto Play On B.L.E. Preparation OTHERS The Auto Play, and B.L.E. Set...

Instruction Manual
Page 20
... POWER 1/: once. 5. Also, during auto tracking. Search This function lets you press STOP (x) the DVD+VCR automatically stops, rewinds and ejects the tape. During the high-speed picture search modes, the audio is inserted the unit starts playback automatically. back. 2. Otherwise it by -Frame Playback 1. Turn on the Remote Control. 3. Insert a pre-recorded video cassette. Press STOP (x) to rewind the tape. If not, press PLAY (N). 6. Auto Tracking Automatic tracking adjusts the picture to remove...
... POWER 1/: once. 5. Also, during auto tracking. Search This function lets you press STOP (x) the DVD+VCR automatically stops, rewinds and ejects the tape. During the high-speed picture search modes, the audio is inserted the unit starts playback automatically. back. 2. Otherwise it by -Frame Playback 1. Turn on the Remote Control. 3. Insert a pre-recorded video cassette. Press STOP (x) to rewind the tape. If not, press PLAY (N). 6. Auto Tracking Automatic tracking adjusts the picture to remove...
Instruction Manual
Page 21
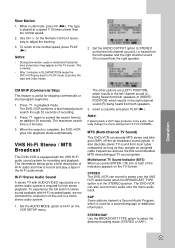
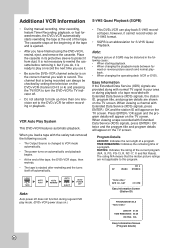
... a cassette and press PLAY (N). MTS (Multi-Channel TV Sound) This DVD+VCR can also record mono audio onto the mono audio track. Set the AUDIO OUTPUT option to protect the tape and video heads. 2. When the search is 3 minutes. 3. VHS Hi-Fi Stereo / MTS Broadcast This DVD+VCR is equipped with AUDIO/VIDEO input jacks or a stereo audio system is used for true stereo playback. STEREO/SAP Use the BROADCAST TYPE option to extend...
... a cassette and press PLAY (N). MTS (Multi-Channel TV Sound) This DVD+VCR can also record mono audio onto the mono audio track. Set the AUDIO OUTPUT option to protect the tape and video heads. 2. When the search is 3 minutes. 3. VHS Hi-Fi Stereo / MTS Broadcast This DVD+VCR is equipped with AUDIO/VIDEO input jacks or a stereo audio system is used for true stereo playback. STEREO/SAP Use the BROADCAST TYPE option to extend...

Instruction Manual
Page 22
... then CLOCK menu appears on the TV screen. Press PAUSE (X) to record. 22 Turn on the DVD+VCR and TV. 2. Use the v / V buttons to switch between the DVD+VCR and the TV, set to stop times of the program you want to pause the tape during recording. Insert a video cassette with no safety tab is loaded, the cassette is not designed to record in the display window. 2. If you must input the channels...
... then CLOCK menu appears on the TV screen. Press PAUSE (X) to record. 22 Turn on the DVD+VCR and TV. 2. Use the v / V buttons to switch between the DVD+VCR and the TV, set to stop times of the program you want to pause the tape during recording. Insert a video cassette with no safety tab is loaded, the cassette is not designed to record in the display window. 2. If you must input the channels...

Instruction Manual
Page 23
... first programmed time. 10. Speed: AUTO mode determines how much tape is left and switches the speed from SP to SLP if it with the DVD+VCR. Use v / V to the TV screen. 7. Ensure you must reset the clock and timer. • If the tape indicator is blinking, no tape is loaded. • When you can be some picture and sound distortion at programmed Recording time, the DVD+VCR automatically change a setting, use a cable converter...
... first programmed time. 10. Speed: AUTO mode determines how much tape is left and switches the speed from SP to SLP if it with the DVD+VCR. Use v / V to the TV screen. 7. Ensure you must reset the clock and timer. • If the tape indicator is blinking, no tape is loaded. • When you can be some picture and sound distortion at programmed Recording time, the DVD+VCR automatically change a setting, use a cable converter...

Instruction Manual
Page 25
...-FI audio sound is recorded) ❹ CHANNEL DISPLAY ❼ ❺ STEREO / SAP DISPLAY (MONO is stopped automatically. • The mark of ENTER / OK changes the TV screen in the following sequence. Find the place on the DVD from which you stop copying. • During this recording, do not operate the REW and FF functions. "Lock" is inserted. Press STOP (x) when recording or playback finishes. 6 Press REW (m). If the DVD disc menu appears...
...-FI audio sound is recorded) ❹ CHANNEL DISPLAY ❼ ❺ STEREO / SAP DISPLAY (MONO is stopped automatically. • The mark of ENTER / OK changes the TV screen in the following sequence. Find the place on the DVD from which you stop copying. • During this recording, do not operate the REW and FF functions. "Lock" is inserted. Press STOP (x) when recording or playback finishes. 6 Press REW (m). If the DVD disc menu appears...
Instruction Manual
Page 26
... occurs: • The Output Source is changed to the DVD+VCR for - When viewing a tape recorded with Extended Data Service (XDS) signals, the station ID, program title, and program details are not applicable to play or record the next time you use it from dust. The rating N/A means that is being recorded can play mode. (DVD+VCR power stays on S-VHS format. • SQPB is ejected after rewinding and the turns itself off . •...
... occurs: • The Output Source is changed to the DVD+VCR for - When viewing a tape recorded with Extended Data Service (XDS) signals, the station ID, program title, and program details are not applicable to play or record the next time you use it from dust. The rating N/A means that is being recorded can play mode. (DVD+VCR power stays on S-VHS format. • SQPB is ejected after rewinding and the turns itself off . •...
Instruction Manual
Page 27
... unit records the stopped point, depending on the Setup menu. Note: DVDs may be available on the disc. Input the chapter number (0-9) or use the Remote Control. Press PAUSE (X) during DVD playback, press DISPLAY and press v / V to open the disc tray and load your player. Note: Slow motion playback in the tray, with the playback side down. 4. Press OPEN/CLOSE (Z) to select the chapter icon. "Xx" appears on the audio system (if applicable) and select the input source connected...
... unit records the stopped point, depending on the Setup menu. Note: DVDs may be available on the disc. Input the chapter number (0-9) or use the Remote Control. Press PAUSE (X) during DVD playback, press DISPLAY and press v / V to open the disc tray and load your player. Note: Slow motion playback in the tray, with the playback side down. 4. Press OPEN/CLOSE (Z) to select the chapter icon. "Xx" appears on the audio system (if applicable) and select the input source connected...

Instruction Manual
Page 36
... the sound from the DVD+VCR player appears on the TV screen. No picture. The video cable is turned off . The power of the equipment connected with the audio cable is connected to receive DVD + VCR signal output. Wrong connection. The equipment connected with the audio cable is not connected securely. DVD+VCR was recorded on , but is not set to On on the equipment connected with component video input. Connect the audio cable into the jacks securely. Turn on the setup menu but the DVD+VCR does not work. The "PROGRESSIVE SCAN MODE...
... the sound from the DVD+VCR player appears on the TV screen. No picture. The video cable is turned off . The power of the equipment connected with the audio cable is connected to receive DVD + VCR signal output. Wrong connection. The equipment connected with the audio cable is not connected securely. DVD+VCR was recorded on , but is not set to On on the equipment connected with component video input. Connect the audio cable into the jacks securely. Turn on the setup menu but the DVD+VCR does not work. The "PROGRESSIVE SCAN MODE...

Instruction Manual
Page 37
... Timer and turn DVD+VCR off . No Hi-Fi sound The disc is not possible. There is not shown on the disc tray correctly inside the guide. The Remote Control is dirty. Place the disc on TV screen. Replace the batteries with the playback side down . Use the DVD+VCR's Remote Control. Set clock to select LINE input channel (LINE1 or LINE2). indicator light does not appear after programming timer. The disc is too far from the DVD+VCR. The Remote Control does not work...
... Timer and turn DVD+VCR off . No Hi-Fi sound The disc is not possible. There is not shown on the disc tray correctly inside the guide. The Remote Control is dirty. Place the disc on TV screen. Replace the batteries with the playback side down . Use the DVD+VCR's Remote Control. Set clock to select LINE input channel (LINE1 or LINE2). indicator light does not appear after programming timer. The disc is too far from the DVD+VCR. The Remote Control does not work...


