Instructions
Page 2
...a Class B digital device, pursuant to Part 15 of the appliance, and have the cord replaced with an exact replacement part by JVC could result in the literature accompanying the product. DO NOT STARE INTO BEAM. REGULATORY INFORMATION: FCC Part 15 This equipment has been ...This lightning flash with liquids, such as being twisted, kinked, pinched, closed in a particular installation. WARNING: Do not install this owner's manual to this guide as a bookcase or similar unit. CAUTION: VISIBLE AND INVISIBLE LASER RADIATION WHEN OPEN AND INTERLOCKS DEFEATED. However, there is encouraged...
...a Class B digital device, pursuant to Part 15 of the appliance, and have the cord replaced with an exact replacement part by JVC could result in the literature accompanying the product. DO NOT STARE INTO BEAM. REGULATORY INFORMATION: FCC Part 15 This equipment has been ...This lightning flash with liquids, such as being twisted, kinked, pinched, closed in a particular installation. WARNING: Do not install this owner's manual to this guide as a bookcase or similar unit. CAUTION: VISIBLE AND INVISIBLE LASER RADIATION WHEN OPEN AND INTERLOCKS DEFEATED. However, there is encouraged...
Instructions
Page 3
... prong are provided for replacement of the product and to . 8. IMPORTANT SAFETY INSTRUCTIONS CAUTION: PLEASE READ AND OBSERVE ALL WARNINGS AND INSTRUCTIONS IN THIS OWNER'S MANUAL. AND THOSE MARKED ON THE PRODUCT. REFER SERVICING TO QUALIFIED SERVICE PERSONNEL ONLY. 1. All these safety and operating instructions should not be repaired by placing...
... prong are provided for replacement of the product and to . 8. IMPORTANT SAFETY INSTRUCTIONS CAUTION: PLEASE READ AND OBSERVE ALL WARNINGS AND INSTRUCTIONS IN THIS OWNER'S MANUAL. AND THOSE MARKED ON THE PRODUCT. REFER SERVICING TO QUALIFIED SERVICE PERSONNEL ONLY. 1. All these safety and operating instructions should not be repaired by placing...
Instructions
Page 4
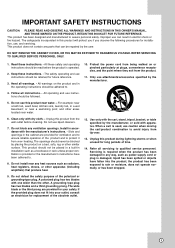
...or Cable TV 11 Basic TV Connections 11-12 Optional TV Connections 12 Audio Connection for DVD 12-13 Initial Settings - VCR 14-15 General Operation 14 CLOCK 14 • Auto Clock Set 14 • Manual Clock Set 14 PROGRAM 14 TUNING 15 • Auto Channel Programming 15 • ... OUTPUT (STEREO / LEFT / RIGHT 15 Initial Settings - DVD 16-19 General Operation 16 LANGUAGE 16 DISPLAY 17 AUDIO 18 OTHERS 19 REMOTE CONTROL FUNCTION 19 Operation 20 VCR Tape Playback 20-21 Basic Instructions 20 Auto Tracking 20 Manual Tracking 20 Search 20 Still Picture and Frame-by -Frame ...
...or Cable TV 11 Basic TV Connections 11-12 Optional TV Connections 12 Audio Connection for DVD 12-13 Initial Settings - VCR 14-15 General Operation 14 CLOCK 14 • Auto Clock Set 14 • Manual Clock Set 14 PROGRAM 14 TUNING 15 • Auto Channel Programming 15 • ... OUTPUT (STEREO / LEFT / RIGHT 15 Initial Settings - DVD 16-19 General Operation 16 LANGUAGE 16 DISPLAY 17 AUDIO 18 OTHERS 19 REMOTE CONTROL FUNCTION 19 Operation 20 VCR Tape Playback 20-21 Basic Instructions 20 Auto Tracking 20 Manual Tracking 20 Search 20 Still Picture and Frame-by -Frame ...

Instructions
Page 5
... information on the surface. Should the unit require service, contact an Authorized Service Center. If you use the DVD+VCR in this Manual Indicates hazards likely to cause harm to the unit itself or other material damage. Hold the disc by the edges so that fingerprints do ... it . Notes on your DVD+VCR. DVD VCD CD MP3 JPEG DVD Video CDs Audio CDs MP3 Discs JPEG Discs Storing Discs After playing, store the disc in a parked car exposed to a warm location. Introduction Introduction To ensure proper use of this product, please read this owner's manual carefully and retain for two ...
... information on the surface. Should the unit require service, contact an Authorized Service Center. If you use the DVD+VCR in this Manual Indicates hazards likely to cause harm to the unit itself or other material damage. Hold the disc by the edges so that fingerprints do ... it . Notes on your DVD+VCR. DVD VCD CD MP3 JPEG DVD Video CDs Audio CDs MP3 Discs JPEG Discs Storing Discs After playing, store the disc in a parked car exposed to a warm location. Introduction Introduction To ensure proper use of this product, please read this owner's manual carefully and retain for two ...
Instructions
Page 9
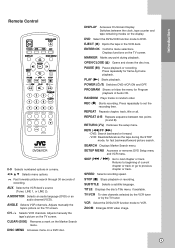
...display. PAUSE (X) Pause playback or recording. ANGLE Selects VCR channels. DVD: Search backward or forward. - VCR Select the DVD+VCR function mode to previous chapter or track. DISPLAY Accesses On-Screen Display. VCR: Rewinds/Advances the tape during playback. REPEAT A-B Repeats ... TV screen. ZOOM Enlarges DVD video image. 9 Introduction Remote Control 0-9 Selects numbered options in a menu. DVD Select the DVD+VCR function mode to DVD. Adjusts manually the tape's picture on the TV screen. b B v V Selects menu options. Adjusts manually the tape's picture on ...
...display. PAUSE (X) Pause playback or recording. ANGLE Selects VCR channels. DVD: Search backward or forward. - VCR Select the DVD+VCR function mode to previous chapter or track. DISPLAY Accesses On-Screen Display. VCR: Rewinds/Advances the tape during playback. REPEAT A-B Repeats ... TV screen. ZOOM Enlarges DVD video image. 9 Introduction Remote Control 0-9 Selects numbered options in a menu. DVD Select the DVD+VCR function mode to DVD. Adjusts manually the tape's picture on the TV screen. b B v V Selects menu options. Adjusts manually the tape's picture on ...

Instructions
Page 10
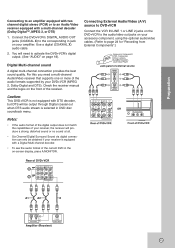
... to a TV or other equipment there are various ways you can connect the player. Do not connect the DVD+VCR via another VCR. The DVD image could be distorted during playback. b VCR IN LINE 1 (VIDEO/AUDIO (Left/Right)) Connect the audio/video output of your TV and other equipment ...inputs. h COAXIAL (DIGITAL AUDIO OUT jack) (DVD OUT) Connect to a TV with Y Pb Pr inputs. c DVD/VCR OUT (VIDEO/AUDIO (Left/Right)) Connect to digital (coaxial) audio equipment. f AC Power Cord Plug into the power source. OUT Connect to the manuals of an external source (Audio system, TV/...
... to a TV or other equipment there are various ways you can connect the player. Do not connect the DVD+VCR via another VCR. The DVD image could be distorted during playback. b VCR IN LINE 1 (VIDEO/AUDIO (Left/Right)) Connect the audio/video output of your TV and other equipment ...inputs. h COAXIAL (DIGITAL AUDIO OUT jack) (DVD OUT) Connect to a TV with Y Pb Pr inputs. c DVD/VCR OUT (VIDEO/AUDIO (Left/Right)) Connect to digital (coaxial) audio equipment. f AC Power Cord Plug into the power source. OUT Connect to the manuals of an external source (Audio system, TV/...
Instructions
Page 13
...with a Digital Multi-channel decoder. • To see the audio format of the audio formats supported by your amplifier. Caution: This DVD+VCR is selected in jack on -screen display, press A.MONITOR. Notes: • If the audio format of the digital output does not...the receiver. Connect the DVD+VCR's DIGITAL AUDIO OUT jacks (COAXIAL X) to activate the DVD+VCR's digital output. (See "AUDIO" on the front of DVD+VCR A1 A2 X L R AUDIO INPUT COAXIAL DIGITAL INPUT Amplifier (Receiver) 13 Use a digital (COAXIAL X) audio cable. 2. Check the receiver manual and the logos on ...
...with a Digital Multi-channel decoder. • To see the audio format of the audio formats supported by your amplifier. Caution: This DVD+VCR is selected in jack on -screen display, press A.MONITOR. Notes: • If the audio format of the digital output does not...the receiver. Connect the DVD+VCR's DIGITAL AUDIO OUT jacks (COAXIAL X) to activate the DVD+VCR's digital output. (See "AUDIO" on the front of DVD+VCR A1 A2 X L R AUDIO INPUT COAXIAL DIGITAL INPUT Amplifier (Receiver) 13 Use a digital (COAXIAL X) audio cable. 2. Check the receiver manual and the logos on ...
Instructions
Page 14
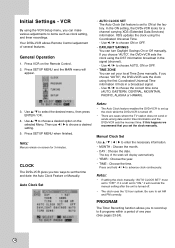
... advance clock continuously. Press and hold b / B to set the time and date: the Auto Clock Feature or Manually. PROGRAM The Timer Recording function allows you choose "AUTO", the DVD+VCR sets the clock using the Coordinated Universal Time. - Note: Menus remain on the Remote Control. 2. If you to ...record up the clock while the DVD+VCR is set to choose AUTO, ON or OFF. • TIME ZONE You can turn Daylight Savings On or Off manually. Notes: • If setting the clock manually, "AUTO CLOCK SET" must set your local Time Zone manually. Press SETUP MENU and the ...
... advance clock continuously. Press and hold b / B to set the time and date: the Auto Clock Feature or Manually. PROGRAM The Timer Recording function allows you choose "AUTO", the DVD+VCR sets the clock using the Coordinated Universal Time. - Note: Menus remain on the Remote Control. 2. If you to ...record up the clock while the DVD+VCR is set to choose AUTO, ON or OFF. • TIME ZONE You can turn Daylight Savings On or Off manually. Notes: • If setting the clock manually, "AUTO CLOCK SET" must set your local Time Zone manually. Press SETUP MENU and the ...
Instructions
Page 15
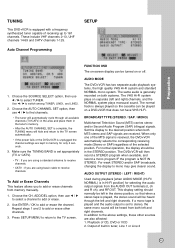
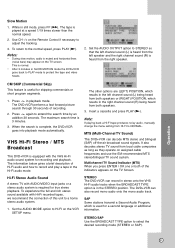
... does not have VHS Hi-Fi. In addition to receive channels. Playback of the selected position. Choose the CH. AUDIO MODE The DVD+VCR has two separate audio playback systems, the high quality VHS Hi-Fi system and standard NORMAL mono system. For weak STEREO and/or SAP... unplugged the channel settings are also affected: 1. TUNING This DVD+VCR is equipped with a frequency synthesized tuner capable of built in tuner, Line 1 or Line 2 15 Press SETUP MENU to return to add or erase channels from memory manually. 1. Choose the AUTO CHANNEL SET option, then use b / B to find channels....
... does not have VHS Hi-Fi. In addition to receive channels. Playback of the selected position. Choose the CH. AUDIO MODE The DVD+VCR has two separate audio playback systems, the high quality VHS Hi-Fi system and standard NORMAL mono system. For weak STEREO and/or SAP... unplugged the channel settings are also affected: 1. TUNING This DVD+VCR is equipped with a frequency synthesized tuner capable of built in tuner, Line 1 or Line 2 15 Press SETUP MENU to return to add or erase channels from memory manually. 1. Choose the AUTO CHANNEL SET option, then use b / B to find channels....
Instructions
Page 20
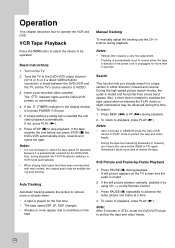
... between the DVD+VCR and the TV, set the TV's source selector to the DVD+VCR output channel ...6. Search This function lets you press STOP (x) the DVD+VCR automatically stops, rewinds and ejects the tape. Press REW...-by the DVD+VCR. If the (TIMER) indicator in STILL mode the DVD+VCR stops to ... Basic Instructions 1. The indicator lights and the DVD+VCR powers on the TV. 2. Notes: •...DVD+VCR returns to PLAY mode to be observed during this time. VCR Tape Playback Press the VCR...Operation This chapter describes how to VCR mode automatically. • When playing ...
... between the DVD+VCR and the TV, set the TV's source selector to the DVD+VCR output channel ...6. Search This function lets you press STOP (x) the DVD+VCR automatically stops, rewinds and ejects the tape. Press REW...-by the DVD+VCR. If the (TIMER) indicator in STILL mode the DVD+VCR stops to ... Basic Instructions 1. The indicator lights and the DVD+VCR powers on the TV. 2. Notes: •...DVD+VCR returns to PLAY mode to be observed during this time. VCR Tape Playback Press the VCR...Operation This chapter describes how to VCR mode automatically. • When playing ...
Instructions
Page 21
... normal. • After 3 minutes in playback mode. The maximum search time is complete, the DVD+VCR goes into playback mode automatically. This is used for recording and playback. Note: If playing back a HI-FI tape produces noisy audio, manually change the menu setting from local cable companies as long as they operate on...
... normal. • After 3 minutes in playback mode. The maximum search time is complete, the DVD+VCR goes into playback mode automatically. This is used for recording and playback. Note: If playing back a HI-FI tape produces noisy audio, manually change the menu setting from local cable companies as long as they operate on...
Instructions
Page 25
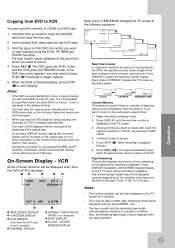
... • The function displays can copy the contents of the tape running in hours, minutes, and seconds. The DVD goes into PLAY mode and the VCR goes into the VCR deck. 3. Do not press any tape operation. At the point that you will be displayed correctly depending on it...and over again. • When you stop the copy process manually when the DVD movie ends, or the unit may need to press PLAY (N) manually to the same point several times. 1. VCR Some of these functions will be displayed every time the DVD+VCR is operated. ❶❷ ❸ ❹❺ ...
... • The function displays can copy the contents of the tape running in hours, minutes, and seconds. The DVD goes into PLAY mode and the VCR goes into the VCR deck. 3. Do not press any tape operation. At the point that you will be displayed correctly depending on it...and over again. • When you stop the copy process manually when the DVD movie ends, or the unit may need to press PLAY (N) manually to the same point several times. 1. VCR Some of these functions will be displayed every time the DVD+VCR is operated. ❶❷ ❸ ❹❺ ...
Instructions
Page 26
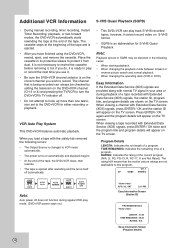
.../ OK twice and the program title and program details will appear on S-VHS format. • SQPB is being recorded can play mode. (DVD+VCR power stays on.) 26 "Home video" APR 30 , SAT 2:15 PM Easy Information Screen (Station ID) PROGRAM DETAILS "Home video" LENGTH... and normal playback. • When changing the operating deck (VCR or DVD). Additional VCR Information S-VHS Quasi Playback (SQPB) • During manual recording, timer recording, Instant Timer Recording, playback, or fast forward modes, the DVD+VCR automatically starts rewinding the tape at the beginning of SQPB may ...
.../ OK twice and the program title and program details will appear on S-VHS format. • SQPB is being recorded can play mode. (DVD+VCR power stays on.) 26 "Home video" APR 30 , SAT 2:15 PM Easy Information Screen (Station ID) PROGRAM DETAILS "Home video" LENGTH... and normal playback. • When changing the operating deck (VCR or DVD). Additional VCR Information S-VHS Quasi Playback (SQPB) • During manual recording, timer recording, Instant Timer Recording, playback, or fast forward modes, the DVD+VCR automatically starts rewinding the tape at the beginning of SQPB may ...
Instructions
Page 36
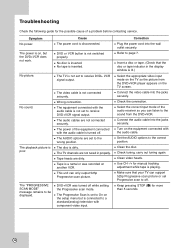
...the appropriate video input mode on the TV so the picture from the DVD+VCR. Set the AUDIO options to receive DVD+ VCR signal output. Use CH -/+ for more than 5 seconds. 36 Symptom No power. DVD or VCR button is dirty. Wrong connection. The power of the equipment connected with...manual tracking adjustment while tape is inserted. Troubleshooting Check the following guide for the possible cause of the audio receiver so you can listen to be displayed. The "PROGRESSIVE SCAN MODE" message remains to the sound from the DVD+VCR player appears on the setup menu but the DVD+VCR...
...the appropriate video input mode on the TV so the picture from the DVD+VCR. Set the AUDIO options to receive DVD+ VCR signal output. Use CH -/+ for more than 5 seconds. 36 Symptom No power. DVD or VCR button is dirty. Wrong connection. The power of the equipment connected with...manual tracking adjustment while tape is inserted. Troubleshooting Check the following guide for the possible cause of the audio receiver so you can listen to be displayed. The "PROGRESSIVE SCAN MODE" message remains to the sound from the DVD+VCR player appears on the setup menu but the DVD+VCR...

