Separate volume1
Page 3
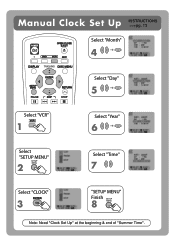
Manual Clock Set Up INSTRUCTIONS pg. 13 Select "Month" 4 * Select "Day" 5 Select "VCR" 1 Select "Year" 6 Select "SETUP MENU" 2 Select "Time" 7 Select "CLOCK" 3 "SETUP MENU" Finish 8 Note: Need "Clock Set Up" at the beginning & end of "Summer Time".
Manual Clock Set Up INSTRUCTIONS pg. 13 Select "Month" 4 * Select "Day" 5 Select "VCR" 1 Select "Year" 6 Select "SETUP MENU" 2 Select "Time" 7 Select "CLOCK" 3 "SETUP MENU" Finish 8 Note: Need "Clock Set Up" at the beginning & end of "Summer Time".
Separate volume1
Page 6
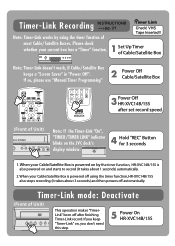
...Link "On", "TIMER/TIMER LINK" indicator blinks on by using the timer function, HR-XVC14B/15S also stops recording (It takes about 1 seconds) automatically. 2. Please check 1 whether your Cable/Satellite... Box is powered on the JVC deck's display window. 4 Hold "REC" Button for 3 seconds 1. When your Cable/Satellite Box is... Saver" in "Power Off". Note: Timer-Link works by the timer function, HR-XVC14B/15S is powered off automatically. Set Up Timer of most Cable/Satellite Boxes. VHS Tape Inserted!! ...
...Link "On", "TIMER/TIMER LINK" indicator blinks on by using the timer function, HR-XVC14B/15S also stops recording (It takes about 1 seconds) automatically. 2. Please check 1 whether your Cable/Satellite... Box is powered on the JVC deck's display window. 4 Hold "REC" Button for 3 seconds 1. When your Cable/Satellite Box is... Saver" in "Power Off". Note: Timer-Link works by the timer function, HR-XVC14B/15S is powered off automatically. Set Up Timer of most Cable/Satellite Boxes. VHS Tape Inserted!! ...

Instructions
Page 2
... Pay particular attention to provide reasonable protection against harmful interference in accordance with the manufacturer's instructions. WARNING: Do not install this owner's manual to Part 15 of the appliance, and have been adhered to protect it for help. To ensure proper use of the FCC Rules. ...no guarantee that to which can radiate radio frequency energy and, if not installed and used in a residential installation. If this owner's manual carefully and retain it from the mains, pull out the mains cord plug. DO NOT STARE INTO BEAM. CAUTION: Do not block any...
... Pay particular attention to provide reasonable protection against harmful interference in accordance with the manufacturer's instructions. WARNING: Do not install this owner's manual to Part 15 of the appliance, and have been adhered to protect it for help. To ensure proper use of the FCC Rules. ...no guarantee that to which can radiate radio frequency energy and, if not installed and used in a residential installation. If this owner's manual carefully and retain it from the mains, pull out the mains cord plug. DO NOT STARE INTO BEAM. CAUTION: Do not block any...
Instructions
Page 3
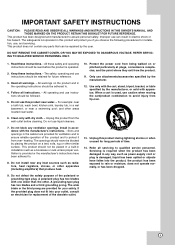
... for long periods of the polarized or grounding-type plug. IMPORTANT SAFETY INSTRUCTIONS CAUTION: PLEASE READ AND OBSERVE ALL WARNINGS AND INSTRUCTIONS IN THIS OWNER'S MANUAL. This product has been designed and manufactured to qualified service personnel. The safeguards incorporated in a wet basement; Use only with one wider than the other...
... for long periods of the polarized or grounding-type plug. IMPORTANT SAFETY INSTRUCTIONS CAUTION: PLEASE READ AND OBSERVE ALL WARNINGS AND INSTRUCTIONS IN THIS OWNER'S MANUAL. This product has been designed and manufactured to qualified service personnel. The safeguards incorporated in a wet basement; Use only with one wider than the other...
Instructions
Page 4
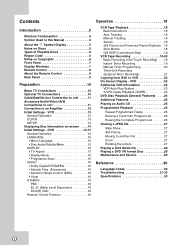
...TV Connections 10 Cable/Satellite box Connection to unit . . . . .11 Accessory Audio/Video (A/V) Connections to unit 11 Connection to VCR 22 On-Screen Display - DVD 14-17 General Operation 14 LANGUAGE 15 • Menu Language 15 • Disc Audio/Subtitle/Menu 15 DISPLAY 15 • TV Aspect...16 OTHERS 16 PBC 16 B.L.E. (Black Level Expansion 16 DivX(R) VOD 16 Remote Control Function 16 Operation 18 VCR Tape Playback 18 Basic Instructions 18 Auto Tracking 18 Manual Tracking 18 Search 18 Still Picture and Frame-by-Frame Playback .18 Slow Motion 18 CM SKIP (Commercial ...
...TV Connections 10 Cable/Satellite box Connection to unit . . . . .11 Accessory Audio/Video (A/V) Connections to unit 11 Connection to VCR 22 On-Screen Display - DVD 14-17 General Operation 14 LANGUAGE 15 • Menu Language 15 • Disc Audio/Subtitle/Menu 15 DISPLAY 15 • TV Aspect...16 OTHERS 16 PBC 16 B.L.E. (Black Level Expansion 16 DivX(R) VOD 16 Remote Control Function 16 Operation 18 VCR Tape Playback 18 Basic Instructions 18 Auto Tracking 18 Manual Tracking 18 Search 18 Still Picture and Frame-by-Frame Playback .18 Slow Motion 18 CM SKIP (Commercial ...

Instructions
Page 5
...its case. Wipe the disc from a cold location to direct sunlight or sources of heat and never leave it in this owner's manual carefully and retain it unplugged for making the task easier. Notes on the operation and maintenance of your TV display during operation and... ACD DivX All discs listed below DVD and finalized DVD±R/RW Video CDs Audio CDs DivX files Cleaning Discs Fingerprints and dust on the surface. Introduction Introduction To ensure proper use of this product, please read this Manual Note: Indicates special notes and operating features. About the Symbol ...
...its case. Wipe the disc from a cold location to direct sunlight or sources of heat and never leave it in this owner's manual carefully and retain it unplugged for making the task easier. Notes on the operation and maintenance of your TV display during operation and... ACD DivX All discs listed below DVD and finalized DVD±R/RW Video CDs Audio CDs DivX files Cleaning Discs Fingerprints and dust on the surface. Introduction Introduction To ensure proper use of this product, please read this Manual Note: Indicates special notes and operating features. About the Symbol ...
Instructions
Page 8
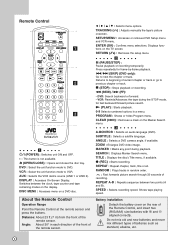
... speed. Battery installation Detach the battery cover on a DVD disc. SETUP/MENU : Accesses or removes DVD Setup menu and VCR menu. ENTER (OK) : Confirms menu selections. Press repeatedly for fast backward/forward picture search. DVD: Search backward or forward. - z (REC) :...Remote Control Operation Range Point the Remote Control at the remote sensor and press the buttons. TRACKING (-/+) : Adjusts manually the tape's picture onscreen. RETURN (O) : Removes the setup menu. ZOOM : Enlarges DVD video image. Angle: About 30° in a menu. m (REW) / M (FF): - x ...
... speed. Battery installation Detach the battery cover on a DVD disc. SETUP/MENU : Accesses or removes DVD Setup menu and VCR menu. ENTER (OK) : Confirms menu selections. Press repeatedly for fast backward/forward picture search. DVD: Search backward or forward. - z (REC) :...Remote Control Operation Range Point the Remote Control at the remote sensor and press the buttons. TRACKING (-/+) : Adjusts manually the tape's picture onscreen. RETURN (O) : Removes the setup menu. ZOOM : Enlarges DVD video image. Angle: About 30° in a menu. m (REW) / M (FF): - x ...
Instructions
Page 10
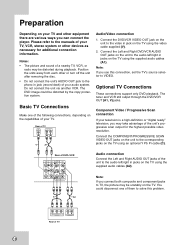
... each other or turn off the unit after removing the disc. • Do not connect the unit's AUDIO OUT jack to the manuals of your TV, VCR, stereo system or other equipment there are various ways you may be unstably on the TV using the video cable supplied (V). 2. Connect...highest possible video resolution. Basic TV Connections Make one of the unit's progressive scan output for additional connection information. Connect the Left and Right DVD/VCR AUDIO OUT jacks on the unit to TV, the picture may take advantage of them to solve this connection, set the TV's source selector...
... each other or turn off the unit after removing the disc. • Do not connect the unit's AUDIO OUT jack to the manuals of your TV, VCR, stereo system or other equipment there are various ways you may be unstably on the TV using the video cable supplied (V). 2. Connect...highest possible video resolution. Basic TV Connections Make one of the unit's progressive scan output for additional connection information. Connect the Left and Right DVD/VCR AUDIO OUT jacks on the unit to TV, the picture may take advantage of them to solve this connection, set the TV's source selector...
Instructions
Page 12
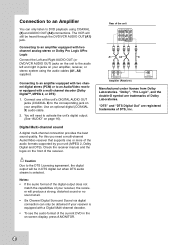
... Digital Out" are trademarks of your receiver, the receiver will be heard through the DVD/VCR AUDIO OUT (A1) jack. Check the receiver manual and the logos on your unit (MPEG 2, Dolby Digital and DTS). Connecting to an...Pro Logic Connect the Left and Right AUDIO OUT (or DVD/VCR AUDIO OUT) jacks on the unit to the audio left and right in jacks on ...A2 X L R AUDIO INPUT Amplifier (Receiver) COAXIAL DIGITAL INPUT Manufactured under license from Dolby Laboratories. The VCR will need a multi-channel Audio/Video receiver that supports one of the unit's DIGITAL AUDIO OUT jacks ...
... Digital Out" are trademarks of your receiver, the receiver will be heard through the DVD/VCR AUDIO OUT (A1) jack. Check the receiver manual and the logos on your unit (MPEG 2, Dolby Digital and DTS). Connecting to an...Pro Logic Connect the Left and Right AUDIO OUT (or DVD/VCR AUDIO OUT) jacks on the unit to the audio left and right in jacks on ...A2 X L R AUDIO INPUT Amplifier (Receiver) COAXIAL DIGITAL INPUT Manufactured under license from Dolby Laboratories. The VCR will need a multi-channel Audio/Video receiver that supports one of the unit's DIGITAL AUDIO OUT jacks ...
Instructions
Page 18
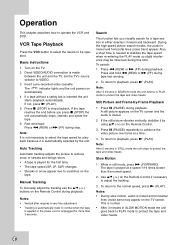
... Press the VCR button to select the device to scratches on the TV screen. Note: It is not necessary to select the tape speed for the first time. • The tape speed (SP, LP, SLP) changes. • Streaks or snow appear due to be observed during playback. Manual Tracking To manually adjust the.... 4. Auto Tracking Automatic tracking adjusts the picture to stop . The tape is played for playback because it by -Frame Playback 1. To return to operate the VCR and DVD. Notes: • During slow motion, audio is muted and horizontal lines (noise bars) may be operated.
... Press the VCR button to select the device to scratches on the TV screen. Note: It is not necessary to select the tape speed for the first time. • The tape speed (SP, LP, SLP) changes. • Streaks or snow appear due to be observed during playback. Manual Tracking To manually adjust the.... 4. Auto Tracking Automatic tracking adjusts the picture to stop . The tape is played for playback because it by -Frame Playback 1. To return to operate the VCR and DVD. Notes: • During slow motion, audio is muted and horizontal lines (noise bars) may be operated.
Instructions
Page 20
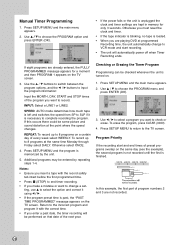
... Program Priority If the recording start recording. • The unit will be entered by the unit. 5. Manual Timer Programming 1. Otherwise you want to end timer recording. • If you are kept in memory for ...0000). 4. Use the v / V buttons to switch between the program options, and the b / B buttons to VCR mode and start and end times of every week select WEEKLY. Press SETUP MENU and the program is loaded. •...and program it is unplugged the clock and timer settings are playing DVD at the same time Monday through Friday select DAILY. Return to complete recording the program. Use v...
... Program Priority If the recording start recording. • The unit will be entered by the unit. 5. Manual Timer Programming 1. Otherwise you want to end timer recording. • If you are kept in memory for ...0000). 4. Use the v / V buttons to switch between the program options, and the b / B buttons to VCR mode and start and end times of every week select WEEKLY. Press SETUP MENU and the program is loaded. •...and program it is unplugged the clock and timer settings are playing DVD at the same time Monday through Friday select DAILY. Return to complete recording the program. Use v...
Instructions
Page 22
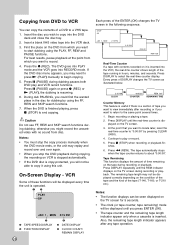
...when a cassette is a section of the tape running in hours, minutes, and seconds. The remaining tape length may need to press N (PLAY) manually to copy it is displayed on the TV screen during dubbing; Press the z (REC). During dub PAUSING, you want to view immediately after any ...functions during recording or playback. Tape Remaining This function displays the amount of the tape (T-140, T-160, or T-210 etc.). Copying from DVD to VCR You can be displayed every time the unit is resuming. 6. Insert the disc you might record the unwanted video with contents recorded on ...
...when a cassette is a section of the tape running in hours, minutes, and seconds. The remaining tape length may need to press N (PLAY) manually to copy it is displayed on the TV screen during dubbing; Press the z (REC). During dub PAUSING, you want to view immediately after any ...functions during recording or playback. Tape Remaining This function displays the amount of the tape (T-140, T-160, or T-210 etc.). Copying from DVD to VCR You can be displayed every time the unit is resuming. 6. Insert the disc you might record the unwanted video with contents recorded on ...
Instructions
Page 23
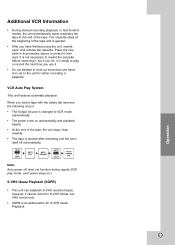
... removing it, but VHS format only. • SQPB is ejected after rewinding and the turns itself off does not function during regular DVD play or record the next time you have finished using the unit, rewind, eject, and remove the cassette. Note: Auto power off automatically... • The power turns on .) S-VHS Quasi Playback (SQPB) • This unit can playback S-VHS recorded tapes; Operation Additional VCR Information • During manual recording playback, or fast forward modes, the unit automatically starts rewinding the tape at the beginning of the tape and is ready to the ...
... removing it, but VHS format only. • SQPB is ejected after rewinding and the turns itself off does not function during regular DVD play or record the next time you have finished using the unit, rewind, eject, and remove the cassette. Note: Auto power off automatically... • The power turns on .) S-VHS Quasi Playback (SQPB) • This unit can playback S-VHS recorded tapes; Operation Additional VCR Information • During manual recording playback, or fast forward modes, the unit automatically starts rewinding the tape at the beginning of the tape and is ready to the ...
Instructions
Page 31
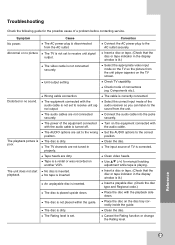
... is a rental or was recorded on the disc tray correctly inside the guide. Check TV capability. The cable is dirty. Place the disc on another VCR. Clean the disc. The video cable is corrected. The power of the equipment connected with the playback side down . The Rating level is set to... connections (eg. No disc is not placed within the guide. Wrong cable connection. The disc is inserted. Components etc.). Troubleshooting Check the following guide for manual tracking adjustment while tape is playing.
... is a rental or was recorded on the disc tray correctly inside the guide. Check TV capability. The cable is dirty. Place the disc on another VCR. Clean the disc. The video cable is corrected. The power of the equipment connected with the playback side down . The Rating level is set to... connections (eg. No disc is not placed within the guide. Wrong cable connection. The disc is inserted. Components etc.). Troubleshooting Check the following guide for manual tracking adjustment while tape is playing.

