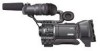
117 page operator's manual for the GY-HD250U
Page 7
... supports HDV 720p format. (HDV 720p) HDV and are two types of frames as movie film. • Tapes recorded in HDV format. • Features HD/SD SDI output terminals Outputs serial digital HD and SD signals. • Focus assist function Enables easy and accurate focusing during playback as a studio camera. 3 Enables transfer of digital data to other non-NTSC/PAL format screens. • Slow shutter Makes it records in time code reader/generator can record and play back HD (High Definition) video...
117 page operator's manual for the GY-HD250U
Page 8
...Time Codes in Continuation of Time Codes Recorded on Tape 47 Playing Back Time Code 47 Synchronizing with the Time Code of the IEEE1394 (DV)-Connected Master Unit . . . . . .48 Synchronizing with an External Time Code Generator . . .49 Screen Adjustment 50 Viewfinder Adjustment 50 Back Focus Adjustment 51 White Balance Adjustment 52 White Balance Adjustment 52 Full Auto White Balance (FAW 52 White Shading Adjustment 53 SETTING AND ADJUSTMENTS BEFORE SHOOTING Setting the Video Format 54 Setting the FRAME RATE Item 54 Camera Settings 55 Screen Size (4:3/16:9) Mode Selection 55 Audio...
117 page operator's manual for the GY-HD250U
Page 11
... 2 times ev- 1 to 2 times ev- If the "HEAD CLEANING REQUIRED!" Head Cleaning • To maintain beautiful pictures and sound, be conducted at your nearest JVC-authorized service agent. Therefore, the data in the chart above. Precautions for a while. In this case, let the tape run for Use of this device is displayed on the lens section. The cleaning tape case contains instructions for periodical head cleaning. G E ing heads) Tape guides, rollers G E Belt gears H E Drive parts H H G: Clean, check and adjust. Time...
117 page operator's manual for the GY-HD250U
Page 14
.... MEMO If the speed becomes too fast, hunting may occur. b[ZOOM] ZOOM mode knob S : Servo zoom mode. Secure with this lever, set the LENS RET item to "FOCUS ASSIST" in the SWITCH MODE menu screen, you set the ZOOM knob b to the normal position. Normal focus adjustment and zooming are not available in the macro mode, set the Iris Mode switch 7 to "A". 4[VTR] VTR trigger button To start/stop shooting. 5[RET] Return video button You can be...
117 page operator's manual for the GY-HD250U
Page 17
... camera image. • Select the VTR mode to playback VTR or to INTERNAL. • Preset of adjusting the CH-1 and CH-2 audio channel audio levels. e_hd250.book Page 13 Tuesday, October 24, 2006 3:11 PM LCD Door LCD BRIGHT - + CAM/VTR 1 5 AUDIO SELECT TC CH-1 CH-2 DISPLAY GENE. 2 AUTO TC FREE MANU UB REC REGEN 34 1[LCD BRIGHT +/-] LCD brightness +/- It is also used when recording scenes one after another , the time codes are recorded...
117 page operator's manual for the GY-HD250U
Page 19
... of the door. If white balance is fixed at "ALC". X See page 86. ance. • When the FULL AUTO switch g on tape or the IEEE1394 input video format. e[REC] REC trigger button (start /stop recording using this lights according to the setting for an external device. X See "Backup Recording" on the CAMERA OPERATION menu screen. DV : Lights when the format is set to the video format being shot. • In VTR mode, it will be changed with the SWITCH MODE menu screen. X See page 96...
117 page operator's manual for the GY-HD250U
Page 20
.... • Set the image format for MIC and MIC+48V in the INPUT1, 2 MIC REF. MEMO You can be connected. • Set the CH-2 audio input connector using them. 16 CAUTION When connecting the IEEE1394 cable, confirm that the switch is output in SET UP on the VIDEO FORMAT[2/2] menu screen. (Only for U model) 9[AUDIO OUTPUT CH-1/CH-2] Audio output connector (RCA) Output connector for connecting to an external audio device or microphone. • Set the [AUDIO INPUT] switch 3 according to the device to MIC+48V before...
117 page operator's manual for the GY-HD250U
Page 21
...] switch d is set to PBPR. • Outputs the LTC time code of the VIDEO FORMAT[2/2] menu screen. MEMO Set the [Y/PB/PR] terminal (i j k) output image signal to TC. For details, refer to the [PB/TC IN] and [PR/TC OUT] terminal signals. AUX IN : Set to slave lock this camera can be controlled externally. d[PBPR/TC] PBPR/Time code switch Set according to the KA-HD250 INSTRUCTION MANUAL. f[REMOTE] REMOTE terminal (Round 6-pin) Some functions...
117 page operator's manual for the GY-HD250U
Page 33
... FOCUS enhancements) is connected, its operation status is pressed. During recording in DV format, the data from the IEEE1394 connector is no input signal. 5 Indication of the TC GENE switch on the LCD/VF[1/2] menu screen X See page 91. Whether or not the date and time should be showed alone in magnified size on the TIME/DATE menu screen. Item Contents 1 Audio Lock Indicator Displayed during playback, fast forward, and rewind. Turns...
117 page operator's manual for the GY-HD250U
Page 42
... displayed. Audio signal are used up, set to a high temperature (under direct sunlight in the Camera mode) • Alarm indication: LOW VOLTAGE displayed. FRONT and BACK TALLY lamp on the above for a moment when the DC cable is nearly finished. Remaining Battery Power Display LCD monitor/Viewfinder • When you use , recharging may differ depending on the LCD/VF[3/4] menu screen to CAPA% or TIME to the video...
117 page operator's manual for the GY-HD250U
Page 47
... use input time code data from the IEEE1394 terminal, set to ON in IEEE1394 input mode, values input in the viewfinder. • Time code generator data is displayed. • When TCG SOURCE on the tape are displayed. In the play mode or the record mode, the reproduced time codes or user's bits are shown on the LCD monitor or in the [IEEE1394] terminal is displayed. • Values recorded on the TC/UB/CLOCK menu screen is set to EXTERNAL...
117 page operator's manual for the GY-HD250U
Page 48
... mode" is set from the TC/UB/CLOCK menu screen. * See page 46 for every minute not divisible by 10. Use this setting when placing emphasis on the VIDEO FORMAT menu screen is necessary to record continual time codes across different scenes. * However, approximately ±1-frame varia- REC : The data preset in scene accuracy. : The time code starts to run from the LCD screen. FREE tions may occur in the time code...
117 page operator's manual for the GY-HD250U
Page 64
Then it records the black video signal and the mute audio signal for the UB PRESET item on the HEADER REC menu screen. DISABLE : HEADER REC operation is completed, this device enters the RecordStandby mode. Sets the user's bits of the tape. CANCEL : Clears the set time code. MEMO The user's bits for the UB DATA item on the TC/UB/ CLOCK menu screen. (only when set to REC RUN or FREE RUN mode) HEADER REC menu screen contents...
117 page operator's manual for the GY-HD250U
Page 72
... audio. • Operations may differ depending on again. • If you perform this type of this device, and stop recording on the record- IEEE1394 cable CAUTION • Set the IEEE1394 switch on both devices to the IEEE1394 connector on and off or switch the video input, noise may not be possible in HDV format 2. Set the PB TAPE item on the recording device. tion. 9. Press the CAM/VTR button. Press the PLAY...
117 page operator's manual for the GY-HD250U
Page 75
... mode, AUX IN mode or during playback or HEADER REC, the AUTO WHITE function does not work even if the auto white operation is displayed on remote control unit to the REMOTE terminal. In the case of the RM-LP55, "LOW LIGHT ERROR" is performed with the remote control unit (RM-LP55/RM-LP57). Turn the device ON. 2. e_hd250.book Page 71 Tuesday, October 24, 2006 3:11 PM Connect a Remote Control Unit (RM-LP55/RMLP57) Set camera switch functions...
117 page operator's manual for the GY-HD250U
Page 97
... data should be reached from this is set on the TIME/DATE screen that can be displayed during playback. MEMO • This is validated when TCG SOURCE is set to "OFF is displayed and this device is disabled when set to record the time code (TC) and user's bits (UB) during recording. EXECUTE : The set time code is set to INTERNAL. • In HDV format, the UB set on the VIDEO FORMAT menu screen. 93 NON DROP : Internal time code generator works...
117 page operator's manual for the GY-HD250U
Page 100
....book Page 96 Tuesday, October 24, 2006 3:11 PM MENU SCREENS OTHERS[1/2] Menu Screen The OTHERS menu screen consists of the BACK TALLY lamp during recording. During VTR recording, the mode is set "3MIN" and use this position and press the SHUTTER dial. ON : On-screen display. MIDDLE : Alarm sound is not output. HIGH : Alarm sound is output through the monitoring loudspeaker and the PHONES jack. ON : The lamp lights...
117 page operator's manual for the GY-HD250U
Page 110
...! Use a MiniDV videocassette. GY-HD250/GY-HD251 cannot record or play back or input an HDV- Set the IEEE1394 switch to input external images. REC INHIBIT* A tape that cannot be recorded (back switch is set to 50/25 or 24, and a tape re- Display Status Action 60/30 INHIBIT CHANGE FRAME RATE MENU The FRAME RATE item is set to REC. DV-24P INVALID! nector in VTR mode. Insert a cassette tape. 106 LOCKING" is input...
117 page operator's manual for the GY-HD250U
Page 114
... TIME/DATE menu screen set to ON when the data should be ejected after being turned OFF? Image shown on other than AUTO? Cassette cannot be displayed and recorded. • Is the date and time setting made? Set to 2? • Is the iris closed? • Is the shutter speed too fast? • Is the viewfinder cable correctly connected? Playback does not start when the play back. • Is the PB TAPE item on the LCD...
117 page operator's manual for the GY-HD250U
Page 116
... less [Camera section] Image pickup device : 1/3" interline-transfer CCDs Color separation : F1.4, 3-color separation prism optical system Number of total pixels : Approx. 1,110,000 pixels Color bars Lens mount ND filter Gain : SMPTE/EBU type Sync system: Internal sync (built-in the Record mode) : 224(W) × 242.3(H) × 401(D) mm (U model) 224(W) × 242.3(H) × 414(D) mm (E model) : 3.6 d(8.0 lbs.) (U model) 3.8 d(8.4 lbs.) (E model) (including lens (Th16 × 5.5BRMU), viewfinder, microphone and tape...