Instructions
Page 3
...high pressure mercury lamp. Do not look at doors, plugs, receptacles, and the point where they may result in performance this projector is in a space of the projector could be impaired. - Do not use an air-conditioner so that the internal and external temperatures are the same. 150 ... and disconnect the cable system. Be careful when disposing of the grounded plug. - Never push objects of any kind into the projection lens while the illumination lamp is enclosed in proper operating condition. - When this product, ask the service technician to perform safety checks to ...
...high pressure mercury lamp. Do not look at doors, plugs, receptacles, and the point where they may result in performance this projector is in a space of the projector could be impaired. - Do not use an air-conditioner so that the internal and external temperatures are the same. 150 ... and disconnect the cable system. Be careful when disposing of the grounded plug. - Never push objects of any kind into the projection lens while the illumination lamp is enclosed in proper operating condition. - When this product, ask the service technician to perform safety checks to ...
Instructions
Page 7
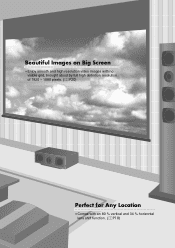
Getting Started Preparation Basic Operation Settings Beautiful Images on Big Screen zEnjoy smooth and high resolution video images with no visible grid, brought about by full high definition resolution of 1920 c 1080 pixels. (pP20) Perfect for Any Location zComes with an 80 % vertical and 34 % horizontal lens shift function. (pP18) 7 Troubleshooting Others
Getting Started Preparation Basic Operation Settings Beautiful Images on Big Screen zEnjoy smooth and high resolution video images with no visible grid, brought about by full high definition resolution of 1920 c 1080 pixels. (pP20) Perfect for Any Location zComes with an 80 % vertical and 34 % horizontal lens shift function. (pP18) 7 Troubleshooting Others
Instructions
Page 10
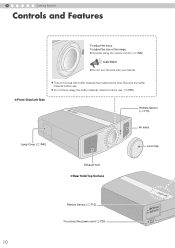
1 Getting Started Controls and Features To adjust the focus. z This unit comes with your hands. Remove the buffer material before use . (pP50) „ Front Side/Left Side Remote Sensor (pP13) Air Inlets Lamp Cover (pP40) Lens Cap Exhaust Vent „Rear Side/Top Surface Remote Sensor (pP13) To connect the power cord (pP20) 10 z Do not throw away the buffer material, retain for future use . To adjust the size of the image. z Operate using the remote control. (pP20) CAUTION z Do not turn the lens with buffer material that cushions the lens.
1 Getting Started Controls and Features To adjust the focus. z This unit comes with your hands. Remove the buffer material before use . (pP50) „ Front Side/Left Side Remote Sensor (pP13) Air Inlets Lamp Cover (pP40) Lens Cap Exhaust Vent „Rear Side/Top Surface Remote Sensor (pP13) To connect the power cord (pP20) 10 z Do not throw away the buffer material, retain for future use . To adjust the size of the image. z Operate using the remote control. (pP20) CAUTION z Do not turn the lens with buffer material that cushions the lens.

Instructions
Page 19
...the center of aspect ratio 16:9. J) Basic Operation Settings Troubleshooting Screen Size and Projection Distance Determine the distance from the lens to the screen to the left or right Moves the image up or down TIPS z Adjustment can be done easily by... that the projected image is in the setting menu after adjusting the image position. (pP27 - Approx. This unit uses a 2.0x power zoom lens for projection. „ Relationship Between Projection Screen Size and Projection Distance Projection Screen Size (Diagonal Length) Aspect Ratio 16:9 Approximate Projection Distance W ...
...the center of aspect ratio 16:9. J) Basic Operation Settings Troubleshooting Screen Size and Projection Distance Determine the distance from the lens to the screen to the left or right Moves the image up or down TIPS z Adjustment can be done easily by... that the projected image is in the setting menu after adjusting the image position. (pP27 - Approx. This unit uses a 2.0x power zoom lens for projection. „ Relationship Between Projection Screen Size and Projection Distance Projection Screen Size (Diagonal Length) Aspect Ratio 16:9 Approximate Projection Distance W ...
Instructions
Page 20
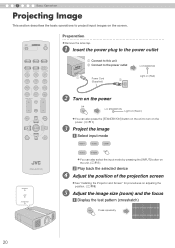
...ON] button on the power. (pP11) Project the image a Select input mode HDMI 1 HDMI 2 COMP. OPERATE ........ ON Preparation z Remove the lens cap. A Insert the power plug to turn on the unit to the power outlet HDMI 1 HDMI 2 COMP. CONTRAST COLOR TEMP BRIGHT INFO HIDE...button on the unit. (pP11) b Play back the selected device D Adjust the position of the projection screen E z See "Installing the Projector and Screen" for procedures on the screen. 3 Basic Operation Projecting Image This section describes the basic operations to project input images on adjusting ...
...ON] button on the power. (pP11) Project the image a Select input mode HDMI 1 HDMI 2 COMP. OPERATE ........ ON Preparation z Remove the lens cap. A Insert the power plug to turn on the unit to the power outlet HDMI 1 HDMI 2 COMP. CONTRAST COLOR TEMP BRIGHT INFO HIDE...button on the unit. (pP11) b Play back the selected device D Adjust the position of the projection screen E z See "Installing the Projector and Screen" for procedures on the screen. 3 Basic Operation Projecting Image This section describes the basic operations to project input images on adjusting ...
Instructions
Page 21
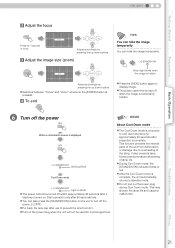
z Pull out the power plug when the unit will not be turned off the power. (pP11) z Put back the lens cap after 90 seconds time. It also prevents lamp blowout and premature shortening of the lamp. This function prevents the internal parts of the unit ... by pressing the up down buttons z Switches between "Focus" and "Zoom" whenever the [ENTER] button is complete. Start operation only after use to prevent the lens from deformation or damage due to overheating of lamp life. z During Cool Down mode, the [STANDBY/ON] indicator blinks in red. Settings Troubleshooting Others 21...
z Pull out the power plug when the unit will not be turned off the power. (pP11) z Put back the lens cap after 90 seconds time. It also prevents lamp blowout and premature shortening of the lamp. This function prevents the internal parts of the unit ... by pressing the up down buttons z Switches between "Focus" and "Zoom" whenever the [ENTER] button is complete. Start operation only after use to prevent the lens from deformation or damage due to overheating of lamp life. z During Cool Down mode, the [STANDBY/ON] indicator blinks in red. Settings Troubleshooting Others 21...
Instructions
Page 36
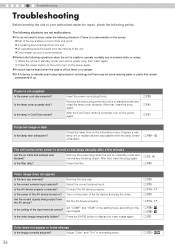
...in standby mode, pull out the power plug, then insert again. The unit works when power is turned on the information menu. Remove the lens cap. Select the correct external input. Is the AV device properly connected? Set the AV device properly. C D z A creaking sound ... Troubleshooting Before sending the unit to your authorized dealer for repair, check the following situations if there is no danger. „ D-ILA device is manufactured using high-precision technology but stops abruptly after a few minutes Are the air inlets and exhaust vent blocked? pP20 pP41...
...in standby mode, pull out the power plug, then insert again. The unit works when power is turned on the information menu. Remove the lens cap. Select the correct external input. Is the AV device properly connected? Set the AV device properly. C D z A creaking sound ... Troubleshooting Before sending the unit to your authorized dealer for repair, check the following situations if there is no danger. „ D-ILA device is manufactured using high-precision technology but stops abruptly after a few minutes Are the air inlets and exhaust vent blocked? pP20 pP41...
Instructions
Page 50
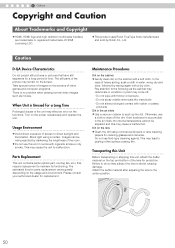
...programs. There is no problem when playing normal video images such as the cabinet may deteriorate in condition or paint may subject the lens to shock causing damage. Maintenance Procedures Dirt on the cabinet z Gently clean dirt on the screens of the surface coating film. ...chemicals like insecticide • Do not allow prolonged contact with rubber or plastic products Dirt in rooms with a dry cloth. Caution D-ILA Device Characteristics Do not project still pictures or pictures that require replacement to maintain its functioning. Dirt on the screen. The still parts...
...programs. There is no problem when playing normal video images such as the cabinet may deteriorate in condition or paint may subject the lens to shock causing damage. Maintenance Procedures Dirt on the cabinet z Gently clean dirt on the screens of the surface coating film. ...chemicals like insecticide • Do not allow prolonged contact with rubber or plastic products Dirt in rooms with a dry cloth. Caution D-ILA Device Characteristics Do not project still pictures or pictures that require replacement to maintain its functioning. Dirt on the screen. The still parts...
Instructions
Page 52
... (HDMI 1, HDMI 2) Power Requirements Power Consumption Operation Environment Installation Height Dimensions (Width c Height c Depth) Mass Accessories D-ILA Projector DLA-HD100 D-ILA device 1 2 / 0.7" (1920 pixels c1080 pixels) c 3 (Total no. Only 0.01 % or less of pixels: Approx. 6.22 million) 2.0x power zoom lens (1.4: 1 f 2.8: 1) (Zoom/Focus: Power) 200 W Ultra-high pressure mercury lamp [Part No.: BHL5009-S] Approx. 60" f 200...
... (HDMI 1, HDMI 2) Power Requirements Power Consumption Operation Environment Installation Height Dimensions (Width c Height c Depth) Mass Accessories D-ILA Projector DLA-HD100 D-ILA device 1 2 / 0.7" (1920 pixels c1080 pixels) c 3 (Total no. Only 0.01 % or less of pixels: Approx. 6.22 million) 2.0x power zoom lens (1.4: 1 f 2.8: 1) (Zoom/Focus: Power) 200 W Ultra-high pressure mercury lamp [Part No.: BHL5009-S] Approx. 60" f 200...

Instructions
Page 53
... 227.5 12 „ Left Side 88.5 245.5 149.5 21.5 172.5 77 Others 42 Center of dots [dot] 800 800 1056 1344 1688 Total no . of Lens 53 Total no .
... 227.5 12 „ Left Side 88.5 245.5 149.5 21.5 172.5 77 Others 42 Center of dots [dot] 800 800 1056 1344 1688 Total no . of Lens 53 Total no .
