Instructions
Page 8
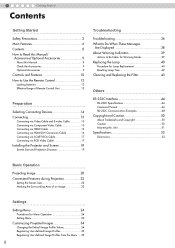
...9 About this Manual 9 Check the Accessories 9 Optional Accessories 9 Controls and Features 10 How to Use the Remote Control 13 Loading Batteries 13 Effective Range of Remote Control Unit 13 Preparation Selecting Connecting Devices 14 Connecting 15 Connecting via Video Cable and S-video Cable 15 ...16 Connecting via HDMI-DVI Conversion Cable 16 Connecting via SCART-RCA Cable 17 Connecting via RGB Video Cable 17 Installing the Projector and Screen 18 Screen Size and Projection Distance 19 Troubleshooting Troubleshooting 36 What to Do When These Messages Are Displayed 38 ...
...9 About this Manual 9 Check the Accessories 9 Optional Accessories 9 Controls and Features 10 How to Use the Remote Control 13 Loading Batteries 13 Effective Range of Remote Control Unit 13 Preparation Selecting Connecting Devices 14 Connecting 15 Connecting via Video Cable and S-video Cable 15 ...16 Connecting via HDMI-DVI Conversion Cable 16 Connecting via SCART-RCA Cable 17 Connecting via RGB Video Cable 17 Installing the Projector and Screen 18 Screen Size and Projection Distance 19 Troubleshooting Troubleshooting 36 What to Do When These Messages Are Displayed 38 ...
Instructions
Page 9
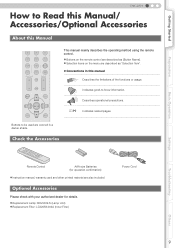
... 1 HDMI 2 VIDCEIONEMA S-VIDNEAOTURALANSPEDCYT NAMICD USER2 C USER1 COLO+R USER3 SHAR+P GAMMA SHAR-P COLO-RCONTRAST COTLBEOMRRPIGHT INFO HIDE MENU EXIT ENTER TEST LIGHT Remote Control AAA size Batteries (for details. Getting Started Preparation Basic Operation ENGLISH How to Read this Manual/ Accessories/Optional Accessories About this manual Describes the limitations of the functions...
... 1 HDMI 2 VIDCEIONEMA S-VIDNEAOTURALANSPEDCYT NAMICD USER2 C USER1 COLO+R USER3 SHAR+P GAMMA SHAR-P COLO-RCONTRAST COTLBEOMRRPIGHT INFO HIDE MENU EXIT ENTER TEST LIGHT Remote Control AAA size Batteries (for details. Getting Started Preparation Basic Operation ENGLISH How to Read this Manual/ Accessories/Optional Accessories About this manual Describes the limitations of the functions...
Instructions
Page 13
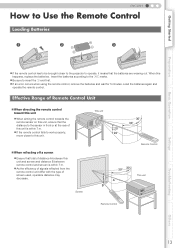
... the remote control has to be brought closer to the projector to insert the - When this unit and screen and distance B between this happens, replace the batteries. end first. z Be sure to operate, it means that the batteries are wearing out. Screen This unit 20° 20° 30° 30...the remote sensor on this unit is within 7 m. marks. z If the remote control fails to work properly, move closer to the +- Insert the batteries according to this unit. „ When reflecting off a screen z Ensure that the distance to the sensor in front or at the rear of screen ...
... the remote control has to be brought closer to the projector to insert the - When this unit and screen and distance B between this happens, replace the batteries. end first. z Be sure to operate, it means that the batteries are wearing out. Screen This unit 20° 20° 30° 30...the remote sensor on this unit is within 7 m. marks. z If the remote control fails to work properly, move closer to the +- Insert the batteries according to this unit. „ When reflecting off a screen z Ensure that the distance to the sensor in front or at the rear of screen ...
Instructions
Page 37
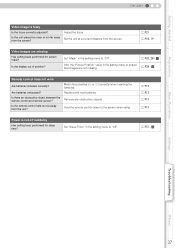
.... pP13 pP13 pP13 pP13 Power is fuzzy Is the focus correctly adjusted? M Remote control does not work Are batteries installed correctly? Replace with new batteries. Are batteries exhausted? f Basic Operation Settings Troubleshooting Others 37 pP23, 28 - pP31 - Set the unit at a correct ... Is there an obstructive object between the remote control and remote sensor? Match the polarities (+ or -) correctly when inserting the batteries. Set "Sleep Timer" in the setting menu to "Off". Hold the remote control closer to ensure that images are missing...
.... pP13 pP13 pP13 pP13 Power is fuzzy Is the focus correctly adjusted? M Remote control does not work Are batteries installed correctly? Replace with new batteries. Are batteries exhausted? f Basic Operation Settings Troubleshooting Others 37 pP23, 28 - pP31 - Set the unit at a correct ... Is there an obstructive object between the remote control and remote sensor? Match the polarities (+ or -) correctly when inserting the batteries. Set "Sleep Timer" in the setting menu to "Off". Hold the remote control closer to ensure that images are missing...