
Instructions
Page 1
Retain this information for future reference. Model No. Serial No. and Serial No. INSTRUCTIONS MANUEL D'INSTRUCTIONS MANUAL DE INSTRUCCIONES LNT0066-001A ESPAÑOL FRANÇAIS ENGLISH FM CORDLESS HEADPHONES CASQUE FM SANS FIL AURICULARES INALÁMBRICOS FM HA-W600RF-J/C For customer Use: Enter below the Model No. which are located on the top or bottom of the cabinet.
Retain this information for future reference. Model No. Serial No. and Serial No. INSTRUCTIONS MANUEL D'INSTRUCTIONS MANUAL DE INSTRUCCIONES LNT0066-001A ESPAÑOL FRANÇAIS ENGLISH FM CORDLESS HEADPHONES CASQUE FM SANS FIL AURICULARES INALÁMBRICOS FM HA-W600RF-J/C For customer Use: Enter below the Model No. which are located on the top or bottom of the cabinet.
Instructions
Page 5
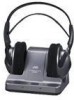
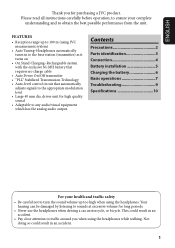
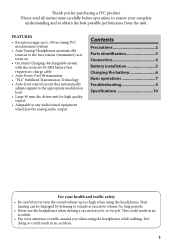
... 2 Parts identification 3 Connection 4 Battery installation 5 Charging the battery 6 Basic operations 7 Troubleshooting 9 Specifications 10 For your complete understanding and to turn the sound volume up to 50 m/164 ft. (using JVC measurement system) • Auto Tuning-Headphones automatically tunes in an accident. 1 This could result in to the base station (transmitter) as it turns on base station (transmitter) • Reception range up too high when using the headphones. Please read all instructions carefully...
... 2 Parts identification 3 Connection 4 Battery installation 5 Charging the battery 6 Basic operations 7 Troubleshooting 9 Specifications 10 For your complete understanding and to turn the sound volume up to 50 m/164 ft. (using JVC measurement system) • Auto Tuning-Headphones automatically tunes in an accident. 1 This could result in to the base station (transmitter) as it turns on base station (transmitter) • Reception range up too high when using the headphones. Please read all instructions carefully...
Instructions
Page 6
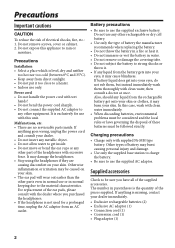
.... Power cord • Do not handle the power cord with clean water, then consult a doctor at once. Malfunctions, etc. • There are causing discomfort on your skin. • The ear pad will wear out earlier than the other parts even in normal use any other equipment. If battery liquid does get onto your skin. Do not remove screws, cover or cabinet. 2. Charging precautions...
.... Power cord • Do not handle the power cord with clean water, then consult a doctor at once. Malfunctions, etc. • There are causing discomfort on your skin. • The ear pad will wear out earlier than the other parts even in normal use any other equipment. If battery liquid does get onto your skin. Do not remove screws, cover or cabinet. 2. Charging precautions...
Instructions
Page 10
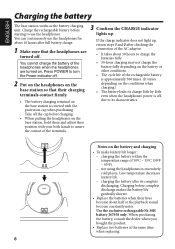
... only. Press POWER to use the headphones for about half or the playback sound become about 10 hours after full battery charge. 1 Make sure that their charging terminals contact firmly. • The battery charging terminal on the base station, hold them and adjust their lives become constantly noisy. Low temperature decreases battery life. - ENGLISH Charging the battery The base station works as the battery charging unit. You...
... only. Press POWER to use the headphones for about half or the playback sound become about 10 hours after full battery charge. 1 Make sure that their charging terminals contact firmly. • The battery charging terminal on the base station, hold them and adjust their lives become constantly noisy. Low temperature decreases battery life. - ENGLISH Charging the battery The base station works as the battery charging unit. You...
Instructions
Page 11
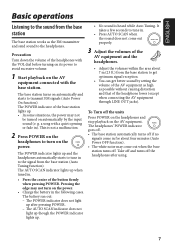
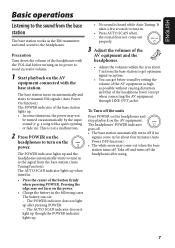
... not be turned on automatically by setting the volume of the AV equipment as high as the FM transmitter and send sound to the headphones. To Turn off the units Press POWER on the headphones and stop playback on the power. • Charge the battery in the following cases. The AUTO SCAN indicator does not light up though the POWER indicator lights up after using. 7 The headphones' POWER indicator...
... not be turned on automatically by setting the volume of the AV equipment as high as the FM transmitter and send sound to the headphones. To Turn off the units Press POWER on the headphones and stop playback on the power. • Charge the battery in the following cases. The AUTO SCAN indicator does not light up though the POWER indicator lights up after using. 7 The headphones' POWER indicator...
Instructions
Page 13
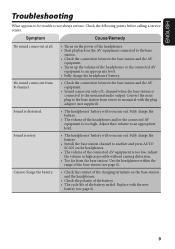
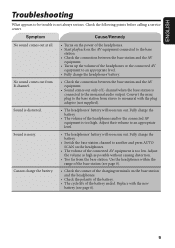
... charge the battery. • Switch the base station channel to the monaural audio output. Sound is noisy. Convert the mini plug to the base station from stereo to be trouble is too low. No sound comes out from the base station. Check the following points before calling a service center. Adjust their volume to an appropriate level. • Fully charge the headphones' battery. • Check the connection...
... charge the battery. • Switch the base station channel to the monaural audio output. Sound is noisy. Convert the mini plug to the base station from stereo to be trouble is too low. No sound comes out from the base station. Check the following points before calling a service center. Adjust their volume to an appropriate level. • Fully charge the headphones' battery. • Check the connection...

Instructions
Page 14
... pin plug x 2: 0.1 m (0.33 ft)) • Plug adaptor x 1 (converts 3.5 mm (0.13˝) dia. stereo mini jack - stereo mini plug to change without connection cord and AC adaptor) Headphones Power requirements: Rechargeable Ni-MH battery (1.2 V) x 2 Battery running time: 10 hours (when charged for 30 hours) Mass: 250 g (8.8 oz) (with the exclusive AC adaptor) Audio input terminals: 3.5 mm (0.13˝) dia. stereo mini plug: 2.2 m (7.22 ft)) • Conversion cord x 1 (3.5 mm (0.13˝) dia. standard stereo phone plug) * Design and specifications...
... pin plug x 2: 0.1 m (0.33 ft)) • Plug adaptor x 1 (converts 3.5 mm (0.13˝) dia. stereo mini jack - stereo mini plug to change without connection cord and AC adaptor) Headphones Power requirements: Rechargeable Ni-MH battery (1.2 V) x 2 Battery running time: 10 hours (when charged for 30 hours) Mass: 250 g (8.8 oz) (with the exclusive AC adaptor) Audio input terminals: 3.5 mm (0.13˝) dia. stereo mini plug: 2.2 m (7.22 ft)) • Conversion cord x 1 (3.5 mm (0.13˝) dia. standard stereo phone plug) * Design and specifications...

Instructions
Page 23
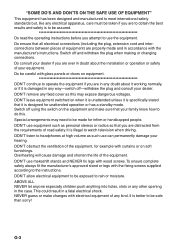
... holes, slots or any way-switch off and withdraw the plug when making or changing connections. Do ensure that your dealer. Switch off using the switch on equipment. It is damaged in any other opening in accordance with electrical equipment of any kind. DON'T listen to headphones at high volume as such use makeshift stands and NEVER fix legs with glass panels or...
... holes, slots or any way-switch off and withdraw the plug when making or changing connections. Do ensure that your dealer. Switch off using the switch on equipment. It is damaged in any other opening in accordance with electrical equipment of any kind. DON'T listen to headphones at high volume as such use makeshift stands and NEVER fix legs with glass panels or...
Instructions
Page 24
Contents Precautions 2 Parts identification 3 Connection 4 Battery installation 5 Charging the battery 6 Basic operations 7 Troubleshooting 9 Specifications 10 For your complete understanding and to obtain the best possible performance from the unit. This could result in an accident. 1 driver unit for long periods. • Never use the headphones when driving a car, motorcycle, or bicycle. Your hearing can be damaged by listening to sounds at excessive volume for high...
Contents Precautions 2 Parts identification 3 Connection 4 Battery installation 5 Charging the battery 6 Basic operations 7 Troubleshooting 9 Specifications 10 For your complete understanding and to obtain the best possible performance from the unit. This could result in an accident. 1 driver unit for long periods. • Never use the headphones when driving a car, motorcycle, or bicycle. Your hearing can be damaged by listening to sounds at excessive volume for high...

Instructions
Page 25
... bend the power cord sharply. • Do not connect the supplied AC adaptor to use the supplied exclusive battery. In this case, wash with this appliance to strong shocks or throw it. • If any other part of battery may damage the headphones. • Stop using the headphones if they are no serviceable parts inside . • Do not move or bend the ear cups or...
... bend the power cord sharply. • Do not connect the supplied AC adaptor to use the supplied exclusive battery. In this case, wash with this appliance to strong shocks or throw it. • If any other part of battery may damage the headphones. • Stop using the headphones if they are no serviceable parts inside . • Do not move or bend the ear cups or...

Instructions
Page 29
... charging.) • The battery leaks its charge little by little even when the headphones' power is off . You can continuously use the headphones. If the charge indicator does not light up . charging the battery after checking the connection of the AC adaptor. • It takes about half or the playback sound become about 30 hours to charge the batteries fully. • 30-hour charging may not charge the battery...
... charging.) • The battery leaks its charge little by little even when the headphones' power is off . You can continuously use the headphones. If the charge indicator does not light up . charging the battery after checking the connection of the AC adaptor. • It takes about half or the playback sound become about 30 hours to charge the batteries fully. • 30-hour charging may not charge the battery...
Instructions
Page 30
... and the headphones. • Adjust the volumes within the area about four minutes (Auto Power OFF function). • The white noise may not be turned on the AV equipment connected with a quiet opening or fade in). The AUTO SCAN indicator does not light up though the POWER indicator lights up after using. 7 The battery ran out: - The POWER indicator of the button firmly when...
... and the headphones. • Adjust the volumes within the area about four minutes (Auto Power OFF function). • The white noise may not be turned on the AV equipment connected with a quiet opening or fade in). The AUTO SCAN indicator does not light up though the POWER indicator lights up after using. 7 The battery ran out: - The POWER indicator of the button firmly when...
Instructions
Page 32
... equipment. • Turns up the volume of the headphones or the connected AV equipment to an appropriate level. • Fully charge the headphones' battery. • Check the connection between the base station and the AV equipment. • Sound comes out only of the headphones and/or the connected AV equipment is connected to the monaural audio output. Use the headphones within the range of the base...
... equipment. • Turns up the volume of the headphones or the connected AV equipment to an appropriate level. • Fully charge the headphones' battery. • Check the connection between the base station and the AV equipment. • Sound comes out only of the headphones and/or the connected AV equipment is connected to the monaural audio output. Use the headphones within the range of the base...

Instructions
Page 33
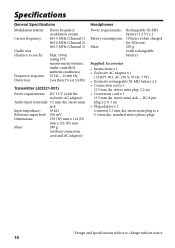
... plug to change without connection cord and AC adaptor) Headphones Power requirements: Rechargeable Ni-MH battery (1.2 V) x 2 Battery running time: 10 hours (when charged for 30 hours) Mass: 250 g (with the exclusive AC adaptor) Audio input terminals: 3.5 mm dia. ENGLISH Specifications General Specifications Modulation system: Carrier frequency: Usable area (distance to reach): Frequency response: Distortion: Stereo frequency modulation system 863.5 MHz (Channel 1) 864.0 MHz (Channel 2) 864.5 MHz (Channel 3) Max. 100 m (using JVC...
... plug to change without connection cord and AC adaptor) Headphones Power requirements: Rechargeable Ni-MH battery (1.2 V) x 2 Battery running time: 10 hours (when charged for 30 hours) Mass: 250 g (with the exclusive AC adaptor) Audio input terminals: 3.5 mm dia. ENGLISH Specifications General Specifications Modulation system: Carrier frequency: Usable area (distance to reach): Frequency response: Distortion: Stereo frequency modulation system 863.5 MHz (Channel 1) 864.0 MHz (Channel 2) 864.5 MHz (Channel 3) Max. 100 m (using JVC...
Instructions
Page 38
... about the installation or operation or safety of the equipment. Do be careful with glass panels or doors on the equipment and make changes with the manufacturer's instructions. Special arrangements may expose dangerous voltages. Switch off using the switch on equipment. DON'T remove any fixed cover as personal stereos or radios so that your dealer. DON'T use the equipment. Do read the operating instructions before you...
... about the installation or operation or safety of the equipment. Do be careful with glass panels or doors on the equipment and make changes with the manufacturer's instructions. Special arrangements may expose dangerous voltages. Switch off using the switch on equipment. DON'T remove any fixed cover as personal stereos or radios so that your dealer. DON'T use the equipment. Do read the operating instructions before you...
Instructions
Page 39
... the analog audio output. Your hearing can be damaged by listening to sounds at excessive volume for high quality sound • Adaptable to traffic around you for purchasing a JVC product. driver unit for long periods. • Never use the headphones when driving a car, motorcycle, or bicycle. Not doing so could result in an accident. 1 Contents Precautions 2 Parts identification 3 Connection 4 Battery installation 5 Charging the battery 6 Basic operations 7 Troubleshooting 9 Specifications 10...
... the analog audio output. Your hearing can be damaged by listening to sounds at excessive volume for high quality sound • Adaptable to traffic around you for purchasing a JVC product. driver unit for long periods. • Never use the headphones when driving a car, motorcycle, or bicycle. Not doing so could result in an accident. 1 Contents Precautions 2 Parts identification 3 Connection 4 Battery installation 5 Charging the battery 6 Basic operations 7 Troubleshooting 9 Specifications 10...
Instructions
Page 40
... headphones with clean water, then consult a doctor at once. Also, should any other part of the pieces supplied. If anything goes wrong, unplug the power cord and consult your skin. Charging precautions • Charge only with the dealer where you have all of the ear pads, please consult with supplied Ni-MH type battery. The number in water. • Do not remove...
... headphones with clean water, then consult a doctor at once. Also, should any other part of the pieces supplied. If anything goes wrong, unplug the power cord and consult your skin. Charging precautions • Charge only with the dealer where you have all of the ear pads, please consult with supplied Ni-MH type battery. The number in water. • Do not remove...

Instructions
Page 45
... the volumes of the base station lights up. • In some situations, the power may not turn on the AV equipment. The battery ran out: - The base station turns on the power. • Charge the battery in . • Press the center of the headphone lower (except when connecting the AV equipment through LINE OUT jacks). The AUTO SCAN indicator lights up . • No sound...
... the volumes of the base station lights up. • In some situations, the power may not turn on the AV equipment. The battery ran out: - The base station turns on the power. • Charge the battery in . • Press the center of the headphone lower (except when connecting the AV equipment through LINE OUT jacks). The AUTO SCAN indicator lights up . • No sound...

Instructions
Page 47
... connected to monaural with the new battery (see page 8). • Check the contact of the charging terminals on the headphones. • The volume of the base station (see page 6). 9 Convert the mini plug to the base station from stereo to the monaural audio output. Use the headphones within the range of the connected AV equipment is too low. Replace with the plug adaptor (not supplied). • The headphones' battery...
... connected to monaural with the new battery (see page 8). • Check the contact of the charging terminals on the headphones. • The volume of the base station (see page 6). 9 Convert the mini plug to the base station from stereo to the monaural audio output. Use the headphones within the range of the connected AV equipment is too low. Replace with the plug adaptor (not supplied). • The headphones' battery...
Instructions
Page 48
... specifications subject to change without connection cord and AC adaptor) Headphones Power requirements: Rechargeable Ni-MH battery (1.2 V) x 2 Battery running time: 10 hours (when charged for 30 hours) Mass: 250 g (with the exclusive AC adaptor) Audio input terminals: 3.5 mm dia. Specifications General Specifications Modulation system: Carrier frequency: Usable area (distance to reach): Frequency response: Distortion: Stereo frequency modulation system 863.5 MHz (Channel 1) 864.0 MHz (Channel 2) 864.5 MHz (Channel 3) Max. 100 m (using JVC...
... specifications subject to change without connection cord and AC adaptor) Headphones Power requirements: Rechargeable Ni-MH battery (1.2 V) x 2 Battery running time: 10 hours (when charged for 30 hours) Mass: 250 g (with the exclusive AC adaptor) Audio input terminals: 3.5 mm dia. Specifications General Specifications Modulation system: Carrier frequency: Usable area (distance to reach): Frequency response: Distortion: Stereo frequency modulation system 863.5 MHz (Channel 1) 864.0 MHz (Channel 2) 864.5 MHz (Channel 3) Max. 100 m (using JVC...


