
Instructions
Page 2
... playback videos (੬ pg. 28) SD Memory Card You can connect the camera to a DVD burner (sold separately) with PictBridge, still images can register recorded videos to events according to a DVD disc. "When Using an SD Card" (੬ pg. 17) ● To record still images (੬ pg. 22) ● To playback still images (੬ pg. 32) Auto/Manual Recording Mode You can easily edit video and create your printer is compatible with a USB mini A/B cable to save recorded files easily...
... playback videos (੬ pg. 28) SD Memory Card You can connect the camera to a DVD burner (sold separately) with PictBridge, still images can register recorded videos to events according to a DVD disc. "When Using an SD Card" (੬ pg. 17) ● To record still images (੬ pg. 22) ● To playback still images (੬ pg. 32) Auto/Manual Recording Mode You can easily edit video and create your printer is compatible with a USB mini A/B cable to save recorded files easily...
Instructions
Page 3
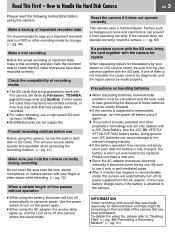
... camera correctly during use Before using the AC adapter, the access lamp lights up, and the LCD turns off automatically to "Deleting Files" (੬ pg. 38)/"Formatting a Recording Medium" (੬ pg. 41). Be sure to use a high-speed SD card (at shops might be strictly followed. ● If the camera is attached to work with a JVC Data Battery. Make a backup of important recorded data It is worn out and needs to copy your camera together with sound...
... camera correctly during use Before using the AC adapter, the access lamp lights up, and the LCD turns off automatically to "Deleting Files" (੬ pg. 38)/"Formatting a Recording Medium" (੬ pg. 41). Be sure to use a high-speed SD card (at shops might be strictly followed. ● If the camera is attached to work with a JVC Data Battery. Make a backup of important recorded data It is worn out and needs to copy your camera together with sound...

Instructions
Page 6
... Manual Setting in MSET Menu 24 Nightalive 27 Backlight Compensation 27 Spot Exposure Control 27 PLAYBACK Video Video Playback 28 Various Operations during Playback 29 File Search Function 30 Date Index Screen 30 Event Screen 31 To Play Back Files in the [EXTMOV] Folder ......31 Deleting a Video File 31 Still image Still Image Playback 32 File Search Function 32 Slide Show 33 Image Rotation 33 Playback Zoom 33 Deleting a Still Image File 33 Video / Still image Watching Images on TV/Remote Control .......... 34 Connecting to a TV, VCR or DVD Recorder...
... Manual Setting in MSET Menu 24 Nightalive 27 Backlight Compensation 27 Spot Exposure Control 27 PLAYBACK Video Video Playback 28 Various Operations during Playback 29 File Search Function 30 Date Index Screen 30 Event Screen 31 To Play Back Files in the [EXTMOV] Folder ......31 Deleting a Video File 31 Still image Still Image Playback 32 File Search Function 32 Slide Show 33 Image Rotation 33 Playback Zoom 33 Deleting a Still Image File 33 Video / Still image Watching Images on TV/Remote Control .......... 34 Connecting to a TV, VCR or DVD Recorder...
Instructions
Page 11
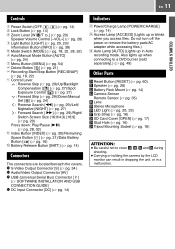
... access files. M S-Video Output Connector [S] (੬ pg. 34) N Audio/Video Output Connector [AV] O USB (Universal Serial Bus) Connector [ ] (੬ SOFTWARE INSTALLATION AND USB CONNECTION GUIDE) P DC Input Connector [DC] (੬ pg. 14) Indicators Q Power/Charge Lamp [POWER/CHARGE] (੬ pg. 14) R Access Lamp [ACCESS] (Lights up when connecting to a DVD burner [sold separately].) (੬ pg. 49) Other Parts T Reset Button [RESET] (੬ pg. 60) U Speaker (੬ pg. 28) V Battery Pack Mount (੬ pg. 14) W Camera Sensor Remote Sensor (੬ pg. 35) X Lens...
... access files. M S-Video Output Connector [S] (੬ pg. 34) N Audio/Video Output Connector [AV] O USB (Universal Serial Bus) Connector [ ] (੬ SOFTWARE INSTALLATION AND USB CONNECTION GUIDE) P DC Input Connector [DC] (੬ pg. 14) Indicators Q Power/Charge Lamp [POWER/CHARGE] (੬ pg. 14) R Access Lamp [ACCESS] (Lights up when connecting to a DVD burner [sold separately].) (੬ pg. 49) Other Parts T Reset Button [RESET] (੬ pg. 60) U Speaker (੬ pg. 28) V Battery Pack Mount (੬ pg. 14) W Camera Sensor Remote Sensor (੬ pg. 35) X Lens...
Instructions
Page 12
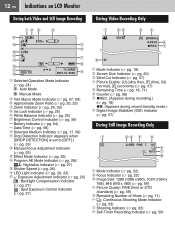
... Video and Still Image Recording During Video Recording Only 17 16:9 [0h56m] 11:30AM NOV.10. 2006 a Selected Operation Mode Indicator (੬ pg. 24) : Auto Mode : Manual Mode b Tele Macro Mode Indicator (੬ pg. 57, 59) c Approximate Zoom Ratio (੬ pg. 20, 23) d Zoom Indicator (੬ pg. 20, 23) e Iris Lock Indicator (੬ pg. 25) f White Balance Indicator (੬ pg. 25) g Brightness Control Indicator (੬ pg. 56) h Battery...
... Video and Still Image Recording During Video Recording Only 17 16:9 [0h56m] 11:30AM NOV.10. 2006 a Selected Operation Mode Indicator (੬ pg. 24) : Auto Mode : Manual Mode b Tele Macro Mode Indicator (੬ pg. 57, 59) c Approximate Zoom Ratio (੬ pg. 20, 23) d Zoom Indicator (੬ pg. 20, 23) e Iris Lock Indicator (੬ pg. 25) f White Balance Indicator (੬ pg. 25) g Brightness Control Indicator (੬ pg. 56) h Battery...

Instructions
Page 15
...; pg. 16) GETTING STARTED Language Setting The language on the video/still image file and it can find the desired file from the date index screen. (੬ pg. 30) After performing step 1-4 in "Language Setting" (੬ pg. 15) 5 Select [CLOCK ADJUST]. Select Set DATE/TIME SCENE COUNTER LANGUAGE CLOCK ADJUST DATE DISPLAY ORDER 5 Select [LANGUAGE]. Slide while pressing down the lock button. Power off Playback Recording Lock button 3 CAMERA SETTING BASIC SETTING REC MEDIA SETTING DATE/DISPLAY REGISTER EVENT QUALITY WIND CUT 4 Select...
...; pg. 16) GETTING STARTED Language Setting The language on the video/still image file and it can find the desired file from the date index screen. (੬ pg. 30) After performing step 1-4 in "Language Setting" (੬ pg. 15) 5 Select [CLOCK ADJUST]. Select Set DATE/TIME SCENE COUNTER LANGUAGE CLOCK ADJUST DATE DISPLAY ORDER 5 Select [LANGUAGE]. Slide while pressing down the lock button. Power off Playback Recording Lock button 3 CAMERA SETTING BASIC SETTING REC MEDIA SETTING DATE/DISPLAY REGISTER EVENT QUALITY WIND CUT 4 Select...

Instructions
Page 17
... power switch to format an SD card, see "Check the compatibility of recording media" (੬ pg. 3). Select Set 5 Do not touch the terminal on how to 1 or . RESET VIDEO MODE IMAGE MODE FORMAT CLEAN UP 3 Select [VIDEO MODE] or [IMAGE MODE]. After the card comes out a little, pull it for the first time This will also ensure stable speeds and operation when accessing the SD card. To change the recording medium back to be corrupted. 1 Open the SD card cover. Format...
... power switch to format an SD card, see "Check the compatibility of recording media" (੬ pg. 3). Select Set 5 Do not touch the terminal on how to 1 or . RESET VIDEO MODE IMAGE MODE FORMAT CLEAN UP 3 Select [VIDEO MODE] or [IMAGE MODE]. After the card comes out a little, pull it for the first time This will also ensure stable speeds and operation when accessing the SD card. To change the recording medium back to be corrupted. 1 Open the SD card cover. Format...

Instructions
Page 19
... at playback. The selected event is not operated for a file to play back these files, see "Changing the Screen Size" (੬ pg. 20). ● If the camera is displayed on again, set to the [EXTMOV] folder. Unless you change the setting, you do so, the sound of the hard disk drive may be created for every 4 GB of recording. ● After recording video for 12 consecutive hours, recording stops automatically. ● A new file...
... at playback. The selected event is not operated for a file to play back these files, see "Changing the Screen Size" (੬ pg. 20). ● If the camera is displayed on again, set to the [EXTMOV] folder. Unless you change the setting, you do so, the sound of the hard disk drive may be created for every 4 GB of recording. ● After recording video for 12 consecutive hours, recording stops automatically. ● A new file...
Instructions
Page 24
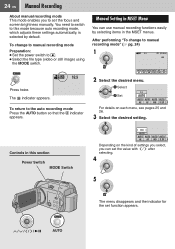
... change to . ● Select the file type (video or still image) using the MODE switch. 16:9 Press twice. After performing "To change to manual recording mode Preparation: ● Set the power switch to manual recording mode" (੬ pg. 24) 1 16:9 [0h56m] AUTO AUTO AUTO AUTO OFF OFF AE AF WB S.SP P.AE EF 2 Select the desired menu. To return to set function appears. / / / / 49 AUTO Select Set 0 AUTO AUTO AUTO AUTO AUTO AE AF WB S.SP P For details on the kind of settings...
... change to . ● Select the file type (video or still image) using the MODE switch. 16:9 Press twice. After performing "To change to manual recording mode Preparation: ● Set the power switch to manual recording mode" (੬ pg. 24) 1 16:9 [0h56m] AUTO AUTO AUTO AUTO OFF OFF AE AF WB S.SP P.AE EF 2 Select the desired menu. To return to set function appears. / / / / 49 AUTO Select Set 0 AUTO AUTO AUTO AUTO AUTO AE AF WB S.SP P For details on the kind of settings...

Instructions
Page 28
... stop momentarily or the sound may be played back, see page 17. 3 Press / / / to select the desired file, then press 49. To turn the volume up , playback may be interrupted. If the camera continues to protect the recording medium. To adjust the speaker volume During playback, slide the speaker volume control towards + to turn the date display on/off : Still image mode Playback Recording VIDEO Lock button Zoom Lever/Speaker Volume Control 53/53 Index screen for videos LIGHT...
... stop momentarily or the sound may be played back, see page 17. 3 Press / / / to select the desired file, then press 49. To turn the volume up , playback may be interrupted. If the camera continues to protect the recording medium. To adjust the speaker volume During playback, slide the speaker volume control towards + to turn the date display on/off : Still image mode Playback Recording VIDEO Lock button Zoom Lever/Speaker Volume Control 53/53 Index screen for videos LIGHT...

Instructions
Page 31
... functions are saved to the [EXTMOV] folder. (੬ pg. 19) 1 Press the REC/SNAP button while the index screen is displayed. 2 After [MPG] is displayed, press / / / to select the file you want to narrow down the search. Select Set To exit the file delete screen Select [CANCEL] in "To change the event registration of the screen. EN 31 PLAYBACK Event Screen You can search by the recording date...
... functions are saved to the [EXTMOV] folder. (੬ pg. 19) 1 Press the REC/SNAP button while the index screen is displayed. 2 After [MPG] is displayed, press / / / to select the file you want to narrow down the search. Select Set To exit the file delete screen Select [CANCEL] in "To change the event registration of the screen. EN 31 PLAYBACK Event Screen You can search by the recording date...

Instructions
Page 32
Index screen Date index screen For details on /off Playback Recording Lock button LIGHT/INFO Zoom Lever 2 Set the MODE switch to . : Video mode : Still image mode IMAGE 53/53 Index screen for still image INDEX ● To change the medium to be played back, see page 30. To return to . 32 EN Still Image Playback 1 Set the power switch to the index screen Press INDEX. Power off Set [DATE/TIME] to [ON], [AUTO] or [OFF]. (੬ pg. 56) To check the file information...
Index screen Date index screen For details on /off Playback Recording Lock button LIGHT/INFO Zoom Lever 2 Set the MODE switch to . : Video mode : Still image mode IMAGE 53/53 Index screen for still image INDEX ● To change the medium to be played back, see page 30. To return to . 32 EN Still Image Playback 1 Set the power switch to the index screen Press INDEX. Power off Set [DATE/TIME] to [ON], [AUTO] or [OFF]. (੬ pg. 56) To check the file information...
Instructions
Page 34
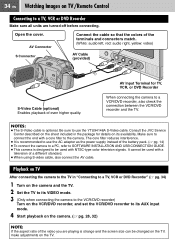
...) S-Video Cable (optional) Enables playback of a different standard. ● When using S-video cable, also connect the AV cable. Make sure to connect the end with a core filter to its VIDEO mode. 3 (Only when connecting the camera to the VCR/DVD recorder) Turn on the VCR/DVD recorder, and set the VCR/DVD recorder to the camera. NOTES: ● The S-Video cable is designed to a TV, VCR or DVD Recorder Make sure all units are playing is strange and the screen size can be changed...
...) S-Video Cable (optional) Enables playback of a different standard. ● When using S-video cable, also connect the AV cable. Make sure to connect the end with a core filter to its VIDEO mode. 3 (Only when connecting the camera to the VCR/DVD recorder) Turn on the VCR/DVD recorder, and set the VCR/DVD recorder to the camera. NOTES: ● The S-Video cable is designed to a TV, VCR or DVD Recorder Make sure all units are playing is strange and the screen size can be changed...

Instructions
Page 42
... operation. ● Depending on the hard disk drive it may take several minutes for the power supply when cleaning up a recording medium. (੬ pg. 14) 1 DIS CAMERA SETTING BASIC SETTING REC MEDIA SETTING DATE/DISPLAY REGISTER EVENT QUALITY 2 Select and set items as follows. [REC MEDIA SETTING] [CLEAN UP] Select Set HDD SD 3 Select [HDD] or [SD]. Select Set EXECUTE NO. RESET FOR VIDEO FILES EXECUTE CANCEL 4 Select [EXECUTE]. The new files you are going to or . 1 DIS CAMERA SETTING...
... operation. ● Depending on the hard disk drive it may take several minutes for the power supply when cleaning up a recording medium. (੬ pg. 14) 1 DIS CAMERA SETTING BASIC SETTING REC MEDIA SETTING DATE/DISPLAY REGISTER EVENT QUALITY 2 Select and set items as follows. [REC MEDIA SETTING] [CLEAN UP] Select Set HDD SD 3 Select [HDD] or [SD]. Select Set EXECUTE NO. RESET FOR VIDEO FILES EXECUTE CANCEL 4 Select [EXECUTE]. The new files you are going to or . 1 DIS CAMERA SETTING...

Instructions
Page 47
... [CHECK SETTINGS], then press 49. ● If necessary, change the number of prints with this section Zoom Lever Power Switch MODE Switch / / / / 49 MENU To cancel the selection Set the number of prints. Select Set ● If you slide and hold the zoom lever towards T, the preview screen of the still image is useful to . 1 2 Select [DPOF]. To print all still images (One print for the desired file by...
... [CHECK SETTINGS], then press 49. ● If necessary, change the number of prints with this section Zoom Lever Power Switch MODE Switch / / / / 49 MENU To cancel the selection Set the number of prints. Select Set ● If you slide and hold the zoom lever towards T, the preview screen of the still image is useful to . 1 2 Select [DPOF]. To print all still images (One print for the desired file by...

Instructions
Page 48
... date and time. 7 Select [PRINT]. Select Set NUMBER OF PRINTS DATE OFF PRINT CANCEL To Print Using the DPOF Settings If the printer is compatible with PictBridge, still images can be printed easily by Selecting a Still Image Preparation: ● Set the power switch to ● Set the MODE switch to select [CHECK SETTINGS], then press 49. Select Set To stop printing after direct printing with the USB cable. ● After a while, the print menu...
... date and time. 7 Select [PRINT]. Select Set NUMBER OF PRINTS DATE OFF PRINT CANCEL To Print Using the DPOF Settings If the printer is compatible with PictBridge, still images can be printed easily by Selecting a Still Image Preparation: ● Set the power switch to ● Set the MODE switch to select [CHECK SETTINGS], then press 49. Select Set To stop printing after direct printing with the USB cable. ● After a while, the print menu...
Instructions
Page 60
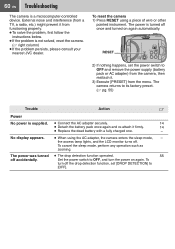
...; Replace the dead battery with a fully charged one. - No display appears. ● When using a piece of wire or other pointed instrument. the access lamp lights, and the LCD monitor turns off accidentally. To cancel the sleep mode, perform any operation such as zooming. Set the power switch to OFF and remove the power supply (battery pack or AC adapter) from the camera, then reattach it from the menu. To reset the camera 1) Press RESET using...
...; Replace the dead battery with a fully charged one. - No display appears. ● When using a piece of wire or other pointed instrument. the access lamp lights, and the LCD monitor turns off accidentally. To cancel the sleep mode, perform any operation such as zooming. Set the power switch to OFF and remove the power supply (battery pack or AC adapter) from the camera, then reattach it from the menu. To reset the camera 1) Press RESET using...
Instructions
Page 64
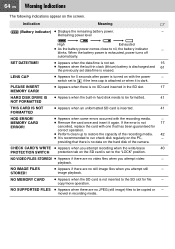
... recording media. NO VIDEO FILES STORED! ● Appears if there are no still image files when you attempt still - blinks. LENS CAP ● Appears for file - SET DATE/TIME! ● Appears when the date/time is not 17 cancelled, replace the card with the power - MEMORY CARD ERROR! ● Appears when some errors occurred with the recording media. - ● Remove the card once and insert it is exhausted, power turns off automatically. image playback. Indication Meaning ੬ (Battery indicator) ● Displays...
... recording media. NO VIDEO FILES STORED! ● Appears if there are no still image files when you attempt still - blinks. LENS CAP ● Appears for file - SET DATE/TIME! ● Appears when the date/time is not 17 cancelled, replace the card with the power - MEMORY CARD ERROR! ● Appears when some errors occurred with the recording media. - ● Remove the card once and insert it is exhausted, power turns off automatically. image playback. Indication Meaning ੬ (Battery indicator) ● Displays...

Instructions
Page 70
...°F) Pickup 1/5" (1,330,000 pixels) CCD Lens F 1.2 to 2.8, f = 3.0 mm to 45 mm, 15:1 power zoom lens Filter diameter ø30.5 mm LCD monitor 2.7" diagonally measured, LCD panel/TFT active matrix system Speaker Monaural LED Light Within 1.5 m (4.9 ft) (recommended shooting distance) Language English/French/Spanish/Portuguese/Japanese/ Korean/Traditional Chinese For video/audio Format SD-VIDEO Recording/Playback format Video: MPEG-2 Audio: Dolby Digital (2 ch) Signal format NTSC standard Recording mode (video) ULTRA FINE: 720 x 480 pixels...
...°F) Pickup 1/5" (1,330,000 pixels) CCD Lens F 1.2 to 2.8, f = 3.0 mm to 45 mm, 15:1 power zoom lens Filter diameter ø30.5 mm LCD monitor 2.7" diagonally measured, LCD panel/TFT active matrix system Speaker Monaural LED Light Within 1.5 m (4.9 ft) (recommended shooting distance) Language English/French/Spanish/Portuguese/Japanese/ Korean/Traditional Chinese For video/audio Format SD-VIDEO Recording/Playback format Video: MPEG-2 Audio: Dolby Digital (2 ch) Signal format NTSC standard Recording mode (video) ULTRA FINE: 720 x 480 pixels...

Instructions
Page 72
TERMS EN A AC Adapter 14, 67 B Backlight Compensation 27 Battery Pack 14 Brightness Control 56 C Changing Event Registration 43, 58 Changing the Menu Settings 54 Cleaning Up a Recording Medium 42, 56 Clock Adjust 15, 57 Connecting to a TV, VCR or DVD Recorder 34 Continuous Shooting 23, 59 Copying/Moving Still Image Files 53, 56 D Data Battery 16 Date Display Order 57 Date Index Screen 30 Date/Time Setting 15 Deleting Files 38 Demonstration Mode 55 Digital Image Stabilizer (DIS 57 Direct Printing 48, 59...
TERMS EN A AC Adapter 14, 67 B Backlight Compensation 27 Battery Pack 14 Brightness Control 56 C Changing Event Registration 43, 58 Changing the Menu Settings 54 Cleaning Up a Recording Medium 42, 56 Clock Adjust 15, 57 Connecting to a TV, VCR or DVD Recorder 34 Continuous Shooting 23, 59 Copying/Moving Still Image Files 53, 56 D Data Battery 16 Date Display Order 57 Date Index Screen 30 Date/Time Setting 15 Deleting Files 38 Demonstration Mode 55 Digital Image Stabilizer (DIS 57 Direct Printing 48, 59...


