
Software Guide
Page 13
... PC Connect the camera to the PC to copy still images and video files in a recording medium. NOTES: ● It is recommended to use the AC Adapter as the power supply instead of a software that [Task Manager] appears. 2) Click [Processes] tab and select [msmsgs.exe]. 3) Click [End process]. ...have already been installed on the PC, uninstall them before making any connections. 2 Connect the AC adapter to the camera, then plug the AC adapter into an AC outlet. ● If necessary, plug the AC adapter into an AC outlet with the provided power cord. 3 Turn on the camera. 4 Connect the camera to...
... PC Connect the camera to the PC to copy still images and video files in a recording medium. NOTES: ● It is recommended to use the AC Adapter as the power supply instead of a software that [Task Manager] appears. 2) Click [Processes] tab and select [msmsgs.exe]. 3) Click [End process]. ...have already been installed on the PC, uninstall them before making any connections. 2 Connect the AC adapter to the camera, then plug the AC adapter into an AC outlet. ● If necessary, plug the AC adapter into an AC outlet with the provided power cord. 3 Turn on the camera. 4 Connect the camera to...
Software Guide
Page 21
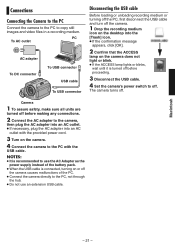
... 1 To assure safety, make sure all units are turned off before making any connections. 2 Connect the AC adapter to the camera, then plug the AC adapter into an AC outlet. ● If necessary, plug the AC adapter into the [Trash] icon. ● If the confirmation message appears, click [OK]. 2 Confirm that ... the USB cable. 4 Set the camera's power switch to copy still images and video files in a recording medium. PC To AC outlet AC adapter To DC connector To USB connector USB cable To USB connector Disconnecting the USB cable Before loading or unloading recording medium or turning off...
... 1 To assure safety, make sure all units are turned off before making any connections. 2 Connect the AC adapter to the camera, then plug the AC adapter into an AC outlet. ● If necessary, plug the AC adapter into the [Trash] icon. ● If the confirmation message appears, click [OK]. 2 Confirm that ... the USB cable. 4 Set the camera's power switch to copy still images and video files in a recording medium. PC To AC outlet AC adapter To DC connector To USB connector USB cable To USB connector Disconnecting the USB cable Before loading or unloading recording medium or turning off...

Instructions
Page 3
... a certain length of time passes without operation ● When using the AC adapter, the access lamp lights up, and the LCD turns off its power supplied from operating correctly. Precautions on the hard disk of recording media ● The SD cards that you hold the camera correctly... during use Before using the camera. To delete this case, battery charge starts if the battery is worn out and needs to conserve power. Reset the camera if it from the AC adapter. Using generic non-JVC...
... a certain length of time passes without operation ● When using the AC adapter, the access lamp lights up, and the LCD turns off its power supplied from operating correctly. Precautions on the hard disk of recording media ● The SD cards that you hold the camera correctly... during use Before using the camera. To delete this case, battery charge starts if the battery is worn out and needs to conserve power. Reset the camera if it from the AC adapter. Using generic non-JVC...

Instructions
Page 4
... mount. ● The rating information and safety caution of these batteries must be considered and the local rules or laws governing the disposal of the AC adapter are blocked by the LCD monitor can cause eye injuries, as well as lighted candles, should be exposed to allow for ventilation (10 cm (3-15...
... mount. ● The rating information and safety caution of these batteries must be considered and the local rules or laws governing the disposal of the AC adapter are blocked by the LCD monitor can cause eye injuries, as well as lighted candles, should be exposed to allow for ventilation (10 cm (3-15...

Instructions
Page 8
Core Filter for remote control unit) Pre-installed in the remote control unit at time of shipment. 8 EN Accessories or AC Adapter AP-V18U / AP-V14U Battery Pack BN-VF707U Audio/Video Cable USB Cable (੬ SOFTWARE INSTALLATION AND USB CONNECTION GUIDE) Shoulder Strap (੬ pg. 9) Lens Cap (੬ pg. 9) CD-ROM Remote Control Unit RM-V730U (੬ pg. 33) Lithium Battery CR2025 (for Cables (੬ pg. 9) Large (A): Audio/Video Cable Large (B): USB Cable Small : DC Cord
Core Filter for remote control unit) Pre-installed in the remote control unit at time of shipment. 8 EN Accessories or AC Adapter AP-V18U / AP-V14U Battery Pack BN-VF707U Audio/Video Cable USB Cable (੬ SOFTWARE INSTALLATION AND USB CONNECTION GUIDE) Shoulder Strap (੬ pg. 9) Lens Cap (੬ pg. 9) CD-ROM Remote Control Unit RM-V730U (੬ pg. 33) Lithium Battery CR2025 (for Cables (੬ pg. 9) Large (A): Audio/Video Cable Large (B): USB Cable Small : DC Cord
Instructions
Page 9
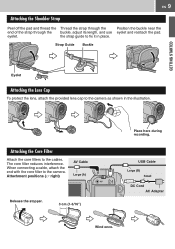
eyelet. The core filter reduces interference. USB Cable Large (B) Small DC Cord AC Adapter Wind once. Attaching the Core Filter Attach the core filters to the camera. When connecting a cable, attach the end with the core filter to the ...
eyelet. The core filter reduces interference. USB Cable Large (B) Small DC Cord AC Adapter Wind once. Attaching the Core Filter Attach the core filters to the camera. When connecting a cable, attach the end with the core filter to the ...
Instructions
Page 11
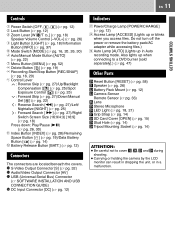
Also lights up in a malfunction. Do not turn off the power or remove the battery pack/AC adapter while accessing files.) S Auto Lamp [AUTO] (Lights up when connecting to a DVD burner [sold separately].) (੬ pg. 47) Other Parts T Reset Button [RESET] (੬ pg. ...
Also lights up in a malfunction. Do not turn off the power or remove the battery pack/AC adapter while accessing files.) S Auto Lamp [AUTO] (Lights up when connecting to a DVD burner [sold separately].) (੬ pg. 47) Other Parts T Reset Button [RESET] (੬ pg. ...
Instructions
Page 12
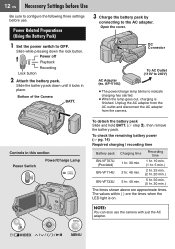
...is on. Slide the battery pack down the lock button. Unplug the AC adapter from the AC outlet and disconnect the AC adapter from the camera. The values within ( ) are approximate times. INDEX / / / / 49 MENU DC Connector AC Adapter (ex. NOTE: You can also use . 12 EN Necessary Settings .... (੬ step 2), then remove the battery pack. Power Related Preparations (Using the Battery Pack) 1 Set the power switch to the AC adapter. Controls in place. Bottom of the Camera BATT. 3 Charge the battery pack by connecting to OFF. Power off Playback Recording Lock button ...
...is on. Slide the battery pack down the lock button. Unplug the AC adapter from the AC outlet and disconnect the AC adapter from the camera. The values within ( ) are approximate times. INDEX / / / / 49 MENU DC Connector AC Adapter (ex. NOTE: You can also use . 12 EN Necessary Settings .... (੬ step 2), then remove the battery pack. Power Related Preparations (Using the Battery Pack) 1 Set the power switch to the AC adapter. Controls in place. Bottom of the Camera BATT. 3 Charge the battery pack by connecting to OFF. Power off Playback Recording Lock button ...

Instructions
Page 17
... easy to find at playback. If you do, the sound of the hard disk drive may be sure to make a trial recording. ● Do not move or shake the camera suddenly during recording or playback for 5 minutes when using the AC adapter, the camera enters the sleep mode (the access lamp lights and the...
... easy to find at playback. If you do, the sound of the hard disk drive may be sure to make a trial recording. ● Do not move or shake the camera suddenly during recording or playback for 5 minutes when using the AC adapter, the camera enters the sleep mode (the access lamp lights and the...

Instructions
Page 20
... the REC/SNAP button to start recording. 40 FINE PHOTO LIGHT/INFO The PHOTO indicator appears during recording or playback for 5 minutes when using the AC adapter, the camera enters the sleep mode (the access lamp lights and the LCD monitor turns off : Still image mode Playback Recording Lock button ● The... . 20 EN Still Image Recording Preparation: Open the LCD monitor. (੬ pg. 10) 1 2 Set the power switch to record still images on the built-in hard disk when it is shipped from the factory.
... the REC/SNAP button to start recording. 40 FINE PHOTO LIGHT/INFO The PHOTO indicator appears during recording or playback for 5 minutes when using the AC adapter, the camera enters the sleep mode (the access lamp lights and the LCD monitor turns off : Still image mode Playback Recording Lock button ● The... . 20 EN Still Image Recording Preparation: Open the LCD monitor. (੬ pg. 10) 1 2 Set the power switch to record still images on the built-in hard disk when it is shipped from the factory.
Instructions
Page 32
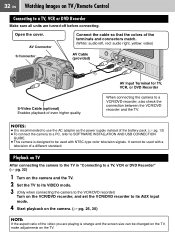
... recorder to a VCR/DVD recorder, also check the connection between the VCR/DVD recorder and the TV. NOTES: ● It is recommended to use the AC adapter as the power supply instead of the battery pack. (੬ pg. 12) ● To connect the camera to a PC, refer to SOFTWARE INSTALLATION AND USB...
... recorder to a VCR/DVD recorder, also check the connection between the VCR/DVD recorder and the TV. NOTES: ● It is recommended to use the AC adapter as the power supply instead of the battery pack. (੬ pg. 12) ● To connect the camera to a PC, refer to SOFTWARE INSTALLATION AND USB...

Instructions
Page 36
... during recording mode, the file recorded most recently will be corrupted if the battery becomes exhausted during operation. Also, be sure to use the provided AC adapter, as turning off and on the recording medium may be deleted. VIDEO 53/53 Controls in step 3. 36 EN Managing Files You can select the...
... during recording mode, the file recorded most recently will be corrupted if the battery becomes exhausted during operation. Also, be sure to use the provided AC adapter, as turning off and on the recording medium may be deleted. VIDEO 53/53 Controls in step 3. 36 EN Managing Files You can select the...
Instructions
Page 40
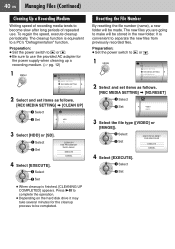
... Files (Continued) Cleaning Up a Recording Medium Writing speed of recording media tends to become slow after long periods of repeated use the provided AC adapter for the cleanup process to or . 1 DIS CAMERA SETTING BASIC SETTING REC MEDIA SETTING DATE/DISPLAY REGISTER EVENT QUALITY 2 Select and set...Preparation: ● Set the power switch to be stored in the new folder. Press 49 to complete the operation. ● Depending on the hard disk drive it may take several minutes for the power supply when cleaning up a recording medium. (੬ pg. 12) 1 DIS CAMERA SETTING BASIC ...
... Files (Continued) Cleaning Up a Recording Medium Writing speed of recording media tends to become slow after long periods of repeated use the provided AC adapter for the cleanup process to or . 1 DIS CAMERA SETTING BASIC SETTING REC MEDIA SETTING DATE/DISPLAY REGISTER EVENT QUALITY 2 Select and set...Preparation: ● Set the power switch to be stored in the new folder. Press 49 to complete the operation. ● Depending on the hard disk drive it may take several minutes for the power supply when cleaning up a recording medium. (੬ pg. 12) 1 DIS CAMERA SETTING BASIC ...
Instructions
Page 47
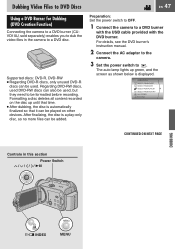
... ALL SCENES PLAY DVD CONTINUED ON NEXT PAGE Controls in the camera to a DVD disc. For details, see the DVD burner's instruction manual. 2 Connect the AC adapter to the camera. 3 Set the power switch to a DVD burner with the USB cable provided with the DVD burner. EN 47 Preparation: Set the power...
... ALL SCENES PLAY DVD CONTINUED ON NEXT PAGE Controls in the camera to a DVD disc. For details, see the DVD burner's instruction manual. 2 Connect the AC adapter to the camera. 3 Set the power switch to a DVD burner with the USB cable provided with the DVD burner. EN 47 Preparation: Set the power...

Instructions
Page 58
..., set the power switch to [OFF]. RESET 2) If nothing happens, set [DROP DETECTION] to OFF and remove the power supply (battery pack or AC adapter) from the camera, then reattach it. 3) Execute [PRESET] from functioning properly. ● To solve the problem, first follow the instructions below. ●...; If the problem is not solved, reset the camera. (੬ right column) ● If the problem persists, please consult your nearest JVC dealer. The camera returns to OFF, and turn off once and turned on again. To turn the power on again automatically. External noise and...
..., set the power switch to [OFF]. RESET 2) If nothing happens, set [DROP DETECTION] to OFF and remove the power supply (battery pack or AC adapter) from the camera, then reattach it. 3) Execute [PRESET] from functioning properly. ● To solve the problem, first follow the instructions below. ●...; If the problem is not solved, reset the camera. (੬ right column) ● If the problem persists, please consult your nearest JVC dealer. The camera returns to OFF, and turn off once and turned on again. To turn the power on again automatically. External noise and...

Instructions
Page 59
...if playing back on the camera does not temperatures. back on the LCD monitor. FURTHER INFORMATION whitish. Image appears to an AC outlet using the AC adapter for an instant. When the screen is ● This is difficult in clock's rechargeable lithium battery is erased. 13 ...These spots are not recorded on the LCD monitor become dark. subject illuminated by bright light, vertical lines appear. Consult your nearest JVC dealer. Then set date/time is discharged, so 12 the previously set the date/ time. under direct sunlight during charging. appear...
...if playing back on the camera does not temperatures. back on the LCD monitor. FURTHER INFORMATION whitish. Image appears to an AC outlet using the AC adapter for an instant. When the screen is ● This is difficult in clock's rechargeable lithium battery is erased. 13 ...These spots are not recorded on the LCD monitor become dark. subject illuminated by bright light, vertical lines appear. Consult your nearest JVC dealer. Then set date/time is discharged, so 12 the previously set the date/ time. under direct sunlight during charging. appear...

Instructions
Page 64
Use an SD card that was 29 AND THE POWER IS TURNED OFF turned off the camera and remove the battery pack and AC adapter. CARD ● Otherwise, clean up the recording medium. 40 MEMORY CARD CANNOT BE ● The recording medium cannot be recorded on the recording medium - CANNOT ... available in the video mode. - Try recording again. To clean the exterior Wipe gently with a soft cloth. Use the 40 Cleanup function [CLEAN UP] in hard disk is full and recording is corrupted. RECORDING MAY NOT BE ● The data may form if the lens is particularly dirty, dip the cloth into...
Use an SD card that was 29 AND THE POWER IS TURNED OFF turned off the camera and remove the battery pack and AC adapter. CARD ● Otherwise, clean up the recording medium. 40 MEMORY CARD CANNOT BE ● The recording medium cannot be recorded on the recording medium - CANNOT ... available in the video mode. - Try recording again. To clean the exterior Wipe gently with a soft cloth. Use the 40 Cleanup function [CLEAN UP] in hard disk is full and recording is corrupted. RECORDING MAY NOT BE ● The data may form if the lens is particularly dirty, dip the cloth into...
Instructions
Page 65
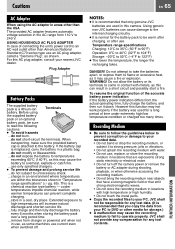
... genuine JVC batteries are within the tolerances shown in this may not work properly if the battery was used in "Temperature range specifications" (੬ pg. 65). Do not attempt to take the batteries apart, or expose them to temperatures exceeding 60°C (140°F), as it down. Before using the AC adapter in...
... genuine JVC batteries are within the tolerances shown in this may not work properly if the battery was used in "Temperature range specifications" (੬ pg. 65). Do not attempt to take the batteries apart, or expose them to temperatures exceeding 60°C (140°F), as it down. Before using the AC adapter in...

Instructions
Page 67
...: Reorient or relocate the receiving antenna. Changes or modifications not approved by one of Conformity Model Number : GZ-MG37U GZ-MG27U Trade Name : JVC Responsible party : JVC AMERICAS CORP. This equipment generates, uses, and can be determined by turning the equipment off and on, ...9679; Do not store your local JVC dealer. Serious malfunctioning If malfunctioning occurs, stop using the unit immediately and consult your CD-ROM in a particular installation. In such cases, first disconnect its power supply unit (battery pack, AC adapter, etc.) and wait a few minutes...
...: Reorient or relocate the receiving antenna. Changes or modifications not approved by one of Conformity Model Number : GZ-MG37U GZ-MG27U Trade Name : JVC Responsible party : JVC AMERICAS CORP. This equipment generates, uses, and can be determined by turning the equipment off and on, ...9679; Do not store your local JVC dealer. Serious malfunctioning If malfunctioning occurs, stop using the unit immediately and consult your CD-ROM in a particular installation. In such cases, first disconnect its power supply unit (battery pack, AC adapter, etc.) and wait a few minutes...
Instructions
Page 68
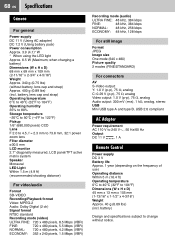
... Video output: 1.0 V (p-p), 75 Ω, analog Audio output: 300 mV (rms), 1 kΩ, analog, stereo USB Mini USB type A and type B, USB 2.0 compliant AC Adapter Power requirement AC 110 V to 240 Vd, 50 Hz/60 Hz Output DC 11 V , 1 A Remote Control Power supply DC 3 V Battery life Approx. 1 year (depending on the ...mm (1-13/16" x 1-1/2" x 4-3/16") Weight Approx. 40 g (0.09 lbs) (incl. 68 EN Specifications Camera For general Power supply DC 11 V (Using AC adapter) DC 7.2 V (Using battery pack) Power consumption Approx. 3.9 (4.1)* W * When using the LED light Approx. 6.5 W (Maximum;
... Video output: 1.0 V (p-p), 75 Ω, analog Audio output: 300 mV (rms), 1 kΩ, analog, stereo USB Mini USB type A and type B, USB 2.0 compliant AC Adapter Power requirement AC 110 V to 240 Vd, 50 Hz/60 Hz Output DC 11 V , 1 A Remote Control Power supply DC 3 V Battery life Approx. 1 year (depending on the ...mm (1-13/16" x 1-1/2" x 4-3/16") Weight Approx. 40 g (0.09 lbs) (incl. 68 EN Specifications Camera For general Power supply DC 11 V (Using AC adapter) DC 7.2 V (Using battery pack) Power consumption Approx. 3.9 (4.1)* W * When using the LED light Approx. 6.5 W (Maximum;


