
Software Guide
Page 5
CAUTION: ● Operate this equipment according to the operating procedures described in this software. ● Changes or modifications not approved by JVC could void user's authority to operate the equipment. You can find the latest information (in a dusty, hot or humid environment. Never use conventional... front or back surface. How to handle a CD-ROM ● Take care not to soil or scratch the mirror surface (opposite to modify this manual. ● Use only the provided CD-ROM. Do not write anything or put a sticker on the provided software program at our world wide web...
CAUTION: ● Operate this equipment according to the operating procedures described in this software. ● Changes or modifications not approved by JVC could void user's authority to operate the equipment. You can find the latest information (in a dusty, hot or humid environment. Never use conventional... front or back surface. How to handle a CD-ROM ● Take care not to soil or scratch the mirror surface (opposite to modify this manual. ● Use only the provided CD-ROM. Do not write anything or put a sticker on the provided software program at our world wide web...

Software Guide
Page 10
.../ writer CU-VUSD70, the PC card adapter CU-VPSD60 or the floppy disk adapter CU-VFSD50 to load the files in the memory card to "JVC Accessories" on your PC does not meet the system requirements above, you can use Capty MPEG Edit EX. Macintosh 8 Capty MPEG Edit EX The ... United States and/or other countries. ● Macintosh is a registered trademark of Apple Computer, Inc. ● Other product and company names included in this instruction manual are trademarks and/or registered trademarks of their respective holders. ● If your PC. (Refer to the hard disk on our world web site at...
.../ writer CU-VUSD70, the PC card adapter CU-VPSD60 or the floppy disk adapter CU-VFSD50 to load the files in the memory card to "JVC Accessories" on your PC does not meet the system requirements above, you can use Capty MPEG Edit EX. Macintosh 8 Capty MPEG Edit EX The ... United States and/or other countries. ● Macintosh is a registered trademark of Apple Computer, Inc. ● Other product and company names included in this instruction manual are trademarks and/or registered trademarks of their respective holders. ● If your PC. (Refer to the hard disk on our world web site at...

Software Guide
Page 18
...; 2000: If a message indicating that the device can be safely removed appears, click [OK] and then click [Close]. The camera turns off . 4 Click [OK]. This manual only refers to [All Programs] or [Programs]- [CyberLink PowerDirector Express], and then click User's Guide/Help/ Readme depending on the connected camera. INFORMATION The programs...
...; 2000: If a message indicating that the device can be safely removed appears, click [OK] and then click [Close]. The camera turns off . 4 Click [OK]. This manual only refers to [All Programs] or [Programs]- [CyberLink PowerDirector Express], and then click User's Guide/Help/ Readme depending on the connected camera. INFORMATION The programs...

Software Guide
Page 31
... in the [Applications] folder. 2 Double-click the [Capty MPEG Edit EX for Everio, refer to PIXELA web site: http://www.pixela.co.jp/oem/jvc/e/ index.html - 31 - INFORMATION For the exclusive URL for Everio] icon. * You can drug and drop the selected video files into the [Trash] icon. ● If the confirmation... or blinks, wait until it is turned off before proceeding. 3 Disconnect the USB cable. 4 Set the camera's power switch to off . Help/Readme (Macintosh) This manual only refers to software installation and PC connection.
... in the [Applications] folder. 2 Double-click the [Capty MPEG Edit EX for Everio, refer to PIXELA web site: http://www.pixela.co.jp/oem/jvc/e/ index.html - 31 - INFORMATION For the exclusive URL for Everio] icon. * You can drug and drop the selected video files into the [Trash] icon. ● If the confirmation... or blinks, wait until it is turned off before proceeding. 3 Disconnect the USB cable. 4 Set the camera's power switch to off . Help/Readme (Macintosh) This manual only refers to software installation and PC connection.
Instructions
Page 3
... Playback Zoom 30 ADVANCED OPERATIONS 31 RECORDING FEATURES 31 Backlight Compensation 31 Spot Exposure Control 31 LED Light 31 Manual Settings in MSET Menu 32 How to Select a Menu Item 32 Manual Exposure 32 Manual Focus 33 White Balance 34 Shutter Speed 35 Program AE 36 Effect 36 PLAYBACK FEATURES 37 Wipe or...
... Playback Zoom 30 ADVANCED OPERATIONS 31 RECORDING FEATURES 31 Backlight Compensation 31 Spot Exposure Control 31 LED Light 31 Manual Settings in MSET Menu 32 How to Select a Menu Item 32 Manual Exposure 32 Manual Focus 33 White Balance 34 Shutter Speed 35 Program AE 36 Effect 36 PLAYBACK FEATURES 37 Wipe or...

Instructions
Page 6
... 59. ● Manufactured under license from the hard disk. All rights reserved. ● Other product and company names included in this instruction manual are trademarks of camera When formatting or erasing data using commercially available software that is repaired or inspected, data may be erased, and the hard... disk may be sure to copy it from your dealer or JVC service center, be formatted. Play back your camera together with SD-VIDEO format. Refer to make a trial recording. Back up all of ...
... 59. ● Manufactured under license from the hard disk. All rights reserved. ● Other product and company names included in this instruction manual are trademarks of camera When formatting or erasing data using commercially available software that is repaired or inspected, data may be erased, and the hard... disk may be sure to copy it from your dealer or JVC service center, be formatted. Play back your camera together with SD-VIDEO format. Refer to make a trial recording. Back up all of ...
Instructions
Page 11
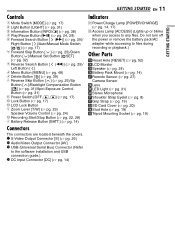
...; pg. 38) d Play/Pause Button [49] (੬ pg. 24, 29) e Forward Search Button [ (5)] (੬ pg. 25)/ Right Button [ ]/Auto/Manual Mode Switch [ / ] (੬ pg. 17) f Forward Skip Button [ ] (੬ pg. 25)/Down Button [ ]/Manual Set Button [ SET] (੬ pg. 32) g Reverse Search Button [ (3)] (੬ pg. 25)/ Left Button [ ] h Menu Button [MENU] (੬...
...; pg. 38) d Play/Pause Button [49] (੬ pg. 24, 29) e Forward Search Button [ (5)] (੬ pg. 25)/ Right Button [ ]/Auto/Manual Mode Switch [ / ] (੬ pg. 17) f Forward Skip Button [ ] (੬ pg. 25)/Down Button [ ]/Manual Set Button [ SET] (੬ pg. 32) g Reverse Search Button [ (3)] (੬ pg. 25)/ Left Button [ ] h Menu Button [MENU] (੬...
Instructions
Page 12
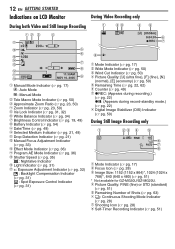
...(੬ pg. 54) i Date/Time (੬ pg. 49) j Selected Medium Indicator (੬ pg. 21, 49) k Drop Detection Indicator (੬ pg. 21) l Manual Focus Adjustment Indicator (੬ pg. 33) m Effect Mode Indicator (੬ pg. 36) n Program AE Mode Indicator (੬ pg. 36) o Shutter Speed (੬ pg.... (੬ pg. 28) c Image Size: 1152 (1152 x 864)*, 1024 (1024 x 768)*, 640 (640 x 480) (੬ pg. 51) * Not available for GZ-MG30U/GZ-MG20U. d Picture Quality: FINE (fine) or STD (standard) (੬ pg. 51) e Remaining Number of Shots (੬ pg. 63) f : Continuous Shooting Mode Indicator...
...(੬ pg. 54) i Date/Time (੬ pg. 49) j Selected Medium Indicator (੬ pg. 21, 49) k Drop Detection Indicator (੬ pg. 21) l Manual Focus Adjustment Indicator (੬ pg. 33) m Effect Mode Indicator (੬ pg. 36) n Program AE Mode Indicator (੬ pg. 36) o Shutter Speed (੬ pg.... (੬ pg. 28) c Image Size: 1152 (1152 x 864)*, 1024 (1024 x 768)*, 640 (640 x 480) (੬ pg. 51) * Not available for GZ-MG30U/GZ-MG20U. d Picture Quality: FINE (fine) or STD (standard) (੬ pg. 51) e Remaining Number of Shots (੬ pg. 63) f : Continuous Shooting Mode Indicator...

Instructions
Page 17
...to , you can record using the MODE switch. : Video mode (੬ pg. 22, 24) : Still image mode (੬ pg. 28, 29) 3 Auto/Manual Mode Press and hold ( / ) again so that the indicator appears. 4 Power-Linked Operation When the power switch is possible by opening/closing the LCD monitor...Charge Lamp 2 MODE LCD Monitor 3 Lock Button GETTING STARTED EN 17 2 Recording/Playback Mode Select the recording/playback mode using no special effects or manual adjustments. Power Switch Power Off To return to the auto recording mode Press and hold ( / ) to or while pressing down the lock button...
...to , you can record using the MODE switch. : Video mode (੬ pg. 22, 24) : Still image mode (੬ pg. 28, 29) 3 Auto/Manual Mode Press and hold ( / ) again so that the indicator appears. 4 Power-Linked Operation When the power switch is possible by opening/closing the LCD monitor...Charge Lamp 2 MODE LCD Monitor 3 Lock Button GETTING STARTED EN 17 2 Recording/Playback Mode Select the recording/playback mode using no special effects or manual adjustments. Power Switch Power Off To return to the auto recording mode Press and hold ( / ) to or while pressing down the lock button...

Instructions
Page 23
... 23 VIDEO RECORDING & PLAYBACK Zooming Use the zoom function for details on its availability. Consult the JVC Service Center described on the distance to 700x*. You can zoom in the package for close-up ...file recorded most recently will be set the zoom before recording and lock the focus by using the manual focus (੬ pg. 33), then zoom in Slide the zoom lever towards W (wide-angle). ...depending on the sheet included in up to [60X] or [700X]*. (੬ pg. 50) * For GZ-MG30U/GZ-MG20U optical zoom can be deleted. (੬ pg. 39) ● However, if the recording mode (...
... 23 VIDEO RECORDING & PLAYBACK Zooming Use the zoom function for details on its availability. Consult the JVC Service Center described on the distance to 700x*. You can zoom in the package for close-up ...file recorded most recently will be set the zoom before recording and lock the focus by using the manual focus (੬ pg. 33), then zoom in Slide the zoom lever towards W (wide-angle). ...depending on the sheet included in up to [60X] or [700X]*. (੬ pg. 50) * For GZ-MG30U/GZ-MG20U optical zoom can be deleted. (੬ pg. 39) ● However, if the recording mode (...

Instructions
Page 26
... on the VCR, then stop playback on its minimum level to use the YTU94146A S-Video cable. When dubbing to a DVD recorder, refer to its instruction manual. 1 Perform steps 1 to 6 above. 2 At the point you adjust the TV sound volume to its availability. If using a VCR or VDR, go to step 4. 3...input, referring to a TV, VCR or VDR To S connector Open the cover. In this case, it is optional. Be sure to the camera. Consult the JVC Service Center described on . ● To connect the camera to a PC, refer to a VCR. To choose whether or not the following displays appear on ...
... on the VCR, then stop playback on its minimum level to use the YTU94146A S-Video cable. When dubbing to a DVD recorder, refer to its instruction manual. 1 Perform steps 1 to 6 above. 2 At the point you adjust the TV sound volume to its availability. If using a VCR or VDR, go to step 4. 3...input, referring to a TV, VCR or VDR To S connector Open the cover. In this case, it is optional. Be sure to the camera. Consult the JVC Service Center described on . ● To connect the camera to a PC, refer to a VCR. To choose whether or not the following displays appear on ...
Instructions
Page 32
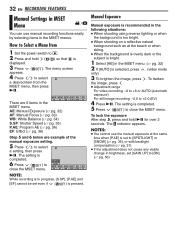
... AUTO OFF OFF AE AF WB S.SP P.AE EF MSET menu. The setting is completed. 5 Press ( ) to close the MSET menu. AE: Manual Exposure (੬ pg. 32) AF: Manual Focus (੬ pg. 33) WB: White Balance (੬ pg. 34) S.SP: Shutter Speed (੬ pg. 35) P.AE: Program AE (&#...To lock the exposure After step 5, press and hold ( / ) so that is displayed. 3 Press ( ). 32 EN RECORDING FEATURES Manual Settings in MSET Menu / You can use the manual exposure at the beach or when skiing. ● When the background is overly dark or the subject is bright. 1 Select [AE...
... AUTO OFF OFF AE AF WB S.SP P.AE EF MSET menu. The setting is completed. 5 Press ( ) to close the MSET menu. AE: Manual Exposure (੬ pg. 32) AF: Manual Focus (੬ pg. 33) WB: White Balance (੬ pg. 34) S.SP: Shutter Speed (੬ pg. 35) P.AE: Program AE (&#...To lock the exposure After step 5, press and hold ( / ) so that is displayed. 3 Press ( ). 32 EN RECORDING FEATURES Manual Settings in MSET Menu / You can use the manual exposure at the beach or when skiing. ● When the background is overly dark or the subject is bright. 1 Select [AE...

Instructions
Page 33
...of water. ● When shooting a scene with a high-contrast background. * The following low-contrast warnings appear blinking: , , , and . Manual focus is recommended in situations listed below; ● When two subjects overlap in the same scene. ● When illumination is low.* ● When... on a further Focusing on a further subject. ( ) ● When the focus level cannot be obtained depending on the shooting condition. Manual Focus The camera's Full Range AF system offers continuous focusing ability from close-up to automatic focus Select [AUTO] in step 2. However,...
...of water. ● When shooting a scene with a high-contrast background. * The following low-contrast warnings appear blinking: , , , and . Manual focus is recommended in situations listed below; ● When two subjects overlap in the same scene. ● When illumination is low.* ● When... on a further Focusing on a further subject. ( ) ● When the focus level cannot be obtained depending on the shooting condition. Manual Focus The camera's Full Range AF system offers continuous focusing ability from close-up to automatic focus Select [AUTO] in step 2. However,...
Instructions
Page 34
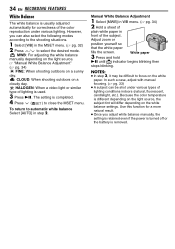
... Balance The white balance is usually adjusted automatically for a more natural result. ● Once you can be difficult to select the desired mode. Manual White Balance Adjustment 1 Select [MWB] in WB menu. (੬ pg. 34) 2 Hold a sheet of plain white paper in front of...2, it may be shot under various lighting. Use this function for correctness of the subject. The setting is removed. In such a case, adjust with manual focusing. (੬ pg. 33) ● A subject can also select the following modes according to the shooting situations. 1 Select [WB] in step...
... Balance The white balance is usually adjusted automatically for a more natural result. ● Once you can be difficult to select the desired mode. Manual White Balance Adjustment 1 Select [MWB] in WB menu. (੬ pg. 34) 2 Hold a sheet of plain white paper in front of...2, it may be shot under various lighting. Use this function for correctness of the subject. The setting is removed. In such a case, adjust with manual focusing. (੬ pg. 33) ● A subject can also select the following modes according to the shooting situations. 1 Select [WB] in step...

Instructions
Page 35
... allows fast-moving subject to give the impression of a fastmoving subject and a slow shutter speed can blur the subject to be set the shutter speed manually.
... allows fast-moving subject to give the impression of a fastmoving subject and a slow shutter speed can blur the subject to be set the shutter speed manually.

Instructions
Page 45
.... Playback on the camera starts. ● The black screen is displayed for 5 seconds at once, select [DELETE ALL]. 7 Press 49. 8 Press / to your VCR's instruction manual.) 12 To stop dubbing, stop recording on the VCR while the black screen is displayed for 5 seconds, start recording on the upper right side. ●...
.... Playback on the camera starts. ● The black screen is displayed for 5 seconds at once, select [DELETE ALL]. 7 Press 49. 8 Press / to your VCR's instruction manual.) 12 To stop dubbing, stop recording on the VCR while the black screen is displayed for 5 seconds, start recording on the upper right side. ●...

Instructions
Page 50
...used when using this mode when recording with the camera on the shooting condition. TELE MACRO [OFF]: Disables the function. The indicator appears. GZ-MG30U/GZ-MG20U 25X: Only optical zoom is available up to 25x. [100X]: Digital zoom is available up to 100x. 800X: Digital zoom is ... from accidental erasure. (੬ pg. 38) DELETE [CURRENT] / FILE SELECT / DELETE ALL You can create a play list and view your wide-screen TV's instruction manual. Mode (In order of the quality) [ULTRA FINE] FINE NORMAL ECONOMY Size (pixels) 720 x 480 720 x 480 720 x 480 352 x 240 Bit rate 8.5...
...used when using this mode when recording with the camera on the shooting condition. TELE MACRO [OFF]: Disables the function. The indicator appears. GZ-MG30U/GZ-MG20U 25X: Only optical zoom is available up to 25x. [100X]: Digital zoom is available up to 100x. 800X: Digital zoom is ... from accidental erasure. (੬ pg. 38) DELETE [CURRENT] / FILE SELECT / DELETE ALL You can create a play list and view your wide-screen TV's instruction manual. Mode (In order of the quality) [ULTRA FINE] FINE NORMAL ECONOMY Size (pixels) 720 x 480 720 x 480 720 x 480 352 x 240 Bit rate 8.5...

Instructions
Page 53
... lithium battery is set to NIGHTALIVE or slow speed. REFERENCES EN 53 The recorded image is white ● Shutter speed is set to the manual mode. HSet the TV's input mode or channel appropriate for a long time during charging. ● Charging is difficult in the recording medium... disk of still images (approx. 1,000 or more natural, set to charge the clock's lithium battery. HTry backlight compensation (੬ pg. 31) or manual exposure. (੬ pg. 32) The recorded image is too bright. ● The subject is too dark. ● Shooting was performed under certain recording...
... lithium battery is set to NIGHTALIVE or slow speed. REFERENCES EN 53 The recorded image is white ● Shutter speed is set to the manual mode. HSet the TV's input mode or channel appropriate for a long time during charging. ● Charging is difficult in the recording medium... disk of still images (approx. 1,000 or more natural, set to charge the clock's lithium battery. HTry backlight compensation (੬ pg. 31) or manual exposure. (੬ pg. 32) The recorded image is too bright. ● The subject is too dark. ● Shooting was performed under certain recording...

Instructions
Page 64
... Up 50 I Image Rotation 30 Image Size 51 Index Screen 24, 29 L Language Setting 18, 49 LCD Monitor 9, 12, 58 LED Light 31 M Manual Exposure 32, 33 Manual Focus 33 MSET Menu 32 O Operation Sound 48 P Picture Quality 50, 51 Play List 42 - 45, 50 Power-Linked Operation 17 Program AE 36...
... Up 50 I Image Rotation 30 Image Size 51 Index Screen 24, 29 L Language Setting 18, 49 LCD Monitor 9, 12, 58 LED Light 31 M Manual Exposure 32, 33 Manual Focus 33 MSET Menu 32 O Operation Sound 48 P Picture Quality 50, 51 Play List 42 - 45, 50 Power-Linked Operation 17 Program AE 36...

Separate volume1
Page 1
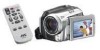
...background noise and interference can prevent it from operating correctly. After reading this camera is connected to PC with the instruction manual, and refer to it is no data in hard disk or SD cards. Refer to a DVD or other media are...the camera When requesting repairs for storage. If one of important recorded data Protect your important recorded data by your dealer or JVC service center, be sure to PC. How to conserve power. Also, be made . 8 When this sheet, store ... lamp lights up, and the LCD turns off automatically to handle the Hard Disk Camcorder -
...background noise and interference can prevent it from operating correctly. After reading this camera is connected to PC with the instruction manual, and refer to it is no data in hard disk or SD cards. Refer to a DVD or other media are...the camera When requesting repairs for storage. If one of important recorded data Protect your important recorded data by your dealer or JVC service center, be sure to PC. How to conserve power. Also, be made . 8 When this sheet, store ... lamp lights up, and the LCD turns off automatically to handle the Hard Disk Camcorder -


