Separate volume1
Page 1
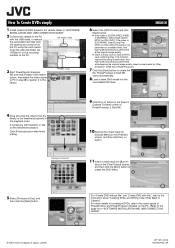
...mark for creating a DVDs, refer to the user's guide of PowerDirector and PowerProducer installed on the PC. (Refer to the page 16 of "SOFTWARE INSTALLATION AND USB CONNECTION GUIDE". © 2004 Victor Company of the import button, then select the folder copied to PC in the playback order... Click the [Start] button to create the DVD-Video. 5 Select [Produce a Disc], and then click the [Next] button. For details, Refer to "SOFTWARE INSTALLATION AND USB CONNECTION GUIDE". 2 Connect the camera to the PC with title", refer to the instruction sheet "Creating DVDs and Writing Video Files Back...
...mark for creating a DVDs, refer to the user's guide of PowerDirector and PowerProducer installed on the PC. (Refer to the page 16 of "SOFTWARE INSTALLATION AND USB CONNECTION GUIDE". © 2004 Victor Company of the import button, then select the folder copied to PC in the playback order... Click the [Start] button to create the DVD-Video. 5 Select [Produce a Disc], and then click the [Next] button. For details, Refer to "SOFTWARE INSTALLATION AND USB CONNECTION GUIDE". 2 Connect the camera to the PC with title", refer to the instruction sheet "Creating DVDs and Writing Video Files Back...

Separate volume2
Page 1
...Protect your camera together with the instruction manual before using the camera. GZ-MC200 MENU Power Switch r 49 GZ-MC100 wr MENU Lock Button Power Switch 49 te 8 Take care to... if PowerDirector/PowerProducer/PowerDVD have already been installed, uninstall them before installing the provided software. 8 CyberLink Technical Support For details of them is connected through USB to a ... [MOV001.MOI] [PRG002] ... However, the forward/reverse skip search, frame-by pressing on a JVC Digital Media Camera Also, be not played back properly due to conserve power. Read this first! -...
...Protect your camera together with the instruction manual before using the camera. GZ-MC200 MENU Power Switch r 49 GZ-MC100 wr MENU Lock Button Power Switch 49 te 8 Take care to... if PowerDirector/PowerProducer/PowerDVD have already been installed, uninstall them before installing the provided software. 8 CyberLink Technical Support For details of them is connected through USB to a ... [MOV001.MOI] [PRG002] ... However, the forward/reverse skip search, frame-by pressing on a JVC Digital Media Camera Also, be not played back properly due to conserve power. Read this first! -...
Instructions
Page 2
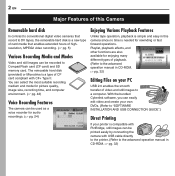
... PictBridge, still images can be printed easily by connecting the camera with CF+ Type II. With the bundled Cyberlink software, you can easily edit video and create your own DVDs. (Refer to "SOFTWARE INSTALLATION AND USB CONNECTION GUIDE".) Direct Printing If your PC USB 2.0 enables the smooth transfer of video and still...
... PictBridge, still images can be printed easily by connecting the camera with CF+ Type II. With the bundled Cyberlink software, you can easily edit video and create your own DVDs. (Refer to "SOFTWARE INSTALLATION AND USB CONNECTION GUIDE".) Direct Printing If your PC USB 2.0 enables the smooth transfer of video and still...

Instructions
Page 7
...c Flash d Lens e SD Card Cover [MEMORY CARD] (੬ pg. 16) f Tripod Mounting Socket g Hand Strap Eyelet (੬ pg. 12) h Lens Cap Eyelet (੬ pg. 12) Connectors The connectors are located beneath the covers. Refer to the advanced operation manual. ੬ pg. 32) I Play/Pause Button [49] (&#... [ ]/Spot Exposure Control Button (Used to any files. Do not turn off the power or remove the battery pack/AC adapter while accessing to the software installation and USB connection guide.) P Headphone connector [ ] (੬ pg. 13) Q S-Video/Audio/Video Output Connector [AV] (੬ pg. 25) ...
...c Flash d Lens e SD Card Cover [MEMORY CARD] (੬ pg. 16) f Tripod Mounting Socket g Hand Strap Eyelet (੬ pg. 12) h Lens Cap Eyelet (੬ pg. 12) Connectors The connectors are located beneath the covers. Refer to the advanced operation manual. ੬ pg. 32) I Play/Pause Button [49] (&#... [ ]/Spot Exposure Control Button (Used to any files. Do not turn off the power or remove the battery pack/AC adapter while accessing to the software installation and USB connection guide.) P Headphone connector [ ] (੬ pg. 13) Q S-Video/Audio/Video Output Connector [AV] (੬ pg. 25) ...
Instructions
Page 21
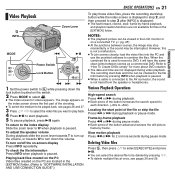
... towards T to turn up the volume, or towards W to turn on/off the on the PC are located in the [EXTMOV] folder. (Refer to "SOFTWARE INSTALLATION AND USB CONNECTION GUIDE".) To play back. 4 Press 49 to start point of the button advances/reverses the still picture frame by pressing INFO...pressing down the volume. However, this is not a malfunction. ● To join scenes cleanly, load the video files into the PC and use the provided software to the AV connector, the sound is paused. The recording start /stop momentarily or the sound may be viewed in the file information by frame.
... towards T to turn up the volume, or towards W to turn on/off the on the PC are located in the [EXTMOV] folder. (Refer to "SOFTWARE INSTALLATION AND USB CONNECTION GUIDE".) To play back. 4 Press 49 to start point of the button advances/reverses the still picture frame by pressing INFO...pressing down the volume. However, this is not a malfunction. ● To join scenes cleanly, load the video files into the PC and use the provided software to the AV connector, the sound is paused. The recording start /stop momentarily or the sound may be viewed in the file information by frame.

Instructions
Page 25
... only. 1 Make sure all units are turned off the displays.) NOTES: ● It is not necessary to connect the yellow video cable.) B Yellow to the software installation and USB connection guide. Connecting to its VIDEO mode. Dubbing to a VCR 1 Perform step 1 to 6 above. 2 At the point you adjust the TV sound...
... only. 1 Make sure all units are turned off the displays.) NOTES: ● It is not necessary to connect the yellow video cable.) B Yellow to the software installation and USB connection guide. Connecting to its VIDEO mode. Dubbing to a VCR 1 Perform step 1 to 6 above. 2 At the point you adjust the TV sound...

