
Basic User Guide
Page 2
... rear). CAUTION: The mains plug shall remain readily operable. • Remove the mains plug immediately if the camcorder functions abnormally. WARNING: The battery pack, the camcorder with battery installed, and the remote control with water. Caution on the cables will cause this unit and leaving it has sufficient space on all sides to the Detailed User Guide http://manual.jvc.co.jp/index.html/ CAUTION...
... rear). CAUTION: The mains plug shall remain readily operable. • Remove the mains plug immediately if the camcorder functions abnormally. WARNING: The battery pack, the camcorder with battery installed, and the remote control with water. Caution on the cables will cause this unit and leaving it has sufficient space on all sides to the Detailed User Guide http://manual.jvc.co.jp/index.html/ CAUTION...

Basic User Guide
Page 4
... LCD Monitor 6 Using the Touch Screen 7 IGetting Started 8 Charging the Battery Pack 8 Grip Adjustment 9 Using as a Hand Strap 9 Inserting an SD Card 9 Clock Setting 12 Video Quality 13 IRecording 14 Video Recording 14 Still Image Recording 15 IPlayback 16 Playing Back/Deleting Files on this Unit 16 Playing Back on TV 17 ICopying 19 Copying Files 19 Dubbing Files by Connecting to a DVD Recorder or VCR 20 Copying to Computer 21 IFurther Information 24 Operating the Menu 24 Recordable Time/Number...
... LCD Monitor 6 Using the Touch Screen 7 IGetting Started 8 Charging the Battery Pack 8 Grip Adjustment 9 Using as a Hand Strap 9 Inserting an SD Card 9 Clock Setting 12 Video Quality 13 IRecording 14 Video Recording 14 Still Image Recording 15 IPlayback 16 Playing Back/Deleting Files on this Unit 16 Playing Back on TV 17 ICopying 19 Copying Files 19 Dubbing Files by Connecting to a DVD Recorder or VCR 20 Copying to Computer 21 IFurther Information 24 Operating the Menu 24 Recordable Time/Number...

Basic User Guide
Page 5
...Zoom/Volume Lever (p. 14, 16) R SNAPSHOT (Still Image Recording) Button (p. 15) S DC Connector (p. 8) T START/STOP (Video Recording) Button (p. 14) U Lens Cover Switch (p. 14) V Grip Belt (p. 9) W Strap Lock (p. 9) X Tripod Mounting Hole Y SD Card Slot (p. 9) Z Battery Release Lever (p. 8) 5 For more information, refer to turn the power on /off while the LCD monitor is opened. E Speaker F ACCESS (Access) Lamp Lights up/blinks during recording or playback. Playback : Displays file information such as recording date. A Lens Cover B Light (GZ-HM690/GZ-HM670/GZ-HM650) C Stereo Microphone...
...Zoom/Volume Lever (p. 14, 16) R SNAPSHOT (Still Image Recording) Button (p. 15) S DC Connector (p. 8) T START/STOP (Video Recording) Button (p. 14) U Lens Cover Switch (p. 14) V Grip Belt (p. 9) W Strap Lock (p. 9) X Tripod Mounting Hole Y SD Card Slot (p. 9) Z Battery Release Lever (p. 8) 5 For more information, refer to turn the power on /off while the LCD monitor is opened. E Speaker F ACCESS (Access) Lamp Lights up/blinks during recording or playback. Playback : Displays file information such as recording date. A Lens Cover B Light (GZ-HM690/GZ-HM670/GZ-HM650) C Stereo Microphone...

Basic User Guide
Page 6
... functions. D Recording Start/Stop Button (p. 14, 15) g : Video Recording Start Button a : Video Recording Stop Button Q : Still Image Recording Button E Menu Button (p. 24) F Display Button Some displays disappear after approximately 3 seconds. Press this button again to release the displays. .1 2 3 4 5 A Recording Mode Button Switches to fix the displays. B Index Screen Button C Delete Button D Volume Adjustment Button (p. 16) E Menu Button (p. 24) F Operation Buttons (p. 16) Playback Screen (Still Image) MENU 5 .1 2 3 4 A Recording Mode Button Switches to the Detailed User Guide...
... functions. D Recording Start/Stop Button (p. 14, 15) g : Video Recording Start Button a : Video Recording Stop Button Q : Still Image Recording Button E Menu Button (p. 24) F Display Button Some displays disappear after approximately 3 seconds. Press this button again to release the displays. .1 2 3 4 5 A Recording Mode Button Switches to fix the displays. B Index Screen Button C Delete Button D Volume Adjustment Button (p. 16) E Menu Button (p. 24) F Operation Buttons (p. 16) Playback Screen (Still Image) MENU 5 .1 2 3 4 A Recording Mode Button Switches to the Detailed User Guide...
Basic User Guide
Page 9
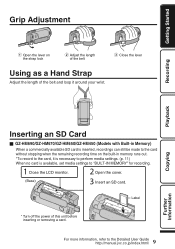
... card. Playback Copying Inserting an SD Card o GZ-HM690/GZ-HM670/GZ-HM650/GZ-HM450 (Models with Built-in memory runs out. *To record to the card, it around your wrist. inserting or removing a card. 9 For more information, refer to "BUILT-IN MEMORY" for recording. Label Turn off the power of the belt and loop it is necessary to perform media settings. (p. 11) When no card is available, set media settings to the Detailed User Guide...
... card. Playback Copying Inserting an SD Card o GZ-HM690/GZ-HM670/GZ-HM650/GZ-HM450 (Models with Built-in memory runs out. *To record to the card, it around your wrist. inserting or removing a card. 9 For more information, refer to "BUILT-IN MEMORY" for recording. Label Turn off the power of the belt and loop it is necessary to perform media settings. (p. 11) When no card is available, set media settings to the Detailed User Guide...
Basic User Guide
Page 13
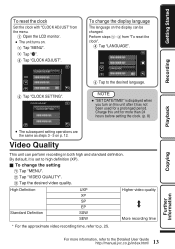
... displayed when you turn on . NOTE 0 "SET DATE/TIME!" Charge this unit after it has not been used for more information, refer to high definition (XP). High Definition Standard Definition UXP XP SP EP SSW SEW . B Tap "MENU". CLOCK ADJUST CLOCK SETTING To change the setting A Tap "MENU". Getting Started Recording Playback To reset the clock Set the clock with "CLOCK ADJUST" from "To reset the clock". CLOCK ADJUST . Higher video...
... displayed when you turn on . NOTE 0 "SET DATE/TIME!" Charge this unit after it has not been used for more information, refer to high definition (XP). High Definition Standard Definition UXP XP SP EP SSW SEW . B Tap "MENU". CLOCK ADJUST CLOCK SETTING To change the setting A Tap "MENU". Getting Started Recording Playback To reset the clock Set the clock with "CLOCK ADJUST" from "To reset the clock". CLOCK ADJUST . Higher video...

Basic User Guide
Page 14
... remove the battery pack, AC adapter, or SD card when the access lamp is H Manual, press the S button to switch. Zooming (Wide angle) (Telephoto) .. 0 You can also tap g on the screen. If the mode is lighted. To stop . The recorded data may become unreadable. 14 For more information, refer to record. Start recording. Open the lens cover. Settings such as backlight (C), night view (B), person (A) etc., its icon is displayed on the touch screen...
... remove the battery pack, AC adapter, or SD card when the access lamp is H Manual, press the S button to switch. Zooming (Wide angle) (Telephoto) .. 0 You can also tap g on the screen. If the mode is lighted. To stop . The recorded data may become unreadable. 14 For more information, refer to record. Start recording. Open the lens cover. Settings such as backlight (C), night view (B), person (A) etc., its icon is displayed on the touch screen...

Basic User Guide
Page 16
... slow playback U Volume adjustment - Playback Playing Back/Deleting Files on this Unit Select and play back. 2011 To delete unwanted files Tap A. Tap on the file to the recording mode. Tap I/J to the Detailed User Guide http://manual.jvc.co.jp/index.html/ k Forward slow-motion / Press and hold - to the video index screen. Tap u to return to start slow playback l Reverse slow-motion / Press and hold - o To capture a still image during playback Pause the playback and press the SNAPSHOT button. To remove...
... slow playback U Volume adjustment - Playback Playing Back/Deleting Files on this Unit Select and play back. 2011 To delete unwanted files Tap A. Tap on the file to the recording mode. Tap I/J to the Detailed User Guide http://manual.jvc.co.jp/index.html/ k Forward slow-motion / Press and hold - to the video index screen. Tap u to return to start slow playback l Reverse slow-motion / Press and hold - o To capture a still image during playback Pause the playback and press the SNAPSHOT button. To remove...
Basic User Guide
Page 17
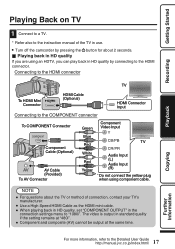
... the instruction manual of connection, contact your TV's manufacturer. 0 Use a High Speed HDMI Cable as the HDMI mini cable. 0 When playing back in HD quality, set "COMPONENT OUTPUT" in the connection settings menu to the COMPONENT connector HDMI Connector Input To COMPONENT Connector Component Cable (Optional) AV Cable (Provided) . To AV Connector Green Blue Red White Red Yellow Component Video Input Y CB/PB TV CR/PR Audio Input (L) Audio Input (R) Do not connect the yellow plug when using an...
... the instruction manual of connection, contact your TV's manufacturer. 0 Use a High Speed HDMI Cable as the HDMI mini cable. 0 When playing back in HD quality, set "COMPONENT OUTPUT" in the connection settings menu to the COMPONENT connector HDMI Connector Input To COMPONENT Connector Component Cable (Optional) AV Cable (Provided) . To AV Connector Green Blue Red White Red Yellow Component Video Input Y CB/PB TV CR/PR Audio Input (L) Audio Input (R) Do not connect the yellow plug when using an...
Basic User Guide
Page 18
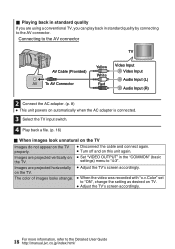
... User Guide http://manual.jvc.co.jp/index.html/ o Playing back in standard quality If you can play back in the "COMMON" (basic the TV. on 0 Set "VIDEO OUTPUT" in standard quality by connecting to the AV connector TV AV Cable (Provided) AV To AV Connector Yellow White Red Video Input Video Input Audio Input (L) Audio Input (R) . 2 Connect the AC adapter. (p. 8) 0 This unit powers on automatically when the AC adapter is connected. 3 Select the TV input switch. 4 Play back a file...
... User Guide http://manual.jvc.co.jp/index.html/ o Playing back in standard quality If you can play back in the "COMMON" (basic the TV. on 0 Set "VIDEO OUTPUT" in standard quality by connecting to the AV connector TV AV Cable (Provided) AV To AV Connector Yellow White Red Video Input Video Input Audio Input (L) Audio Input (R) . 2 Connect the AC adapter. (p. 8) 0 This unit powers on automatically when the AC adapter is connected. 3 Select the TV input switch. 4 Play back a file...

Basic User Guide
Page 20
... press the record button on the recorder. 0 After playback is connected. 2 Tap L to select the playback mode. 3 Prepare to record. Dubbing Files by Connecting to a DVD Recorder or VCR You can dub videos in the "COMMON" (basic settings) menu to the aspect ratio ("4:3" or "16:9") of the TV, DVD recorder, VCR, etc. 1 Connect to a VCR/DVD recorder. 0 Turn off the camcorder by connecting to a compatible external input. 0 Insert a DVD-R or video tape. To AV Connector AV Cable (Provided) Yellow White Red Video Input Video Input Audio Input (L) Audio Input (R) AC Adapter To AC Outlet...
... press the record button on the recorder. 0 After playback is connected. 2 Tap L to select the playback mode. 3 Prepare to record. Dubbing Files by Connecting to a DVD Recorder or VCR You can dub videos in the "COMMON" (basic settings) menu to the aspect ratio ("4:3" or "16:9") of the TV, DVD recorder, VCR, etc. 1 Connect to a VCR/DVD recorder. 0 Turn off the camcorder by connecting to a compatible external input. 0 Insert a DVD-R or video tape. To AV Connector AV Cable (Provided) Yellow White Red Video Input Video Input Audio Input (L) Audio Input (R) AC Adapter To AC Outlet...
Basic User Guide
Page 22
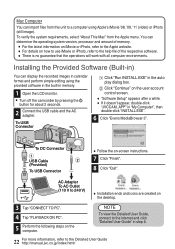
Installing the Provided Software (Built-in) You can display the recorded images in memory. 1 Open the LCD monitor. 0 Turn off the camcorder by pressing the M button for about 2 seconds. 2 Connect the USB cable and the AC adapter. B Click "Continue" on the user account control screen. 0 "Software Setup" appears after a while. 0 If it doesn't appear, double-click "JVCCAM_APP" in the auto play dialog box. To USB Connector A Click "Run INSTALL.EXE" in "My Computer", then double...
Installing the Provided Software (Built-in) You can display the recorded images in memory. 1 Open the LCD monitor. 0 Turn off the camcorder by pressing the M button for about 2 seconds. 2 Connect the USB cable and the AC adapter. B Click "Continue" on the user account control screen. 0 "Software Setup" appears after a while. 0 If it doesn't appear, double-click "JVCCAM_APP" in the auto play dialog box. To USB Connector A Click "Run INSTALL.EXE" in "My Computer", then double...
Basic User Guide
Page 24
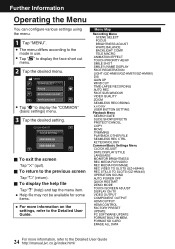
... REC FACE SUB-WINDOW VIDEO QUALITY ZOOM SEAMLESS RECORDING x.v.Color USER BUTTON SETTING Playback Menu SEARCH DATE SLIDE SHOW EFFECTS PROTECT/CANCEL COPY MOVE TRIMMING PLAYBACK OTHER FILE SEAMLESS REC CTRL K2 TECHNOLOGY Common/Basic Settings Menu CLOCK ADJUST DATE DISPLAY STYLE LANGUAGE MONITOR BRIGHTNESS REC MEDIA FOR VIDEO REC MEDIA FOR IMAGE REC VIDEO TO SLOTS (GZ-HM440) REC STILLS TO SLOTS (GZ-HM440) OPERATION SOUND AUTO POWER OFF QUICK RESTART DEMO MODE TOUCH SCREEN ADJUST DISPLAY ON TV VIDEO OUTPUT COMPONENT OUTPUT HDMI OUTPUT HDMI CONTROL FACTORY PRESET UPDATE PC SOFTWARE UPDATE FORMAT...
... REC FACE SUB-WINDOW VIDEO QUALITY ZOOM SEAMLESS RECORDING x.v.Color USER BUTTON SETTING Playback Menu SEARCH DATE SLIDE SHOW EFFECTS PROTECT/CANCEL COPY MOVE TRIMMING PLAYBACK OTHER FILE SEAMLESS REC CTRL K2 TECHNOLOGY Common/Basic Settings Menu CLOCK ADJUST DATE DISPLAY STYLE LANGUAGE MONITOR BRIGHTNESS REC MEDIA FOR VIDEO REC MEDIA FOR IMAGE REC VIDEO TO SLOTS (GZ-HM440) REC STILLS TO SLOTS (GZ-HM440) OPERATION SOUND AUTO POWER OFF QUICK RESTART DEMO MODE TOUCH SCREEN ADJUST DISPLAY ON TV VIDEO OUTPUT COMPONENT OUTPUT HDMI OUTPUT HDMI CONTROL FACTORY PRESET UPDATE PC SOFTWARE UPDATE FORMAT...

Basic User Guide
Page 25
... values when "LIGHT" is set to "OFF" and "MONITOR BRIGHTNESS" is set to "3" (standard). 0 The actual recording time may be shorter if zooming is used or if recording is stopped repeatedly. (It is only a guide. Approximate Video Recording Time Built-in Memory SDHC Card Image Size GZ-HM450 GZ-HM650 8 GB GZ-HM670 32 GB GZ-HM690 64 GB... GZ-HM650/GZ-HM670/GZ-HM690 0 Up to the Detailed User Guide http://manual.jvc.co.jp/index.html/ Copying Further Information Getting Started Recordable Time/Number of Shots) Built-in Memory SDHC/SDXC Card Quality GZ-HM450 GZ-HM670 GZ-HM690 4 GB GZ-...
... values when "LIGHT" is set to "OFF" and "MONITOR BRIGHTNESS" is set to "3" (standard). 0 The actual recording time may be shorter if zooming is used or if recording is stopped repeatedly. (It is only a guide. Approximate Video Recording Time Built-in Memory SDHC Card Image Size GZ-HM450 GZ-HM650 8 GB GZ-HM670 32 GB GZ-HM690 64 GB... GZ-HM650/GZ-HM670/GZ-HM690 0 Up to the Detailed User Guide http://manual.jvc.co.jp/index.html/ Copying Further Information Getting Started Recordable Time/Number of Shots) Built-in Memory SDHC/SDXC Card Quality GZ-HM450 GZ-HM670 GZ-HM690 4 GB GZ-...
Basic User Guide
Page 26
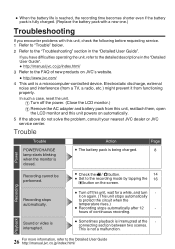
...-controlled device. Sound or video is interrupted. 0 Sometimes playback is closed. This is being charged. Page 8 Recording cannot be performed. 0 Check the A / B button. 14 0 Set to the Detailed User Guide http://manual.jvc.co.jp/index.html/ A Turn off this unit powers on the screen. If you encounter problems with a new one.) Troubleshooting If you have difficulties operating the unit, refer to the detailed descriptions in the "Detailed User Guide". Action 0 The battery...
...-controlled device. Sound or video is interrupted. 0 Sometimes playback is closed. This is being charged. Page 8 Recording cannot be performed. 0 Check the A / B button. 14 0 Set to the Detailed User Guide http://manual.jvc.co.jp/index.html/ A Turn off this unit powers on the screen. If you encounter problems with a new one.) Troubleshooting If you have difficulties operating the unit, refer to the detailed descriptions in the "Detailed User Guide". Action 0 The battery...
Basic User Guide
Page 27
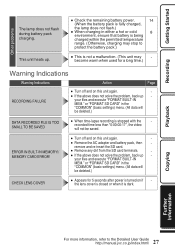
... CARD" in the "COMMON" (basic settings) menu. (All data will be deleted.) CHECK LENS COVER 0 Appears for a long time.) Warning Indications Warning Indications RECORDING FAILURE Action Page 0 Turn off and on this unit again. - 0 Remove the AC adapter and battery pack, then - Playback Warning Indications Copying Further Information 27 For more information, refer to protect the battery pack.) 0 This is fully charged, the lamp does not flash.) 0 When charging...
... CARD" in the "COMMON" (basic settings) menu. (All data will be deleted.) CHECK LENS COVER 0 Appears for a long time.) Warning Indications Warning Indications RECORDING FAILURE Action Page 0 Turn off and on this unit again. - 0 Remove the AC adapter and battery pack, then - Playback Warning Indications Copying Further Information 27 For more information, refer to protect the battery pack.) 0 This is fully charged, the lamp does not flash.) 0 When charging...
Basic User Guide
Page 29
... soft camcorder case excessively when the camcorder is connected may be parental guidance. If this device must be damaged. J. 07470 power plug or an AC wall outlet. near appliances generating strong magnetic or electric fields (speakers, broadcasting Changes or modifications not approved by turning the equipment off and on a TV. expose the lens to the Detailed User Guide http://manual.jvc.co...
... soft camcorder case excessively when the camcorder is connected may be parental guidance. If this device must be damaged. J. 07470 power plug or an AC wall outlet. near appliances generating strong magnetic or electric fields (speakers, broadcasting Changes or modifications not approved by turning the equipment off and on a TV. expose the lens to the Detailed User Guide http://manual.jvc.co...
Basic User Guide
Page 31
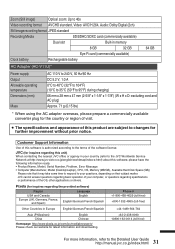
... to the Detailed User Guide http://manual.jvc.co.jp/index.html/ Zoom (Still image) Optical zoom: Up to 40x Video recording format AVCHD standard, Video: AVC/H.264, Audio: Dolby Digital (2ch) Stillimage recordingformat JPEG standard Recording Media SD/SDHC/SDXC card (commercially available) Dual slot Built-in memory 8 GB 32 GB Eye-Fi card (commercially available) Clock battery Rechargeable battery AC Adapter (AC-V11U)* 64 GB Power supply Output Allowable operating temperature Dimensions...
... to the Detailed User Guide http://manual.jvc.co.jp/index.html/ Zoom (Still image) Optical zoom: Up to 40x Video recording format AVCHD standard, Video: AVC/H.264, Audio: Dolby Digital (2ch) Stillimage recordingformat JPEG standard Recording Media SD/SDHC/SDXC card (commercially available) Dual slot Built-in memory 8 GB 32 GB Eye-Fi card (commercially available) Clock battery Rechargeable battery AC Adapter (AC-V11U)* 64 GB Power supply Output Allowable operating temperature Dimensions...
Basic User Guide
Page 32
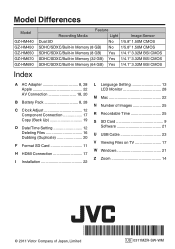
.../Built-in Memory (64 GB) Yes 1/4.1" 3.32M BSI CMOS Index A AC Adapter 8, 28 Apple 22 AV Connection 18, 20 B Battery Pack 8, 28 C Clock Adjust 12 Component Connection 17 Copy (Back Up 19 D Date/Time Setting 12 Deleting Files 16 Dubbing (Duplicate 20 F Format SD Card 11 H HDMI Connection 17 I Installation 22 L Language Setting 13 LCD Monitor 28 M Mac 22 N Number of Images 25 R Recordable Time 25 S SD Card 9 Software 21 U USB Cable 23 V Viewing Files on TV 17 W Windows 21 Z Zoom 14...
.../Built-in Memory (64 GB) Yes 1/4.1" 3.32M BSI CMOS Index A AC Adapter 8, 28 Apple 22 AV Connection 18, 20 B Battery Pack 8, 28 C Clock Adjust 12 Component Connection 17 Copy (Back Up 19 D Date/Time Setting 12 Deleting Files 16 Dubbing (Duplicate 20 F Format SD Card 11 H HDMI Connection 17 I Installation 22 L Language Setting 13 LCD Monitor 28 M Mac 22 N Number of Images 25 R Recordable Time 25 S SD Card 9 Software 21 U USB Cable 23 V Viewing Files on TV 17 W Windows 21 Z Zoom 14...

Printer Friendly Specs
Page 2
... Sub-Window Animation E ect High-Speed Motor Drive Recording Seamless Recording Face Recognition K2 Technology Auto Illumi. SPECIFICATIONS Internal Storage Media SDXC/SDHC/SD Card Slot* Image Sensor Lens Zoom Ratios Optical Dynamic Digial 2D-3D Conversion Playback High De nition Recording Standard De nition Recording Video Recording Modes Video Recording Time (max.) 1080/60P Output 24Mbps High Bit Rate Recording HDMI® Terminal LCD Size and Resolution Touch Panel LCD Glasses-free 3D Viewing on LCD Built-in camera) BN...
... Sub-Window Animation E ect High-Speed Motor Drive Recording Seamless Recording Face Recognition K2 Technology Auto Illumi. SPECIFICATIONS Internal Storage Media SDXC/SDHC/SD Card Slot* Image Sensor Lens Zoom Ratios Optical Dynamic Digial 2D-3D Conversion Playback High De nition Recording Standard De nition Recording Video Recording Modes Video Recording Time (max.) 1080/60P Output 24Mbps High Bit Rate Recording HDMI® Terminal LCD Size and Resolution Touch Panel LCD Glasses-free 3D Viewing on LCD Built-in camera) BN...


