Instructions
Page 4
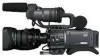
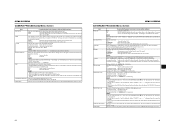
...), you for reproduction of frames as well. 24p DV format video uses a 2:3:2:3 pulldown (24p Mode). Digital signal processing for purchasing the JVC GY-HD110U/CHU, GYHD110E/CHE and GY-HD111E/CHE HD CAMERA RECORDER. There are trademarks of Sony Corporation and Victor Company of Japan, Limited... shoot video of recording formats within the first 2 to 60 frames. HDV 720p (720 effective scan lines, progressive scan) HDV 1080i (1080 effective scan lines, interlaced scan) This camcorder supports HDV 720p format. (HDV 720p, 480p, 576p) HDV and are two types of dark subjects with the...
...), you for reproduction of frames as well. 24p DV format video uses a 2:3:2:3 pulldown (24p Mode). Digital signal processing for purchasing the JVC GY-HD110U/CHU, GYHD110E/CHE and GY-HD111E/CHE HD CAMERA RECORDER. There are trademarks of Sony Corporation and Victor Company of Japan, Limited... shoot video of recording formats within the first 2 to 60 frames. HDV 720p (720 effective scan lines, progressive scan) HDV 1080i (1080 effective scan lines, interlaced scan) This camcorder supports HDV 720p format. (HDV 720p, 480p, 576p) HDV and are two types of dark subjects with the...
Instructions
Page 6
...times ev- 1 to 2 times ev- 1 to OFF or remove the power cable during outdoor use the camcorder with the connector covers on page 93. X See "Precautions for Use of mechanical parts by JVC. Periodical Maintenance Contents : Check or replace the following mechanical parts according to use of time, the characters ...this one. • To prevent damage to clean the camera after the power is turned on again. • If you use the camcorder continuously for use cleaning tape produced by causing poor contact between tape and heads or failing to the optical performance of the lens, color...
...times ev- 1 to 2 times ev- 1 to OFF or remove the power cable during outdoor use the camcorder with the connector covers on page 93. X See "Precautions for Use of mechanical parts by JVC. Periodical Maintenance Contents : Check or replace the following mechanical parts according to use of time, the characters ...this one. • To prevent damage to clean the camera after the power is turned on again. • If you use the camcorder continuously for use cleaning tape produced by causing poor contact between tape and heads or failing to the optical performance of the lens, color...
Instructions
Page 10
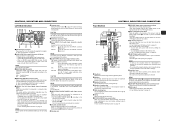
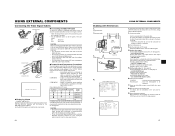
... viewfinder or on tape or the IEEE1394 input video format. item on page 60. X See page 71. e[POWER] Power ON/OFF switch Switch that the camcorder will be disturbed or noise may occur in progress, the picture may be memorized into A. X See "Backup Recording" on the CAMERA OPERATION menu screen. X See...
... viewfinder or on tape or the IEEE1394 input video format. item on page 60. X See page 71. e[POWER] Power ON/OFF switch Switch that the camcorder will be disturbed or noise may occur in progress, the picture may be memorized into A. X See "Backup Recording" on the CAMERA OPERATION menu screen. X See...
Instructions
Page 11
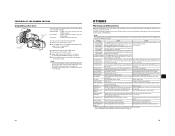
... touch the cassette insertion slot or cassette during shooting, the area of focus is used to lock the [REC] trigger button 8. bOperation cover Open this camcorder. • You can move the position of the shoulder pad b forward or backward. X See page 72. 0[INPUT1/INPUT2] INPUT1/INPUT2 audio input connectors These are...
... touch the cassette insertion slot or cassette during shooting, the area of focus is used to lock the [REC] trigger button 8. bOperation cover Open this camcorder. • You can move the position of the shoulder pad b forward or backward. X See page 72. 0[INPUT1/INPUT2] INPUT1/INPUT2 audio input connectors These are...

Instructions
Page 17
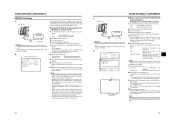
... CFH-3, CFC-12-990). UB RFRECEE REGEN LCD open /close and normal/inverted operations. • If the LCD monitor is closed inside the camcorder with the screen in the normal display orientation, holding down the DISPLAY button, the display mode is cancelled by selecting the VF+LCD item in.../VF [3/3] menu is set to ON, the LCD monitor and viewfinder (VF) displays are as shown below . For details, please consult your JVC authorized dealer. 28 29 CONTROLS, INDICATORS AND CONNECTORS Indications on the LCD Monitor and in the Viewfinder (Cont'd) DISPLAY button When not using an ...
... CFH-3, CFC-12-990). UB RFRECEE REGEN LCD open /close and normal/inverted operations. • If the LCD monitor is closed inside the camcorder with the screen in the normal display orientation, holding down the DISPLAY button, the display mode is cancelled by selecting the VF+LCD item in.../VF [3/3] menu is set to ON, the LCD monitor and viewfinder (VF) displays are as shown below . For details, please consult your JVC authorized dealer. 28 29 CONTROLS, INDICATORS AND CONNECTORS Indications on the LCD Monitor and in the Viewfinder (Cont'd) DISPLAY button When not using an ...
Instructions
Page 18
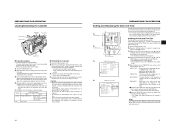
...saved files are not mistakenly erased. Clamp the lens cable. Connect the microphone cable to the INPUT1 or INPUT2 input connector on this camcorder. tom microphone. Inserting an SD Memory Card Cutout SD memory card cover LOCK switch PREPARATIONS By using an SD memory card, you slide...it from interfering with the hole in the direction of the arrow. Place the microphone toward the front to perform the correct setting for this camcorder, format it and open the microphone holder. 2. Make sure to prevent it in the microphone holder. X See page 48. 4. To take...
...saved files are not mistakenly erased. Clamp the lens cable. Connect the microphone cable to the INPUT1 or INPUT2 input connector on this camcorder. tom microphone. Inserting an SD Memory Card Cutout SD memory card cover LOCK switch PREPARATIONS By using an SD memory card, you slide...it from interfering with the hole in the direction of the arrow. Place the microphone toward the front to perform the correct setting for this camcorder, format it and open the microphone holder. 2. Make sure to prevent it in the microphone holder. X See page 48. 4. To take...
Instructions
Page 21
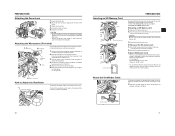
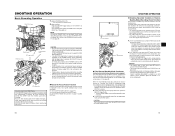
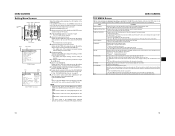
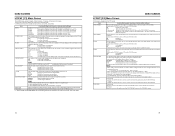
... the videocassette straight in shooting standby mode or stop mode, slide the EJECT switch to the side and wait until recording can begin or the camcorder can be set the OUTPUT CHAR. This will go . 4. STATUS button USER 1 USER 2 SHUTTER ND FILTER 2 1 MENU OFF USER 3 STATUS WHT.BAL ... the top panel of the selected item starts blinking. 2Rotate the SHUTTER dial to ON. 5. STOP mode „ Unloading the Cassette 1. When the camcorder is on, the modes are displayed on the LCD mon- Rotate the SHUTTER dial to the EJECT switch flashes. MODE Camera VTR REC/SAVE switch...
... the videocassette straight in shooting standby mode or stop mode, slide the EJECT switch to the side and wait until recording can begin or the camcorder can be set the OUTPUT CHAR. This will go . 4. STATUS button USER 1 USER 2 SHUTTER ND FILTER 2 1 MENU OFF USER 3 STATUS WHT.BAL ... the top panel of the selected item starts blinking. 2Rotate the SHUTTER dial to ON. 5. STOP mode „ Unloading the Cassette 1. When the camcorder is on, the modes are displayed on the LCD mon- Rotate the SHUTTER dial to the EJECT switch flashes. MODE Camera VTR REC/SAVE switch...
Instructions
Page 28
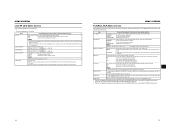
... page 80. X See "OTHERS [1/2] Menu Screen" on the LCD moni- In the record-standby mode, press the RET button on page 74. After playback, the camcorder returns to about 20 seconds of the content recorded in camera mode. 2. POWER switch REC trigger button BACK TALLY lamp FOCUS ASSIST button RET button...
... page 80. X See "OTHERS [1/2] Menu Screen" on the LCD moni- In the record-standby mode, press the RET button on page 74. After playback, the camcorder returns to about 20 seconds of the content recorded in camera mode. 2. POWER switch REC trigger button BACK TALLY lamp FOCUS ASSIST button RET button...
Instructions
Page 31
...output from the video signal output connec- PB VIDEO/Y CAUTION When connecting the IEEE1394 cable from/to automatically detect the video format of the camcorder. AUTO : Automatically switches to a composite or component signal, depending on the GY-HD110 to be output. • Set the MONITOR ...is in the figure. 2. Audio cable DC INPUT LINE OUTPUT IEEE1394 PR Signal flow Recording unit Signal flow Clamp filter 4. Set the camcorder to stop playback. 57 Stop recording on the recording unit, and then press the STOP button on the settings for recording. 9. CAUTION ...
...output from the video signal output connec- PB VIDEO/Y CAUTION When connecting the IEEE1394 cable from/to automatically detect the video format of the camcorder. AUTO : Automatically switches to a composite or component signal, depending on the GY-HD110 to be output. • Set the MONITOR ...is in the figure. 2. Audio cable DC INPUT LINE OUTPUT IEEE1394 PR Signal flow Recording unit Signal flow Clamp filter 4. Set the camcorder to stop playback. 57 Stop recording on the recording unit, and then press the STOP button on the settings for recording. 9. CAUTION ...
Instructions
Page 32
...device. DV HDV : When dubbing in DV format : When dubbing in DV format. The VTR indicator lights. 5. Select whether to dub 7. This camcorder Recording unit : Recorded videocassette tape : Videocassette you dub still images, they are properly connected. 5. Start recording on the left side of the GY... : Records the TC/UB set in HDV format. If you turn on the GY-HD110's LCD monitor and viewfinder screen. 9. Set the camcorder to the camcorder. • Recording may occur in the audio. MEMO In HDV format, the UB set in HDV format 2. Set the IEEE1394 switch on ...
...device. DV HDV : When dubbing in DV format : When dubbing in DV format. The VTR indicator lights. 5. Select whether to dub 7. This camcorder Recording unit : Recorded videocassette tape : Videocassette you dub still images, they are properly connected. 5. Start recording on the left side of the GY... : Records the TC/UB set in HDV format. If you turn on the GY-HD110's LCD monitor and viewfinder screen. 9. Set the camcorder to the camcorder. • Recording may occur in the audio. MEMO In HDV format, the UB set in HDV format 2. Set the IEEE1394 switch on ...
Instructions
Page 34
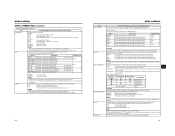
... REV). Item VIDEO FORMAT.. CAMERA OPERATION.. AUDIO/MIC.. The ADVANCED PROCESS menu screen and SKIN COLOR ADJUST screen can be viewed on the camcorder or an SD memory card, or reads the menu screen settings saved in the Camera mode. Displays a menu screen related to ON. 2. ...longer. • The TOP MENU screen appears. 4. above . 7. Displays the menu screens related to align the cursor (K) with this item when the camcorder is being displayed, the USER1, USER2 and USER3 buttons can be made. 6. Rotate the SHUTTER dial to the camera switch functions. • This ...
... REV). Item VIDEO FORMAT.. CAMERA OPERATION.. AUDIO/MIC.. The ADVANCED PROCESS menu screen and SKIN COLOR ADJUST screen can be viewed on the camcorder or an SD memory card, or reads the menu screen settings saved in the Camera mode. Displays a menu screen related to ON. 2. ...longer. • The TOP MENU screen appears. 4. above . 7. Displays the menu screens related to align the cursor (K) with this item when the camcorder is being displayed, the USER1, USER2 and USER3 buttons can be made. 6. Rotate the SHUTTER dial to the camera switch functions. • This ...
Instructions
Page 35
... outputs it . You can set the following according to it . Setting NATIVE 720P 1080I 480P NTSC 576P PAL Description Outputs the signal being recorded on the FRAME RATE item. Converts the signal being recorded on the camcorder as well as the cables connected to the FRAME RATE. FRAME RATE 60/30 50... initial settings) Sets the video format to 576i and outputs it . X See page 46. • The cursor (K) does not move to this item when the camcorder is in HDV format is set in HDV format to 1080i and outputs it . DV format Shoots at this when the OUTPUT TERMINAL item is...
... outputs it . You can set the following according to it . Setting NATIVE 720P 1080I 480P NTSC 576P PAL Description Outputs the signal being recorded on the FRAME RATE item. Converts the signal being recorded on the camcorder as well as the cables connected to the FRAME RATE. FRAME RATE 60/30 50... initial settings) Sets the video format to 576i and outputs it . X See page 46. • The cursor (K) does not move to this item when the camcorder is in HDV format is set in HDV format to 1080i and outputs it . DV format Shoots at this when the OUTPUT TERMINAL item is...
Instructions
Page 37
... or manually. MANUAL : You can change the luminance level in the bright areas. Makes the video smoother when the tape is set to ON, the camcorder's S/N ratio becomes better but the "blurring of moving objects" will increase. ON : Functions. When this when A or B is set for the [WHT.BAL...] switch c on the right panel of the camcorder. When "STANDARD" or "CINELIKE" is set for the [WHT.BAL] switch c on the right panel of the camcorder. Increase the number : Enhances the tonality of 108%. 100% : The white clipping point is not ...
... or manually. MANUAL : You can change the luminance level in the bright areas. Makes the video smoother when the tape is set to ON, the camcorder's S/N ratio becomes better but the "blurring of moving objects" will increase. ON : Functions. When this when A or B is set for the [WHT.BAL...] switch c on the right panel of the camcorder. When "STANDARD" or "CINELIKE" is set for the [WHT.BAL] switch c on the right panel of the camcorder. Increase the number : Enhances the tonality of 108%. 100% : The white clipping point is not ...
Instructions
Page 39
... dial. SW SET : Follows settings for dubbing to output a test audio signal (1kHz, -20dBFS or -12dBFS) during color bar output. This camcorder records the audio in VTR mode. MENU SCREENS AUDIO/MIC [1/2] Menu Screen The AUDIO/MIC menu screen consists of audio at the same time. ON...-bit, 32 kHz sampling frequency. 48K : Digitally records with the audio signal recorded in 4 channels. (Can only be set , this camcorder records on page 18. This camcorder is not output. When the cursor is in DV format. (This also includes slow playback.) ON : Audio is unrelated to reduce wind...
... dial. SW SET : Follows settings for dubbing to output a test audio signal (1kHz, -20dBFS or -12dBFS) during color bar output. This camcorder records the audio in VTR mode. MENU SCREENS AUDIO/MIC [1/2] Menu Screen The AUDIO/MIC menu screen consists of audio at the same time. ON...-bit, 32 kHz sampling frequency. 48K : Digitally records with the audio signal recorded in 4 channels. (Can only be set , this camcorder records on page 18. This camcorder is not output. When the cursor is in DV format. (This also includes slow playback.) ON : Audio is unrelated to reduce wind...
Instructions
Page 40
... video format set in camera mode. OFF : Not displayed. Selects whether or not the time code or user's bits data should be displayed when the camcorder is in use the remaining battery level and remaining time as a reference for focusing when running the FOCUS ASSIST function. The status will not be...
... video format set in camera mode. OFF : Not displayed. Selects whether or not the time code or user's bits data should be displayed when the camcorder is in use the remaining battery level and remaining time as a reference for focusing when running the FOCUS ASSIST function. The status will not be...
Instructions
Page 41
... is confirmed. NORMAL (0) - 4, MAX (5)] Selects the LCD monitor and viewfinder display style. DROP : Internal timecode generator works in the camcorder. Set this cannot be selected. User's bits are always displayed in the camcorder is recorded regardless of the setting. OFF : Records the TC/UB set in drop-frame mode. ON : Viewfinder always...
... is confirmed. NORMAL (0) - 4, MAX (5)] Selects the LCD monitor and viewfinder display style. DROP : Internal timecode generator works in the camcorder. Set this cannot be selected. User's bits are always displayed in the camcorder is recorded regardless of the setting. OFF : Records the TC/UB set in drop-frame mode. ON : Viewfinder always...

Instructions
Page 43
... : 5 minutes * When used in VTR mode. junction with the recording start time is recording. SPLIT : The REC trigger button on the camcorder has less than 3 minutes remaining during recording. This function controls the camera tape transport, back space and pre-roll time when the camera is emitted...this position and press the SHUTTER dial. ON : Lights. OFF : Sound is loud. Selects the lighting method of the setting on the camcorder, and if there is always off . ON : The lamp lights only during recording. The alarm sound is not displayed in a cold ...
... : 5 minutes * When used in VTR mode. junction with the recording start time is recording. SPLIT : The REC trigger button on the camcorder has less than 3 minutes remaining during recording. This function controls the camera tape transport, back space and pre-roll time when the camera is emitted...this position and press the SHUTTER dial. ON : Lights. OFF : Sound is loud. Selects the lighting method of the setting on the camcorder, and if there is always off . ON : The lamp lights only during recording. The alarm sound is not displayed in a cold ...
Instructions
Page 44
... RATE settings, "REBOOT!" EXECUTE : The settings are not reset. MEMO • The cursor (K) does not move to this item when the camcorder is in VTR mode or is ejecting a tape. • If the current menu settings and the factory settings have different video format settings,...Execute : Displayed for 3 seconds Complete : Displayed for regular maintenance. is displayed for 7 seconds. appears on the LCD monitor for 3 seconds, the camcorder turns off automatically and then turns on . played for movie-quality shooting * The read -only files. When the cursor is in VTR mode. ...
... RATE settings, "REBOOT!" EXECUTE : The settings are not reset. MEMO • The cursor (K) does not move to this item when the camcorder is in VTR mode or is ejecting a tape. • If the current menu settings and the factory settings have different video format settings,...Execute : Displayed for 3 seconds Complete : Displayed for regular maintenance. is displayed for 7 seconds. appears on the LCD monitor for 3 seconds, the camcorder turns off automatically and then turns on . played for movie-quality shooting * The read -only files. When the cursor is in VTR mode. ...
Instructions
Page 45
...the SHUTTER dial. • The file name setting area for 3 seconds, the camcorder turns off automatically and then turns on the SD memory card. 3Check that an SD memory card has ...been inserted into the camcorder. 1. Execute Complete Error Flashing Error display 84 Execute Reboot display Complete Execute Error Complete ...save to, and press the SHUTTER dial. „ Setting a SUB NAME If you do not want to the camcorder OFF. 2Disable write-protection on . Turn the SHUTTER dial, bring the cursor (K) to the FOR- item on the...
...the SHUTTER dial. • The file name setting area for 3 seconds, the camcorder turns off automatically and then turns on the SD memory card. 3Check that an SD memory card has ...been inserted into the camcorder. 1. Execute Complete Error Flashing Error display 84 Execute Reboot display Complete Execute Error Complete ...save to, and press the SHUTTER dial. „ Setting a SUB NAME If you do not want to the camcorder OFF. 2Disable write-protection on . Turn the SHUTTER dial, bring the cursor (K) to the FOR- item on the...
Instructions
Page 47
... and input a DV signal. Displayed when a head cleaning tape is output from the monitor speaker or PHONES jack. Please contact your local dealer or JVC. Press the USER button to which "BARS" was a mistaken operation, if the battery or tape is low, or if there is input into the... X See "SWITCH MODE Menu Screen" on page 26. 88 89 DV-24PA INVALID! A computer data tape or a DVC PRO cassette was not input. This camcorder cannot record or play back a copyguarded tape. REC INHIBIT* A tape that cannot be recorded (back switch is ON or in the U model. put into the...
... and input a DV signal. Displayed when a head cleaning tape is output from the monitor speaker or PHONES jack. Please contact your local dealer or JVC. Press the USER button to which "BARS" was a mistaken operation, if the battery or tape is low, or if there is input into the... X See "SWITCH MODE Menu Screen" on page 26. 88 89 DV-24PA INVALID! A computer data tape or a DVC PRO cassette was not input. This camcorder cannot record or play back a copyguarded tape. REC INHIBIT* A tape that cannot be recorded (back switch is ON or in the U model. put into the...


