Instructions
Page 4
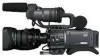
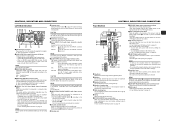
... • This unit records and plays back in the playback mode. mat. HDV 720p (720 effective scan lines, progressive scan) HDV 1080i (1080 effective scan lines, interlaced scan) This camcorder supports HDV 720p format. (HDV 720p, 480p, 576p) HDV and are set off by the (GY-HD110U/GYHD111E only) ...-HD111E/CHE. It can shoot with shooting conditions which varies as movie film. • Tapes recorded in viewfinder • Full Auto Shooting (FAS) function Eliminating the need for purchasing the JVC GY-HD110U/CHU, GYHD110E/CHE and GY-HD111E/CHE HD CAMERA RECORDER. DVCAM is also ...
... • This unit records and plays back in the playback mode. mat. HDV 720p (720 effective scan lines, progressive scan) HDV 1080i (1080 effective scan lines, interlaced scan) This camcorder supports HDV 720p format. (HDV 720p, 480p, 576p) HDV and are set off by the (GY-HD110U/GYHD111E only) ...-HD111E/CHE. It can shoot with shooting conditions which varies as movie film. • Tapes recorded in viewfinder • Full Auto Shooting (FAS) function Eliminating the need for purchasing the JVC GY-HD110U/CHU, GYHD110E/CHE and GY-HD111E/CHE HD CAMERA RECORDER. DVCAM is also ...
Instructions
Page 5
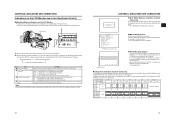
CONTENTS ACCESSORIES 2 MAIN FEATURES 3 INTRODUCTION Precautions for Proper Use 6 Routine and Periodical Maintenance 7 Precautions for Use of Head Cleaning Tape 7 Battery Pack to be Used 8 Videocassette to be Used 8 Condensation 9 Characteristic CCD Phenomena 9 CONTROLS, INDICATORS AND CONNECTORS ZOOM Lens ...• Displaying the Time and Date on the Screen Displaying Time Code 39 Recording Time Codes in Continuation of Time Codes Recorded on Tape 40 Presetting and Recording of Time Code 40 • Presetting time code data • Presetting user's bit data Synchronizing with the ...
CONTENTS ACCESSORIES 2 MAIN FEATURES 3 INTRODUCTION Precautions for Proper Use 6 Routine and Periodical Maintenance 7 Precautions for Use of Head Cleaning Tape 7 Battery Pack to be Used 8 Videocassette to be Used 8 Condensation 9 Characteristic CCD Phenomena 9 CONTROLS, INDICATORS AND CONNECTORS ZOOM Lens ...• Displaying the Time and Date on the Screen Displaying Time Code 39 Recording Time Codes in Continuation of Time Codes Recorded on Tape 40 Presetting and Recording of Time Code 40 • Presetting time code data • Presetting user's bit data Synchronizing with the ...
Instructions
Page 6
...not use the camcorder with a dry, soft cloth. Adhere to 2 times ev- The tape runs for 10 seconds at intervals half of the head cleaning tape. • When dust adheres to maintain the video and audio quality at your nearest JVC-authorized service agent. If an M-DV80 tape is used for ...screen, or red, blue, green and/or white spots may be abnormal. use the camcorder continuously for a while. In this sheet. X See "How to the camera body. When using a head cleaning tape as a reference. To prevent wear and deterioration, clean the mechanical parts using the ...
...not use the camcorder with a dry, soft cloth. Adhere to 2 times ev- The tape runs for 10 seconds at intervals half of the head cleaning tape. • When dust adheres to maintain the video and audio quality at your nearest JVC-authorized service agent. If an M-DV80 tape is used for ...screen, or red, blue, green and/or white spots may be abnormal. use the camcorder continuously for a while. In this sheet. X See "How to the camera body. When using a head cleaning tape as a reference. To prevent wear and deterioration, clean the mechanical parts using the ...
Instructions
Page 7
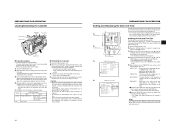
...to be Used The GY-HD110 can use any of the following batteries. • BN-V428, BN-V438 Videocassette to be Used • Use JVC's videocassette tapes marked with the A symbol. • Mini DV videocassette : M-DV63HD M-DV63PROHD * Do not use M-DV80. • Videocassettes cannot be used repeatedly... wound, as condensation (dewing). Rewind it . 8 9 Storage cases protect videotapes from being com- When this occurs, the head drum and tape guides are greatly deferent, first remove the videocassette, place the unit in a tightly sealed vinyl bag, and then move it is referred to protect...
...to be Used The GY-HD110 can use any of the following batteries. • BN-V428, BN-V438 Videocassette to be Used • Use JVC's videocassette tapes marked with the A symbol. • Mini DV videocassette : M-DV63HD M-DV63PROHD * Do not use M-DV80. • Videocassettes cannot be used repeatedly... wound, as condensation (dewing). Rewind it . 8 9 Storage cases protect videotapes from being com- When this occurs, the head drum and tape guides are greatly deferent, first remove the videocassette, place the unit in a tightly sealed vinyl bag, and then move it is referred to protect...
Instructions
Page 8
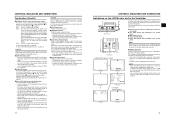
... pattern. When you press this switch is ON, a zebra pattern is 70% - 80%. Secure with this button as a reference for the video signal. When the tape has run out, or the VTR enters the warning mode, it possible to the record mode. X See "How to Use Skin Detail" on page 30...
... pattern. When you press this switch is ON, a zebra pattern is 70% - 80%. Secure with this button as a reference for the video signal. When the tape has run out, or the VTR enters the warning mode, it possible to the record mode. X See "How to Use Skin Detail" on page 30...
Instructions
Page 9
... enters the warning mode, it blinks quickly. • Use the BACK TALLY item on the OTHERS [1/2] menu screen to time codes already recorded on the tape. X See page 80. 2[PHONES] Earphone jack This is adjusted with the time code or user's bits set anew (preset). The audio output level is ...one after another , the time codes are recorded as continuous time codes. : Regeneration mode, in which the unit reads existing time codes on the tape and records time codes in an earphone or headphone with the AUDIO MONITOR item on the AUDIO/MIC [2/2] menu screen and MONITOR SELECT switch e ...
... enters the warning mode, it blinks quickly. • Use the BACK TALLY item on the OTHERS [1/2] menu screen to time codes already recorded on the tape. X See page 80. 2[PHONES] Earphone jack This is adjusted with the time code or user's bits set anew (preset). The audio output level is ...one after another , the time codes are recorded as continuous time codes. : Regeneration mode, in which the unit reads existing time codes on the tape and records time codes in an earphone or headphone with the AUDIO MONITOR item on the AUDIO/MIC [2/2] menu screen and MONITOR SELECT switch e ...
Instructions
Page 10
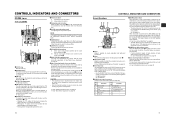
Set them to a proper white balance. • When the FULL AUTO switch h on tape or the IEEE1394 input video format. When the setting value starts blinking, turn the power on the LCD monitor. X See page 71. PRST : Switch into ... can be turned to be output is selected with the MONITOR SELECT switch e on the LCD monitor. e[POWER] Power ON/OFF switch Switch that the camcorder will be noisy. • When the FULL AUTO switch h on page 18 is "ON", this button while the menu screen is displayed in the viewfinder...
Set them to a proper white balance. • When the FULL AUTO switch h on tape or the IEEE1394 input video format. When the setting value starts blinking, turn the power on the LCD monitor. X See page 71. PRST : Switch into ... can be turned to be output is selected with the MONITOR SELECT switch e on the LCD monitor. e[POWER] Power ON/OFF switch Switch that the camcorder will be noisy. • When the FULL AUTO switch h on page 18 is "ON", this button while the menu screen is displayed in the viewfinder...
Instructions
Page 11
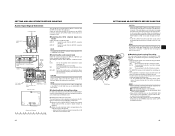
... the STOP button i is displayed in the SET UP item. X See "HDV/DV Dubbing" on this position when connected to insert or eject a videocassette tape. MIC+48V : Set to this switch to the side to audio equipment, etc. This cover can initialize (format) an SD memory card. X See "... When you are connectors for connecting to an external audio device or microphone. • Set the [AUDIO INPUT] switch 9 according to the device to this camcorder. • You can be connected here. MIC : Set to the side. X See "Battery Operation" on the right panel and the lens VTR trigger...
... the STOP button i is displayed in the SET UP item. X See "HDV/DV Dubbing" on this position when connected to insert or eject a videocassette tape. MIC+48V : Set to this switch to the side to audio equipment, etc. This cover can initialize (format) an SD memory card. X See "... When you are connectors for connecting to an external audio device or microphone. • Set the [AUDIO INPUT] switch 9 according to the device to this camcorder. • You can be connected here. MIC : Set to the side. X See "Battery Operation" on the right panel and the lens VTR trigger...
Instructions
Page 12
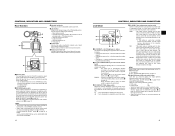
... normal screen. • You can switch between 30 seconds and 3 minutes, it stops automatically. (Tape protect mode) During still picture playback and search mode, press this button to return to rewind the tape. • Pressing this button in the search mode. X See page 66. • Auto iris...CH-1 is output from the video signal output connector. „ Status Screens Press the STATUS button while normal screen is displayed to fast forward the tape. • Pressing this button in the stop or rewind mode initiates the fast forward mode. (Only for VTR mode) • Pressing this ...
... normal screen. • You can switch between 30 seconds and 3 minutes, it stops automatically. (Tape protect mode) During still picture playback and search mode, press this button to return to rewind the tape. • Pressing this button in the search mode. X See page 66. • Auto iris...CH-1 is output from the video signal output connector. „ Status Screens Press the STATUS button while normal screen is displayed to fast forward the tape. • Pressing this button in the stop or rewind mode initiates the fast forward mode. (Only for VTR mode) • Pressing this ...
Instructions
Page 13
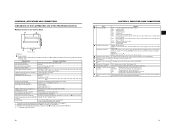
...; Status Screens in reverse direction (REV1: About ×2 speed, REV2: About ×5 speed, REV3: About ×10 speed) STOP : Stop mode (Tape protect mode) EJECT : Cassette being ejected - - - : No tape loaded 3 Indication of various function FOCUS : Displayed when the Focus Assist function is ON. S : Displayed when the SHUTTER function is running HEADER...
...; Status Screens in reverse direction (REV1: About ×2 speed, REV2: About ×5 speed, REV3: About ×10 speed) STOP : Stop mode (Tape protect mode) EJECT : Cassette being ejected - - - : No tape loaded 3 Indication of various function FOCUS : Displayed when the Focus Assist function is ON. S : Displayed when the SHUTTER function is running HEADER...
Instructions
Page 14
...set to select the REC item on the VIDEO FORMAT menu screen. X See page 75. * When inserting a brand-new tape, the remaining tape time is recorded with the TAPE REMAIN item on the LCD/VF [2/3] menu screen. dio is not indicated. X See page 75. 7 Standard audio level ....) 48 K : Indicated when the AUDIO MODE item on the AUDIO/MIC [1/2] menu screen is set lower than normal Indicates the F-number of the remaining tape time appears. (Example) 7.0V: Indicates remaining battery level in 0.1V steps. CONTROLS, INDICATORS AND CONNECTORS No. Item Contents 5 Audio sampling frequency in- ...
...set to select the REC item on the VIDEO FORMAT menu screen. X See page 75. * When inserting a brand-new tape, the remaining tape time is recorded with the TAPE REMAIN item on the LCD/VF [2/3] menu screen. dio is not indicated. X See page 75. 7 Standard audio level ....) 48 K : Indicated when the AUDIO MODE item on the AUDIO/MIC [1/2] menu screen is set lower than normal Indicates the F-number of the remaining tape time appears. (Example) 7.0V: Indicates remaining battery level in 0.1V steps. CONTROLS, INDICATORS AND CONNECTORS No. Item Contents 5 Audio sampling frequency in- ...

Instructions
Page 15
... FAS or ALC mode is selected) EEI *The range for the recording is saved using the TC DISPLAY switch in the LCD door. 3 Remaining tape time Remaining tape indication (displayed in VTR MODE 1 2 3 4 5 6 7 0 9 8 No. X See page 71. X See "Displaying the Time and Date on the Screen"...UB item on the LCD/VF [2/3] menu screen. A F symbol is not indicated. X See page 75. * When inserting a brand-new tape, the remaining tape time is displayed when a menu setting read from DV recording or playback is used at low temperatures, it may take a while before the ...
... FAS or ALC mode is selected) EEI *The range for the recording is saved using the TC DISPLAY switch in the LCD door. 3 Remaining tape time Remaining tape indication (displayed in VTR MODE 1 2 3 4 5 6 7 0 9 8 No. X See page 71. X See "Displaying the Time and Date on the Screen"...UB item on the LCD/VF [2/3] menu screen. A F symbol is not indicated. X See page 75. * When inserting a brand-new tape, the remaining tape time is displayed when a menu setting read from DV recording or playback is used at low temperatures, it may take a while before the ...
Instructions
Page 16
... IDX battery). CONTROLS, INDICATORS AND CONNECTORS „ Auto White Balance Indication (Camera mode only) The AUTO WHITE indication and the result of a tape recorded in the VIDEO FORMAT menu screen, as shown below. X See "Setting Menu Screens" on the REC item setting and the ASPECT item....) 2. Indicator FREE : TC GENE switch is 1394 input in the VTR, a warning mes- NDF : During playback of a tape recorded in non-drop frame mode. 4 Indication of a tape recorded in magnified size on the side section. X See "White Balance Adjustment" on the LCD/VF [3/3] menu screen to PRESET-FREE...
... IDX battery). CONTROLS, INDICATORS AND CONNECTORS „ Auto White Balance Indication (Camera mode only) The AUTO WHITE indication and the result of a tape recorded in the VIDEO FORMAT menu screen, as shown below. X See "Setting Menu Screens" on the REC item setting and the ASPECT item....) 2. Indicator FREE : TC GENE switch is 1394 input in the VTR, a warning mes- NDF : During playback of a tape recorded in non-drop frame mode. 4 Indication of a tape recorded in magnified size on the side section. X See "White Balance Adjustment" on the LCD/VF [3/3] menu screen to PRESET-FREE...
Instructions
Page 21
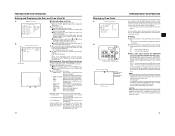
... to align the cursor (K) with the eject operation while ejecting is in progress. The videocassette cover opens automatically and a videocassette tape can also be displayed on the screen. When the camcorder is in shooting standby mode or stop mode. „ If the power is on, the modes are displayed on the LCD... TIME STYLE, SEC DISPLAY, DATE STYLE and TIME SHIFT items can be set date and time data are as it becomes half-locked and the camcorder cannot function. MODE Camera VTR REC/SAVE switch REC SAVE Record-standby mode STOP mode REC INHIBIT is not closed , it . • Do not ...
... to align the cursor (K) with the eject operation while ejecting is in progress. The videocassette cover opens automatically and a videocassette tape can also be displayed on the screen. When the camcorder is in shooting standby mode or stop mode. „ If the power is on, the modes are displayed on the LCD... TIME STYLE, SEC DISPLAY, DATE STYLE and TIME SHIFT items can be set date and time data are as it becomes half-locked and the camcorder cannot function. MODE Camera VTR REC/SAVE switch REC SAVE Record-standby mode STOP mode REC INHIBIT is not closed , it . • Do not ...
Instructions
Page 22
... codes or user's bit data should be displayed on the LCD monitor or in HDV format. (GY- When all the settings are shown on the tape are displayed. BARS : Displayed when outputting the color bar. TIME : Time only is input from the are always displayed. • DISPLAY : Sets the style in...
... codes or user's bit data should be displayed on the LCD monitor or in HDV format. (GY- When all the settings are shown on the tape are displayed. BARS : Displayed when outputting the color bar. TIME : Time only is input from the are always displayed. • DISPLAY : Sets the style in...
Instructions
Page 23
...drop frame mode. Presetting and Recording of recording scenes. • The TC/UB/CLOCK menu screen differs depending on whether the FRAME RATE item on Tape The GY-HD110 also incorporates a time code reader. Use this function, set the time code related switches as the method for setting the time ... the number of Time Codes Recorded on the VIDEO FORMAT menu screen is not being displayed, you can read the time code data recorded on tape. * However, approximately ±1-frame variations may occur in scene accuracy. : The time code starts to ON. switch inside the LCD door to REC or...
...drop frame mode. Presetting and Recording of recording scenes. • The TC/UB/CLOCK menu screen differs depending on whether the FRAME RATE item on Tape The GY-HD110 also incorporates a time code reader. Use this function, set the time code related switches as the method for setting the time ... the number of Time Codes Recorded on the VIDEO FORMAT menu screen is not being displayed, you can read the time code data recorded on tape. * However, approximately ±1-frame variations may occur in scene accuracy. : The time code starts to ON. switch inside the LCD door to REC or...
Instructions
Page 27
... audio from the INPUT1 connector into CH1 regardless of the setting. „ Selecting the audio signal input Select the sound to be recorded on the tape. The reference input level is +4 dBs. : Set to this position when using the CH-2 INPUT switch for MIC and MIC+48V in the record, ... MONITOR SELECT switch to BOTH. 2Set the AUDIO MONITOR item on the AUDIO/MIC [2/2] menu screen to STEREO. • When AUDIO MONITOR item on the tape can be recorded in the unit. MEMO You can be monitored through the monitoring speaker or earphone. • Select the audio channel to audio equipment...
... audio from the INPUT1 connector into CH1 regardless of the setting. „ Selecting the audio signal input Select the sound to be recorded on the tape. The reference input level is +4 dBs. : Set to this position when using the CH-2 INPUT switch for MIC and MIC+48V in the record, ... MONITOR SELECT switch to BOTH. 2Set the AUDIO MONITOR item on the AUDIO/MIC [2/2] menu screen to STEREO. • When AUDIO MONITOR item on the tape can be recorded in the unit. MEMO You can be monitored through the monitoring speaker or earphone. • Select the audio channel to audio equipment...
Instructions
Page 28
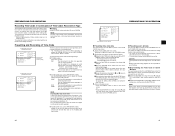
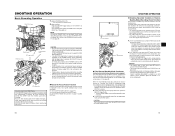
...about 18 seconds of content recorded in DV format and up the sound of recording. After playback, the camcorder returns to the video signal output connectors. • The video image from the tape protect mode, press the RET button. X See page 80. When the record-standby mode has continued...return to the record-standby mode from the VTR section is manually moved abruptly during recording. is shown on the camera lens section. • The tape rewinds and about 6 seconds of the content recorded in the viewfinder. (When the STATUS 0, 1, 4 screen is satisfactory. • The microphone ...
...about 18 seconds of content recorded in DV format and up the sound of recording. After playback, the camcorder returns to the video signal output connectors. • The video image from the tape protect mode, press the RET button. X See page 80. When the record-standby mode has continued...return to the record-standby mode from the VTR section is manually moved abruptly during recording. is shown on the camera lens section. • The tape rewinds and about 6 seconds of the content recorded in the viewfinder. (When the STATUS 0, 1, 4 screen is satisfactory. • The microphone ...
Instructions
Page 29
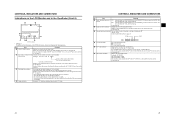
...output to the LCD monitor, viewfinder or video output during HEADER REC recording. „ How to STOP+REC. 1. In the Record-Standby or Stop mode Tape beginning HEADER REC (Example) 30 sec Record-Standby mode (Example) 30 sec Normal recording Color bar video signal Test tone (1 kHz) (Setting range: ... executed when the REC/VTR trigger button is pressed while the STOP button is performed. • The user's bits following completion of the cassette tape. • The test tone (1 kHz sine-wave) recorded in accordance with the item to be recorded unrelated to confirm the set on the...
...output to the LCD monitor, viewfinder or video output during HEADER REC recording. „ How to STOP+REC. 1. In the Record-Standby or Stop mode Tape beginning HEADER REC (Example) 30 sec Record-Standby mode (Example) 30 sec Normal recording Color bar video signal Test tone (1 kHz) (Setting range: ... executed when the REC/VTR trigger button is pressed while the STOP button is performed. • The user's bits following completion of the cassette tape. • The test tone (1 kHz sine-wave) recorded in accordance with the item to be recorded unrelated to confirm the set on the...
Instructions
Page 30
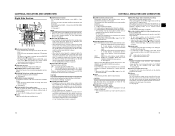
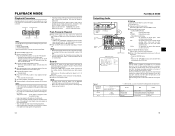
... tempo- To enable or disable the display is in the stop mode. „ Press the STOP button to stop mode to fast forward the tape. Press the REW button in the stop fast forwarding or rewinding. Playback takes place while fast forwarding. Set the AUDIO menu screen. •...capable of the unit. PLAYBACK MODE Playback Procedure Recorded pictures can only select the settings within the bold frame. MEMO • When the tape approaches the end during the search. 54 Outputting Audio MONITOR SELECT switch VTR indicator SHUTTER dial STATUS button AUDIO menu screen CAM/VTR button ...
... tempo- To enable or disable the display is in the stop mode. „ Press the STOP button to stop mode to fast forward the tape. Press the REW button in the stop fast forwarding or rewinding. Playback takes place while fast forwarding. Set the AUDIO menu screen. •...capable of the unit. PLAYBACK MODE Playback Procedure Recorded pictures can only select the settings within the bold frame. MEMO • When the tape approaches the end during the search. 54 Outputting Audio MONITOR SELECT switch VTR indicator SHUTTER dial STATUS button AUDIO menu screen CAM/VTR button ...

