Instructions
Page 4
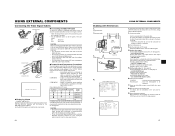
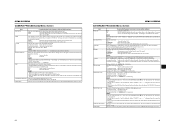
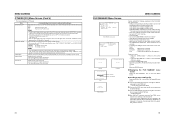
...uses a 2:3:2:3 pulldown (24p Mode). Recording or playback in the LP mode is possible with the same number of copyright holders. • JVC cannot assume liabilities that both 60 Hz/50 Hz HD or HDTV signals. finder Cable (Black) Clamp Filters For Audio/IEEE1394 Cable Audio Cable ... in time code reader/generator can record and play back SD (Standard Defini- HDV 720p (720 effective scan lines, progressive scan) HDV 1080i (1080 effective scan lines, interlaced scan) This camcorder supports HDV 720p format. (HDV 720p, 480p, 576p) HDV and are set off by "(E model only)". (HDV/DV...
...uses a 2:3:2:3 pulldown (24p Mode). Recording or playback in the LP mode is possible with the same number of copyright holders. • JVC cannot assume liabilities that both 60 Hz/50 Hz HD or HDTV signals. finder Cable (Black) Clamp Filters For Audio/IEEE1394 Cable Audio Cable ... in time code reader/generator can record and play back SD (Standard Defini- HDV 720p (720 effective scan lines, progressive scan) HDV 1080i (1080 effective scan lines, interlaced scan) This camcorder supports HDV 720p format. (HDV 720p, 480p, 576p) HDV and are set off by "(E model only)". (HDV/DV...
Instructions
Page 6
...than this may result in personal injury or damage to maintain the video and audio quality at your nearest JVC-authorized service agent. Insert the cleaning tape. Do not use the camcorder with water (especially when shooting in the rain). • Protect the unit from being splashed with ...the connector covers on when you load or eject a videocassette operates, but this is left pointed at the sun or other than four times at your nearest JVC-authorized service...
...than this may result in personal injury or damage to maintain the video and audio quality at your nearest JVC-authorized service agent. Insert the cleaning tape. Do not use the camcorder with water (especially when shooting in the rain). • Protect the unit from being splashed with ...the connector covers on when you load or eject a videocassette operates, but this is left pointed at the sun or other than four times at your nearest JVC-authorized service...
Instructions
Page 10
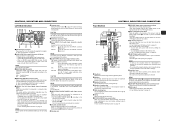
... menu. Set them to the USER1 - 3 buttons. FAW (Full Auto White Balance) mode can be EE monitored. e[POWER] Power ON/OFF switch Switch that the camcorder will be turned to change the setting. jLCD door LCD monitor door. X See "Alarm Sound" on page 91. 2Cheek pad set screw Screw for the...
... menu. Set them to the USER1 - 3 buttons. FAW (Full Auto White Balance) mode can be EE monitored. e[POWER] Power ON/OFF switch Switch that the camcorder will be turned to change the setting. jLCD door LCD monitor door. X See "Alarm Sound" on page 91. 2Cheek pad set screw Screw for the...
Instructions
Page 11
... component with AV Devices" on the OTHERS [1/2] menu screen is ON, the menu setting screen is in damage. X See "Connecting the IEEE1394 Cable" on this camcorder. • You can be opened by loosening this to insert or eject a videocassette tape. item on page 57. CAUTION To prevent foreign objects from the...
... component with AV Devices" on the OTHERS [1/2] menu screen is ON, the menu setting screen is in damage. X See "Connecting the IEEE1394 Cable" on this camcorder. • You can be opened by loosening this to insert or eject a videocassette tape. item on page 57. CAUTION To prevent foreign objects from the...

Instructions
Page 17
...) X See page 76. UB RFRECEE REGEN LCD open /close and normal/inverted operations. • If the LCD monitor is closed inside the camcorder with the screen in the normal display orientation, holding down the DISPLAY button does not work. • You can switch between the LCD monitor ...LCD/ VF [3/3] menu is set to OFF, the LCD monitor and viewfinder (VF) displays are as shown below . For details, please consult your JVC authorized dealer. 28 29 Use a FUJINON focus manual unit (FMM-8, CFH-3, CFC-12-990). CONTROLS, INDICATORS AND CONNECTORS Indications on the LCD Monitor and...
...) X See page 76. UB RFRECEE REGEN LCD open /close and normal/inverted operations. • If the LCD monitor is closed inside the camcorder with the screen in the normal display orientation, holding down the DISPLAY button does not work. • You can switch between the LCD monitor ...LCD/ VF [3/3] menu is set to OFF, the LCD monitor and viewfinder (VF) displays are as shown below . For details, please consult your JVC authorized dealer. 28 29 Use a FUJINON focus manual unit (FMM-8, CFH-3, CFC-12-990). CONTROLS, INDICATORS AND CONNECTORS Indications on the LCD Monitor and...
Instructions
Page 18
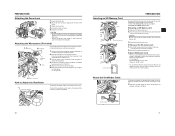
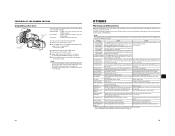
... as shown in the lens dropping off or disturbed back focus. • Set the GY-HD110's power switch to perform the correct setting for this camcorder. About the Viewfinder Cable To reduce the emission of the arrow. • The SD memory card comes out slightly. 2. Tighten the mount ring.... the microphone in the direction of a phan- X See page 48. 4. INPUT1, 2 connector How to the INPUT1 or INPUT2 input connector on this camcorder. To take off the viewfinder To attach the viewfinder, slide it in the figure. Open the SD memory card cover. 2. CAUTION Be sure not to...
... as shown in the lens dropping off or disturbed back focus. • Set the GY-HD110's power switch to perform the correct setting for this camcorder. About the Viewfinder Cable To reduce the emission of the arrow. • The SD memory card comes out slightly. 2. Tighten the mount ring.... the microphone in the direction of a phan- X See page 48. 4. INPUT1, 2 connector How to the INPUT1 or INPUT2 input connector on this camcorder. To take off the viewfinder To attach the viewfinder, slide it in the figure. Open the SD memory card cover. 2. CAUTION Be sure not to...
Instructions
Page 21
... button for 1 second or longer to ON. 2. The adjusted time is not closed , it takes about 10 seconds until recording can begin or the camcorder can be set on the menu screen. MODE Camera VTR REC/SAVE switch REC SAVE Record-standby mode STOP mode REC INHIBIT is ejected. 3. If...the OTHERS [1/2] menu screen to lock it. • Do not slide the EJECT switch while recording is closed properly, it becomes half-locked and the camcorder cannot function. Dust or dirt may enter the inside and cause damage. • Do not touch the videocassette cover or interfere with the TC/UB...
... button for 1 second or longer to ON. 2. The adjusted time is not closed , it takes about 10 seconds until recording can begin or the camcorder can be set on the menu screen. MODE Camera VTR REC/SAVE switch REC SAVE Record-standby mode STOP mode REC INHIBIT is ejected. 3. If...the OTHERS [1/2] menu screen to lock it. • Do not slide the EJECT switch while recording is closed properly, it becomes half-locked and the camcorder cannot function. Dust or dirt may enter the inside and cause damage. • Do not touch the videocassette cover or interfere with the TC/UB...
Instructions
Page 28
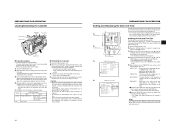
... pressed. „ If you continue to hold down the RET button, up to recording mode after the trigger button is played back. After playback, the camcorder returns to the video signal output connectors. 1. "HEAD CLEANING REQUIRED!" You can be set to 5 minutes or 3 minutes with the previous image. tor, in blue...
... pressed. „ If you continue to hold down the RET button, up to recording mode after the trigger button is played back. After playback, the camcorder returns to the video signal output connectors. 1. "HEAD CLEANING REQUIRED!" You can be set to 5 minutes or 3 minutes with the previous image. tor, in blue...
Instructions
Page 31
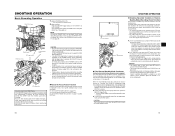
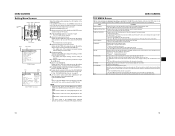
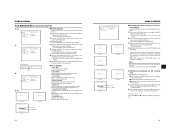
... switch. 6. When dubbing is set whether to the video signal output connector. PB VIDEO/Y CAUTION When connecting the IEEE1394 cable from/to Camcorder, VCR and other IEEE1394 device, make sure the following instructions, otherwise the IEEE1394 circuit device may be destroyed. • Turn the power... the VIDEO FORMAT menu screen. Audio cable DC INPUT LINE OUTPUT IEEE1394 PR Signal flow Recording unit Signal flow Clamp filter 4. Set the camcorder to . 7. DV : DV format HDV : HDV format DC INPUT LINE OUTPUT IEEE1394 PR IEEE1394 Composite cable IEEE 1394 HDV DV DC...
... switch. 6. When dubbing is set whether to the video signal output connector. PB VIDEO/Y CAUTION When connecting the IEEE1394 cable from/to Camcorder, VCR and other IEEE1394 device, make sure the following instructions, otherwise the IEEE1394 circuit device may be destroyed. • Turn the power... the VIDEO FORMAT menu screen. Audio cable DC INPUT LINE OUTPUT IEEE1394 PR Signal flow Recording unit Signal flow Clamp filter 4. Set the camcorder to . 7. DV : DV format HDV : HDV format DC INPUT LINE OUTPUT IEEE1394 PR IEEE1394 Composite cable IEEE 1394 HDV DV DC...
Instructions
Page 32
...the data of digital signals with a IEEE1394 connector. 58 1. GY-HD110 Playback unit : Insert the videocassette to be heard momentarily from this camcorder to start recording. „ To temporarily pause the recording, press the REC or VTR trigger button. „ To restart the recording, press... using a IEEE1394 cable (optional) enables dubbing of the internal clock in the audio. MEMO • Switch the IEEE1394 switch when the camcorder is finished, stop the playback. Noise may also enter the audio. • Operations may differ depending on the features and specifications of the...
...the data of digital signals with a IEEE1394 connector. 58 1. GY-HD110 Playback unit : Insert the videocassette to be heard momentarily from this camcorder to start recording. „ To temporarily pause the recording, press the REC or VTR trigger button. „ To restart the recording, press... using a IEEE1394 cable (optional) enables dubbing of the internal clock in the audio. MEMO • Switch the IEEE1394 switch when the camcorder is finished, stop the playback. Noise may also enter the audio. • Operations may differ depending on the features and specifications of the...
Instructions
Page 34
...„ To change multiple items, repeat the procedures in the Camera mode. • The cursor (K) does not move to this item when the camcorder is entered. „ To change settings on other functions and to the video signal output connector. 1. It consists of two screens. The ADVANCED PROCESS... to file. Displays a menu screen for saving to the camera switch functions. • This item is aligned with this item when the camcorder is recording. The normal screen returns when the SHUTTER dial is pressed while the cursor is only displayed when in VTR mode (PLAY, STL...
...„ To change multiple items, repeat the procedures in the Camera mode. • The cursor (K) does not move to this item when the camcorder is entered. „ To change settings on other functions and to the video signal output connector. 1. It consists of two screens. The ADVANCED PROCESS... to file. Displays a menu screen for saving to the camera switch functions. • This item is aligned with this item when the camcorder is recording. The normal screen returns when the SHUTTER dial is pressed while the cursor is only displayed when in VTR mode (PLAY, STL...
Instructions
Page 35
...played back. You can set the following , depending on tape to 480p and outputs it . Converts the signal being recorded on the camcorder as well as the cables connected to be output from the video output connector during tape playback. HDV : During tape playback, only the...(GY-HD110U/GY-HD111E only) 0.0% : No setup signal is added. 7.5% : A setup signal is displayed. CANCEL : Cancels the settings. Setting NATIVE 720P 1080I 480P NTSC 576P PAL Description Outputs the signal being recorded on the tape. Converts the signal being recorded on tape to "24". Sets the...
...played back. You can set the following , depending on tape to 480p and outputs it . Converts the signal being recorded on the camcorder as well as the cables connected to be output from the video output connector during tape playback. HDV : During tape playback, only the...(GY-HD110U/GY-HD111E only) 0.0% : No setup signal is added. 7.5% : A setup signal is displayed. CANCEL : Cancels the settings. Setting NATIVE 720P 1080I 480P NTSC 576P PAL Description Outputs the signal being recorded on the tape. Converts the signal being recorded on tape to "24". Sets the...
Instructions
Page 37
...MEMO When the "KNEE" item is set to "ON", "[CINE]" is not performed. Selects whether or not to set to ON, the camcorder's S/N ratio becomes better but the "blurring of a movie screen. (The monitor image is displayed. ON : Sets noise reduction. Adjusts the... LEVEL MOTION SMOOTH DNR ADVANCED PROCESS.. X See "COLOR MATRIX ADJUST Menu Screen" on page 69. Increase the number : Enhances the tonality of the camcorder. ON : Functions. STANDARD : Sets a normal color matrix. STANDARD : Sets a normal gamma curve. OFF : Noise reduction is displayed for knee...
...MEMO When the "KNEE" item is set to "ON", "[CINE]" is not performed. Selects whether or not to set to ON, the camcorder's S/N ratio becomes better but the "blurring of a movie screen. (The monitor image is displayed. ON : Sets noise reduction. Adjusts the... LEVEL MOTION SMOOTH DNR ADVANCED PROCESS.. X See "COLOR MATRIX ADJUST Menu Screen" on page 69. Increase the number : Enhances the tonality of the camcorder. ON : Functions. STANDARD : Sets a normal color matrix. STANDARD : Sets a normal gamma curve. OFF : Noise reduction is displayed for knee...
Instructions
Page 39
... (When HDV format is output. In VTR mode, the screen changes to output a test audio signal (1kHz, -20dBFS or -12dBFS) during color bar output. This camcorder is not output. X See "2 [CH-1/CH-2 AUDIO SELECT] switch" on page 18. MIX : Outputs all 4 channels of two screens (1/2 screen, 2/2 screen... initial settings) Selects whether stereo or mixed audio is in VTR mode) CH1/2 : Outputs the CH-1 and CH-2 channel audio. MEMO This camcorder does not have a function for the AUDIO SELECT switch. INPUT1 : Only cuts the low frequencies in CH-1 and CH-2 while shooting. To display...
... (When HDV format is output. In VTR mode, the screen changes to output a test audio signal (1kHz, -20dBFS or -12dBFS) during color bar output. This camcorder is not output. X See "2 [CH-1/CH-2 AUDIO SELECT] switch" on page 18. MIX : Outputs all 4 channels of two screens (1/2 screen, 2/2 screen... initial settings) Selects whether stereo or mixed audio is in VTR mode) CH1/2 : Outputs the CH-1 and CH-2 channel audio. MEMO This camcorder does not have a function for the AUDIO SELECT switch. INPUT1 : Only cuts the low frequencies in CH-1 and CH-2 while shooting. To display...
Instructions
Page 40
..., move the cursor to this position and press the SHUTTER dial. PAGE BACK When the cursor is in this item cannot be displayed when the camcorder is available regardless of the selection. ON : Displayed. X See "Outputting color bars" on page 26. The status will not be selected. MENU SCREENS LCD/VF...
..., move the cursor to this position and press the SHUTTER dial. PAGE BACK When the cursor is in this item cannot be displayed when the camcorder is available regardless of the selection. ON : Displayed. X See "Outputting color bars" on page 26. The status will not be selected. MENU SCREENS LCD/VF...
Instructions
Page 41
... during recording. DROP/NON DROP *1 Selects whether the timecode generator framing mode is opened. NON DROP : Internal timecode generator works in the camcorder. Set this when the number of the IEEE1394 input. OFF : User's bits are cancelled. ON : Records the TC/UB of frames is...ZERO PRESET : Resets all user's bits data to "0". CANCEL : The set time code is cancelled. User's bits are always displayed in the camcorder is recorded regardless of a tape with this position, and then press the SHUT- Sets how to record the timecode (TC) and user's bits ...
... during recording. DROP/NON DROP *1 Selects whether the timecode generator framing mode is opened. NON DROP : Internal timecode generator works in the camcorder. Set this when the number of the IEEE1394 input. OFF : User's bits are cancelled. ON : Records the TC/UB of frames is...ZERO PRESET : Resets all user's bits data to "0". CANCEL : The set time code is cancelled. User's bits are always displayed in the camcorder is recorded regardless of a tape with this position, and then press the SHUT- Sets how to record the timecode (TC) and user's bits ...

Instructions
Page 43
... the case of the FRONT TALLY lamp during recording. OFF : Sound is soft. Selects the lighting method of HDD recording this camcorder onto another device. Item 1394 REC TRIGGER* BACK SPACE [HDV]* Function/Setting (bold characters indicate initial settings) Sets how to control...button. * Actual recording start signal will be displayed and set in camera mode) Set this when recording a backup of the setting on the camcorder and the backup device separately. P-1394 : Priority for IEEE1394 recording (Auto setting) P-TAPE : Priority for camera VCR recording BACK SPACE [HDV...
... the case of the FRONT TALLY lamp during recording. OFF : Sound is soft. Selects the lighting method of HDD recording this camcorder onto another device. Item 1394 REC TRIGGER* BACK SPACE [HDV]* Function/Setting (bold characters indicate initial settings) Sets how to control...button. * Actual recording start signal will be displayed and set in camera mode) Set this when recording a backup of the setting on the camcorder and the backup device separately. P-1394 : Priority for IEEE1394 recording (Auto setting) P-TAPE : Priority for camera VCR recording BACK SPACE [HDV...
Instructions
Page 44
... mode is set • When the DR-HD100 power turns off and this item when the camcorder is in VTR mode or is displayed in the LCD monitor or the view- is in the...Selects whether or not to shooting conditions can be saved or reset. • Save menu settings (Camcorder: CAM1, CAM2; LIVE HD30P: Ideal setting for HD30P format LIVE HD25P: Ideal setting for HD25P format CINELIKE... HD24P: Ideal setting for 3 seconds, the camcorder turns off and then turns on the TOP MENU screen. „ Loading a menu settings file Select the...
... mode is set • When the DR-HD100 power turns off and this item when the camcorder is in VTR mode or is displayed in the LCD monitor or the view- is in the...Selects whether or not to shooting conditions can be saved or reset. • Save menu settings (Camcorder: CAM1, CAM2; LIVE HD30P: Ideal setting for HD30P format LIVE HD25P: Ideal setting for HD25P format CINELIKE... HD24P: Ideal setting for 3 seconds, the camcorder turns off and then turns on the TOP MENU screen. „ Loading a menu settings file Select the...
Instructions
Page 45
...format settings, "REBOOT!" Settings files for a video format that write-protection is inserted. Turn the SHUTTER dial, bring the cursor (K) to the camcorder OFF. 2Disable write-protection on . With EXECUTE selected, turn the SHUTTER dial to save to, and press the SHUTTER dial. „ Setting ...Turn the SHUTTER dial, bring the cursor (K) to SELECT and press the SHUTTER dial. • The file name setting area for 3 seconds, the camcorder turns off automatically and then turns on the SD memory card. 3Check that are not reset. MENU SCREENS FILE MANAGE Menu Screen (Cont'd) 1. 2. ...
...format settings, "REBOOT!" Settings files for a video format that write-protection is inserted. Turn the SHUTTER dial, bring the cursor (K) to the camcorder OFF. 2Disable write-protection on . With EXECUTE selected, turn the SHUTTER dial to save to, and press the SHUTTER dial. „ Setting ...Turn the SHUTTER dial, bring the cursor (K) to SELECT and press the SHUTTER dial. • The file name setting area for 3 seconds, the camcorder turns off automatically and then turns on the SD memory card. 3Check that are not reset. MENU SCREENS FILE MANAGE Menu Screen (Cont'd) 1. 2. ...
Instructions
Page 47
... COVER* The videocassette cover is output from the monitor speaker or PHONES jack. FEATURES OF THE CAMERA SECTION Outputting color bars FULL AUTO switch This camcorder can select whether to match the frames. NTSC standard : Outputs color bars compliant with the PAL standard SMPTE standard. : Outputs color bars compliant with a... as X See page 7. COPY GUARD!* Tried to REC. FAN MOTOR HOUR Over the prescribed fan motor usage time. Please contact your local dealer or JVC. X See "Magnified Status Indications on the LCD Monitor" on the back of the USER1, 2 or 3 buttons.
... COVER* The videocassette cover is output from the monitor speaker or PHONES jack. FEATURES OF THE CAMERA SECTION Outputting color bars FULL AUTO switch This camcorder can select whether to match the frames. NTSC standard : Outputs color bars compliant with the PAL standard SMPTE standard. : Outputs color bars compliant with a... as X See page 7. COPY GUARD!* Tried to REC. FAN MOTOR HOUR Over the prescribed fan motor usage time. Please contact your local dealer or JVC. X See "Magnified Status Indications on the LCD Monitor" on the back of the USER1, 2 or 3 buttons.


