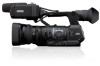
GY-HM600U Instruction Manual (135 pages)
Page 8
... Cards 41 Shooting Basic Shooting Procedures 42 Selecting System Definition, File Format and Video Format 43 Zoom Operation 44 Focus Operation 45 Adjusting the Focusing by Face Detection ...... 46 Adjusting the Brightness 48 8 Adjusting the Iris 49 Setting the Gain 50 Setting the Electronic Shutter 51 Setting the ND Filter 53 Adjusting the White Balance 53 Adjusting the Camera Image 56 Using the Image Stabilizer 56 Audio Recording 57 Monitoring Audio Sound During Recording Using a Headphone 59 Time Code and User's Bit 60 Setting Time Code Generator 61 Synchronizing Time Code...
... Cards 41 Shooting Basic Shooting Procedures 42 Selecting System Definition, File Format and Video Format 43 Zoom Operation 44 Focus Operation 45 Adjusting the Focusing by Face Detection ...... 46 Adjusting the Brightness 48 8 Adjusting the Iris 49 Setting the Gain 50 Setting the Electronic Shutter 51 Setting the ND Filter 53 Adjusting the White Balance 53 Adjusting the Camera Image 56 Using the Image Stabilizer 56 Audio Recording 57 Monitoring Audio Sound During Recording Using a Headphone 59 Time Code and User's Bit 60 Setting Time Code Generator 61 Synchronizing Time Code...

GY-HM600U Instruction Manual (135 pages)
Page 9
... Set Item 102 System Menu 104 Record Set Item 105 Adding/Editing Frequently Used Menu Items (Favorites Menu 108 Adding Menu Items to Favorites Menu ...... 108 Editing Favorites Menu 109 Display/Status Screen Display Screen in Camera Mode 112 Display Screen in Media Mode 116 Status Screen 118 Camera Features Marker and Safety Zone Displays (Camera Mode Only 119 Smoothening the Skin Color (Skin Detail Function 119 Color Bar Output 119 Adjusting Color Matrix 120 Configuring Setup Files 121 Saving Setup Files 121 Loading a Setup File 122 Deleting Setup Files 123 Connecting External...
... Set Item 102 System Menu 104 Record Set Item 105 Adding/Editing Frequently Used Menu Items (Favorites Menu 108 Adding Menu Items to Favorites Menu ...... 108 Editing Favorites Menu 109 Display/Status Screen Display Screen in Camera Mode 112 Display Screen in Media Mode 116 Status Screen 118 Camera Features Marker and Safety Zone Displays (Camera Mode Only 119 Smoothening the Skin Color (Skin Detail Function 119 Color Bar Output 119 Adjusting Color Matrix 120 Configuring Setup Files 121 Saving Setup Files 121 Loading a Setup File 122 Deleting Setup Files 123 Connecting External...
GY-HM600U Instruction Manual (135 pages)
Page 10
... zoom ring pin enables zooming from imaging devices are most commonly used as well. Variable Frame Rec Enables beautiful slow motion and quick motion image recording such as digital output. QuickTime (MPEG-2 HD/H.264 SD)/MP4 (MPEG-2 HD)/AVCHD File Format By inheriting the concept in the menu for adjusting preferred tones. 10 These include dual recording of individual R, G, B color signals. 12-bit signal processing and the new 2D DNR removes...
... zoom ring pin enables zooming from imaging devices are most commonly used as well. Variable Frame Rec Enables beautiful slow motion and quick motion image recording such as digital output. QuickTime (MPEG-2 HD/H.264 SD)/MP4 (MPEG-2 HD)/AVCHD File Format By inheriting the concept in the menu for adjusting preferred tones. 10 These include dual recording of individual R, G, B color signals. 12-bit signal processing and the new 2D DNR removes...
GY-HM600U Instruction Manual (135 pages)
Page 13
o This camera recorder saves the recorded images and audio sound on the SD card is not operated correctly. o Depending on the recording format, SD card with a hammer, etc. o If the SD card contains files recorded by physically destroying the SD card with Class 4 or higher performance can check the usage time of use oil-based pens. Do not turn on the cards. o We are exposed to remove the cards after every 9000 hours (suggested...
o This camera recorder saves the recorded images and audio sound on the SD card is not operated correctly. o Depending on the recording format, SD card with a hammer, etc. o If the SD card contains files recorded by physically destroying the SD card with Class 4 or higher performance can check the usage time of use oil-based pens. Do not turn on the cards. o We are exposed to remove the cards after every 9000 hours (suggested...

GY-HM600U Instruction Manual (135 pages)
Page 14
... the video signal output terminals are not in a cold place, the images may appear to lag on the screen, but this unit continuously for a long period of the viewfinder display device, colors may appear in the image when switching modes. o If placed on its side, heat release efficiency will not appear after the power is turned on the screen. Retained images are manufactured using high...
... the video signal output terminals are not in a cold place, the images may appear to lag on the screen, but this unit continuously for a long period of the viewfinder display device, colors may appear in the image when switching modes. o If placed on its side, heat release efficiency will not appear after the power is turned on the screen. Retained images are manufactured using high...
GY-HM600U Instruction Manual (135 pages)
Page 17
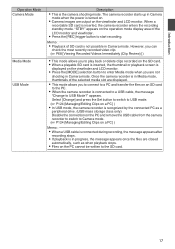
... playback screen is turned on the viewfinder and LCD monitor. 0 Press the [MODE] selection button to start recording. appears. "STBY" appears on the viewfinder and LCD monitor. The camera recorder starts up in Camera mode when the power is displayed on . 0 Camera images are not shooting in Camera mode. However, you can check the most recently recorded video clip. (A P68 [Viewing Recorded Videos Immediately (Clip Review)] ) 0 This mode allows you are output on the operation mode display area of SD card is connected...
... playback screen is turned on the viewfinder and LCD monitor. 0 Press the [MODE] selection button to start recording. appears. "STBY" appears on the viewfinder and LCD monitor. The camera recorder starts up in Camera mode when the power is displayed on . 0 Camera images are not shooting in Camera mode. However, you can check the most recently recorded video clip. (A P68 [Viewing Recorded Videos Immediately (Clip Review)] ) 0 This mode allows you are output on the operation mode display area of SD card is connected...
GY-HM600U Instruction Manual (135 pages)
Page 22
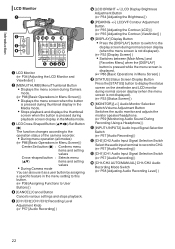
... Camera mode. (A P86 [Basic Operations in Menu Screen] ) 0 Displays the menu screen when the button is pressed during playback screen display in the menu setting to this button. (A P36 [Assigning Functions to User Buttons] ) D [CANCEL] Cancel Button Cancels various settings and stops playback. C LCD Cross-Shaped Button (JKHI)/Set Button (R) The function changes according to CH2. (A P57 [Audio Recording] ) M [CH1] CH1 Audio Input Signal Selection Switch (A P57 [Audio Recording] ) N [CH1/CH2 AUTO/MANUAL] CH1/CH2 Audio Recording Mode Switch (A P58 [Adjusting Audio Recording Level...
... Camera mode. (A P86 [Basic Operations in Menu Screen] ) 0 Displays the menu screen when the button is pressed during playback screen display in the menu setting to this button. (A P36 [Assigning Functions to User Buttons] ) D [CANCEL] Cancel Button Cancels various settings and stops playback. C LCD Cross-Shaped Button (JKHI)/Set Button (R) The function changes according to CH2. (A P57 [Audio Recording] ) M [CH1] CH1 Audio Input Signal Selection Switch (A P57 [Audio Recording] ) N [CH1/CH2 AUTO/MANUAL] CH1/CH2 Audio Recording Mode Switch (A P58 [Adjusting Audio Recording Level...

GY-HM600U Instruction Manual (135 pages)
Page 28
... power. 2 POWER ON 1 OFF (CHG) MODE . 1 Connect the DC cable of the AC adapter to the [DC] terminal of the camera recorder. 0 Check that the power switch of the Menu Screen] ) . 28 Preparations Using AC Power (DC IN Power) Use the supplied AC adapter to operate the camera recorder with insufficient capacity. When this happens, set the [POWER ON/OFF(CHG)] switch to "ON" to display the [Initial Setting] screen, then set the date/time. (A P30 [Initial Settings] ) Power Status Display Viewfinder Screen and LCD...
... power. 2 POWER ON 1 OFF (CHG) MODE . 1 Connect the DC cable of the AC adapter to the [DC] terminal of the camera recorder. 0 Check that the power switch of the Menu Screen] ) . 28 Preparations Using AC Power (DC IN Power) Use the supplied AC adapter to operate the camera recorder with insufficient capacity. When this happens, set the [POWER ON/OFF(CHG)] switch to "ON" to display the [Initial Setting] screen, then set the date/time. (A P30 [Initial Settings] ) Power Status Display Viewfinder Screen and LCD...

GY-HM600U Instruction Manual (135 pages)
Page 35
... display the viewfinder screen in black and white. 0 [Main Menu] B [LCD/VF] B [VF Color] item B Press Set button (R) B Select "Off" B Press Set button (R). (A P97 [ VF Color ] ) 35 Turn the visibility adjustment lever to adjust the visibility. It does not affect the recorded images, SDI output, AV output, or HDMI output. 1 Incline the viewfinder vertically to a position that enables easy viewing. 2 Turn the visibility adjustment lever to sharpen the image on the LCD monitor. Adjusting the Brightness Use...
... display the viewfinder screen in black and white. 0 [Main Menu] B [LCD/VF] B [VF Color] item B Press Set button (R) B Select "Off" B Press Set button (R). (A P97 [ VF Color ] ) 35 Turn the visibility adjustment lever to adjust the visibility. It does not affect the recorded images, SDI output, AV output, or HDMI output. 1 Incline the viewfinder vertically to a position that enables easy viewing. 2 Turn the visibility adjustment lever to sharpen the image on the LCD monitor. Adjusting the Brightness Use...

GY-HM600U Instruction Manual (135 pages)
Page 41
... card. Clip (Recorded Data) and Clip Name 0 When recording is stopped, the images, audio and accompanying data which are recorded from the [Format Media] menu on one "clip" on the recording time of the clip. 0 When copying videos in MP4 file format to a HDD using a PC, it is recommended to use [JVC ProHD Clip Manager Software], which is automatically generated for recording in those settings will be generated. 0 When the [System] settings and [QuickTime(MPEG2)] settings are changed...
... card. Clip (Recorded Data) and Clip Name 0 When recording is stopped, the images, audio and accompanying data which are recorded from the [Format Media] menu on one "clip" on the recording time of the clip. 0 When copying videos in MP4 file format to a HDD using a PC, it is recommended to use [JVC ProHD Clip Manager Software], which is automatically generated for recording in those settings will be generated. 0 When the [System] settings and [QuickTime(MPEG2)] settings are changed...

GY-HM600U Instruction Manual (135 pages)
Page 58
...] B [A/V Set] B [Audio Set] menu is disabled. Manual Adjustment Mode (Manual Adjustment) 0 Set the [CH1/CH2 AUTO/MANUAL] switch on the camera recorder even if the [FULL AUTO] switch is set the recording level. 0 You can adjust the level manually during the recording, recording standby, and stop modes. o Setting Input Channel to "INPUT1"/"INPUT2" 1 Set the [CH1/CH2 AUTO/MANUAL] selection switch to "MANUAL" for the two channels (CH1/CH2) manually or automatically. Mic Separation] in the menu to set to "Off" while in microphone and the [AUX] input terminal are used, the recording levels...
...] B [A/V Set] B [Audio Set] menu is disabled. Manual Adjustment Mode (Manual Adjustment) 0 Set the [CH1/CH2 AUTO/MANUAL] switch on the camera recorder even if the [FULL AUTO] switch is set the recording level. 0 You can adjust the level manually during the recording, recording standby, and stop modes. o Setting Input Channel to "INPUT1"/"INPUT2" 1 Set the [CH1/CH2 AUTO/MANUAL] selection switch to "MANUAL" for the two channels (CH1/CH2) manually or automatically. Mic Separation] in the menu to set to "Off" while in microphone and the [AUX] input terminal are used, the recording levels...

GY-HM600U Instruction Manual (135 pages)
Page 60
... Rec enters Free Run mode. (A P105 [ Format ] ) 60 Shooting Time Code and User's Bit Time code and user's bit data are displayed on the display screen. Time Code Operation Mode Set the time code operation in [Main Menu] B [TC/ UB] B [TC Generator]. (A P96 [ TC Generator ] ) Setting Description Free Run(Ext) This mode synchronizes another card, time code will be recorded on the SD card is turned off . When the SD card is replaced, the last time code recorded on the card is read and recorded on a new card so that the time code...
... Rec enters Free Run mode. (A P105 [ Format ] ) 60 Shooting Time Code and User's Bit Time code and user's bit data are displayed on the display screen. Time Code Operation Mode Set the time code operation in [Main Menu] B [TC/ UB] B [TC Generator]. (A P96 [ TC Generator ] ) Setting Description Free Run(Ext) This mode synchronizes another card, time code will be recorded on the SD card is turned off . When the SD card is replaced, the last time code recorded on the card is read and recorded on a new card so that the time code...

GY-HM600U Instruction Manual (135 pages)
Page 61
... recording continuous time code in connecting frames. 0 [Free Run]: Time code starts to "Rec Run" or "Free Run". (A P96 [ TC Generator ] ) 0 [Rec Run]: Preset data in the time code generator operates in the [TC/UB] menu. (A P97 [ TC Preset ] ) Memo : 0 When [Main Menu] B [System] B [Record Set] B [Record Format] B [Frame & Bit Rate] is set to non-drop frame mode. Memo : 0 When [TC/UB] B [TC Generator] is set to drop frame mode. Shooting Setting Time Code Generator Presetting the Time Code Time code and user...
... recording continuous time code in connecting frames. 0 [Free Run]: Time code starts to "Rec Run" or "Free Run". (A P96 [ TC Generator ] ) 0 [Rec Run]: Preset data in the time code generator operates in the [TC/UB] menu. (A P97 [ TC Preset ] ) Memo : 0 When [Main Menu] B [System] B [Record Set] B [Record Format] B [Frame & Bit Rate] is set to non-drop frame mode. Memo : 0 When [TC/UB] B [TC Generator] is set to drop frame mode. Shooting Setting Time Code Generator Presetting the Time Code Time code and user...

GY-HM600U Instruction Manual (135 pages)
Page 63
...SD Card This camera recorder is recorded. Shooting Setting Time Code without Opening the Menu MENU/THUMB CANCEL MENU/THUMB AE LEVEL CANCEL FOCUS ASSIST/1 OIS / 2 TIME CODE . Caution : 0 When the camera recorder is switched to Media mode during editing, editing will close. 0 When editing time code, operations of the [FOCUS ASSIST/1], [OIS/2] buttons that are set in the [Main Menu] B [Camera Function] B [User Switch Set] menu are disabled. [OIS/2] functions as the number reset button. (A P91 [User Switch Set Item] ) Recording Time Code in continuation of the Recorded Time Code on...
...SD Card This camera recorder is recorded. Shooting Setting Time Code without Opening the Menu MENU/THUMB CANCEL MENU/THUMB AE LEVEL CANCEL FOCUS ASSIST/1 OIS / 2 TIME CODE . Caution : 0 When the camera recorder is switched to Media mode during editing, editing will close. 0 When editing time code, operations of the [FOCUS ASSIST/1], [OIS/2] buttons that are set in the [Main Menu] B [Camera Function] B [User Switch Set] menu are disabled. [OIS/2] functions as the number reset button. (A P91 [User Switch Set Item] ) Recording Time Code in continuation of the Recorded Time Code on...

GY-HM600U Instruction Manual (135 pages)
Page 77
..., 18, 12.5, 10, 6, 2 Effect during playback Slow motion Standard Quick motion 77 Shooting Variable Frame Rec Shooting in this mode allows you can be changed during recording. To enable Variable Frame Rec, the following two settings are added to "30p(HQ)", "24p(HQ)", or "25p(HQ)". Using different frame rate settings for recording and playback, videos captured at the same time. 0 [Resolution] in the [Record Format] menu is set to the ending of Frames...
..., 18, 12.5, 10, 6, 2 Effect during playback Slow motion Standard Quick motion 77 Shooting Variable Frame Rec Shooting in this mode allows you can be changed during recording. To enable Variable Frame Rec, the following two settings are added to "30p(HQ)", "24p(HQ)", or "25p(HQ)". Using different frame rate settings for recording and playback, videos captured at the same time. 0 [Resolution] in the [Record Format] menu is set to the ending of Frames...

GY-HM600U Instruction Manual (135 pages)
Page 89
... Date/Time Time Zone System Information . . LCD + VF VF Color VF Bright VF Contrast LCD Contrast LCD Backlight LCD Mirror A/V Set... Bars OIS Flicker Correction Shutter AE Level AE Speed ALC Limit Auto Iris Limit (OPEN) Auto Iris Limit (CLOSE) EEI Limit Smooth Trans GAIN L GAIN M GAIN H AE LEVEL SW Handle Zoom Speed User Switch Set... Detail Master Black Black Toe Knee White Clip Gamma WDR White Balance... Menu Display and Detailed Settings Menu Screen Hierarchical Chart Main Menu... Color Matrix Color Gain Reverse Picture Reset...
... Date/Time Time Zone System Information . . LCD + VF VF Color VF Bright VF Contrast LCD Contrast LCD Backlight LCD Mirror A/V Set... Bars OIS Flicker Correction Shutter AE Level AE Speed ALC Limit Auto Iris Limit (OPEN) Auto Iris Limit (CLOSE) EEI Limit Smooth Trans GAIN L GAIN M GAIN H AE LEVEL SW Handle Zoom Speed User Switch Set... Detail Master Black Black Toe Knee White Clip Gamma WDR White Balance... Menu Display and Detailed Settings Menu Screen Hierarchical Chart Main Menu... Color Matrix Color Gain Reverse Picture Reset...

GY-HM600U Instruction Manual (135 pages)
Page 102
..., Off] AGC Response 9 Attack Time Sets the time to activate the limiter. [Setting Values: Fast, RMiddle, Slow] 9 Decay Time Sets the time to deactivate the limiter operation. [Setting Values: Fast, RMiddle, Slow] AGC Mode For setting whether to the maximum recording level. 0 Off: Depending on the settings of the [CH1/CH2 AUTO/MANUAL] selection switches, the operation may be recorded to the SD card. (Applies to link manual audio adjustment operation between [INPUT1] and [INPUT2] terminals...
..., Off] AGC Response 9 Attack Time Sets the time to activate the limiter. [Setting Values: Fast, RMiddle, Slow] 9 Decay Time Sets the time to deactivate the limiter operation. [Setting Values: Fast, RMiddle, Slow] AGC Mode For setting whether to the maximum recording level. 0 Off: Depending on the settings of the [CH1/CH2 AUTO/MANUAL] selection switches, the operation may be recorded to the SD card. (Applies to link manual audio adjustment operation between [INPUT1] and [INPUT2] terminals...

GY-HM600U Instruction Manual (135 pages)
Page 126
... are output. (A P105 [ System ] ) * To display menu screen or display screen on the external monitor, set [Display On TV] in the [Record Format] menu is set to "SD" and [SD Aspect] is set to "4:3", this item cannot be selected. (A P105 [ System ] ) AV input HDMI SDI IN Connecting External Devices . 126 Memo : 0 The sampling frequency for both the HD-SDI and SDSDI signals. 0 User's bit output from the camera recorder, and connect using an appropriate cable...
... are output. (A P105 [ System ] ) * To display menu screen or display screen on the external monitor, set [Display On TV] in the [Record Format] menu is set to "SD" and [SD Aspect] is set to "4:3", this item cannot be selected. (A P105 [ System ] ) AV input HDMI SDI IN Connecting External Devices . 126 Memo : 0 The sampling frequency for both the HD-SDI and SDSDI signals. 0 User's bit output from the camera recorder, and connect using an appropriate cable...

GY-HM600U Instruction Manual (135 pages)
Page 130
... is also output when an error occurs in [A/V Set] B [Audio Set] B [Alarm Level]. (A P103 [ Alarm Level ] ) Troubleshooting Symptom Power does not turn on . pressing the Set button (R). Is the currently played clip recorded in the Variable Frame Rec mode? (A P77 [Variable Frame Rec] ) Others 130 Make sure to the Camera mode? Action 0 Is the AC adapter properly connected? 0 Is the battery charged? 0 Is the power turned on ? Use the [MODE] selection button to switch to the Camera mode. (A P16 [Operation Modes] ) Camera image is turned off...
... is also output when an error occurs in [A/V Set] B [Audio Set] B [Alarm Level]. (A P103 [ Alarm Level ] ) Troubleshooting Symptom Power does not turn on . pressing the Set button (R). Is the currently played clip recorded in the Variable Frame Rec mode? (A P77 [Variable Frame Rec] ) Others 130 Make sure to the Camera mode? Action 0 Is the AC adapter properly connected? 0 Is the battery charged? 0 Is the power turned on ? Use the [MODE] selection button to switch to the Camera mode. (A P16 [Operation Modes] ) Camera image is turned off...

GY-HM600U Instruction Manual (135 pages)
Page 133
Video/Audio Accessories Item Description Accessories Recording time Approx. 25 minutes (8 GB SD Warranty Card (U model only) 1 card, 35 Mbps, VBR mode) Instructions 1 HD mode (MOV/MP4: MPEG-2) CD-ROM 1 Video QuickTime File Format (For AC Adapter 1 recording file Final Cut Pro)/MP4 File Format format Power Cord (U model: 1, E model: 2) Video Battery 1 HQ mode MPEG-2 Long GOP VBR, AV Cable 1 35 Mbps (Max) MP@HL, Clamp Filter 1 1920x1080/59.94i, 29.97p, Wire Clamp 1 23.98p, 50i, 25p Large Eyecup...
Video/Audio Accessories Item Description Accessories Recording time Approx. 25 minutes (8 GB SD Warranty Card (U model only) 1 card, 35 Mbps, VBR mode) Instructions 1 HD mode (MOV/MP4: MPEG-2) CD-ROM 1 Video QuickTime File Format (For AC Adapter 1 recording file Final Cut Pro)/MP4 File Format format Power Cord (U model: 1, E model: 2) Video Battery 1 HQ mode MPEG-2 Long GOP VBR, AV Cable 1 35 Mbps (Max) MP@HL, Clamp Filter 1 1920x1080/59.94i, 29.97p, Wire Clamp 1 23.98p, 50i, 25p Large Eyecup...


