
Instructions
Page 2
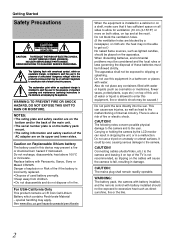
.... special handling may present a fire or chemical burn hazard if mistreated. NO USER-SERVICEABLE PARTS INSIDE. Caution on unsteady or unlevel surfaces. Do not use a tripod on Replaceable lithium battery The battery used battery promptly. • Keep away from children. • Do not disassemble and do not place any containers filled...
.... special handling may present a fire or chemical burn hazard if mistreated. NO USER-SERVICEABLE PARTS INSIDE. Caution on unsteady or unlevel surfaces. Do not use a tripod on Replaceable lithium battery The battery used battery promptly. • Keep away from children. • Do not disassemble and do not place any containers filled...
Instructions
Page 3
Keep these instructions. 2. Follow all warnings. 4. Use only with the cart, stand, tripod, bracket, or table specified by turning the equipment off and on, the user is used in accordance with dry cloth. 7. If this apparatus near ...not operate normally, or has been dropped. Plug Adapter 3 Unplug this AC plug adapter, consult your nearest JVC dealer. Refer all servicing to Part 15 of Conformity Model Number : GY-HM100U Trade Name : JVC Responsible party : JVC AMERICAS CORP. Connect the equipment into the apparatus, the apparatus has been exposed to operate the equipment. ...
Keep these instructions. 2. Follow all warnings. 4. Use only with the cart, stand, tripod, bracket, or table specified by turning the equipment off and on, the user is used in accordance with dry cloth. 7. If this apparatus near ...not operate normally, or has been dropped. Plug Adapter 3 Unplug this AC plug adapter, consult your nearest JVC dealer. Refer all servicing to Part 15 of Conformity Model Number : GY-HM100U Trade Name : JVC Responsible party : JVC AMERICAS CORP. Connect the equipment into the apparatus, the apparatus has been exposed to operate the equipment. ...
Instructions
Page 5
...Adjustments Before Use 18 Adjusting the Grip Belt 18 Setting up the Remote Control 18 Attaching an External Microphone 18 Attaching the Tripod 18 Removing the Hood 19 Charging the Battery 19 Checking the Remaining Battery Power 20 Turning On the Power 20 Lens .... 27 Shooting Videos 27 Capturing Still Pictures in the Video Shooting Mode 28 Recording Multiple Clips as a Continuous File . . . . . .28 Using the Camcorder in the Still Picture Shooting Mode 29 Setting the Picture Quality, Recording Size, and Sensitivity 29 Capturing Still Pictures 29 Zoom Operation 30 Adjusting the...
...Adjustments Before Use 18 Adjusting the Grip Belt 18 Setting up the Remote Control 18 Attaching an External Microphone 18 Attaching the Tripod 18 Removing the Hood 19 Charging the Battery 19 Checking the Remaining Battery Power 20 Turning On the Power 20 Lens .... 27 Shooting Videos 27 Capturing Still Pictures in the Video Shooting Mode 28 Recording Multiple Clips as a Continuous File . . . . . .28 Using the Camcorder in the Still Picture Shooting Mode 29 Setting the Picture Quality, Recording Size, and Sensitivity 29 Capturing Still Pictures 29 Zoom Operation 30 Adjusting the...

Instructions
Page 12
...DISPLAY] Display button For switching the displays on the SD card (A Page 27) and the remaining battery power (A Page 20). PRST- Press this camcorder to the Camera Shooting or Media Playback mode. LINE - B- M- H- F Built-in the playback mode, pressing this button according to exit the...Page 46) J [REC] Video recording button (A Page 27) Button for menu setting. (A Page 57) Bottom N Tripod mounting holes (A Page 18) ● To prevent the camcorder from falling, attach securely using the rotation prevention hole. ● Use screws with screw length 5 mm and below. 12...
...DISPLAY] Display button For switching the displays on the SD card (A Page 27) and the remaining battery power (A Page 20). PRST- Press this camcorder to the Camera Shooting or Media Playback mode. LINE - B- M- H- F Built-in the playback mode, pressing this button according to exit the...Page 46) J [REC] Video recording button (A Page 27) Button for menu setting. (A Page 57) Bottom N Tripod mounting holes (A Page 18) ● To prevent the camcorder from falling, attach securely using the rotation prevention hole. ● Use screws with screw length 5 mm and below. 12...
Instructions
Page 18
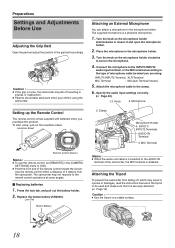
...sensor. Attach the microphone cable to the AUDIO IN terminal of microphone cable terminal you purchase this product. Attaching the Tripod To prevent the camcorder from the camcorder. Turn the knob on the microphone holder anticlockwise to loosen it is securely attached. (A Page 12) Caution :... ● Use the tripod on the microphone holder clockwise to the type of the camcorder, the MIC terminal is connected to the clamp. 6 . INPUT1/INPUT2 Terminal: XLR Terminal MIC Terminal : Mini-...
...sensor. Attach the microphone cable to the AUDIO IN terminal of microphone cable terminal you purchase this product. Attaching the Tripod To prevent the camcorder from the camcorder. Turn the knob on the microphone holder anticlockwise to loosen it is securely attached. (A Page 12) Caution :... ● Use the tripod on the microphone holder clockwise to the type of the camcorder, the MIC terminal is connected to the clamp. 6 . INPUT1/INPUT2 Terminal: XLR Terminal MIC Terminal : Mini-...
Instructions
Page 32
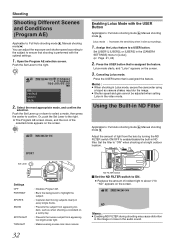
... screen closes, and the icon of incident light to AONB when shooting at a bright outdoor location. Memo : ● When shooting in Lolux mode, secure the camcorder using a tripod as when shooting a snowfield on the screen. 3 . ND FILTER Switch Ⅵ Set the ND FILTER switch to ON. ● Reduces the amount of the...
... screen closes, and the icon of incident light to AONB when shooting at a bright outdoor location. Memo : ● When shooting in Lolux mode, secure the camcorder using a tripod as when shooting a snowfield on the screen. 3 . ND FILTER Switch Ⅵ Set the ND FILTER switch to ON. ● Reduces the amount of the...
Instructions
Page 66
... Displays on tally lamp. For selecting whether to camera shake. ALWAYS-ON VIEWFINDER : Displays on the camcorder are pressed. RESET ALL MENU A separate screen is secured, such as when using a tripod. R OFF : Power does not turn on the operation sound when the operation buttons on the viewfinder... at all times regardless of the setting. Use this setting when the camcorder is displayed. (A Page 56) Use this feature may...
... Displays on tally lamp. For selecting whether to camera shake. ALWAYS-ON VIEWFINDER : Displays on the camcorder are pressed. RESET ALL MENU A separate screen is secured, such as when using a tripod. R OFF : Power does not turn on the operation sound when the operation buttons on the viewfinder... at all times regardless of the setting. Use this setting when the camcorder is displayed. (A Page 56) Use this feature may...